Signs of wear on oil seals
The main factor in replacing these caps is their wear, which occurs over time . After a long period of work, they already become unusable, especially if poor quality caps were installed on the car. Among the main signs of cap wear are the following:
- the appearance of bluish smoke when the engine starts or prolonged braking occurs;
- oiling of spark plugs, which occurs constantly;
- very high oil consumption.
To replace oil seals, it is not necessary to remove the head from the block.
Why are valve stem seals needed?
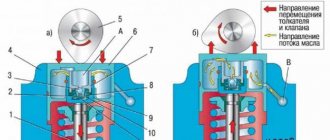
Engine operation involves non-stop operation of the elements of the vehicle's gas distribution mechanism. To reduce their wear due to friction, oil is supplied to the timing gear, which should not end up in the combustion valve, otherwise the stable operation of the engine will be disrupted. When the valves operate, the oil seals take on the task of removing excess oil and act as an obstacle, preventing oil from entering the combustion chamber.
Replacing valve stem seals on a VAZ 2112
In order to begin the replacement process, you need to arm yourself with the following tools:
- key 12;
- tweezers or a screwdriver with a magnet;
- a device for compressing valve springs;
Special tool for removing caps
- inertial puller for valve stem seals.
Let's start the replacement process:
- disconnect the negative cable from the battery;
- We remove the spark plugs from the car.
Installing the piston of the first cylinder in the desired position
Installation of the piston of the first cylinder
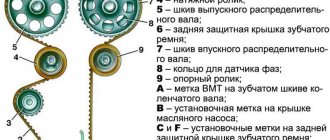
Now you will need to set the piston of the first cylinder to the compression stroke position. This is done so that when carrying out work related to removing the camshaft belt, the installation of the gas distribution phases is not disrupted. As you know, if the valve timing is disrupted, the car engine does not work well enough . TDC must be set according to the mark, which is located on the camshaft pulley. The same installation on the crankshaft pulley involves placing the first or fourth cylinder in the desired position. After this, you should make sure that the labels match. If the marks do not match, then the gas distribution setting is broken and the following actions should be taken:
- remove the camshaft drive belt;
Drive belt and camshaft
- turn the crankshaft until the marks coincide.
Advice. Not everyone can turn the crankshaft. To do this you need to know some secrets. Here, for example, is this method:
- the car's transmission must be set to fourth speed;
- then drive the car slowly until the marks match.
Or this one:
- any gear is engaged, after which the front part of the car on either side is raised on a jack;
- the hung wheel is rotated until the marks coincide.
Coincidence of camshaft and cylinder head marks
The alignment of the marks on the camshaft timing pulley must be aligned with the marks on the cylinder head or the slots on the rear cover of the timing belt. The marks on the cylinder block and the crankshaft gear are visible only after removing the generator drive and power steering pump. As for the triangular mark, which is located on the gear pulley, it should coincide with the recess of the oil pump. In addition, marks are found on the edges of the crankshaft pulley groove and on the lower cover of the timing belt. They are visible even without disassembling the main components.
Removing the cylinder cover
Cylinder head cover VAZ 2112
After installing the front cylinder piston in the desired position, remove the cylinder head cover. We work with keys 10 and 12. Let's get started:
Ignition coil VAZ 2112
Remove the ignition coil as follows:
- disconnect the blocks with wires coming from the low-voltage terminals of the coils;
- we find the tip of the high-voltage wire and disconnect it from the ignition coil terminal;
- remove the high-voltage wires from the holders on the coil body;
- unscrew the two bolts securing the ignition coil to the cylinder head cover;
- remove the coil.
Let's continue:
- we find the hoses of the crankcase ventilation system;
Engine crankcase ventilation hoses
- We remove the throttle valve drive cable from the holder on the cover and then move it to the side;
- we find the bolt securing the power steering hose to the cylinder head cover;
- we move this hose to the side, together with the holder;
- find the cylinder head cover bolts (there should be six of them);
- unscrew these bolts;
- remove the cover;
- We also remove the gasket located in the grooves of the cover (if it has become unusable, replace it with a new one).
Replacing valve stem seals on the VAZ 2112 continues:
Thirteen bolts securing the valve rocker shafts
- we find thirteen bolts securing the axes of the valve rocker arms.
Important. Crackers are installed on the rocker arm axle mounting bolts. During the disassembly process, you must not lose them and install them in their original places during reassembly.
VAZ 2112 axles and rocker arms
- removable and rocker arms.
Note: You don’t have to remove the rocker arms from the axles if you don’t need to change them. If, however, the rocker arms have been removed, they cannot be turned upside down, as oil may leak out, and during assembly it will be necessary to remove air from them by filling with diesel fuel.
Replacing valve stem seals on a VAZ 2112, the video process of which can be viewed at this link
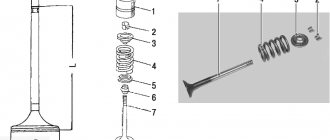
- take a special tool called a valve spring compressor;
Valve spring compressor
- screw a bolt into one of the holes in the block head that secures the axes of the valve rocker arms;
- We hook the valve compressor to this bolt;
- compress the valve spring;
- remove two crackers from the spring plate (use tweezers or a magnetized screwdriver);
- remove the device and the spring plate;
- remove the valve spring.
Note. During the process, the valve spring support washer does not need to be removed, since, in principle, it does not interfere with replacing the cap.
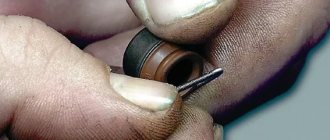
- press the oil seal located on the valve sleeve.
Tip: In order for the cap to be pressed correctly, you need to install the collet of the cap removal tool on the cap and sharply hit the sleeve with the striker. After this, sharply hit the tool handle with the striker, thereby pressing the cap off the sleeve.
If you could not find a device for removing valve stem seals, you can use regular pliers. Only in this case should the force be applied strictly upward so as not to damage the valve guide.
Advice. It is not recommended to remove the cap using two screwdrivers. Typically, the guide sleeve on which the cap is placed is made of ceramic, which can be easily damaged.
Replacing valve stem seals without removing the head of a VAZ 2112, 16 valves, step-by-step instructions with photos
Dear friends, today we will tell you in detail and with photographs how to independently replace valve stem seals on VAZ-2112, 2111 and 2112 equipped with a 16-valve engine. The beauty of our story is that in order to replace the oil caps we will not remove the head from the engine, and this is a significant saving of time and labor costs, there is no need to drain the antifreeze, unscrew the manifold, etc.
At the same time, we will do this without using an expensive valve depressurizer, which allows us to do this, but will use a regular valve depressurizer for the VAZ-2110, which can be bought on the car market for 200 rubles. Even before starting work, I recommend purchasing this desiccant, if you have little experience in desiccaning and drying, then take a stock of heels of crackers, we will also need an anaerobic (do not use silicone) sealant, unlike conventional silicone, when in contact with oil, it does not clog the channels but dissolves in it, and also buy a key for tensioning the timing pulley for 50 rubles, since the belt will have to be removed and then set according to the marks. By the way, it wouldn’t hurt to replace the timing belt and rollers at the same time, ideally. If you are ready to do it yourself - no problem, if you lack determination - I can recommend contacting the guys in Minsk to replace the timing belt, they will definitely do it well and inexpensively.
Well, if you’re ready to do everything yourself, then let’s get started. First, remove the plastic cover from the engine and gain access to the “intake manifold”