General information about valve stem seals
Oil seals (oil seals) are part of the oil distribution mechanism in the engine. The presence of oil is the most important condition for the operation of the internal combustion engine. But it doesn’t have to be everywhere. For example, the camshaft is always surrounded by oil mist during its rotation. But there should be no lubricant in the combustion chambers. There is only a fuel-air mixture, which burns. If you add oil to it, combustion will worsen, which will affect the increase in gasoline consumption.
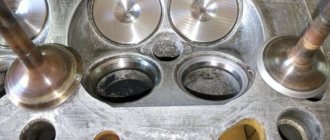
In addition, carbon deposits will form on the bottom of the valves. As a result, the valve begins to close loosely. The same carbon deposits accumulate on the cylinder walls and on the piston rings. This phenomenon is called engine coking. Of course, all this does not improve its performance, but, on the contrary, reduces its service life. And it increases the cost of oil and fuel. Located on the stem, the cap (also known as the valve stem seal) removes oil from the valve during its downward movement and prevents it from entering the combustion chamber.
It is curious that this indicator practically does not depend on the manufacturer of the part itself: on expensive and budget cars they serve approximately the same. This will be useful for those who are thinking about the question: which valve stem seals are better? In this case, it is much more important to buy only those that match the engine and make of the car.
When to change caps
In a good way, these parts need to be replaced after several tens of thousands of kilometers. Experienced drivers are able to visually determine that it is time for another repair, as there are certain signs of wear on the valve stem seals.
The first sign is an increase in oil and possibly fuel consumption. After all, a worn cap will let oil into the combustion chamber with all the consequences mentioned above. The second sign is blue smoke from the exhaust pipe when accelerating. It should be noted that these signs already indicate the presence of a problem and the need for urgent repairs.
True, it’s not always a matter of seals. Sometimes the problem may be worn rings. Of course, the question arises: how to identify valve stem seals or rings, because the “symptoms” are almost the same. The answer is quite simple. It is necessary to unscrew the spark plugs and inspect them for oil and carbon deposits. The presence of both indicates a malfunction of the caps. This can also be checked by measuring the compression in the cylinder (the spark plug is unscrewed and a special device is screwed into its place). If it is normal according to the passport, then the rings do not require replacement. In addition, if the oil seals need to be replaced, the car will smoke during acceleration and during engine braking.
In general, the destruction of the oil seal occurs due to the fact that it is constantly in a chemically aggressive environment (oil). Plus is subjected to intense mechanical stress (friction). As a result, the rubber loses its elasticity, hardens and begins to collapse. Often, after removal, the caps simply fall apart in your fingers.
Useful tips
- There are additives for restoring seals. When you are tempted to use one of them instead of changing the caps, remember that there are no miracles in the operation of the internal combustion engine and natural wear and tear. These additives soften hardened rubber and supposedly restore the quality of the seals. Experience shows that these additives either have no effect on the rubber, or soften it too much, and as a result, the size of the working edge increases, and oil consumption after using the additive increases significantly. So you better think about how to change the valve stem seals. How much it will cost you depends on the type of internal combustion engine. But you will definitely be sure that the caps perform their function. Additives, alas, cannot guarantee you such an effect. You should not try such additives on your car.
- If you haven't found a device with a collet clamp for removing caps, but that hasn't stopped you. Remember that the landing step under the cap has a wall thickness of just over a millimeter and is very fragile, and when you try to remove the cap with pliers, this part of the valve guide is broken very often, and the repairs that are necessary after this (replacing the guide, milling the seat and lapping the valve) are much more expensive more expensive than replacing caps and related devices.
Valve seals perform an important function in the timing mechanism of a car; they remove excess oil from the valve stems as they move and prevent foreign substances from entering the combustion chamber. When the valve stem seals wear out, it is very important to replace them in a timely manner to avoid increased oil consumption and carbon deposits on car parts and mechanisms. Car owners with no repair experience will learn from this article how to replace the caps without removing the cylinder head.
What you need to replace valve stem seals
If a car enthusiast decides to carry out this repair on his own, it will be much easier if he has everything he needs to replace the valve stem seals on hand. So, those who decide to act independently will have to acquire the following tools:
- spark plug wrench (spark plug head);
- a good long flathead screwdriver;
- tweezers or long-nose pliers (some use a medical clip);
- magnetic handle or oblong narrow (up to 2 centimeters) magnet;
- keys for removing valve covers and cylinder heads;
- oil seal remover;
- a tin rod 30-50 cm long and about 8 mm in diameter (if you plan to disassemble the engine to a minimum);
- valve desiccant (you shouldn’t skimp on this tool, because if it’s not strong enough, it will simply break during operation).
How many valve stem seals there are in an engine depends on how many cylinders and valves it has. One valve - one cap (it is recommended to have several spare ones). Replacement can be done either with the cylinder head removed or when it remains in place.
Replacing caps
- First of all, you need to disconnect the battery terminals for safety reasons.
- After disconnecting all the wires, you need to unscrew the spark plugs.
- Remove the cylinder head cover.
- At this stage, it is necessary to set the first cylinder to top dead center (TDC). There is a very simple way to do this: engage fourth gear, jack up the rear wheel and then, by rotating it, set the desired position according to the marks on the timing gear sprocket. After this, the jack can be removed.
- Now you need to remove the cylinder head. This is a rather labor-intensive process. Therefore, valve stem seals are often removed without removing the head. However, this simplified method has its drawbacks, as will be discussed below.
- Next you need to remove the camshaft. After this, it will be possible to remove the rockers from the valves (it is important to follow the order: where they are removed from, they are then placed there). By the way, this action is performed even when the engine head is not removed.
- After dismantling the camshaft, access to the timing valves will open and it will be possible to replace the seals.
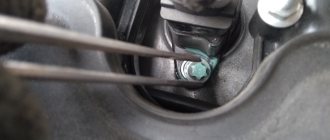
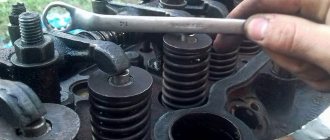
- Using a puller (desiccant), you need to press on the valve spring, and when it goes down, carefully remove the crackers with tweezers or long-nose pliers (some people use their own fingers, but this is not very convenient).
- Now carefully remove the valve plate, springs (inner and outer) and the washer under them. It is important to install all parts in their places during assembly. That is, the springs and valves must match each other.
- Using a puller, you need to remove the valve stem seals.
- Before installing a new cap, the spring is removed from it (it is in the form of a ring). The cap is well lubricated with oil and, using a special adapter (a tube of suitable diameter will do), is pressed into place with light blows of a hammer. After this, the spring is put on.
- After replacement has been made on all valves, they are assembled and the entire engine is further assembled. In other words, everything needs to be put in its place.
Removing the timing belt
The final step is to remove the cover from the timing belt. To do this, remove the coolant reservoir from its place, disconnect the level sensor from it, and place it on the engine itself. We have access to the lid from the side. Unscrew one bolt there and remove the side cover. We do not remove the top cover from the block yet (we will first align the timing belt to the marks before removing it).
Next, we jack up the car and put it on a stand, hanging the front right wheel. We remove the wheel, unscrew the nut holding the fender liner and bend it, thereby opening access to the crankshaft and timing tensioner (to the left of the crankshaft).
Important information: there is no need to touch or remove the drive belt! He won't bother us.
To rotate the crankshaft, we need a 30mm head and a long shaft so that we can turn it comfortably and not constantly struggle, because we will have to turn it a lot, a lot). I actually assembled such a structure and it hung on me from the beginning to the end of the repair.
Before you continue removing the belt, you need to align the timing mechanism to the marks. On camshafts, marks on the gears indicate the corners of the cutouts in the cover. There are marks on the crankshaft and its 2 sprockets, and there is a protrusion on the engine block. This ledge should be just between these two marked stars.
After the timing belt is set this way, unscrew the lower bolt of the timing belt tensioner, do this from below, sitting in the wheel arch. We unscrew the upper bolt of the timing belt holder by crawling up to it from above, from under the hood. Next, we calmly remove this tensioner and put it aside. After the tensioner is removed, unscrew the 2 bolts securing the upper part of the timing case and remove it, and tighten the belt itself into the shafts and leave it dangling.
After this, install the coolant reservoir in its place.
Does installing new caps always help?
Of course, replacing the caps, especially if you do not remove the engine head, is not a panacea. It happens that the engine consumes oil even after replacing the valve stem seals. In this case, there is a possibility that an error or negligence was made during the work. For example, the oil seal is not fully pressed or is completely torn. But, as a rule, the problem lies in the piston rings. The engine will have to be disassembled (remove the head), remove the pistons and change the piston rings. They are replaced as a whole set.
Sometimes it happens that the car smokes after replacing the valve stem seals. In this case, the reason does not necessarily lie in the rings. Most often, this means that mistakes were made during the repair: the caps were incorrectly sized, carelessly installed, or not replaced at all. If the caps are not pressed in completely, they will fly off during operation with all the ensuing consequences, so to speak.
Before starting the procedure, you need to set all pistons to approximately the same position. To do this, sticks of the same length are inserted into the spark plug channels and by rotating the shaft by the nut, their alignment to the same level is achieved. After this, the decoking agent is poured into the holes.
After 4-6 hours, you need to remove any remaining liquid from the cylinders. To do this, cover the spark plug channels with a rag and crank the engine several times with the starter. Then the spark plugs are screwed into place and the engine starts. This won't happen right away. It may take several tries. While warming up, blue smoke will come out of the exhaust pipe. This is a normal phenomenon that goes away after the engine warms up at idle speed. As soon as the smoke stops, turn off the engine and immediately change the oil completely. The remaining coke deposits will burn out for another 100-200 km.
The VAZ 2106, like any other car, requires periodic maintenance and repairs during operation. If bluish smoke was noticed from the exhaust pipe and at the same time the consumption of engine oil increased, then there is a high probability that it is time to replace the valve stem seals. The repair procedure is simple and, with a minimum set of tools, even a car enthusiast with little experience can perform it.
Installing the timing belt and phases
After the cover is in place, you need to tighten the timing belt and align it to the marks.
To begin with, we take the hydraulic tensioner, which we removed at the very beginning of the operation. Moreover, it would be nice to treat it with a cleaner at the moment when we removed it, wash it and wipe it dry. In this way, it will be possible to understand later whether it is leaking or sweating. Otherwise, it must be replaced. If everything is ok, then you can squeeze it with a vice (the vice must be strong and large enough, it’s not easy to squeeze it) and insert a pin into it. I personally used a small nail as a check. When the tensioner is “charged,” we put it aside and proceed to install the belt.
I would like to note that before putting on the belt, it is necessary to perform one more operation: “swing” the camshafts. The fact is that after installing the belt, we will have to manually crank the engine several times to check the marks. But, considering that we rearranged the shafts and removed the hydraulic compensators, the whole system runs very slowly. For example, my intake shaft was completely stuck in place. Therefore, before putting on the belt, I took a pry bar, and resting it between the bolts that hold the stars and applying considerable force, I moved both shafts, turning them in each direction by several tens of degrees. This set the system in motion and lubricated the insides a little, the shafts began to move quite easily, and we could begin to tension the belt.
First, we check and align the crankshaft to the marks. For ease of operation, remove the coolant expansion tank and place it on the block. There is a mark on 2 teeth on the crankshaft sprocket, and there is a small cast on the block, which should be clearly visible between these teeth. This corresponds to the position of the first cylinder at TDC. Next, we put on the upper part of the timing cover, on which there are marks for the camshafts. We just put the cover on, we don’t screw it in, since it still needs to be removed. When the cover is in place, we adjust the camshaft gears to the marks on the plastic cover. Since the camshafts and the entire timing mechanism in the cylinder head are not 100% lubricated and are in a fairly tight position, we turn the gears using some kind of device. I used a pry bar, it provided good leverage, and hooked it between the bolts that secure the gear to the camshaft.
When the marks are set, tighten the belt and remove the top cover, of course. Below, in the area of the crankshaft, the belt has protection; it is removed when replacing the belt, but we did not remove it, so when tensioning the belt, make sure that it does not catch the belt and that it fits tightly around the gear on the crankshaft. Personally, I tensioned the belt counterclockwise: first the crankshaft, then the idler pulley and intake shaft, then the exhaust shaft, then the pump and tension roller. After this, we take the hydraulic tensioner and put it in place: first tighten the lower bolt, then the upper one. Next, we simply remove the pin using pliers (I did this with virtually no effort at all) and the belt is tensioned.
Next, we again install the timing cover with the marks and begin to manually turn the crankshaft clockwise. I made 6-8 revolutions, all the marks remained in place.
OK it's all over Now. When the belt is installed, we assemble everything that we disassembled before: we install the camshaft sensor, ignition distributor, spark plugs and wires, fuel rail, air filter and other small things.
As for other Volvo modifications, the work is done in approximately the same way. In subsequent engines, the plastic upper timing belt cover has a different shape and the marks are located differently there. As for engines with electronic ignition and 5 coils, where there is no distributor, the crankshaft position sensor is located not on the exhaust camshaft, but on the intake camshaft, which, in general, does not change the picture much.
Oil seals for VAZ 2106 engine
Valve seals or valve seals primarily prevent excess oil from entering the engine. The part is made of rubber of a special composition, which wears out over time, leading to leakage of lubricant. As a result, oil consumption increases. Therefore, it is worth understanding in more detail what this part is, how and when to replace it with a VAZ 2106.
What are they for?
The design of the power unit has intake and exhaust valves. The valve stem is in constant contact with the camshaft, causing oily mist to form. The return part of the intake valve is located in the area of the constant presence of small drops of fuel or in the area of hot exhaust gases, which is typical for the exhaust valve. Correct operation of the camshaft is impossible without lubrication, but its penetration into the cylinders is an undesirable process. When the valve moves back and forth, oil is removed from its stem by the oil seal skirt.
Signs of wear
During engine operation, the valves are subject to constant friction, as well as the aggressive effects of lubricant and exhaust gases. This leads to the fact that the rubber from which the rubbing part of the oil seal is made hardens, and the working edges of the cap wear out. Despite the high quality of the material, the part has to be replaced over time. In order to extend the life of the caps, it is necessary to use high-quality engine oil.
The average service life of valve seals is about 100 thousand km.
The fact that the seals have become unusable and it’s time to change them is indicated by characteristic signs:
- bluish smoke appears from the muffler;
- engine oil consumption increases;
- spark plugs become covered with soot.
Video: sign of wear on valve stem seals
When to change and to what
When the oil seals do not cope with the function assigned to them, oil begins to leak into the cylinder. However, based on the indicated signs, one cannot be completely sure of the wear of the part in question, since lubricant can also enter the combustion chamber if the piston rings are damaged or worn. To determine what exactly needs replacing - rings or seals, you need to observe the exhaust while the car is moving. If, when braking the engine, you sharply press the gas pedal and characteristic blue smoke appears from the exhaust system, this will indicate wear on the valve stem seals. The same situation will occur after the car has been parked for a long time.
The appearance of smoke during the described actions can be explained as follows: when the tightness between the valve stem and the guide sleeve is broken, oil enters the cylinders from the cylinder head. When the piston rings wear out or become stuck, the engine will behave slightly differently.
Ring obstruction - the rings are not able to come out of the piston grooves as a result of carbon deposits.
If the power unit has a problem with the piston rings, then smoke will appear from the muffler when operating under load, i.e. when the vehicle is moving with a load, or when driving dynamically. You can indirectly determine ring wear by a decrease in power, an increase in fuel consumption and the appearance of problems when starting the engine.
Having figured out how to identify wear on the valve stem seals, all that remains is to figure out which components to install on the VAZ 2106. Today, parts from different manufacturers are offered on the shelves of car dealerships. Therefore, vehicle owners have a completely logical question: which one should they choose? The fact is that among quality products, there are many fakes. For the “six” we can recommend installing oil seals from Elring, Victor Reinz, Corteco and SM.
Replacement of VAZ 2106 engine valves
Quite rarely, but such a problem does occur when a valve or several valves need to be replaced. If this part is damaged, compression in the cylinder drops and power decreases. Therefore, repair is a necessary procedure to restore the performance of the power unit.
Can valves be repaired?
The most common reasons for which valves have to be replaced are when a part burns out or the rod bends for one reason or another, for example, when the tension is weak or the timing drive breaks. The simplest and most affordable way to repair is to replace the damaged element. The cost of valves for the VAZ 2106 is not so high as to make it worth trying to restore this part, especially since this is not always possible.
Replacing guides
Valve guides in the cylinder head perform several functions:
- heat removal;
- placing the valve above the hole;
- ensuring minimal oil consumption.
The part is made of metal and is installed in the block head by pressing. Over time, the bushings wear out and need to be replaced, which is carried out in the following cases:
- oil consumption increases, and blue smoke comes out of the exhaust pipe;
- when the engine is running, a characteristic sound appears from the cylinder head;
- overhaul of the block head.
To carry out the work you need to prepare the following tool:
- a set of open-end and ring wrenches;
- set of heads;
- knob;
- torque wrench;
- screwdrivers;
- pliers;
- mount;
- key for rotating the crankshaft;
- puller for unlocking valves;
- hammer;
- mandrel for knocking out and pressing in bushings;
- development at 8.025 mm.
Then you can begin the repair procedure:
- We dismantle the air filter housing and the filter itself.
- Drain the coolant from the cooling system.
The guide bushings for the intake valves are slightly shorter than those for the exhaust valves.
Video: replacing valve guides
Seat replacement
Valve seats, like the valves themselves, constantly operate at high temperatures. Over time, various types of damage may appear on the elements: burns, cracks, cavities. If the block head has been subjected to overheating, then the alignment of the seat and the valve may be disrupted, which leads to loss of tightness between these elements. It is also worth considering that the seat along the cam axis wears out faster than in other places.
To replace the seat, it must be removed from its seat. This can be done with different tools and devices:
- machine;
- electric drill;
- a hammer with a metal tip;
- old valve.
The cylinder head seat can be removed in several ways:
- On the machine. The saddle is subjected to boring, the metal becomes thinner, and the strength decreases. After processing, the remaining part of the part is turned and removed using pliers.
- An electric drill. An abrasive wheel of suitable diameter is clamped into the drill chuck and the metal of the seat is processed. During the grinding process, the tension loosens, which will allow the part to be removed from the seat.
- Welding. The old valve is welded to the seat, after which both parts are knocked out with a hammer.
The new seat is installed as follows:
- To ensure the necessary tension, the block head is heated on a stove to 100 ° C, and the seats are placed in the freezer for 48 hours.
- Using the adapter, a new part is pressed into the cylinder head.
- When the head has cooled, the seats are countersinked.
The best option for chamfering, both in terms of speed and quality, is a machine. Using special equipment, the part can be firmly fixed, and the cutter can be clearly centered, which ensures high precision of work. Since not every car owner has the opportunity to use a special machine, you can resort to an electric drill and cutters.
Using this tool, you will need to cut three edges on the saddle:
The central edge is the working surface with which the valve comes into contact.
Video: how to replace a valve seat
At the end of the procedure, the valves are ground in and the cylinder head is collected.
Lapping and installation of valves
The valves are ground in order to ensure maximum tightness of the combustion chamber. If air and fuel get into it, the stable operation of the engine will be disrupted. Lapping is necessary not only in the case of a major overhaul of the cylinder head, i.e. when replacing valves and seats, but also in case of minor defects in the contact plane.
The procedure can be performed in several ways:
- on special equipment;
- manual milling cutter;
- with your own hands.
In most cases, owners of VAZ family cars perform such work manually. In this case, you will need the following tools and materials:
- hand or electric drill with adjustable speed;
- abrasive paste;
- spring;
- kerosene.
The spring should be so rigid that it can be compressed by hand without much difficulty.
After preparing the tools, you can start working:
- We put a spring on the valve stem and install it in place in the cylinder head.
The valves are installed in the reverse order of disassembly.
We remove the excess.
The first step is to remove the throttle cover and spark plug cap. After this, you need to disconnect the high-voltage wires from the spark plugs and take them to the side. You also need to disconnect the throttle cable going to the gas pedal. After this, you need to disconnect the plug from the mass air flow sensor, remove the trunk clamp between the throttle and the air filter and pull out the entire air filter box from under the hood. This way we will free up a decent amount of space under the hood.
After the air filter box is removed and we have enough free space, we remove the distributor cover (!! without disconnecting the wires so as not to mix it up later!!) from the intake camshaft and the sensor from the exhaust camshaft.
Next, for ease of work, remove the fuel rail with injectors: unscrew the two bolts on the intake manifold. Turn off the power to the injectors. Before disconnecting the ramp from the fuel line (it is simply pulled out of it when the ramp is turned with the nozzles up), we place the container under the gasoline - probably 200 grams will flow out. And after that, be sure to plug the holes in the manifold under the injectors with rags - so that nothing accidentally gets there (a flyaway cracker, for example). It is best to screw the two bolts that held the ramp back into the manifold so as not to lose them. You can’t just buy bolts with M7 threads - it’s a scientific fact.
Valve lid
cover protects the timing mechanism from external influences, as well as from leakage of lubricant to the outside. However, over time, oil leaks can be observed on the engine, which are the result of gasket damage. In this case, the seal needs to be replaced.
Replacing the gasket
To replace the gasket, you will need to remove the cover. In this case, you will need the following tools:
- heads for 8 and 10;
- extension;
- ratchet or crank;
- pliers.
Next we carry out the dismantling procedure:
- Unscrew the nuts securing the air filter cover, remove it and the filter itself.
- We unscrew the nuts securing the housing and remove it, after first pulling off the crankcase gas exhaust hose.
- Disconnect the carburetor throttle linkage.
To ensure that the cover is installed properly, the nuts are tightened in a certain order.
If there is a need to replace valve seals or the valves themselves with elements that ensure their normal operation, it is not necessary to seek help from a service station. By following the step-by-step instructions, you can do the repair work yourself.