Removing and installing the front suspension arm
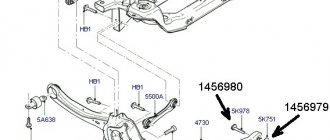
Front suspension arm
: 1 — bolts for securing the rear silent block of the lever; 2 — bolt for fastening the front silent block of the lever; 3 — ball joint We replace the front suspension arm together with the ball joint and silent blocks. Replacing lever silent blocks requires special equipment and certain skills. The front suspension arm with a ball joint is made as a single, non-separable unit. We install the car on an inspection ditch or overpass. We hang the front part of the car on racks. Remove the front wheel (see “Replacing a Wheel”). Remove the engine mudguard (see “Changing the engine oil and oil filter”). We clean the lever from dirt, and moisten the threaded connections with a penetrating liquid such as WD-40 or kerosene.
Using a 15mm socket, unscrew the nut of the coupling screw securing the ball joint pin, holding the screw from turning with a Torx T-50 wrench. We take out the screw.
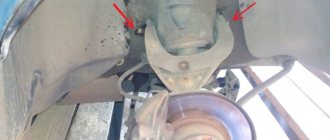
Using a 21 wrench, loosen the nut on the bolt for the internal fastening of the rear silent block of the lever, holding the bolt from turning with a 16 wrench.
Using a 18mm wrench, loosen the nut on the bolt externally securing the rear silent block of the lever to the subframe, holding the bolt from turning with the 15mm socket.
Using a 18mm wrench, loosen the nut on the bolt securing the front silent block to the subframe, holding the bolt from turning with the 15mm socket.
Using a screwdriver or a mounting spatula, lower the lever until the ball joint pin exits the steering knuckle.
If you do not plan to replace the lever, be careful not to damage the protective cover of the ball joint.
Remove the protective cover of the ball joint boot. By moving the steering knuckle forward, we raise the lever to a horizontal position.
To avoid damaging the rubber boot of the outer CV joint when dismantling the lever, cover it with a rag. Unscrew the nuts securing the silent blocks of the lever and remove the bolts.
Using a screwdriver or a mounting spatula, remove the front silent block of the lever from the subframe bracket.
. and remove the lever.
Between the silent block bracket and the subframe (above the hole for the internal bolt of the rear silent block) there is a special washer into which four balls are pressed. When tightening the bolt for securing the silent block, the balls press down the recesses in the subframe and the bracket of the silent block of the lever. This allows you to lock the lever in the desired position. We assemble the suspension in the reverse order. Before installing the right lever, turn the steering wheel all the way to the left and...
. make sure that the protrusions on the washer are aligned with the recesses on the subframe. We install the lever on the subframe (first insert the inner and then the outer bolts securing the rear silent block and tighten the nuts). We turn the steering wheel to a position corresponding to the straight-line movement of the car. Reinstall the ball joint protective cover and insert the support pin into the steering knuckle. To make this operation easier, tighten the steering knuckle so that the lever is in a horizontal position. We remove the rags.
Insert the coupling screw (the head of the screw should be directed towards the front of the car) and tighten the nut without completely tightening it. We insert the bolt securing the front silent block of the lever (the head of the bolt should be directed towards the front of the car) and tighten the nut without completely tightening it. Tighten the nut of the coupling bolt securing the ball joint pin to a torque of 50 N*m. Install the wheel and remove the car from the supports. We rock the front of the car several times so that all suspension components are in working position. We tighten the fastening of the suspension arm to the subframe with a torque of 170-230 N*m. We install the engine mudguard. We check and, if necessary, adjust the angles of the front wheels.
Lower front suspension arm of VAZ 2107: purpose, description, troubleshooting
One of the most common domestic cars is the VAZ 2107. The front suspension of any car is subjected to serious loads, and taking into account the state of our roads, the life of the suspension elements is significantly reduced. To ensure a comfortable and safe ride, you must regularly inspect the condition of all elements of the front suspension, paying special attention to ball joints, silent blocks and levers. If malfunctions are detected, you can repair the front suspension of the VAZ 2107 yourself.
Lower arm of the front suspension VAZ 2107
The VAZ 2107, popularly known simply as the “Seven,” is the latest rear-wheel drive representative from the model range of the popular domestic manufacturer. Unlike front-wheel drive cars, the front suspension here has fewer parts, so diagnosing and repairing it is much easier and you can handle everything yourself, without involving expensive specialists.
The “Seven” has an independent front suspension, the main parts of which are two levers: upper and lower. The lower arm connects the hub or steering knuckle to the car body. Due to the front suspension arms, the wheels are held in a vertical position, and the lateral forces that arise while the vehicle is moving are dampened.
Lower arm housing
The lower arm is fixed to the suspension cross member, which is mounted on the front side members. A ball joint is attached to it, and a spring also rests on the lower edge. All this makes it difficult to replace this suspension element, but even a novice car enthusiast can cope with such a task with his own hands. It is enough to determine the cause of the breakdown, and then act in accordance with the developed rules and recommendations of specialists.
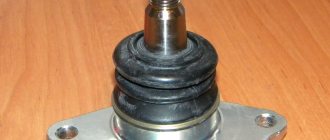
Spherical bearing
A ball joint is securely fixed directly to the lower arm. This is a hinge element that connects the lever and the hub. The ball joint absorbs all the impacts that occur when the wheel hits uneven roads, so special attention is paid to its strength.
Serviceable ball joints limit the swing of the wheel in the vertical direction, but at the same time allow it to move freely in the horizontal plane. When a ball joint breaks, the wheel turns spontaneously, and if this happens while driving, it can lead to an accident.
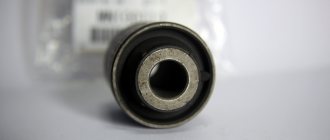
This element is a hinge, the main part of which is a ball rod, on one side there is a ball, on the other there is a thread. The rod is securely pressed into the eye with a plastic liner, after which the entire structure is covered with a boot to prevent moisture and dust from entering the friction points. Modern manufacturers usually use transparent boots, which allows you to assess the condition of the hinge without removing this element.
Since the ball joint is a very important and responsible part of the suspension, if it needs to be replaced, you need to purchase only high-quality products. Some of the most reliable and popular manufacturers of ball joints are the following brands: “TRACK”, “KEDR”, “BELMAG”, LEMFORDER (German company). In addition, any major manufacturer offers reinforced versions of such parts; they are also called sports: “Track-sport”, “Cedar-trial-sport”, etc.
Front suspension device
The front suspension of the VAZ-2107 is independent. It consists of two levers, one of which is located at the top, the second at the bottom, as well as a telescopic shock absorber and a coil spring. The design is completed by a stabilizer bar.
The lower arm with its axis is rigidly attached to the suspension cross member using bolts. It is also rigidly attached to the front side members.
The upper arm is attached to the mudguard post. But the lever does not have its own axis; it is a long bolt passing through the rack.
So that the levers can rotate around the axis, rubber-metal hinges (silent blocks) are used.
At the ends of both arms there are ball joints, to which a steering knuckle is attached, which has a pin for installing the wheel hub.
The coil spring is placed between the mudguard strut and the lower arm. To prevent the spring from moving from its place, its ends are installed in special support cups.
The hydraulic shock absorber is installed inside the spring. The shock absorber body is attached to the lower arm using a rubber-metal hinge.
The shock absorber rod is attached to the car body through rubber cushions. The anti-roll bar is fixed at its ends to the lower suspension arms, and in the middle to the side members.
To prevent direct contact of the stabilizer with the side members, rubber cushions are installed between them.
Lower arm repair
If the lower arm is slightly bent and no other damage is detected, then you can continue to operate the car, you just need to check the wheel alignment. Repair or replacement of this element of the front suspension is carried out in the following cases:
- severe damage to the lower arm;
- appearance of cracks.
To complete the work you will need the following tools:
- set of open-end wrenches;
- set of heads;
- metal brush;
- jack;
- puller for pressing out silent blocks;
Removing the lever
The need to dismantle the lower arm arises when the specified element fails to replace the axle or silent blocks.
Work order:
- Raise the front of the car. To do this, use a jack, but you can also use a lift.
Video: sequence of dismantling the lower arm
Replacing the ball joint
You can replace the ball joint on the lower arm without removing it. Since we have already removed the lower arm, it will be much easier to change the ball joint on it:
- Clean the ball joint mounting nuts. This is done using a metal brush; you can also lubricate the threads with WD-40.
- Remove the support. To do this, unscrew the three fastening nuts and remove the indicated element. Carefully inspect the lever to detect possible damage and cracks.
The new ball joint already comes with lubricant, so there is no need to lubricate it additionally. Some supports have an oil nipple in the lower part, through which you can additionally fill it with lubricant over time.
Video: replacing the ball joint
Replacing silent blocks
The sequence of work to replace silent blocks on the removed lower arm:
- The lever is securely fixed in a vice.
- Using a puller, the old hinges are pressed out.
Video: replacing silent blocks
Experts recommend that after replacing the ball joint and silent blocks, use only new nuts.
Lever Installation
After repairing the lever body, replacing silent blocks or a ball joint, installation of the lower lever is performed in the reverse order:
- The axle and the lever are secured using bolts.
At this point, the replacement of the lower arm is considered complete, and you can continue to operate the car safely and comfortably.
Video: installing the lower arm
By regularly inspecting the condition of the front suspension on the VAZ 2107, you can notice and eliminate any malfunctions in time. Even a novice car enthusiast can replace the lever, ball joint or silent blocks on his own. Keeping the suspension in good condition ensures not only comfortable, but also safe operation of the vehicle. The use of high-quality parts from trusted manufacturers will significantly increase their service life and repairs will need to be performed much less frequently.
How to replace the lower arm on a VAZ 2101-VAZ 2107?
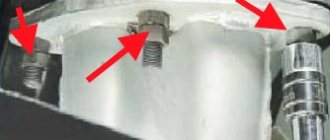
Removal: 1) The lever is easy to remove and install, but you can spend a lot of time on this, otherwise you will essentially need to unscrew the nuts that secure it and after that the lever can be removed from the car, first remove the front spring (How to remove spring, read the article: “Replacing the spring in the front part of a VAZ”) and when it is removed, use a wrench (a cap wrench is most convenient, but a wrench will also be convenient with a cap wrench) unscrew the two nuts (Indicated by red arrows in the large photo) , which attach the lower arm to the cross member and after that, remove the lever completely assembled with the ball joint, with silent blocks and with the axle, but just remove it carefully, because there are metal washers behind the lever in the places where it was attached to the cross member (see. small photo) we do not recommend that you remove them at all, or if you decide to remove all the washers, then remember where they were, otherwise the alignment angles of the front wheel will be lost and it will not sit straight.
Note! When the lower arm is removed with everything assembled, you can remove the ball joint from it, but it is better to buy a new arm assembly so that everything new is installed on it, but still, to remove the ball joint, you need to unscrew the three nuts that hold it attached to the lever and after that, you can completely remove it from the lever!
Installation: Install the new lever in the reverse order, and all the washers must be in their places so that the adjustment angles of the front wheel are at a minimum and by the way, when you tighten the nuts that secure the lever to the cross member, be sure to tighten them all the way, lowering the car to do this and having loaded the side on which you are replacing the lever with a new one, tighten the nuts until they stop and that’s it, the replacement is successful.
Additional video clip: Watch the video that explains the process of removing the lower arm and the process of installing it, in addition, this video shows some nuances that we did not indicate in this article, so be sure to study it in order to obtain additional material in order to so that the replacement is simply remembered much better and is done not from paper but from memory.
Removing the lower front suspension arm
I don't understand how to remove the lever. It is secured with 3 bolts. I disconnected it from the ball, where I also removed the bushing, but I can’t pull out the silent block. Do I need to remove the cross beam and how to remove it? How many bolts does it hold on? I need it urgently, I have to finish the car tomorrow!!
There is no need to remove the beam, did you remove the horizontal bolt?
which one? who holds the bushing?
or which is attached to the beam? he still has a strange puck)))
Sanya, do you have an agent or ICQ?
Toyota Celica Replacing SuperStrut front suspension on Celica ST205
created: 2006-08-22 23:13:31 , updated: 2006-08-29 16:24:25 , hits: 10997
List of parts for the front suspension necessary for its overhaul.
48815 (48815-20270) – stub silent 2 pcs. 48820В, 48810 (48820-20060) – left and right stabilizer strut (one part code) 48510-29285, 48520-29125 – right and left front shock absorbers, respectively, the kit includes the upper nut 48603D, 48609E (94182-11400), ball new support (43350 right, 43360 left) with a locking ring (43350V right, 43360V left). 48603С, 48609D (90303-22049) – right and left, respectively, gaskets for the bearing of the upper shock absorber support. 48603, 48609 (48609-20240) – right and left upper shock absorber supports.
It is better to determine the condition of the shock absorber boots, as well as their bump stops, before ordering parts. But because The factory boot is not large enough, and the bump stop is made of porous rubber (a little soft), which is not for our road conditions, then you can replace these parts with parts from Lada cars. I did this - in addition to the standard boots, I installed boots from the rear shock absorbers of the VAZ 2110, completely replaced the bump stop with a 2110 one, cutting off the upper sector.
When replacing the front control arms, all the nuts were in good condition and did not require replacement.
48068E, 48069A (48068-29195, 48069-29195) – right and left, respectively, front lower arm, comes complete with a nut for the ball joint (48068K right, 48069F left (90171-14007)). 90389-21003 – bushing, lever guide. One came out of the lever, the other stuck and had to be cut out of the bicycle pump.
48068, 48069 (48605-29015, 48606-29015) – the front lever is long right and left, respectively. 48066A, 48066B (48066-20060) – short front lever, same part on both sides. To successfully replace the front arms, you will need keys 12, 14, 17, 19 and 22, preferably with a decent lever, long enough, a spring tie (suitable for Lada cars), a 5mm hexagon, and to remove ball joints, a regular Zhiguli puller (for front-wheel drive models) .
First, unscrew the nuts 22 from balls 1 and 2, having first removed the locking pins. Then use a 19 wrench to unscrew the nut from ball 3 and a 22 wrench to ball 4. Use a 12 wrench to unscrew the nut and remove the brake pipe from the shock absorber strut. Then we use a puller to press out ball number 2 - just tear it off the seat. Next, unscrew and pull out bolt “B,” thereby freeing one edge of the straight front arm. On the right side, to unscrew and remove bolt B, you need to raise the engine 3-4 centimeters with a regular jack.
Then, using a 17mm wrench, unscrew the two bolts and nut marked “A”, after which we move down the blue-shaded ball mount and pull off the front straight arm together with the small front arm with the previously disassembled ball number 2. After which it is necessary to remove the lower arm.
We unscrew bolts C and D. Where the right (see photo) nut D is located, you need to put something in the spacer, after which you can begin to remove the lever itself. It is held back by a guide bushing, so if you haven’t ordered a new one, you must remove the lever carefully so as not to seriously damage the old guide bushing - it is made of thin, soft metal. Half of the dismantling is done - all the levers have been removed, further dismantling of this collective farm can no longer be done by car, which makes the process easier. Of the old parts, you only need to attach the levers - shaded in blue. We release it using a ball joint remover. Next, remove the stabilizer strut from the shock absorber and the stabilizer itself - a 14 key and a 5mm hexagon into the counter thread of the stub strut.
So the steering knuckle with the brake disc and caliper is supported on a ball joint 4, which is pressed into the shock absorber strut, on the steering tip and the drive. To further dismantle the ball joint 4, it is better to place something under the brake disc or tie up the knuckle so that the drive does not fall out when removing the ball joint 4. Next, use a puller and hit the knuckle with a sledgehammer to remove the ball joint 4. The steering knuckle “hangs.” Open the hood and unscrew the 3 nuts with a 14mm key - securing the strut. We take out the strut, compress the springs with zip ties, use nozzle 19 to unscrew the top nut (94182-11400), and remove the upper shock absorber support.
Because I assembled the pendant alone, so here I will give an assembly order that is more convenient for this situation. Since the steering knuckle with drive and brake disc is far from light, to simplify our life we first install the lower arms. First, we install the front short lever (48066-20060) onto the long front lever (48605-29015, 48606-29015) fixing the ball 1. Next, we screw the front long and lower lever onto the lever mount - ball 3. Then we screw the edges of the front large and lower levers to the body with bolts B and C, respectively. It's better to start with the front lower control arm, because... there you need to carefully fix the guide sleeve - under bolt C, tighten the subframe bolts D. Next, screw the fastening of the levers (shaded in blue) to the steering knuckle - 2 bolts and nut A. That's it, now the steering knuckle is firmly fixed and the drive will not fall out of the gearbox.
We assemble the shock absorber strut - spring, upper support. Then the most interesting part begins - strength gymnastics J. We insert the assembled strut into the glass, tighten the 3 fixing screws (under the hood, on the glass), tighten the nut on the shock absorber rod. Next, we put the lower “ear” of the shock absorber strut on the ball 2, this is not difficult to do, because the front short lever rotates around the axis of ball 1. After which you need to sit down more comfortably, stick your head into the wing arch and lift the steering knuckle assembly with everything in order to insert ball 4 into the upper “ear” of the knuckle. Insert it and secure it with a nut. You can take a break. All that remains is to screw the stub rack - a trifle. Next, we tighten all the nuts, insert the locking pins, put on the wheels and put them on the new suspension. From my own experience, after about 500-700 km it is better to re-tighten the suspension nuts.
Here's what it looks like:
Sergey Sklokin (sklopendra)
PS thanks to Ilyukha (aka Tarakanych) for the help and garage questions, comments - icq 142171660, mail can be found in the forum.
Signs of malfunction of levers and silent blocks
One of the signs of a malfunction is noise in the suspension when driving, especially on a bad road. Among other things, it occurs when silent blocks (rubber-metal hinges of levers) are severely worn. Also, if the silent blocks are worn out or the VAZ 2107 lever is deformed, it becomes impossible to set the alignment angles of the front wheels. The same problem occurs when the axes of the front arms are deformed.
If the levers are deformed, the car may pull to the side when driving on a flat road. An extremely unpleasant phenomenon - self-excited vibrations of the front wheels - is often a consequence of wear of the silent blocks.
Elimination of any of the listed malfunctions of the levers and silent blocks requires the removal of the suspension arms
Faulty control levers on the front wheels:
- the car pulls to the side when the steering wheel is straight
- steering is unclear or, conversely, very sensitive
— the car begins to yaw, and you have to “catch” it. This is especially felt even in a small rut
- when driving over uneven surfaces, a knocking or grinding sound is heard
- squeaking when turning wheels
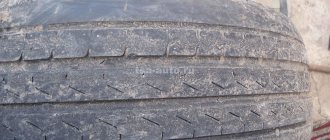
- uneven tire tread wear
— the response of the wheels to steering movement is delayed
- when braking, the car pulls to the right or left
— rapid wear of the lever joints
Replacement of the upper arm of the front suspension
Removing the upper arm of the VAZ front suspension is necessary in three cases:
- Replacing the lever.
- Replacing silent blocks.
- Replacing the lever axis.
The procedure for removing the lever is as follows:
- Place the car on a lift or inspection hole.
- Remove the wheel using a wheel wrench and a jack (the latter is only needed in a pit).
- Remove the bolt securing the front bumper bracket.
- Disconnect the upper ball joint by unscrewing the self-locking nut and mounting bolts.
- Unscrew the self-locking nut of the lever axle, holding the axle with a wrench.
- Remove the axle.
- Remove the upper arm.
If the lever is not deformed or cracked, it can be reused by first replacing the silent blocks. To do this, they need to be pressed out with a puller. When pressing out, the lever is clamped in a vice.
Before installing the lever, it is necessary to press in new silent blocks. This is done with the same puller. To press in the silent blocks, it is necessary to change the position of the puller parts on the suspension arm.
Before installing the lever, it is recommended to replace the self-locking nuts of the lever shaft and ball joint pin with new ones.
Installation of the upper arm is carried out in the following sequence:
- Place the lever on the axle and secure it with nuts without tightening them.
- Install the bolt securing the front bumper mount.
- Load the suspension by lowering the jack or lift.
- Place the ball joint pin into the steering knuckle.
- Tighten the self-locking ball joint nut.
- Tighten the upper arm axle nut.
- Raise the car and install the wheels.
After replacing the lever and/or silent blocks, it is necessary to re-adjust the wheel camber/toe angles.
Diagnostics of wear of silent blocks of front levers
Signs of silent block failure:
- The car reacts slower when turning the steering wheel.
- Knocking and grinding noises are heard from under the car.
- It happens that the car pulls to the side at high speed.
- A backlash (gap, free movement) of the body is formed.
- Tire treads do not wear evenly.
Advice! If the silent blocks are worn out and need to be replaced, then the wheel alignment should not be done until these vibration isolations are replaced with new ones.
The service life of silent blocks lasts from 100,000 to 150,000 km. But, this is if you operate the car in a gentle mode (driving over bumps and potholes slowly, which is quite difficult to do due to the quality of the road surface).
Therefore, drivers operating their cars on bad and not very bad roads should check the silent blocks of the front suspension arms for wear every 20 - 25 thousand km. mileage, and they are usually changed every 50 - 80 thousand km.
To inspect and replace silent blocks, you need an overpass, a lift or a pit. If, during a visual inspection of the vibration isolators of the front levers, cracks are felt and rubber crumbs are visible, then they must be replaced.
Ignoring the replacement of worn silent blocks of the front suspension arms will lead to even more expensive repairs (tire wear, wear of associated body parts, etc.).
Replacing the lower front suspension arm of a VAZ 2107
Like the upper arms, the lower arm of the VAZ 2107 front suspension must be removed to replace the silent blocks, axle or the arm itself.
The work is carried out on an inspection pit or a lift.
Procedure for removing the lower arm:
- Jack up the car or lift it on a lift.
- Remove the wheel.
- Remove the shock absorber.
- Loosen the lower arm mounting nuts.
- Disconnect the stabilizer pad mounting.
- Load the suspension by lowering the jack or lift.
- Unscrew the fastening nut and press the lower ball pin out of the steering knuckle.
- Smoothly unload the suspension while simultaneously moving the stabilizer through the mounting stud.
- Pry off the spring by removing it from the support cup.
- Remove the pair of self-locking nuts holding the lower arm axle.
- Remove the thrust washers.
- Remove the axle using a mounting blade.
- If you need to replace the lever, you will have to remove the lower ball joint by unscrewing the mounting bolts. To replace silent blocks, the ball joint does not need to be removed.
- Place the lever in a vice.
- Press out the silent blocks using a puller.
If the lever is not damaged, you can press in new silent blocks and assemble the assembly. When assembling, new self-locking nuts must be used.
Pressing out and pressing in silent blocks is done using the same puller. Only the position of the parts relative to the lever changes.
Procedure for installing the lower arm:
- Press in only one silent block.
- Insert the axle with installed thrust washers into the lever.
- Install the thrust washer on the side of the installed silent block and tighten the self-locking nut (there is no need to tighten it).
- Press in the second silent block.
- Place the washer on the axle and tighten the self-locking nut.
- Install the lever and other suspension parts in the reverse order of removal.
- After loading the suspension, finally tighten the lower arm axle nuts.
- Install the wheel.
After replacing the silent blocks and/or lower control arm, you should check the wheel alignment angles and adjust them if necessary.
How to replace the lower arm on a VAZ 2101-VAZ 2107?
Removal: 1) The lever is easy to remove and install, but you can spend a lot of time on this, otherwise you will essentially need to unscrew the nuts that secure it and after that the lever can be removed from the car, first remove the front spring (How to remove spring, read the article: “Replacing the spring in the front part of a VAZ”) and when it is removed, use a wrench (a cap wrench is most convenient, but a wrench will also be convenient with a cap wrench) unscrew the two nuts (Indicated by red arrows in the large photo) , which attach the lower arm to the cross member and after that, remove the lever completely assembled with the ball joint, with silent blocks and with the axle, but just remove it carefully, because there are metal washers behind the lever in the places where it was attached to the cross member (see. small photo) we do not recommend that you remove them at all, or if you decide to remove all the washers, then remember where they were, otherwise the alignment angles of the front wheel will be lost and it will not sit straight.
Note! When the lower arm is removed with everything assembled, you can remove the ball joint from it, but it is better to buy a new arm assembly so that everything new is installed on it, but still, to remove the ball joint, you need to unscrew the three nuts that hold it attached to the lever and after that, you can completely remove it from the lever!
Installation: Install the new lever in the reverse order, and all the washers must be in their places so that the adjustment angles of the front wheel are at a minimum and by the way, when you tighten the nuts that secure the lever to the cross member, be sure to tighten them all the way, lowering the car to do this and having loaded the side on which you are replacing the lever with a new one, tighten the nuts until they stop and that’s it, the replacement is successful.
Additional video clip: Watch the video that explains the process of removing the lower arm and the process of installing it, in addition, this video shows some nuances that we did not indicate in this article, so be sure to study it in order to obtain additional material in order to so that the replacement is simply remembered much better and is done not from paper but from memory.
Source