Closing with a screwdriver
Closing the starter with a screwdriver can only be done if the cause of the breakdown is the solenoid relay.
You can recognize such a breakdown by clicking from under the hood
when you turn the key. This means that the retractor relay is turned on, but the drive gear does not turn the crankshaft. In such a situation, nothing can be done other than jumping the starter with a screwdriver and thus applying voltage to the windings.
To close the starter using a screwdriver, you need to set the gearshift lever in the neutral position and tighten the brake. Under these conditions, the screwdriver will act as a pull-in relay. We insert a screwdriver between the power terminals, closing them.
In order to start the car directly through the starter, it is best to resort to the help of an assistant. So this will make things easier. One will insert the screwdriver, the other will close the contacts. With an assistant, everything will go much faster and easier.
Replacing the VAZ 2114 starter. Photos, instructions on how to change the starter on a VAZ 2114
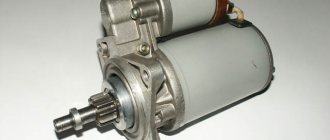
On VAZ 2114/2115 cars, starters 29.3708 or 5712.3708 can be installed.
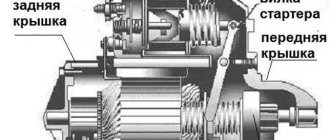
Both starters are an electromechanical DC motor with mixed excitation and an electromagnetic two-winding traction relay.
The main purpose of which is to create primary torque and transmit it through the flywheel to the crankshaft with the required speed.
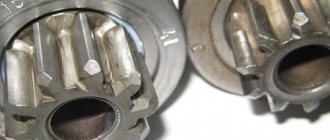
The installation dimensions of the starters are the same - the differences are in the design of the commutator unit and the drive. The starter 29.3708 has a face-type commutator, the starter 5712.3708 has a cylindrical one, and the starter 5712.3708 also has a planetary gearbox in the drive.
When the starter stops working or works intermittently, starting the engine is very problematic and sometimes impossible.
Causes and methods for determining starter malfunction on VAZ 2114/2115
Before moving on to determining the cause of the starter malfunction, you need to know that this design operates in a system with other electrical parts of the car, such as the battery, starter control mechanism, etc.
Before starting to check the functionality of the starter on a VAZ 2114/2115 car, make sure that the car’s battery is fully charged, the battery contacts are reliable and well secured, the wires from the solenoid relay terminal and from the battery to the starter are not damaged and have good contact.
If there is a clear click from the traction relay, but the starter does not turn the engine, or turns it slowly, not powerful enough to start, or works jerkily, then, with a high degree of probability, we can say that contact is lost between the commutator and the brushes. The reasons for this may be:
- the brushes are worn out or do not fit tightly to the commutator;
- the traction relay has failed;
- The armature commutator is worn out.
If there is a break in the winding of the traction relay, a short between turns or a short to ground, and in order to eliminate the possibility of poor contact in the traction relay, it is recommended to remove the starter and connect it directly to the battery.
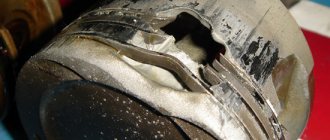
When there are no obvious reasons, the collector may have burned out or its plates have shorted out. Most likely, the brushes are worn out or stuck, but if during diagnostics it is discovered that the armature commutator or traction relay has burned out, then it is better to replace the starter with a new one.
What will you need to replace the VAZ 2114, VAZ 2115 starter?
First of all, a new LADA starter with article number 21080370801006 or its equivalent from the manufacturer BOLINDER-MUNKTELL (VM) with article number ST2108. The starter price is about 4,000 rubles for the original and close to 2,500 rubles for an analogue.
- The price is indicated for spring 2021 in Moscow and the region.
- It is better to carry out the necessary work in a pit or overpass, but you can remove the starter on a VAZ 2114/2115 without a pit.
- Tools needed to replace the starter:
- new starter for VAZ 2114;
- keys to “8”, “13”;
- ratchet with a set of attachments “13”, “14”, “15”.
1
Disconnect the terminals from the battery.
2
3
Using a Phillips screwdriver, unscrew the clamp of the air duct pipe.
4
Disconnect the air duct...
5
... and remove the air filter.
6
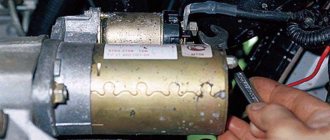
Disconnect the red wire of the starter relay. Using a 13mm wrench, unscrew the nut of the wire terminal leading to the battery.
8
Next you need to unscrew the two starter nuts at the top...
10
Using a ratchet with a 13mm head, unscrew the three nuts securing the starter.
12
We replace the starter with a new one and assemble everything in the reverse order.
Replacing starter Lada 2115 (VAZ 2115)
VAZ 2115 is one of the most worthy creations of the Volga automobile industry. In common parlance, this car is called a tag; it is truly considered one of the most popular and inexpensive cars on the domestic market, produced since 1997. The car earned its popularity quite honestly, since operation and repair do not pose any particular problems to the car owner. However, there are breakdowns that everyone who owns this wonderful car should know about. We will talk about the starter relay, its breakdowns and how to repair it.
The starter itself is a four-pole DC motor that is powered by electricity from the battery. A technical inspection of the starter must be done every 100,000 km. Based on the principle of its operation, the starter consumes quite a powerful current, so even minor fluctuations in resistance can significantly reduce its performance and lead to complete breakdown. In order to make sure that the failure is in the relay, it is necessary to do a check. However, before performing this type of check yourself, be very careful to avoid possible injury. We turn on the ignition and turn the key, if the starter does not work, but you can hear some characteristic clicks, this means the relay is working, but the starter itself will have to be disassembled. If the situation is the opposite and when you bridge the contacts on the back wall of the starter without removing it from the engine you will hear the mechanism spinning, then the whole problem is in the relay.
VAZ 2115 starter relay where is it located
Today, every car, regardless of type, is equipped with special protection for all electrical systems. This protection is called a fuse. They are installed so that in the event of a short circuit or malfunction, the system can turn off via a fuse, thereby protecting itself from breakdown. Fuses are used for every electrical circuit, from a small light bulb to an engine's ignition system. More important engine systems are equipped with special relays, they protect various pumps, electric motors and other powerful sources of electricity consumption.
The fuse is a small structure consisting of a plastic casing with a fusible element inside. If a short circuit occurs, the thin contact melts under the influence of current, which interrupts the electric current. The simplest electrical fuse is a thin copper wire inserted into a circuit. If the upper limit of the supplied current increases, the contact begins to melt and interrupts the flow of electricity. Here there is a description of all fuses and relays for VAZ 2113, 2114, 2115 models of injection and carburetor types, old and new models.
Starter repair - how to fix it?
The VAZ 2114 starter itself may also fail. In this case, it will need to be completely replaced or thoroughly repaired. First, disconnect the starter relay from the control unit. It is located inside the cabin, on the left side of the steering column. In the photo or marking diagram you will find which fuses need to be turned off. If possible, you can replace them.
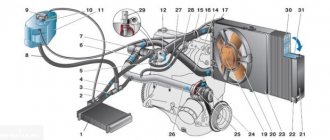
The starter solenoid relay is a device whose operating principle is to transfer current from the battery to the starter. This happens under the influence of an electromagnetic valve. You can see what this part looks like in the photo. It is the solenoid relay that prevents the starter winding from burning out. If it were not there, then a constant current would flow from the battery. The solenoid relay on VAZ 2114 models is located on top of the starter; two wires are connected to it, from the ignition and the battery.
To replace the starter retractor relay, you need a small set of tools, namely several 10 and 8 keys, a flat-head screwdriver and the device itself. The starter relay in the VAZ 2114 is located in such a way that to replace it you do not need to completely remove the entire starter. The starter should be removed only if it is necessary to conduct a full inspection and identify other causes of failure.
The solenoid relay must be removed carefully so that the solenoid core remains inside
Particular attention should be paid to the spring - it is important that it does not remain in the starter, because removing it from there will be very problematic. The new relay kit does not include a core, it is purchased separately, but there is a spring
When trying to start the car, the starter retractor relay may make clicking noises - in this case, you need to replace a device such as bendex. Bendex is responsible for turning the starter and engine gears. It is located inside the starter itself. As the starter revs, the device wears out, and from time to time it needs to be completely replaced.
Starter relay on VAZ 2109: fault diagnosis
If your car stops starting at any point, the cause may be the starter solenoid relay. But the best thing to do is check this first.
Appearance of the device
Finding the problem
If the battery is charged and there are no disturbances in the electrical circuit, then the reason lies in the starter itself or its components - the starting and solenoid relay.
On VAZ 2109 vehicles, the starter activation relay is used to activate the windings and transmit torque from the rotor to the flywheel. When the engine starts, the relay disconnects the drive and turns off the power.
Element Role
All VAZ cars, including model 2109, have a standard engine starting system, which is based on an electric starter. Here's what you need to know about him.
- A starter is a small electric motor that is connected to the flywheel of the motor via a coupling (Bendix) for a short period of time to start the rotation of the flywheel.
- Despite its small dimensions, the starter passes through itself enormous currents.
- If the starter circuit were closed directly in the ignition switch, then not a single component of the system would be able to withstand such current loads. As a result, they would burn out.
- Therefore, for these purposes, the starter is connected remotely to the battery via a relay. Its contacts are designed for high currents.
- The starter operates briefly and must be turned off after the engine starts. Otherwise, its active destruction will begin due to the influence of motor power.
- Relyushka performs these tasks perfectly. Actually, it is precisely to ensure the functioning of the system and protection against current, timely shutdown of the starter, a retractor relay is included in the design.
Element diagram
Checking status
Before changing the relay, make sure that the problem with starting the engine is related to this component.
To do this, consider two situations that indicate its malfunction.
Situation
Your actions
The relay makes clicks, but the armature does not spin
If there are clicks from the relay, check the condition of the armature. To do this, the terminals of the retractor relay are bridged with a large screwdriver or a piece of welding cable to the terminals at the ends. Taking a thin wire or a screwdriver can easily burn the terminals. When the armature is working, after closing the terminals, the armature will spin, which can be determined by the sound. Consequently, the solenoid relay itself has failed and requires repair.
The relay is completely silent
Even if there is silence after closing the terminals, the problem should be looked for in the starter. The relay no longer plays any role here.
Having discovered that the relay has served its purpose, it must be replaced or repaired, if possible.
Dismantling
There should be no problems with the dismantling process. The main thing here is to remove the starter, since the required relay is held on it. Therefore, dismantling is carried out as an assembly.
- Turn on the handbrake, disconnect the battery by removing the negative terminal from it.
- A wire with a large cross-section goes from the battery to the contact of the relay. It can be turned off by unscrewing it using a 13 key.
- Remove the thin winding power wire from the solenoid relay.
- Using the same 13mm wrench, unscrew the three mounting nuts holding the starter to the clutch block.
- You can remove the device through the bottom or top. If you chose the top, then you need to slightly rotate the starter around its axis and remove it.
- The lower output is more difficult, since here you need to remove the crankcase protection. But if parallel work is carried out that requires similar manipulations, problems will not arise.
How to remove the starter on LADA cars with your own hands - Vestashop77
_x000D_
The starter is removed in connection with its replacement, inspection or repair. On LADA cars, the starter is installed on the clutch housing at the front in the direction of travel. Before starting work, you should disconnect the negative terminal of the battery, drive the car onto an inspection ditch (overpass) and remove the engine protection.
_x000D_
On all modern LADA cars (Lada XRAY, Vesta, Largus, Granta, Kalina, Priora and Niva 4x4), removing the starter is performed in the same way. Installation is carried out in reverse order. Distinctive features of the process are presented below.
_x000D_
Lada XRAY and Vesta
_x000D_
Remove the engine splash guard (instructions for Lada Vesta, XRAY).
_x000D_
For configurations with manual transmission: Unscrew 2 bolts (No. 1) and remove the clutch hydraulic cylinder (No. 2), without disconnecting it from the hydraulic actuator tube (No. 3). Hang the cylinder on the technological hook (head “13”).
_x000D_ _x000D_
For all configurations: Unscrew the nut (No. 1) and disconnect the terminal (No. 2) and the block with wires (No. 3) from the starter traction (retractor) relay (No. 4) (head “13”).
_x000D_ _x000D_
Remove 3 bolts (No. 1), remove the clutch hydraulic cylinder mounting bracket (No. 2) (for vehicles with manual transmission) and the starter (No. 3) (Torx E10).
_x000D_ _x000D_
Lada Largus
_x000D_
Remove the cover (if equipped) of the electronic control unit (ECM) by releasing the two fasteners (flat-head screwdriver). Unscrew the 2 nuts (No. 1) securing the expansion tank (No. 2) (10mm wrench). Remove and move the expansion tank to the side without disconnecting the hoses.
_x000D_ _x000D_
For configurations with JR5 gearbox:
_x000D_
- _x000D_
- disconnect the hinges (No. 1) of the gear selection and shift cables from the gearbox (flat-head screwdriver);
_x000D_
press the clamps on both sides and disconnect the stoppers of the sheaths of the selection and shift cables from the gearbox bracket.
_x000D_
_x000D_ _x000D_
For configurations with JH3 gearbox:
_x000D_
- _x000D_
- remove the cover (No. 1) of the gearshift drive rod joint;
_x000D_
Unscrew the bolt (No. 2) securing the gear shift rod, remove the spacer sleeve and disconnect the rod (10mm wrench).
_x000D_
_x000D_ _x000D_
Unscrew the 3 bolts (No. 1) securing the starter (head “13”).
_x000D_ _x000D_
Raise the car and unscrew the nut (No. 2) securing the bracket (No. 4) to the intake manifold (No. 3) (head “13”). Unscrew the bolt (No. 6) securing the bracket (No. 4) to the cylinder block (No. 5) (head “17”). Remove the bracket (No. 4) that mounts the intake manifold (No. 3).
_x000D_ _x000D_
Unscrew the nut (No. 2), Figure 3-7, and disconnect the harness (No. 1), Figure 3-6, of the ignition system wires from the starter (No. 3) (head “10”).
_x000D_ _x000D_
Unscrew the nut (No. 4), Figure 3-7, securing the starter wire (No. 5) ("10" head). Disconnect the starter wire. Unscrew the nut (No. 3) securing the starter electromagnetic relay wire (No. 5) (head “8”). Remove the starter.
_x000D_
- The process is also shown in the video:
_x000D_ _x000D_ _x000D_
Lada Granta, Kalina, Priora
_x000D_
Remove the protective cap (No. 3), unscrew the nut securing the wire to the starter solenoid relay (No. 4) and disconnect the wire from the relay (head “13”). Disconnect the block with wires (No. 2) from the starter solenoid relay.
_x000D_
- For cars with a manual transmission with a traction drive: unscrew the 3 nuts securing the starter (No. 5) and remove it (head “13”).
- For cars with automatic transmission and manual transmission with cable drive: unscrew three bolts (No. 5) and remove the starter (No. 3) (head “13” or Torx E14).
- Process video:
_x000D_ _x000D_ _x000D_ _x000D_ _x000D_ _x000D_
Lada 4×4
_x000D_
- Remove the rear support bracket for the intake pipe by unscrewing the two bolts with a 13mm wrench.
- We remove the starter protective shield by unscrewing its fastening nuts with a “13” wrench.
- Removing the starter protective shield on the Niva 4x4Removing the starter protective shield on the Niva 4x4Removing the starter protective shield on the Niva 4x4
_x000D_ _x000D_ _x000D_ _x000D_
From the bottom of the car, unscrew the two bolts securing the starter.
From the engine compartment side, move the starter forward and disconnect the block with wires.
_x000D_
From the bottom of the car, unscrew the two bolts securing the starter on the Niva 4x4, remove the starter wire on the Niva 4x4
_x000D_
We unscrew the nut and disconnect the wire tip from the contact bolt of the traction relay. Remove the starter from the engine compartment.
_x000D_
- removing the starter on a Niva 4x4; removing the starter on a Niva 4x4; removing the starter on a Niva 4x4
- Video instruction:
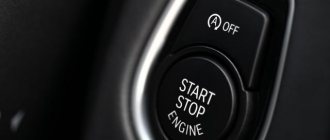
- By the way, do you know that the ignition system of LADA cars can be improved, for example, by abandoning the ignition key in favor of a start/stop button.
_x000D_ _x000D_ _x000D_
How to remove the Niva Chevrolet starter with your own hands
Has your Chevrolet Niva stopped starting or is running intermittently? The reason for this could be a faulty starter. In such a situation, it should be removed, disassembled and possibly partially replaced. Removing the Niva Chevrolet starter with your own hands will not be any problem.
Preliminary diagnosis
Before dismantling the starter, you must make sure that this device is the cause of the malfunction. This can be done visually or by replacing the battery with a working one.
It is also worth checking whether current passes from the battery to the starter: if current passes, then the cause of the malfunction is the starter, but if current does not pass, then the starter relay should be checked. If the latter malfunctions, it must be replaced.
If everything works, then the next step is to remove the starter.
Step-by-step replacement of the Chevrolet Niva cooling radiator
How to remove the Niva Chevrolet starter
To remove the starter, you need to do the following:
- Disconnect the wires from the battery and starter (you can use a wrench of the required size).
- We unscrew the starter, which is attached with three bolts to the box body. You can remove it through the top or bottom, however, motorists believe that it is more convenient to remove it through the bottom. It's difficult to do this without a pit. Air conditioning can be another obstacle. If it is present, you will also need to remove the warm air intake hose. The clamp that secures it to the engine can be loosened using a flathead screwdriver.
Now you need to determine the cause of the failure. There may be several of them:
- Faulty brushes. If they are worn out and do not reach the anchor, they should be replaced.
- Faulty retractor. In this case, replacement is necessary.
- Knocked out guide bushings also require replacement.
- The cause of the breakdown may be a burnt-out winding or a burnt-out armature. It is difficult to repair such a malfunction at home; it is better to contact a specialist.
The wires leading to the starter need to be cleaned and lubricated, and also checked to see if current is flowing through them. If necessary, it is better to replace the power cord, because it can cause poor operation of the device.
If the cause of the breakdown is identified and eliminated, then the next step is to install the starter. You need to do this in reverse order:
- Connect the wires first, then mount the starter and tighten the three bolts;
- screw back the rod that covered the starter outlet and the engine protection;
- connect the battery and check if everything works.
Recommendations for using the starter
To make your starter last longer, you need to follow a few simple recommendations:
- If you turn on the engine, then this should be done no longer than 15-20 seconds, and repeated no earlier than after 25-30 seconds. If after three times the engine does not start, you need to check the ignition and power system. If such faults are detected, they must be corrected.
- Do not use the starter to move the vehicle. This puts a lot of stress on the trigger mechanism.
- If you have successfully started the engine, turn off the starter, as the overrunning clutch may jam due to frequent rotation of the starter drive gear by the flywheel.
Anyone who has already removed and installed the starter at least once is unlikely to want to do it a second time. Although this work is not difficult, it requires a lot of effort and sometimes money. Follow these simple rules to avoid such breakdowns.
Where is the Niva Chevrolet hydraulic chain tensioner located and its malfunctions
Do-it-yourself repair and disassembly of the starter on a VAZ 2107
Yesterday I decided to completely disassemble my used starter in order to show with a clear example how to disassemble it and subsequent repair of the device. I will also describe the solenoid relay, which is often the cause of the starter itself not working. Perhaps this is where we should start.
Cleaning nickels from carbon deposits on the solenoid relay
All this is best done on a removed part, which you can read about here. After this, you need to use a deep socket and a wrench to unscrew the three nuts securing the cover to the body, as is clearly shown in the photo below:
When all the nuts are unscrewed, you need to press on all the bolts from the same side and pull them out from the back:
Now carefully fold back the relay cover, but not all the way, as the wire will get in the way:
Pay attention to the central copper plate: it will definitely need to be cleaned of plaque and carbon deposits, if any. Also, you need to unscrew the nickels themselves (two in total) by unscrewing the two nuts on the outside of the cover:
And then you can take them out from there with your hands, from the back side:
Also clean them thoroughly with fine sandpaper until shiny:
After completing this simple procedure, you can put everything back in place in the reverse order. If the problem was precisely the burnt nickels, then it will definitely disappear!
How to replace starter brushes on a VAZ 2107
The brushes on the starter can also wear out and cause unit failure. In this case, they need to be replaced. On cars of the “classic” family, starters are slightly different from each other. But there won't be much difference in replacing the brushes. It will be necessary to either remove the back cover under which they are located, after unscrewing a couple of bolts. Or unscrew just one bolt, which tightens the protective bracket, under which the brushes are located:
And this is what it looks like after:
There are a total of 4 brushes here, each of which can be removed through a separate window. You just need to unscrew one bolt securing it:
And then, squeezing the spring clip, pry it off with a screwdriver, and it can be easily removed:
All the others are removed in exactly the same way, and they all need to be changed at once. Installation is carried out in reverse order.
Disassembling the VAZ 2107 starter and replacing the main components
In order to disassemble the starter, we need the following tool:
- Socket head for 10
- Ratchet or crank
- Impact or power screwdriver
- Flat screwdriver
- Hammer
- Key for power screwdriver (in my case 19)
First, unscrew the two nuts with a 10mm wrench, which are shown below:
Then remove the cover, prying it with a screwdriver if necessary:
After this, you can remove the housing along with the winding from the studs:
If it is necessary to replace the winding, then this is where we need a power screwdriver. It is necessary to unscrew the 4 bolts on the body on each side, as shown below:
After which the plates pressing the winding fall, and it can be safely removed:
Since the part with the anchor is free, we can begin to dismantle it. To do this, use a thin screwdriver to pry up the plastic bracket; in the photo below it is shown after the shift:
And remove the anchor from the front cover of the starter housing:
And to remove the coupling with the shaft, you must again remove the retaining ring with a screwdriver:
And after that it’s easy to remove it from the rotor shaft:
If it is necessary to repair or replace certain parts, we buy new ones and install them in the reverse order.