Required special tools and accessories:
- wrenches 14 and 17 mm;
- screwdriver;
- combination pliers;
- hammer;
- mandrel;
- special scales for checking the elasticity of springs;
- calipers.
Disassembling the gasoline pump may be necessary in the following cases:
- diaphragm breakthrough 15;
- loss of tightness or other damage to valves 8 and 12;
- weakening or breaking of the working spring 16 of the diaphragm;
- wear or jamming of the drive lever 19.
Rice. Gasoline pump
Determining the causes of fuel pump failure
To determine the cause of a fuel pump failure, you can use several operations related to checking its functionality without removing it from the car.
The fuel pump does not supply fuel to the vehicle systems:
- We check the presence of fuel in the gas tank. It is recommended to operate the car with at least half a tank and with the obligatory use of the entire set of filters that reduce the impact of small particles on fuel pump parts.
- We check the performance of the fuel filters and, if necessary, replace them with new ones.
- We blow out and clean the pipeline system, removing deposits of small particles.
Check fuel filters
The main reasons for fuel pump failure may be:
- Damage to the diaphragm with leaks.
- Loss of spring stiffness and performance.
- Valves clogged due to dirt accumulation.
- Loss of filter capacity due to the accumulation of contaminants.
- Violation of the tightness of the pump circuit with leakage of gasoline and oil.
- Failure to operate due to exhaustion of the pump components.
You can see how the DAAZ fuel pump works in the following diagram:
Performance diagnostics
The main reasons for checking the performance of the pump are as follows:
- significant reduction in fuel supply to the carburetor;
- reduction in engine performance;
- car jerking while driving.
Before diagnosing pump malfunctions, you need to make sure that other elements of the fuel system are working - carburetor, fuel hoses, filters, etc.
For diagnostic work you will need:
- open-end wrench 10;
- flat screwdriver.
The work is performed in the following sequence.
- On a car with a cold engine, the hood opens.
- Use a screwdriver to loosen the clamp securing the pump inlet pipe.
Use a screwdriver to loosen the clamp securing the inlet pipe. - The pipe is removed and a plug (bolt of a suitable size) is installed in its hole to prevent fuel leakage.
- The fuel supply hose is disconnected from the carburetor fitting and lowered, and a plug is placed in the hole.
- By pressing the manual pump lever, the resistance of the diaphragm spring is checked - the pump should make retracting sounds. If there is no resistance and no characteristic sounds, then the pump is faulty.
Signs of a faulty fuel pump
Diagnostics of a high-pressure fuel pump (HPF) in Moscow
If a car enthusiast notices that his favorite “swallow” does not pull, then it is quite possible that the fuel pump has broken down. The first signs that the power supply system has begun to malfunction may be periodic whistling or howling. All this will be accompanied by increased noise. The heart of the fuel system is in the fuel tank, so it’s worth listening to see if any unnecessary sounds have appeared there.
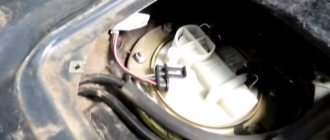
You can make sure that the pump is pumping by checking the pressure in the fuel supply system. How to do this: under the hood of the car, connect the pressure gauge to the fitting on the ramp.
The pressure in the fuel tank should not be lower than 250 kPa, i.e. 2.5 kgf per square centimeter. If it is less, then you should think about changing the fuel filter. It will also help to increase the pressure if you remove the pump and clean the receiver screen (photo above).
When the pump is not fixed, all these procedures will not help. The pressure in the system will not be at the proper level, you will have to buy a new pump for the car’s fuel tank.
We will tell you in detail how to remove the fuel pump in a Lada 2110 car with photo accompaniment.
Replacing the gasket under the fuel pump
It is recommended to replace the rubber seals, including the pump gasket located under the fuel pump. This part is intended for one-time use, so it is not reinstalled after the device is removed.
Ring gasket
What to do if the pump fitting is broken? It requires urgent repair or replacement with a new one. It depends on the specifics of the breakdown, whether the fitting on the cover of the fuel pump module has broken, on the pump itself, or whether we are talking about the fuel supply and return fittings. If the problem is serious, it is recommended to purchase a new kit along with a cover, sold at a car service center.
This is interesting: Why is anti-gravel film needed?
Replacing the fuel pump on a VAZ 2110 car
How the steering cardan works, a review of faults and instructions for replacing it
The sequence of actions is as follows:
1. From terminal “?” disconnect the battery cable.
2. Reduce the pressure in the power system to a minimum.
3. Remove the rear seat cushion.
4. There is a fuel tank hatch cover under the seat - it needs to be removed.
5. The block with wires must be disconnected from the wiring harness. There is a plastic latch there - press it out.
6. Loosen the clamp. The nut securing the hose tip must pass through it.
7. Unscrew the nuts securing the fuel supply (1) and drain (2) hoses. Then disconnect the hoses themselves by threading the ends through the clamp.
8. The hose ends have O-rings. Their condition must be checked for rupture or loss of elasticity. If worn, these parts must be replaced.
10. Remove the clamping ring.
11. Remove the fuel pump carefully: lift and tilt. To remove the fuel level sensor float in the tank.
12. Remove the O-ring and inspect it for wear. Replace if necessary.
13. The new pump is installed in the reverse order of removing the old one. Please note that the arrow on the fuel pump should point towards the rear bumper of the car.
14. To tightly tighten the pump mounting nuts, it must be pressed against the resistance of the springs.
15. Connect the hoses. In this case, the tip of the fuel drain hose (2) should be facing towards the front bumper of the car, and the tip of the supply hose (1), on the contrary, should be facing back.
If you did everything consistently and correctly, then after replacing all the gaskets and the pump, the car will pick up speed like new. Good riddance!
Carburetor engine
Repairing a fuel pump from a carburetor engine is usually not particularly difficult.
Its main malfunctions may be:
- Diaphragm rupture;
- Stuck or clogged valves;
- Worn pump drive lever.
A torn diaphragm can be replaced, the valves can be cleaned, developed, and, if necessary, also replaced, the worn end of the pump drive can be welded on, or the lever can be completely replaced.
How to do this, watch the video using the example of a VAZ 2107.
How to check?
Instructions for changing transmission oil in a VAZ-2109 gearbox
First, we make sure that the source of the system malfunction is the fuel pump.
- Turn the ignition key to position 2, after which a working pump should make a characteristic buzzing sound. If there is none, this indicates a malfunction of the fuel pump or its power supply circuit.
- To check the supply circuit, open the block where the fuses and relays are located. Having found the fuse corresponding to the pump, we check its contact for integrity.
- Next, we diagnose the relay itself. To do this, the assistant turns on the ignition a number of times, and you listen to the relay. If it produces the characteristic clicking sounds without failure, then the supply circuit is working properly.
- In such a situation, the pump itself has probably become unusable and must be replaced.
Electric fuel pump for carburetor: characteristics, installation
A carburetor is one of the components of the engine power supply system. It is designed to prepare an optimal combustible mixture of fuel and air. In the carburetor, gasoline is mixed with air. This element also regulates the volume of mixture supplied to the combustion chambers. Carburetors still remain quite popular and are used not only on classic AvtoVAZ models, but also on some foreign cars.
Characteristic
The carburetor was invented quite a long time ago. These devices were mass produced in the 20th century. However, technological progress does not stand still, and the carburetor was replaced by an injection power system. The carburetor is a fairly old mechanism.
Gasoline pump: main types
This device, as the name implies, is designed to supply liquid gasoline from the tank directly to the combustion chambers of the engine. The main task of any pump is to pump liquid under the required level of pressure, which is necessary for the motor to operate as stably as possible. Modern technologies are slowly but surely taking over the world. Innovation is also coming to the automotive industry, but mechanical pumps are still used on carburetor engines. The mechanical device was created exclusively to work with the carburetor. But the electric fuel pump is designed for injection engines. The mechanical element is most often installed outside the tank, but the electrical element can be found inside it.
The operating principle of an electric fuel pump is very similar to a mechanical device.
Electric fuel pump design
This device is very similar in design and principle of operation to a mechanical device. The work is carried out thanks to the core. It is retracted using a solenoid valve. A low-pressure electric fuel pump consists of a working chamber, valves - inlet and outlet, a diaphragm, a return spring, an electromagnetic sensor, a core and a contact group.
The device works due to the movements of the diaphragm. She moves up and down.
Carburetor tuning: installing an electric fuel pump
You should not think that despite the simplicity of the element, installing it in another power system will be simple. Installing an electric fuel pump is a rather complicated process. But the result is worth the effort. The first step is to determine which specific pump will fit the carburetor and the power system. You will also need various consumables for installation.
In order to install an electric pump, you will need a hose.
Installation work
First, remove the fuel level sensor - it is located in the tank. A hole is drilled in its lid and a 7 mm tube is soldered in with a soldering iron. The end of this tube must be bent - this is so that the return line drain works. It should be bent so that one end of the tube is at a greater distance than the fuel intake pipe. The upper part also bends until it is parallel with the fuel intake hole. Next, a modern fuel level sensor is installed. It is worth noting that it has both an intake and a return line. It is installed in the tank.
A tube with a diameter of 5 mm is put on the second fitting. It is secured to the body in a vertical position using clamps. This is necessary so that the combustible mixture is supplied correctly, that is, from bottom to top. The pump is connected to the tank using a 12 mm hose and adapter. Then you should deal with high blood pressure. It is not needed in the carburetor. To lower it, remove the cover from the pump, unscrew the supply fitting and remove the screen. A hole of up to 3 mm is drilled in the return line fitting. Then all that remains is to connect the electric fuel pump to the carburetor using an ordinary fuel filter. It's easy to do. All you need is clamps and a hose. You need to connect the device to the 12-volt contact on the ignition coil through a relay.
There are many reasons why an electric fuel pump is installed on a carburetor.
Conclusion
As you can see, this is a useful modification. By installing an electric fuel pump on the carburetor of a VAZ or any other car, you will not encounter any shortcomings. The only difficulty is choosing a suitable device and installation work.
Operating principle of an electric fuel pump
Installation and installation of oil pump VAZ 2108-2109-21099
The functional work of the fuel pump is to supply fuel to the injectors. For normal operation of the injectors and creation of the required pressure, the supply of gasoline must begin before the engine starts.
The electric fuel pump is turned on by a special controller using a relay. When the ignition key is turned to the “starter” or “ignition” position, the controller instantly energizes the fuel pump switch relay, and as a result of the created pressure, fuel is supplied to the injectors.
Electric fuel pump VAZ 2114
If the engine does not start running within a few seconds, the controller turns off the relay until the engine is cranked again. After scrolling, the controller turns on the relay again, determining the start of rotation using the reference signal from the crankshaft position sensor.
Diagnostics of electric fuel pump faults
The service life of the electric fuel pump on the VAZ injector is quite long, but everything has its limit. Poor fuel quality primarily damages the discharge part of the unit.
An uncorrected fuel pump in a car prevents it from working at full power, and the engine also becomes unstable at idle. Due to a lack of fuel, when trying to start, the engine begins to “sneeze”, starts with difficulty for a few seconds or does not start at all.
Another available method is to check the pressure in the fuel system with a pressure gauge while the engine is running. But it is recommended to first replace the fuel filter in order to avoid distortion of the device readings.
A decrease in performance also indicates a pump malfunction; this is easy to notice when driving in 3rd or 4th gear. If, when you press the accelerator pedal, the car reacts with dips or does not react at all, most likely the fuel pump on the VAZ 2114 has failed.
Self-replacement of the electric fuel pump
The fuel pump on a VAZ injector, as a rule, cannot be repaired, however, like most electric fuel pumps.
Do-it-yourself is not particularly difficult and does not require special equipment and tools. You will need:
- Phillips screwdriver;
- ratchet with head at 7 and 10;
- key to 17.
The unit is replaced in the following sequence:
- The rear seat is removed. To do this, remove two plugs and, using a ratchet with a 10-mm head, unscrew the two bolts. After removing the seat, a slot in the sound insulation should open in the shape of the letter P. The fuel pump cover is located under it.
- Use a Phillips screwdriver to unscrew the cover, revealing the upper part of the fuel pump module underneath.
- The wiring harness suitable for the module is disconnected.
- Now you need to relieve the pressure in the power system. To do this, the car engine starts and runs until the fuel from the line is completely used up, that is, until the car stalls.
- The battery turns off.
- Using a 17 key, unscrew the fuel line tubes one by one.
- 8 nuts are unscrewed around the perimeter of the clamping ring. To do this, use a ratchet with a 7-mm head. The pressure ring is removed.
- The fuel pump module is carefully removed from the gas tank.
After the fuel pump module is removed, it is possible to either completely replace it with a new one, or replace only the electric fuel pump itself, but this will require disassembling the fuel module.
Disassembling the fuel module and removing the electric fuel pump
- The block of wires is disconnected from the connector of the cover and the fuel pump, then the sensor indicating the fuel level is removed. To do this, two latches are pressed out and the sensor moves along the grooves towards the cover.
- The drain pipe is separated from the body; to do this, you need to slightly pry it with a screwdriver. Then the four housing latches are pressed out one by one and the module cover is removed along with the fuel pump.
- The mesh filter is carefully pryed off with a screwdriver and removed. The lock washer is removed from the installation hole.
- The plastic latch is pressed out with a screwdriver and the pump is pushed out of the holder with your finger.
- The plastic corrugated tube is removed from the pump nozzle. To make removal easier, it can be heated over steam.
- Reassembling the fuel pump is done in the reverse order.
After installation, you should connect the battery and start the car briefly to check for gasoline leaks from the connections. If there is no leak, it means that the replacement of the electric fuel pump in the VAZ 2114 injector fuel module was successful.
Fuel pump Ford Focus 2: replacement
On the Ford Focus 2 model, the fuel pump is installed in such a way that there is simply no special service hole for servicing it. This applies to both pre-restyling versions of Focus II and models after restyling. There is only a plug, under which there is not enough hole to remove the module.
The absence of a separate fuel pump hatch means the following:
- Officially, the module is replaced only after removing the gas tank from the car (the method is complicated);
- to remove the FF2 fuel pump without removing the gas tank, you will need to additionally cut a hole in the floor of the car under the rear seats (often practiced during self-service);
It is important to understand that each of these replacement methods allows you to remove the fuel pump on a Ford Focus, but you also need to take into account the pros and cons of one or another method of removing the module
Removing the gas tank to replace the fuel pump
The replacement method of removing the fuel tank is official, since there is no need to make a hole in the body, cut the bottom, etc.
This replacement method involves gaining free access to the lower part of the car. To do this, you need to drive the car into a viewing hole, overpass, or lift it on a lift.
To replace and remove the tank, you will need to prepare a set of wrenches, a hammer, a screwdriver (flat-head) and penetrating lubricant such as WD-40, as well as a rag.
Before removing fasteners, bolts and nuts should be treated with lubricant. Then you will need to relieve the pressure in the power system by removing relay K4 (pre-restyling models) or relay R19 (after restyling). Having turned off the Ford Focus fuel pump fuse, start the engine and wait until it stalls. First, remove the fuel tank heat shield. Next, you should find a pair of pipelines near the tank, which are disconnected by pressing the latches (on one side, the white plastic latch is picked up and pulled out, then the latch is pressed and it opens). The next step is to remove the filler neck pipeline (loosen the clamp and pull the tube off the outlet pipe). Now you need to unscrew the three bolts securing the metal bands that hold the tank. Now you can remove the gas tank (fuel is first pumped out of it using a bulb or a gas-resistant hose). Next, the outer surface of the tank is cleaned of dirt, after which it is possible to unscrew the plastic pressure ring. After completing this procedure, you can remove the fuel cup from the tank, after which you can check, repair or replace the pump
When installing a new pump, it is important to consider that there is an arrow on the body that should be aligned with the mark on the fuel tank. After installing the pump, tighten the clamping ring. Keep in mind that the ring is made of plastic, that is, it should not be tightened too much
It is important to ensure reliable fixation of the module without over-tightening the ring.
How to change the Ford Focus 2 fuel pump without removing the tank
The second replacement method is unofficial, since the hatch for the fuel pump will need to be cut out. Remember, such work can lead to accidental fuel fire! Another disadvantage is that after cutting out the hatch in the bottom, these areas may be subject to active corrosion.
To complete the work you will need to prepare:
- scissors for cutting metal;
- grinder and drill;
- file;
- screwdriver
It is also advisable to prepare a brush, anti-corrosion compounds or mastic for metal processing. This will prevent the development of corrosion of the bottom and protect the metal from moisture.
To replace the pump in the tank without removing it, do the following:
make a hole in the floor under the rear seat (it is advisable to make a template in advance)
The hole is made with a grinder or scissors; then the terminals and pipes are disconnected from the pump (you need to cover the ends of the fuel line with a rag); Use a wooden block to knock down the retaining ring and unscrew the ring; now the pump can be removed after first cleaning the top of the tank from dirt so that debris does not get inside; Taking into account the fact that the edges of the hole made will rust, it is necessary to treat it with anti-corrosion agent and then paint the area. It is also important, after installing the pump, not to leave the hole without a plug (ignoring this rule will cause the air to create noise at speed). Often the problem is solved by installing a hatch from another car
For example, a hatch from a VAZ “Ten” fits.
Replacing the fuel pump VAZ 2106/07
Replacing the pump on a VAZ 2106/07 is carried out in two cases:
- when its elements are severely worn and cannot be replaced;
- To increase the service life, the DAAZ fuel pump is replaced with a Pekar pump.
To replace the pump you will need:
- wrench 13;
- flat blade screwdriver;
- container for draining gasoline.
Dismantling the pump
To avoid burns, dismantling the old pump is carried out on a cold engine. The following actions are performed:
- Use a screwdriver to loosen the clamp on the fuel supply hose and disconnect the hose.
- The clamp on the fuel supply pipe to the carburetor is loosened - the pipe is removed
The clamps are loosened and the fuel supply hoses are disconnected..
- A container is placed under the resulting holes to drain the fuel.
- Using a 13mm wrench, unscrew the nuts securing the fuel pump to the cylinder block.
- The pump, along with three gaskets, is removed from the studs.
Pump installation
Installation of a new or repaired pump is carried out as follows.
- The installation site is inspected. Carbon deposits or dirt are removed with solvent 642, and the surface is wiped dry with a rag.
- Three new gaskets are put on the studs - adjusting (the thickest), heat-insulating and sealing. The gaskets must match the brand of fuel pump.
- A new fuel pump is installed and secured with two nuts. In order not to create a lot of pressure on the flange, the nuts are tightened alternately.
- Two fuel supply hoses are connected.
- The engine is started and the functionality of the pump is checked.
Video: replacing the fuel pump VAZ 2106/07
Even an inexperienced car enthusiast can repair and replace the fuel pump on a VAZ 2106/07. To do this, you only need a repair kit (or a new pump) and a minimum set of standard tools.
Self-repair and replacement of air conditioner radiator
Do-it-yourself repair and replacement of the fuel tank
About the features of the system design
The design of the fuel supply system to the Renault Logan engine implies the presence of several components through which the fuel-air mixture under pressure enters the combustion chambers of the cylinders. The main elements of this system are:
- gas tank;
- main fuel line;
- fuel rail;
- return line;
- nozzles;
- pressure regulator;
- fuel gasoline pump;
- level sensor and filter.
Sometimes the fuel pump needs to be replaced. The functioning of the system under consideration is subordinated to an on-board computer, which, in real time, based on signals from various sensors, adjusts the operation in order to ensure that the mixture is supplied to the combustion chambers with an optimal ratio of fuel and air. If one of the components malfunctions, the on-board controller generates an error on Renault Logan. And in this case, a mandatory replacement of the fuel pump is required, and in this case you need to know Renault Logan how to properly remove the broken element. A special electric relay is responsible for the timely and correct supply of supply voltage to the fuel pump and to the elements.
Without going into the technical aspects of the system, we will try to understand and clearly describe the process.
- When the ignition key is turned to the 2nd position, the fuel pump relay is turned on, which operates for several seconds, providing the required pressure in the fuel rail. The engine can then be started. This is the normal operating mode of the system.
- When the Renault Logan engine starts, the relay is activated again, ensuring that the pump operates continuously throughout the entire engine operation. Thanks to this, fuel is supplied to the ramp continuously through the fuel pump. In it, the regulator ensures that constant fuel pressure is maintained, eliminating the formation of excess (it returns to the tank via the return line).
- If interruptions occur in the operation of the motor, the first diagnostic measure will be to check the integrity of the pump fuse and relay. And if a breakdown is detected, the fuel pump needs to be replaced.
Replacing the fuel pump for VAZ 21142115
Before you begin work, you should relieve the fuel pressure in the system. Even when the pump is not working, the pressure can remain very high, which will lead to the pressure of a stream of gasoline during dismantling work.
To reduce the pressure in the fuel system of a car, it is enough to let it stand on level ground for three hours. The fuel pressure in the hoses and pipes will noticeably decrease, and replacing the device will take place without any difficulties.
Not in all cases it is necessary to replace the fuel pump with a new one; sometimes it is enough to simply repair it
Preparing tools
To make all stages of the work easier, you will need to prepare several tools. As a rule, most car owners have all of them:
- crosshead screwdriver;
- flat screwdriver;
- open-end wrench 17;
- head at 7;
- extension for key.
How to remove a faulty fuel pump in a VAZ 2114/2115
The procedure for dismantling the fuel pump determines the following stages of work:
- Open the hood and disconnect the negative terminal from the battery.
- Raise the rear seat cushion inside the vehicle.
- There is a small hatch under the seat - it is under it that the fuel pump is located.
- Using a 17mm wrench you will need to unscrew all the nuts securing the hatch to the floor.
- Putting the hatch cover aside, you will need to disconnect the two wire blocks. To do this, you will first need to bend the fixing element on the plug.
- Next, using a 17mm wrench, you will need to unscrew the nuts on the fuel line and disconnect the fuel pipes.
- After this, the fuel pump itself will become accessible. Using an extension cord and a wrench, you will need to unscrew all the fasteners that connect the pump to the metal surface of the car.
- The best way to remove the fuel pump is to use a screwdriver to hook it onto the rubber ring.
How to install the fuel pump back
The procedure for installing the fuel pump in the VAZ 2114/2115 is completely reverse: that is, you will first need to insert the device into the cavity under the seat, and then connect all the disconnected wires and tubes. The final stage is closing the hatch and returning the rear seat cushion to its original place.
The ability to independently diagnose a fuel pump failure, as well as quickly replace or repair the device, will be especially useful for those drivers who are accustomed to servicing their car themselves. In addition, the procedure for checking the fuel pump and its repair cannot be considered particularly complex work, so even an inexperienced owner will be able to get the fuel pump into working condition without contacting a service station.
What is a fuel pump and what is it for?
So, the first thing I want to talk about is what a fuel pump is and what it is intended for. As you can already understand from the name, the gas pump comes from two words: gasoline and pump, that is, it is a pump that pumps gasoline, everything seems to be clear here, and there is nothing complicated about it. In the fuel system, the fuel pump - if compared with the human body, can be called a heart, since our heart is also a kind of pump or pump that pumps blood, providing the body with everything vital. Life is impossible without a heart (fuel pump), and this also applies to a car with a non-working gas pump. The car turns into a static pile of metal that is incapable of anything.
What is a fuel pump
The fuel pump is one of the most important components of the power system, which is responsible for supplying fuel through the fuel channels.
If you're having trouble on the road and your engine won't start, be sure to check if fuel is getting to the cylinders. The fuel pump is designed very reliably, but during long-term use of the car it may be necessary to replace the fuel pump. Every second car service can perform the procedure for replacing or repairing a fuel pump. If you are already an experienced motorist, then you can easily replace the fuel pump yourself, but for this you will need diagrams for replacing the fuel pump.
Why does the fuel pump break?
- Dirty fuel filters;
- Operating a vehicle with an almost empty gas tank.
Both of the listed reasons for fuel pump failure lead to a malfunction due to the maximum operation of the fuel pump. In order for the gas pump to serve you longer, make sure there is fuel in the gas tank and follow the operating recommendations. After all, the quality of the fuel leaves much to be desired.
Before turning the ignition key further, wait until the fuel pump pumps fuel into the system.
What types of fuel pumps are there?
- Mechanical fuel pumps (installed on cars with carburetor engines);
- Electric fuel pumps (work under pressure, as if pushing fuel). The electric fuel pump is driven by an electric motor.
How to replace the fuel pump yourself?
What do you need to replace the fuel pump?
- Key for removing terminals;
- Open-end wrench 17;
- Socket wrench or ratchet with a 7 and 10 head;
- Phillips screwdriver;
- New fuel pump;
- Fuel level sensor.
Instructions for replacing the fuel pump.
1) Drain the gasoline so that there is no more than 10 liters of fuel in the tank.
2) Remove the rear seat of the car (this will require emptying the trunk and removing the carpet).
3) Remove the module cover where the fuel pump is located.
4) Clean everything from dirt to prevent dirt from getting into the fuel system.
5) Disconnect the wires from the module.
6) Start the vehicle to relieve pressure in the fuel lines.
7) Disconnect the battery.
 Remove the fuel line tubes and the pressure ring.
9) Remove the fuel pump module and drain the fuel.
10) Insert the new fuel pump module into its proper place.
11) Put on the clamping ring and install the fuel pump in the correct position so that the fuel pipes can be easily secured.
12) Carry out all the steps in the reverse order from inserting the fuel pump tubes - connecting the battery.
13) Check the fuel system for leaks.
The instructions for replacing the fuel pump are suitable for the VAZ family of cars.
1 – fuel tank; 2 – electric fuel pump grid; 3 – electric fuel pump; 4 – fuel line; 5 – fuel filter; 6 – pressure regulator; 7 – fuel rail; 8 - fitting; 9 — nozzles; 10 – line for draining fuel.
It starts, but...
In cases where the engine starts, but there are problems with the overall handling of the car, concentrate on the sensor readings. You should see a strong oscillation of the needle between the pressure when the pump is off and the operating pressure. If the needle rises slowly, there is a problem. Pull the pressure regulator vacuum hose out and you should see an increase. A reading that is too high may be caused by a faulty regulator or a compressed return tube.
The fuel pressure sensor can tell you a lot. Take readings with the pump off (ignition on, engine off) and operating readings.
Just because you have the required pressure does not mean you have enough flow. The total system volume of a Schrader type valve of 1 pint (=0.568 l) is capable of starting any car in 20 seconds. (While a typical pump can use 30 gallons in an hour, less than one-tenth is needed to start the engine. The rest goes back to the tank and keeps it cool.)
Ford Focus 2 fuel pump repair
Any procedures for repairing a fuel pump are impossible without high-quality diagnostics, since usually only one part of the pump turns out to be faulty. In the process of repairing a Ford Focus fuel pump, the device will have to be disassembled. The fuel pump is also disassembled when cleaning its fuel filter. You can disassemble and repair the fuel pump yourself if you have the proper skill, tools, and a detailed description of the repair process.
Before disassembling the Ford Focus 2 fuel pump, it is recommended to wash it - for this you can use gasoline located in the fuel pump housing. Below we will look at the process of disassembling a car pump. It begins after the fuel module is removed from the fuel tank opening.
How to disassemble the Ford Focus 2 fuel pump:
- First, remove the O-ring from the fuel tank filler neck.
- Use a screwdriver to tighten the sensor clamp from the fuel level indicator
- Move the sensor along the guides of the fuel module housing
- Disconnect the wire ends from the sensor that indicates the fuel level from the terminals located on the top cover of the module
- Remove the sensor
- Squeeze out 4 pieces using a screwdriver. housing clamps and remove the lower cover of the fuel module
- Remove the fuel pump from the fuel module
- Use a screwdriver to press the lock and remove the fuel pump, disconnecting the wire block from the pump motor
- Remove the retaining bracket and strainer by prying it off with a screwdriver
- Use a screwdriver to tighten the two fixing tabs located in the glass of the top cover
- Remove the spring and top cover from the fuel module housing
- Remove the corrugated plastic tube from the fuel filter fittings and the top cover.
After disassembling, the Ford Focus 2 fuel pump filter should be washed in gasoline. Assembly and installation of the device is carried out in the reverse order. After assembly, you should check the fuel system for leaks at the connections. In order to check the operation of the Ford Focus 2 fuel pump, you need to connect the wire terminal to the battery terminal with the “minus” value and turn on the ignition.
In the end, it should be noted that disassembling the Ford Focus 2 fuel pump, as well as repairing or replacing it, is quite difficult, and it is almost impossible to perform such a procedure without certain knowledge and skills. Therefore, if the fuel pump malfunctions, it is better to contact a car service center, where qualified technicians will repair or replace the fuel pump with a guarantee.
Cleaning the fuel pump Ford Focus 2
During the operation of the car, a deposit of dirt and brown-orange resins forms on its fuel pump, which must be removed from time to time. It is necessary to clean the fuel pump during its repair.
For this you can use regular gasoline. It is used to wash the external and internal parts of the fuel pump tank - the internal cavity is wiped with a rag. Typically, the process of washing the tank must be repeated 2-3 times. There may be solid dirt particles inside the housing. Next, the fine filter - the fuel pump mesh - is washed. By the way, if the filter is in unsatisfactory condition, it must be replaced. During the process of washing the filter in gasoline, contaminants may remain in its cells - they can be removed using a carburetor cleaner. After watering with the product, the mesh must be immediately washed in gasoline.
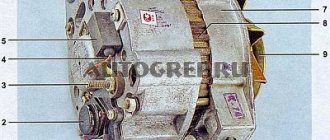
Sequence of operations for removing and disassembling the gasoline pump from the engine:
- Disconnect the inlet and outlet fuel lines from fittings 1 and 22 of head 7 of the pump.
- Unscrew the two special (long) nuts securing the pump housing to the cylinder block and remove the pump.
- Unscrew the nut 9 securing the sump cap, lift the cap, moving the bracket 21 to the side, remove the sump cap 11 and carefully, so as not to damage, remove the strainer 10.
- Unscrew the screws 23 holding the pump body 6 and its head 7 together and separate them. Before disassembling, it is necessary to mark the relative position of the housing and the pump head so that during subsequent assembly, the same position of the inlet and outlet fittings in relation to the engine is maintained.
- Remove diaphragm 15, assembled with rod 3, from engagement with lever 20 by pressing and turning nut 13 1/4 turn clockwise. Remove the diaphragm assembly with the rod and the diaphragm spring 16.
- Check the diaphragm and rod assembly. If necessary, tighten nut 13. By inspection, determine whether there are breaks, cracks or other damage in the diaphragm disks. If defects are found, replace the diaphragm assembly or its individual disks.
- Knock out axle 18 from the pump housing, remove spring 17 and remove levers 19 and 20.
- Carefully inspect the axle and levers. If there is noticeable wear, replace the relevant parts.
- Unscrew the two screws 5 of the 4 valve holder and remove the inlet 8 and exhaust 12 valves assemblies. Wash the removed valve assemblies in gasoline and check for leaks and for the smooth movement of valve 3 and its interaction with spring 4. In addition, it is necessary to check whether there are any tears on valve body 1, which could subsequently damage the valve. If any defects are found, new valve assemblies are installed.
- Check the force of spring 16 of the diaphragm. The length of a working spring in a free state should be 49 mm, and under a load of 2.75 ± 0.15 kg - 15 mm.
After disassembly, all pump parts must be washed in gasoline. The following should be washed with particular care: the sump cap, the strainer and the pump housing, where gasoline sediment accumulates.
Rice. Gasoline pump valve (set): 1 - housing; 2 - gasket; 3 - valve; 4 - spring; 5 saddle
Rice. Position of the manual gasoline pumping lever at the beginning of pump assembly
Rice. Installing the gasoline pump diaphragm on the rod
Fuel pump diagnostics
You can detect a breakdown in the following ways:
- turn on the ignition and turn the key to position 2 - there should be a characteristic sound;
- inspect the fuse responsible for the operation of the module - it should not have any signs of soot or wear;
- turn on the ignition several times, listen to the operation of the relay - a characteristic click should be heard.
Experts also recommend measuring the pressure in the fuel rail using a ready-made or home-made measuring device (a tube from an old filter, a piece of hose and a pressure gauge). The indicators should not differ greatly from the recommended 0.35 MPa. It is advisable to do the check sequentially and several times - you need to:
- connect the pressure gauge to the ramp;
- start the engine;
- measure pressure;
- rev up the gas, measure again;
- turn off the engine;
- After 2 hours, repeat the measurement procedure again.
Please note: if there is a gradual drop in pressure, this indicates a breakdown of the fuel pump.
Fuel pump repair and replacement
Before starting the replacement procedure, you need to dismantle the device. The specific location in a particular car model can be seen in the service book or in the operating manual.
The process of diagnosing, dismantling or repairing a pump is often not difficult. It is easy to carry out the procedures yourself. All you need is time, desire and a minimum set of tools.
Required Tools
To carry out dismantling, you will have to acquire tools: a set of heads, open-end wrenches. You will need a tubular and special wrench. Removing the device is the same for many car brands. Before starting work, it is important to reduce the pressure in the power system.
For further repairs after removing the pump, you will need the following list of tools:
- set of keys for 8 and 10 mm;
- pliers;
- Phillips and flat head screwdriver;
- hammer head 17 mm;
- WD-40 liquid solution;
- M8 bolt or screw clamp;
- vacuum cleaner for car.
It is important to prepare before removing a part. Before repairs, there should not be a lot of fuel left in the tank - no more than 10 liters. If you have open access to the pump from the trunk, clear the space of unnecessary objects and fold back part of the back of the rear seats.
Dismantling and checking the removed fuel pump
Specifically, removing the fuel pump involves a list of simple steps. First, the engine is turned off and the hood is opened. Next, you should find a device on the engine that connects to the fuel supply system. Then the chip with the wiring that is connected to the pump is disconnected. The fuel transfer hose is disconnected. You should also disconnect the collet clamps and unscrew the 4 bolts for fastenings.
The fuel pump is carefully removed from the socket; it should be hooked onto the rubber gasket. It is important to thoroughly clean the part so that dust, dirt or oil does not interfere with the repair.
It is important to diagnose the fuel pump before repair work. Problems in the operation of a part do not always indicate a breakdown of the pump itself. Often, after checking, it turns out that the problem was a blown fuse.
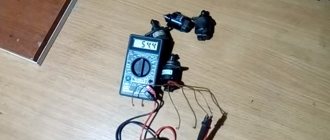
First you need to evaluate the operation of the fuse by checking its voltage using a special device. Further, the possibility of battery breakdowns is eliminated. A multimeter tester will help you measure the voltage level at the terminal.
After this, the contacts are checked - they should be in place. It is worth checking whether they are connected to ground. Failure of the fuel module system often occurs due to oxidation of contacts or breaks.
The serviceability of the fuel pump is diagnosed taking into account the following scheme:
- condition of the fuse - the plates must be intact and not damaged;
- the relay coil is checked by connecting a 12 V lamp to the contacts;
- power diagnostics are checked as follows: a voltmeter is connected to the connector, the operating voltage is from 12 to 12.5 V;
- pressure should be measured in two modes - statistical and dynamic.
It is also very important to pay attention to the pump supply voltage (4th pin). Its norm is from 12 to 14.4.
Replacing the gasket
Gaskets in cars are a common cause of pump malfunction. It is worth checking the degree of wear of the gasket, the level of tightness and contact with the fuel pump. Due to insufficiently tight contact with the part, fuel is supplied in insufficient quantities.
To remove the gasket and install a new one, you need to thoroughly clean the fuel pump socket after removing it. It is worth checking that all excess oil and dust have been removed. Next, lubricate the new gasket with a few drops of gasoline. After this, you can install a new sealing gasket in the socket. After installing the pump on top of the gasket, carefully secure it with bolts.
Replacing the mesh
Regularly replacing the pump screen is an important preventative measure. You can replace it yourself. The mesh is a fuel pump filter for rough cleaning. Over time, this element becomes clogged with small particles of dirt.
To replace the mesh you will need a set of wrenches, screwdrivers, and tubular wrenches. First, the housing area is removed and the fixing elements are loosened. The electrical power connector is disconnected. Next, you need to remove the tubes from the fittings, which fit very tightly, which may require cutting some of the heat shrink.
Next, the latches along the diameter of the fuel pump are snapped off - now the mesh can be freely removed. Installation of a new element is carried out in the reverse order of the above steps.
Bleeding the fuel pump
Gasoline has to work under high pressure. Due to fuel pump malfunctions, the pressure level drops. Therefore, it is necessary to artificially create high pressure. This process is called “priming the fuel pump.”
To bleed the pump, first disconnect the hose between the fuel pump and the engine. To prevent gasoline leakage, the hose is directed into an empty bucket or basin. Next, the starter cranks without first turning on the engine. In this case, the gasoline pump should have time to pump up half a liter of gasoline in 25-35 seconds. This indicates its serviceability. To restore a high level of pressure, you should connect a classic pump to a hose and pump compressed air into the system.
Strainer and pressure
Have you changed the filter at the recommended frequency? Ever? If you haven't been stressed about this, then this is definitely the first thing to check. Even if it is not the reason that the engine does not start, it must be done, so do not waste time.
Important: Removing the filter will be much less dangerous and messy if you relieve the pressure in the system first. Wrap a rag around the Schrader valve on the fuel rail and press down on the valve stem
Or remove the fuel pump fuse and run the engine for 20 seconds.
Release pressure from the system before opening connections.
Checking the fuel pressure is one of the basics when determining the causes of the problem. Inexpensive sensors are also commercially available. Most screw onto a Schrader type valve, but for some you will need a threaded connection or a special fitting.
Turn on the ignition and take the sensor readings. Zero or low pressure means the pump's electrical circuit is faulty. This can happen due to a faulty control relay, check the connections before proceeding to the relay. Inspect all connectors for signs of corrosion or loose connections. Test for battery voltage at the positive terminal of the pump or the wire from the positive terminal, and also check the ground.
By the way, an inertia-type emergency switch in the electrical circuit of the pump, as, for example, on many Fords, can be triggered even by a slight impact, for example, on a snowdrift.
A voltage drop test is the best way to determine where the high resistance is. With the circuit running, use an accurate voltmeter to check for readings between connections and along the length of the wires. A little more than 0.2 volts is too much.
Other possible causes of low pressure are the already mentioned clogged filter, a pinched fuel line hose or, of course, a weak pump.
Turn the ignition key without starting the engine. If the pressure is within normal limits, use a test light on the appropriate injector wire (or you can pull the injector connector and connect one of the inexpensive warning lights to the wire bundle). No light signal? This means that the injectors are not spraying fuel, and troubleshooting goes to another level of complexity, since you will have to look into the electronic engine management and electronic fuel injection (EFI) system.
When to change the pump?
When replacing a fuel pump, you need to perform simple manipulations, but what can lead to this work?
A list of reasons why the fuel pump malfunctions is given below:
- Rod wear can be solved by replacing it. In some cases, it is sufficient to remove one or more gaskets installed under the housing.
- Destruction of the membrane leads to gasoline leaking out of the housing. Air leakage begins, no pressure is created at the outlet.
- Valve malfunction - usually due to excessive heat. When cooled, valve operation returns to normal. As in the previous case, no outlet pressure is created.
And, naturally, physical damage to the pump housing leads to the fact that it stops working normally.
DIY fuel pump replacement
The gasoline pump in the power supply system of an injection gasoline engine is an electromechanical device that pumps fuel from the gas tank and creates the necessary fuel pressure in the fuel line necessary for the most efficient dosed injection of fuel injectors. If a number of conditions are met during vehicle operation, the fuel pump will serve properly for quite a long time (on average, about 200-250 thousand km or more). It should be borne in mind that regular driving with an empty tank, refueling with low-quality fuel with a high content of impurities and debris, ignoring the need to periodically replace the fuel pump screen, flush the fuel system and the gas tank itself lead to the fact that the gas pump breaks down much faster.
Another factor that affects the service life of a submersible electric fuel pump is unprofessional tuning and boosting of the engine. More efficient injectors are installed on the car, the pressure regulator in the fuel rail is changed, the ECU is reflashed (chipped), etc., but the fuel pump remains standard. As a result, the pump constantly works at the limit of its capabilities, heats up and quickly breaks down. For the reasons stated above, as well as as a result of natural wear and tear, drivers often need to replace the fuel pump. Next, we will look at how to change the fuel pump yourself.
Causes of fuel pump failure
First of all, this is low quality fuel. A large number of impurities that can be found even in high-octane and the most expensive fuel (such as BP Ultimate or EKTO from LUKOIL) can very quickly make repairing a gasoline pump a necessity. Often, even the highest quality and most reliable filter cannot clean the impurities contained in domestic gasoline. Another possible cause of the breakdown may be a malfunction of the fuel pump electric motor. As a result of a voltage surge in the vehicle’s on-board network or a short circuit in the electrical network contacts. Of course, in order to accurately determine the cause of the malfunction, it is necessary to conduct professional diagnostics. In any case, only a qualified specialist should diagnose the serviceability of the fuel pump. There are a number of signs by which a car owner can understand whether he needs fuel pump repair or not.
Main signs of pump failure
The service life of submersible fuel pumps is usually more than 200 thousand kilometers. It works almost flawlessly, gasoline lubricates and cools it. But here are a few factors that can accelerate wear on the electric motor and pump pump:
- Lack of gasoline in the tank. When the pump starts to run dry, it overheats and wears out much more. Even a new unit can be rendered unusable in 10-20 minutes. And then it is necessary to replace the fuel pump. On Ford and VAZ they have almost similar designs; the repair algorithm will differ, but only slightly.
- The presence of dirt, rust, dust in gasoline. This leads to the filter installed at the bottom of the pump becoming clogged, as well as the pipeline, fuel rail, and injectors. A coarse filter must be installed at the pump inlet, which allows you to get rid of most of the large impurities. It is advisable to replace this filter at least once every 10-15 thousand kilometers.
Sequence of operations for assembling the pump:
- Install lever 1 for manual pumping of gasoline so that the flat edge of its axis 2 is horizontal.
- Insert lever 20 into the slot of lever 19 so that the protrusion of the first lever rests against the protrusion of the upper edge of the slot of the second lever.
- Insert both levers into the pump housing so that the holes in the levers are aligned with the hole in the housing.
- Press axle 18 into the holes of the pump housing with light blows of a hammer through a copper mandrel and secure the housing bosses in several places on both sides.
- Insert spring 17 between the protrusions of the pump housing and lever 19.
- Insert a round rod with a diameter of 7-9 mm into the lower part of the pump housing from the side flange. bringing it under lever 20 and lifting its end.
- Place sealing washers 2 into the pump housing.
- Insert the diaphragm spring 16 into the pump housing.
- If necessary, install a new diaphragm on rod 3 and insert it together with the rod into the pump housing. When installing a new diaphragm 1 on rod 2, you need to position tongue a in a plane oriented at right angles to the axis of the hole in the rod. The fastening of the diaphragm to the rod using plates 5 and 6, washer 4 and nut 3 must be tight, preventing gasoline from leaking into the joint. The diaphragm assembly with the rod is inserted into the pump body so that the tongue of the diaphragm is shifted 45° clockwise relative to the similar tongue of the protrusion on the body.
- Turn the diaphragm by nut 13 1/8 turn counterclockwise until the narrow end of the lever
- entered the slot in the flat part of the rod 3.
- Remove the round rod from under lever 20 and check whether the diaphragm tongue matches the corresponding protrusion on the pump body. If a match does not work, then turn the diaphragm to the required angle in one direction or another.
- Attach the inlet and outlet valve assemblies to the pump head. When installing valves, be sure to place paper gaskets under the valve bodies.
- Place the pump head on the housing, aligning the marks made during disassembly, and screw in screws 23 one turn.
- Press lever 19 with your right thumb to lower the diaphragm to its extreme position. Press the pump head against the body by tightening two opposite screws 23 as far as possible and, releasing lever 19, evenly tighten the remaining screws (crosswise) to avoid distortion of the diaphragm.
- Install strainer 10 and sump cap 11, first replacing cork gasket 14.
- Check the operation of the gasoline pump.
Replacing the Renault Logan fuel pump mesh
Among the elements of this unit that most often require maintenance, craftsmen highlight the filter (or mesh) of the fuel pump. Usually its condition causes alarm before anyone else, after about 20-30 thousand kilometers, and this is not surprising, because the mesh is the first element of protecting the entire system from clogging.
After inspecting it, the technician makes a verdict - it needs to be replaced (if there is damage) or you can simply clean it (if it is just clogged). The cost of the mesh is not significant, so there is no question of any significant savings for the client. In any case, replacing the Renault Logan fuel pump grid begins with dismantling. It is carried out according to the same scheme as replacing the entire pump assembly. Next, when the pump is removed from the car:
- The housing is being cleaned.
- The float is removed.
- Sensors and wires are disconnected.
- The latches in the pump come loose.
- The mesh is removed.
If the mesh is in good condition, but very dirty, clean it by soaking it in a reagent, washing it with a cleaner and blowing it with a compressor.
Signs of a fuel pump malfunction
An experienced car enthusiast can determine the malfunction of his car by its behavior or by extraneous sounds. This also applies to the fuel pump. If knowledge is not enough, it is worth considering the following characteristic signs indicating problems with the fuel pump:
- the engine does not start;
- the engine stalls almost all the time;
- the power and dynamics of the car decreases.
However, it is worth considering that power may decrease for a number of other reasons: problems with piston rings, valves, etc. If the fuel pump is completely faulty, the engine will not be able to start.
The fuel pump does not pump
There may be several reasons why the device does not supply fuel. Before you start troubleshooting, you need to make sure that there is gasoline in the tank. It happens that the level sensor shows incorrectly and the problem simply comes down to a lack of fuel. You also need to make sure that the filter elements are not clogged, but it is better to replace them, because they are inexpensive. After these steps, you can begin diagnostics.
Due to clogged fuel filters, the pump cannot supply the required amount of fuel to the carburetor.
The causes of problems may be:
- wear due to long mileage;
- diaphragm damage;
- insufficient spring stiffness as a result of stretching;
- valve contamination;
- violation of the tightness of the unit.
If the gas pump on the “seven” does not supply fuel, then there are two ways out of this situation: install a new device or disassemble the old one, carry out diagnostics and replace damaged parts.
On my car, a situation once arose that indicated a lack of fuel for the engine: there was no normal dynamics, the engine periodically stalled and would not start. There was enough gasoline in the tank, the filters were in good condition, but the car did not drive. After lengthy investigations and clarification of the reasons for this phenomenon, the problem was found: the fuel supply hose from the pump to the carburetor was swollen inside, which indicated the poor quality of the product. The internal cross-section has become very small and insufficient to pass the required amount of fuel. After replacing the hose the problem disappeared. In addition, I change fuel filters at least every 5 thousand km. mileage (preferably more often). I have them before and after the fuel pump. As practice shows, even with the installation of two filters, as well as with a mesh in the fuel pump itself and at the carburetor inlet, debris still penetrates into the float chamber. This results in the carburetor having to be cleaned periodically.
Basic fuel pump malfunctions
The fuel pump in the Prior may operate intermittently due to low-quality fuel. This is due to the fact that a fine fuel filter is installed here after the fuel pump.
At the inlet there is only a filter mesh that performs rough cleaning. The gasoline at some of our gas stations is so dirty that the mesh gets clogged quite quickly. The engine does not start well or stalls during operation.
The car jerks along the way and slowly picks up speed. If the filter mesh is partially clogged with debris, the optimal supply of gasoline to the engine is disrupted in different operating modes. When the pump is unable to maintain the required pressure in the fuel system of 3.7-4.0 atmospheres, improper mixing of air and fuel occurs. As a result, the car loses speed.
In addition, even a well-warmed-up engine after a short stop can then start only after prolonged operation of the starter.
Unstable operation of the power unit is most often a consequence of a faulty fuel pump. First of all, you need to check the pressure level in it.
If after stopping the engine the pressure in the pump drops too quickly, then there is obviously damage to the diaphragm, as well as the sealing gasket. In this case, the gasket should be replaced, and the diaphragm should be reinforced with a special film.
There may also be foreign bodies in the fuel system, in which case the fuel pump must be disassembled and thoroughly washed. To do this, use the following tool:
- flat screwdriver;
- pliers;
- set of open-end wrenches;
- Phillips screwdriver;
- set of heads.
You can do this type of repair yourself in your own garage. Before starting it, you should once again make sure that the fuel pump is not working as it should.
To do this, you need to start the car and pay attention to the idle speed.
If it floats, then this is already one of the arguments in favor of carrying out repair work. In addition, you can go out onto the highway and sharply press the gas at about 3000 rpm. If the car starts to twitch while accelerating, then there is a second argument for making repairs.