Disassembly and repair of the VAZ 2107 generator
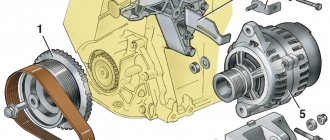
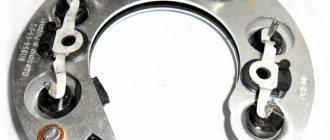
| Terminals and fastenings on the body of the VAZ 2107 generator. The numbers are marked: 10 — stud securing the generator to the tension bar, 9 — pulley, 8 — stator, 7 — front cover of the generator, 6 — rear cover of the generator, 5 — capacitor, 4 — terminal “61” "generator - common terminal of additional diodes, 3 - terminal "30" of the generator, 2 - voltage regulator, 1 - terminal "B" of the voltage regulator. |
- Unscrew the nut securing the generator pulley, remove the pulley and key.
- We unscrew the four nuts of the bolts holding the generator together and remove them.
- Remove the front cover of the generator and take out the rotor. If the generator is removed only to replace the bearings, then we complete the disassembly process.
- After washing the front cover of the generator, we remove the four bolts securing the front bearing and remove the old bearing.
- We install a new, pre-lubricated bearing, insert its mounting bolts and tighten them.
- We remove the rear bearing from the armature shaft using a puller and change it. If the generator only needed to replace the bearings, then you can begin assembling it.
- If there were any other problems, then we will disassemble the generator further.
- If there are problems with charging, remove the diode bridge located in the back cover of the generator. To do this, unscrew the nut of the bolt of the neutral wire coming out of the cover, remove the brush assembly, then from the inside of the cover we give three nuts securing the bridge and the stator winding, and then remove them.
- We check the integrity of the diodes of the bridge about the bell. As a reminder, a diode is an element that allows current to flow in only one direction. The diode bridge consists of six diodes: 3 positive and 3 negative. Looking at the bridge, you can immediately distinguish them by their layout. If during the inspection process a faulty diode is identified, then you can try to replace it or replace the diode bridge assembly.
- We also check the stator winding. All pins must communicate with each other, but not with the housing. If a fault is detected in the winding, then replace the winding.
We assemble and install the generator in the reverse order. We install the belt, tension it, connect the wires, replace the battery terminal and start the engine.
Also read other reviews
- Starter for VAZ 2112 price Review of starters for the VAZ 2112 car. You will find out what is better to repair or change the starter on this car. ...
- Bendix starter for VAZ 2110 price Review of the main problems and methods for solving them that arise with bendix on starters for VAZ 2110 cars. ...
- The VAZ 2110 starter does not work. The article discusses the main actions necessary if the starter in a VAZ 2110 car stops working. ...
Detailed instructions on how to remove a generator with your own hands using the example of a VAZ 2107 generator
The step-by-step diagram for removing the VAZ 2107 generator looks like this:
- Before starting work, you need to completely de-energize the car; to do this, you just need to remove the negative terminal from the battery;
- The engine protection on the right side and the mudguard are removed;
- You need to disconnect all the wires from the generator, while remembering their location (if you have an installation diagram, you don’t have to remember);
- Now you need to disconnect the generator from the engine housing (this will definitely be difficult);
- We get the generator. If it does not unscrew, fill the fastenings with a wedge and knock out the bolt with a hammer (you don’t need to hit it too hard, otherwise you can tear out the fastenings).
If the bolt does not want to come out, the generator will have to be removed along with its fasteners. To remove the fasteners, you need to unscrew two bolts. Sometimes you come across three-bolt fasteners.
Often, to remove the generator assembly with mountings, you have to remove the cooling radiator. Just don’t take it out and dismantle all the radiator pipes; just move it to the side to gain access to the brackets. Having removed all obstacles, you can easily get the generator with fastenings.
Sometimes the removal and installation of a generator follows a simpler scheme; this happens when replacing a relatively new generator with a more powerful one or when the car is still new. In this case, some specialists manage to pull it out through the right wheel arch. The removal procedure is no different from the above, only you will not need to remove the radiator. To remove the generator through the wheel arch, you need to turn the steering wheel all the way. Before removing the generator, be sure to remove the drive belt from the pulley.
How to remove a generator on a scooter, detailed tutorial with photos
Recently the charger in the car disappeared.
The same alternator rotor puller does not fit all scooters, therefore, check the brand of the puller. All this is indicated in online stores, so there shouldn’t be any problems. Now there are an abundance of similar pullers, and if you decide to get to the generator, don’t try to do it without it. In any case, damage the winding and you will need to change the generator, which costs even more than the tool.
And here, in fact, he is. This puller is designed for Honda scooters and Chinese scooters with a 139qmb engine:
On one side of the puller, an M24 thread is used with a pitch of 1 mm on subsequent scooters:
- Honda Tact;
- Honda Dio;
- Peugeot;
- Kymco;
- Chinese scooters with 139QMB engine;
- Other models with a similar rotor.
On the other hand, M27 threads are used with a pitch of 1 mm on Yamaha scooters, 4-stroke Chinese scooters with an engine capacity of 125-150 cc. and other models with a similar rotor.
Also, to fix the rotor, we will need a special clamp, which can also be used to fix the clutch bell. This is what it looks like, I think we’ve already seen it:
1) Of course, if the generator breaks down or its windings are damaged.
2) Behind the rotor there is a hall sensor, which we will talk about below. This sensor is responsible for proper ignition.
3) Naturally, if the generator rotor itself is damaged and requires repair or replacement.
4) It is leaking from the generator side and needs to be replaced.
5) Engine overhaul, during which it is necessary to halve the engine, remove the crankshaft or, for example, the crankshaft bearings.
All these elements require removing the generator rotor on the scooter or the generator itself.
In this lesson, we will use a Chinese four-stroke scooter as an example. Why Chinese? And since it is specifically about such scooters that there are the most questions and problems. The principle of this action on a Japanese scooter is similar. The only difference is in removing the motor casing, but the principle is the same.
I will outline the entire process, right down to the smallest details, and show you in the photo so that you don’t have any questions for me. As usual, on our website Scooter-remont.com, in this case, if you don’t understand something here and there, you can ask your question in the comments field below the article or on the forum.
So let's get down to business. We place the scooter on the central stand and unscrew the side motor casing, behind which there is an impeller.
Watch this video, the best method to remove
rotor
without
pullers, using improvised tools.
Annotation from the motorcycle workshop HONLINGZAKAZ on how to remove
(magnet)
generator
from a 139qmb motor. Like with .
Once you have unscrewed the bolts, the impeller is easily in your hands. I would like to note that these bolts have the same weight, so there is no need to lose them.
After removing the impeller, we see a nut on the shaft that needs to be unscrewed. I’m not demonstrating it as a table, so it’s clear. To unscrew the nut, you can use an impact wrench, if you naturally have one. But most likely, you don’t have a wrench, and here the clutch bell retainer, which I demonstrated at the beginning of the article, will come to our aid. We install the retainer horns into the holes from the impeller mounting bolts. We fix the shaft, and use an ordinary 14 socket (or 13, depending on which nut the manufacturer screwed on) to unscrew the nut.
This is ready, now we tighten our generator rotor puller. Usually, it has a reverse thread.
how to remove a generator on a scooter
You can also read other articles on the topic:
Checking the generator on a car with a multimeter
RadiopillCar charger for laptop
There is a methodically correct sequence of testing - from ordinary to complex.
Testing the relay regulator
This module is designed to maintain a constant voltage (as may be) at the output of the generator. When the car moves, the rotation speed of the generator shaft constantly changes.
The voltage “jumps” between 12 and 20 volts. The regulator limits the value. Not only battery charging depends on its performance. When there is a surge or lack of voltage, all electrical units of the car operate unstably and can simply burn out.
https://youtube.com/watch?v=rfXy9K8o7u0
https://youtube.com/watch?v=rfXy9K8o7u0
How to ring a generator
VAZ 2107
VAZ 2106
.
Checking the VAZ generator
2101-2107: 1. Checking the positive and negative valves of the rectifier unit….
How to check the generator voltage with the engine running. Mode: “DC voltage measurement”, measurement limit: 20-50 volts. Measuring points – output contacts directly on the generator, or battery terminals.
The voltage should be between 14-14.2 V, at any crankshaft speed. Ask your assistant to press the accelerator several times while you watch the readings.
Checking the generator directly on the car video.
Checking the diode bridge
If no malfunction is found, you will have to disassemble the generator housing.
It is located under the ventilation cover, on the back of the generator. The design is unique, but understandable even for a driver without electrical engineering education.
Mode: “dialing”. Diodes are checked without desoldering from the circuit. Calling in both directions. In this case, the multimeter should “beep” only in one direction. If the current does not pass at all, or flows in both directions, the diode is changed.
It's easier to check against the body. The second probe touches the insulated contact of the diode.
Checking the generator rotor
If the diode bridge is in order, the brushes on the voltage regulator are not sharpened, and no visual damage or dirt is found, check the generator rotor.
Mode: “resistance measurement”. We check the resistance between the slip rings of the field winding. The resistance is different for each generator model, the general principle is that the value should not be large.
Then we “call” for the absence of a short circuit between the windings and the rotor housing. We evaluate the condition of the turns.
A car generator is an energy and temperature loaded device. Rewinding of windings should be carried out by specialized specialists.
The last thing to check is the stator.
As the most difficult part of the unit to dismantle. It can only be diagnosed after removal from the generator housing.
First of all, a traditional visual inspection. We check the integrity of the wire insulation, the absence of breaks and signs of burning. Then, in the “continuity” mode, we look for a short circuit of the windings with the stator housing.
Resistance should tend to infinity. If no breakdowns are detected in the housing, we check the resistance of all windings. There are three of them in the generator - the system is asynchronous. The resistance value is individual for each unit model, but the resistance of all windings in one unit must be the same.
The last step of the test is the control lamp circuit on the dashboard. The alarm monitors the battery charge level, as well as the health of the generator and voltage regulator.
The circuit is not very complicated; it consists of a resistance of a certain value, a diode and a lamp.
The correct operation of this unit sometimes depends on the quality of soldering and oxide on the contacts. Even the resistance of the light bulb filament is taken into account when calibrating the control circuit.
Therefore, when replacing a lamp with an LED, the lamp often lights up at random. A simple multimeter is not enough here; you need to connect a diagnostic scanner with the ability to simulate faults.
Checking the generator without removing from the car video instructions
How to remove and replace the generator on a VAZ 2107 car
Replacing a VAZ 2107 generator yourself is a rather complicated procedure. Sometimes, when removing an old generator, serious problems arise due to the fact that the bolted connections and fastenings tightly “stick” to each other. Therefore, before starting work, you need to thoroughly prepare and stock up not only with tools, but also with the popular WD-40 liquid, which allows you to “free” rusted nuts.
How to remove a VAZ 2107 generator
The VAZ 2107 generator is located in a rather inconvenient place. To make it easier to access, it is better to carry out work on a lift or pit. Before starting work, it is necessary to de-energize the vehicle's electrical systems by disconnecting the battery terminals. Further actions are performed in the following sequence:
- Remove the engine protection and the right front fender liner.
- Disconnect the wires from the generator (you must remember how they were connected.
- Loosen the nut holding the generator and remove the belt from it.
- Unscrew the nut from the bolt securing the generator to the bracket. If it is rusty, use WD-40.
- Remove the mounting bolt. If it does not come out, it must be treated with WD-40 and carefully knocked out.
- Remove the generator.
Next, in order to ensure the removal of the VAZ 2107 generator along with the bracket, you will have to move the radiator. There is no need to drain the antifreeze, disconnect the pipes and remove the radiator from the car. It is enough to unscrew its fastenings and move it, providing free access to the bracket and generator.
When removing the generator, you can do without an inspection hole or lift by removing the generator through the wheel arch. This method is only suitable if the bolts and nuts are not rusty and it is possible to remove the generator without a mounting bracket.
How to install a VAZ 2107 radiator
Installing the generator is not particularly difficult, since there is no need to deal with rusted bolted connections. The procedure for installation is the reverse of removal. After installing the generator, you need to install the belt and tension it. If you tighten it too loosely, the belt will slip when the generator is loaded, producing a characteristic whistle. Excessive belt tension will cause premature wear of the alternator bearing. It is easy to check the correct belt tension: it must be turned by hand along the longitudinal axis by 90 degrees. If the angle is smaller, the belt will be tightened. If more, it is weakened.
After installing the generator, connecting the wires to it and tensioning the belt, you can connect the battery terminals.
Everything is ready for testing. You can start the engine. The functionality of the generator can be checked with a voltmeter by measuring the voltage on the battery. When the car engine is running, the on-board voltage should be 14 volts.
How to remove the generator
VAZ 2115 injector battery is not charging
Removal
Genadiya in Samara through the top without straining.
- In order to remove the generator, you will need to drive the car into a pit or lift it on a lift. For ease of operation, it is necessary to remove the crankcase protection. The next step is to remove the terminal from the car battery.
- Moving the rubber boot to the side, you can see the nut that attaches the positive terminal to the generator. It should be unscrewed and the wire block disconnected. This may require some force.
- Using a socket wrench or wrench, unscrew the adjusting bolt.
- Find the nut of the bolt located on top. It is thanks to him that the generator is held on the bar. Both the nut and bolt should be removed while simultaneously removing the tension bar that holds the bolt.
- Finally, you need to unscrew the nut of the bolt located below. Directly behind this nut there is a spacer sleeve that will also need to be removed.
- Next, using milk, you should knock out the bolt from the generator, but at the same time the latter must be held suspended.
Note. Once the bottom nut of the alternator bolt is loosened a little, you will need to remove the alternator belt. To do this, move the generator closer to the engine itself, and with the other hand remove the belt from the generator roller.
It should remain hanging until the generator is put in place or a new one is installed.
Installation of a new generator occurs in exactly the same way, only in reverse order. After installing the generator in place and installing the belt roller, the voltage should be adjusted to the required level.
Important! It is best to replace the generator with a similar one. It often happens that, having purchased a slightly different generator, it is simply impossible to install it on a VAZ-2115
This is directly influenced by several reasons. For example, the mounting may be arranged differently, or the dimensions of the generator may not correspond to those prescribed by the factory. In any case, before purchasing a new generator, it is best to consult a specialist.
There is a special offer on our website. You can get a free consultation with our corporate lawyer by simply submitting your question in the form below.
How to replace an alternator in Volkswagen cars
Although the battery provides the necessary power to start the engine, it is the alternator that starts running the vehicle. Due to the unusual design of the Volkswagen car engine, replacing an alternator requires steps not typically associated with most engines. However, replacing an alternator is still relatively simple and usually takes about an hour.
Under the hood:
- How to replace an alternator in a VW Jetta
- How to Replace the Alternator in a VW Beetle
- How to replace the alternator in a VW Passat
- How to Change the Alternator in a 1974 VW Beetle
How to replace an alternator in a VW Jetta
Determine what kind of alternator your VW Jetta needs. Make sure your new alternator is compatible with your Jetta's engine. Models produced from 1980 to 1984 have 1.6 L or 1.7 L engines. Models produced from 1985 to 1990 had a 1.8 L engine, while models produced from 1991 to 1998 can be equipped with a 1.6 L, 1.8 L, 2.0 L or 2.8 engine. l.
Check out the latest VW Jetta models. Models produced from 1999 to 2004 have 1.4 L, 1.6 L, 1.8 L, 2.0 L or 2.8 L engines. The current version debuted in 2005 and can be had with any of the following engines: 1.4 L TSI, 1.6 L FSI, 2.0 L FSI, 2.0 L TFSI or 2.5 L.
Disconnect the negative battery cable using a socket wrench. If necessary, label the wires and disconnect the electrical wiring from the generator.
Reduce the belt tension so that the drive belt can be removed from the generator. If you have a 2.5L engine, you will remove the mounting bolts using a socket wrench. Otherwise, use a socket wrench to remove the adjusting bolt and then the alternator pivot bolts. This allows you to carefully remove the generator from its bracket.
Install the new generator assembly onto the bracket. Install the upper mounting bolt on the 2.5L engine using a socket wrench. Otherwise, tighten the pivot bolt and loosen the adjusting bolt. Place the drive belt on its pulley and adjust the tension. Tighten the bolts.
Connect the wiring as indicated on the label and attach the negative battery cable using a socket wrench.
Items you will need
- New generator
- Socket wrench set
How to Replace the Alternator in a VW Beetle
Determine what kind of alternator your VW Beetle will need. You want to be sure that the new alternator is compatible with your bug's engine. The latest generation of the VW Beetle debuted in 1998 and is available with a variety of petrol engines that come in sizes 1.4 L, 1.6 L, 1.8 L (regular and turbocharged), 2.0 L, 2.5 L and 3 ,2 l. A 1.9 liter diesel engine is also offered.
Disconnect the negative battery cable using a socket wrench. Remove the electrical wiring from the generator. This may be useful for marking wires as you do.
Release the belt tension and remove the drive belt from the generator pulley. Remove the mounting bolts using a socket wrench if you have a 2.5L engine. If not, remove the adjusting bolt and then the alternator pivot bolts. This will allow you to carefully remove the generator from its bracket.
Install the new generator assembly onto the bracket. Loosen the top mounting bolt loosely if you have a 2.5L engine. Otherwise, secure the pivot bolt with a socket wrench and loosen the adjusting bolt. Place the drive belt on its pulley and adjust the tension. Tighten all bolts as necessary.
Connect the electrical wiring to the alternator and attach the negative battery cable using a socket wrench.
Items you will need
- New generator
- Socket wrench set
How to replace the alternator in a VW Passat
Determine which generator your VW Passat needs. Make sure your new alternator is compatible with your Passat's engine. Models produced before 1982 are equipped with a 1.3 L, 1.4 L, 1.6 L or 1.5 L diesel engine.
Look at later VW Passat models. Models produced from 1982 to 1987 may have 1.3 L, 1.5 L, 1.6 L, 1.8 L, 1.9 L, 2.0 L and 2.2 L petrol engines in addition for diesel engines 1.5 l, 1.6 l and 1.8 l. Engine options for the 1988–1993 model years include 1.6 L, 1.8 L, 1.9 L, 2.0 L and 2.8 L sizes.
Explore engines for the latest VW Passat models. Models manufactured from 1994 to 1997 have 1.6L, 1.8L, 2.0L, 2.8L and 2.9L petrol engines and a 1.9L diesel engine. Models built from 1996 to 2000 also offer a 2.3L petrol engine and a 2.5L diesel engine. The 2.9 L engine was replaced with a 4.0 L engine for the 2001–2004 models.
Look at VW Passat engines produced after 2005. These models are available with 1.4L, 1.6L, 1.8L, 2.0L, 3.2L and 3.6L engines. This model is also available with 1.9L and 2.0L diesel engines.
Disconnect the negative battery cable using a socket wrench. If necessary, label the wires and disconnect the electrical wiring from the generator.
Release the belt tension so that the drive belt can be removed from the generator. Remove the mounting bolts using a socket wrench if you have a 2.5L engine. Otherwise, use a socket wrench to remove the adjusting bolt and then the alternator pivot bolts. This allows you to carefully remove the generator from its bracket.
Install the new generator assembly onto the bracket. Install the upper mounting bolt on the 2.5L engine using a socket wrench. Otherwise, tighten the pivot bolt and loosen the adjusting bolt. Place the drive belt on its pulley and adjust the tension. Tighten all bolts as necessary.
Connect the wiring as indicated on the label and attach the negative battery cable using a socket wrench.
Items you will need
- New generator
- Socket wrench set
How to Change the Alternator in a 1974 VW Beetle
Removing the generator
Disconnect battery cables to avoid accidental electric shock.
Remove the air filter housing mounting bolt using a wrench, then remove the assembly from the carburetor.
Remove the carburetor mounting bolts using a wrench, then remove the carburetor from the engine.
Make a note of the location of each of the wires that connect to the alternator, then disconnect each wire from the alternator.
Remove the large nut on the face of the alternator pulley using a socket wrench to expose the shims.
Remove each metal shim from the surface of the alternator pulley, then pull the pulley away from the alternator to release the alternator belt.
Remove the bolts that secure the bottom of the fan shroud housing to the top of the engine using a wrench.
Remove the bolt holding the metal alternator mounting belt to the alternator using a wrench, then remove the belt from the alternator. The bolt is located on the passenger side of the belt.
Remove the four bolts that surround the metal plate attached to the back of the generator. Note that the two bolts on the bottom of the plate can only be accessed by lifting up onto the fan shroud housing.
Move the generator away from the engine until the fan blades at the rear of the generator clear the fan shroud.
Alternator Installation
Push the fan blades at the rear of the generator into the front of the fan housing assembly until the generator rests on the top of the stand.
Install and tighten the four bolts that surround the metal plate attached to the back of the generator using a wrench.
Position the metal alternator mounting belt around the alternator, then tighten the belt mounting bolt with a wrench.
Install and tighten the bolts that secure the bottom of the fan shroud housing to the top of the engine using a wrench.
Insert the alternator belt into the slot inside the alternator pulley, then place the pulley on the front of the alternator.
Place the metal shims on the surface of the pulley, then tighten the single pulley mounting nut using a socket wrench.
Insert each of the alternator wires into their respective positions on the alternator.
Install the carburetor to the engine, then install and tighten each of the carburetor mounting bolts with a wrench.
Install the air filter housing onto the top of the carburetor, then install and tighten the housing mounting bolt with a wrench.
Connect the battery cables to the battery.
Items you will need
- Wrench
- Socket wrench
Related articles:
- How to Replace the Alternator in a Nissan Sentra
- How to Replace the Alternator in a Nissan Maxima
- How to Replace an Alternator on a Mercury Resident
- How to Replace the Alternator in a Ford Explorer
- How to Replace the Alternator in a Chrysler Sebring
- How to replace the alternator in a Toyota Camry
Common breakdowns
Generator faults can be electrical or mechanical. These include:
- loss of functionality of the voltage regulator;
- rectifier block failure ();
- short circuit of stator windings;
- current short circuit in the rotor winding;
- wear of bearings and brushes.
Voltage regulator
The purpose of this unit is to normalize the voltage before feeding it into the automotive electrical circuit. You can check the serviceability of the regulator by checking the voltage that it supplies to the battery terminals. This indicator depends on the model and brand of the vehicle and varies between 13.5-15.5 V. Therefore, you should find out in advance what voltage your particular type of regulator produces. This can be done by studying the manual for using the machine. For example, you can take a VAZ 2107 or 2110 car, since these vehicles have the most typical faults associated with the integral and relays.
Using a Multimeter
To check the VAZ 2110 generator with a multimeter, you need to switch the device to voltmeter mode. Then you need to connect its probes to the battery terminals. The most important thing is to observe the polarity and turn off the car engine. The voltage normally varies from 12 to 12.8 V. Next, the procedure should be repeated, but with the engine running. The voltage readings should rise to 13.5-15.5 V. Lower and higher voltage values indicate a malfunction of the generator.
Checking the generator without removing it from the car
A bridge of diodes performs the functions of a kind of alternating current converter. It contains three negative and three positive diodes.
Before checking the bridge, you need to disconnect all the wires coming from it and from the voltage regulator. You also need to remove the ground anchor from the battery in advance. First you need to check the rectifier for short circuits. We activate the ohmmeter mode on the multimeter and connect the red (positive) probe to the positive contact of the diode bridge, and the negative probe to the surface of the housing of the generator itself. If the rectifier is fully operational, then the readings of the measuring device will go to infinity. In other cases, the rectifier will be inoperative.
Testing of stator and rotor windings
A common breakdown of a car generator is a short circuit in the windings. It occurs when current surges are too intense, brushes wear out and liquid gets in.
So, you need to remove the rotor and find a pair of slip rings on its structure that will need to be ringed. Having started the ohmmeter mode on the multimeter, we connect the probes to these rings. Normal resistance is 2-6 ohms. If you get large values, then there is a loss of contact between the slip rings. If the device shows lower values, then an interturn short circuit has occurred.
Then it follows between zero and the terminals of the windings. The normal value is no less than 0.3 Ohm.
Wear of brushes and bearings
If you have already disassembled the generator, then it is advisable to check the condition of the brushes. They can wear out or break due to misalignment of the rotor shaft. If the brushes are damaged, they should be replaced with new ones.
Inside a car alternator there is a pair of bearings. One is fixed on the rotor shaft, the other is in the center of the cover. The whistling and hum of the generator when the engine is running is a clear sign of bearing wear. In this case, the generator housing can become very hot. If you notice such signs, it is better to replace the bearings immediately, otherwise you may encounter more serious problems.
You can check the bearing by removing the belt from the generator and trying to rotate its shaft with your own hand. If the part rotates freely and easily, then everything is in order. If it is difficult to rotate the rotor, then you should not delay replacing the bearings.
Generator check
Rotor check
1. Check if there is a break in the field winding. Using an ohmmeter, measure the resistance between the slip rings. Nominal resistance (cold)……….2.7-3.1 Ohm
If the resistance tends to infinity, i.e. circuit is open, replace the rotor
2, Check whether the field winding is shorted to ground. Using an ohmmeter, measure the resistance between the rotor pole and the slip ring. If the resistance is 0 (the circuit is closed), then replace the rotor.
3, Check the slip rings.
a) Check the working surfaces of the slip rings. There should be no burrs or chips on them. b) Using a caliper, measure the diameter of the slip rings. Nominal diameter……………………………….14.2 - 14.4 mm Minimum permissible………….12.8 mm
If the diameter of the slip rings is less than the minimum permissible, replace the rotor
Stator check
1. Check if there is a break in the starter winding. Using an ohmmeter, measure the resistance between the terminals of the stator winding coils.
If the resistance tends to infinity, i.e. the circuit is open, replace the stator
2. Check if the stator winding is shorted to ground. Using an ohmmeter, measure the resistance between the stator housing and the terminals of the stator winding coils
If the resistance is “O”, i.e. circuit is closed, replace the stator.
Checking the brushes
Measure the length of the protruding part of the brushes Nominal length………………………..10.5 mm Minimum permissible…………1.5 mm
Checking the rectifier block
1. Testing the positive valve a) Connect the negative probe of the ohmmeter to the positive terminal of the rectifier unit, and connect the positive probe in series to each of the three steel terminals. Check for continuity (closed circuit) in all three dimensions.
b) Change the polarity of the tester probes and repeat the procedure in point c). Make sure that the circuit is open in all three dimensions (resistance goes to infinity). If the conditions are not met, replace the rectifier unit
2. Checking the negative valve a) Connect the positive ohmmeter probe to the negative terminal of the rectifier unit, and connect the negative probe in series to each of the other three terminals. Verify that there is continuity (closed circuit) in all three dimensions.
b) Change the polarity of the tester probes and repeat the procedure in step a) Make sure that the circuit is open in all three dimensions (the resistance tends to infinity). If the conditions are not met, replace the rectifier unit.
Bearing check
1. Checking the front bearing Check that the front bearing moves smoothly and without jamming.
2. If necessary, replace the bearing a) Remove the 4 screws and remove the bearing holder.
b) Using a press and a socket of a suitable size, press out the front bearing.
c) Using a special punch and press, press the new front bearing into the generator cover on the drive side.
d) Install the bearing holder and tighten the 4 screws securing it. Tightening torque…………………………………2, b N m
3. Check the rear bearing. Check that the rear bearing moves smoothly and without jamming
4. Replace the rear bearing if necessary. a) Using a puller, remove the rear bearing and bearing cover.
b) Using a press, install the new rear bearing onto the rotor shaft. c) Install the bearing cap
Do-it-yourself generator repair for a VAZ 2107
I want to say right away that I will not describe in detail all the repair procedures for this device, but I will give the main ones that VAZ 2107 owners quite often have to perform. I’ll start with the necessary tools that will be needed to repair and disassemble the generator on the “classic”:
- Wrench size 19 - the ring one is more convenient
- Socket heads for 8 and 10
- Extension
- Hammer
Now below I will describe in more detail the disassembly procedure, and I will also analyze the dismantling of each part separately.
Replacing brushes on the generator
In fact, this type of repair is so simple that I will not dwell on it in this article. But if anyone needs detailed information, you can find the details here.
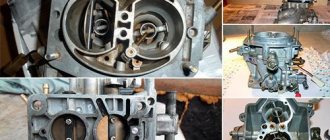
Complete disassembly into parts
First, unscrew the 4 nuts that are located on the back cover of the device, and in the bottom photo they are very clearly visible:
Then we try to unscrew the pulley mounting nut with a 19mm wrench. Usually, it is very tightly tightened and it is quite problematic to do this with the generator removed, unless you clamp it in a vice. But there is a way out of the situation - you can press on the bolts from the reverse side, where we unscrewed the nuts, so that they rest against the impeller blades, thereby fixing it in a stationary state. Next, you can try to unscrew this nut, holding the generator stationary.
Now we take a hammer and, with light tapping, try to separate the generator into two parts, as is clearly demonstrated in the photo below:
As a result, it should look something like this:
As you can see for yourself, there will be a rotor on one part, and a stator (winding) on the other.
Removing and Replacing the Rotor
It is very easy to remove; first we remove the pulley, removing it from the shaft:
Then remove the key:
And now you can easily remove the rotor of the VAZ 2107 generator, since it is easily released from the housing:
Now you can move on.
Removing the winding (stator)
To do this, you need to unscrew the three nuts from the inside with a head, as shown in the picture:
And after this, the stator can be removed without any problems, since it is disconnected from the diode bridge:
If it needs to be replaced and you need to remove it completely, then of course you will need to disconnect the plug with the wiring, which is visible in the top photo.
About replacing the diode bridge (rectifier unit)
Since after removing the winding, the diode bridge is practically free, there is almost nothing to say about replacing it. The only thing you need to do is push the bolts from the inside so that they pop out from the outside:
And the diode bridge has been completely removed and you can replace it:
After carrying out the required repairs to your generator, we reassemble it in the reverse order and do not forget to connect all the winding wires correctly.
Sequence of replacing the generator on a VAZ-2114
To replace, follow these steps:
- Place the machine on a pit or lift it with a lift.
- Remove the engine protection.
- Next you need to loosen the tension roller for the drive belt.
- Unscrew the top bolt that secures the generator.
- Remove the bottom bolt.
- Disconnect the air conditioning compressor retaining fasteners.
- The drive belt is removed and the generator can be removed from its seats by moving the device closer to the battery.
- Next, unscrew the top bolt that secures the air conditioning compressor.
- Now you can completely remove the compressor and hang it on its own tubes. The pipes are quite strong, so they can easily support the weight of the block.
- In this step, unscrew the generator holder bolts.
- Disconnect the terminals and the generator, disconnect the holders that can be pulled down.
- Installation of the new part occurs in the reverse order, followed by adjusting the belt.
Checking the generator voltage regulator
To check the voltage regulator, turn off all consumers except the high beam and remeasure the voltage. The voltage should be in the range of 13.2-14.7 V. The battery charge lamp on the instrument panel is lit, this is a sign of a possible generator malfunction.
The battery charging lamp on the instrument panel is lit, this is a sign of a possible generator malfunction.
1. Disconnect the “-” wire from the battery.
2. Disconnect the generator excitation wire.
3. Using a ten key, unscrew the nut securing the wires to output “B+”...
...and remove them.
4. Remove the generator belt, unscrew the generator adjusting bolt and the fixing nut.
5. Remove the tension bar.
6. Using a 13mm wrench, unscrew the nut of the lower mounting of the generator.
7. Remove the bolt.
8. Remove the generator.
To begin with, clean the generator from dirt to make working with it more pleasant. I don’t like working like some craftsmen up to their ears in oil or fuel oil. Once I watched an engine being repaired on a Niva, a valve fell off the hood to the ground, and the master installed it into the engine without even wiping it. The question is how long the engine will work after such a “repair”. After cleaning, start disassembling.
9. Press out the three latches, pry the casing with a screwdriver...
10...and remove it.
11. Use a Phillips screwdriver to unscrew the two screws...
12...and remove the voltage regulator
13. Disconnect the wire, then remove the voltage regulator
14. Using a “10” wrench, unscrew the “B+” output nut.
15. Remove the spring washer and bushing, remove the capacitor wire lug.
16. Use a Phillips screwdriver to unscrew the screw...
17...remove the capacitor.
18. It is recommended to mark the location of the generator parts before disconnecting. 19. Through the hole in the high “21” head (held by a pipe wrench), insert a “8” hexagon and unscrew the pulley mounting nut.
20. Remove the pulley...
21... puck.
22. Using a Phillips screwdriver, remove the four screws that connect the covers. The bolts come out and during use they often oxidize or rust. It can be very difficult to unscrew them. Before unscrewing, it is advisable to treat them with WD-40.
When the bolts give way, use a felt-tip pen to mark both parts and the generator stator itself. The problem is that there are no marks on the housings and stator to control the assembly. If you do not put marks, then during assembly it is difficult to find the correct position of the parts.
23. Remove the front cover.
24. Using a Phillips screwdriver, unscrew the three screws securing the stator windings...After that, carefully bend the wires upward from the winding. Be careful not to break off the wires.
25... screw for securing the rectifier unit.
26. Remove the rectifier block, it is also called a “horseshoe” (the contact bolt will fall out)
27...and the stator.
28. Press down on the bushing...
29...push it and the rotor out of the rear cover.
30. Using a screwdriver...
31...remove the bushing from the rear bearing.
32. Use a two-jaw puller to press the bearing off the rotor shaft.
If you don’t have a puller, then place 8 nuts on both sides of the bearing and using two screwdrivers as levers, remove the bearing (this is clearly shown in the video)
Assemble the generator in reverse order (the video at the beginning of the article shows disassembly and reassembly).
How to check a generator with a multimeter and tester
The generator is one of the most important devices in a car. Without it, the normal functioning of all blocks, components and devices that require electrical energy becomes impossible. After starting the engine, the autogenerator is turned on to power the on-board network, as well as to charge the battery
It is important to monitor and periodically check the tension of the alternator belt. Not only the service life of the belt itself depends on this, but also the normal charging of the battery
If adjusted incorrectly, the belt may slip, resulting in insufficient tension. In such a situation, the battery will not receive the necessary charge and may discharge over time (how to properly charge the battery).
If any problems arise with the power supply, the first question that faces the driver is how to check the operation of the generator. Of course, the ideal option is to carry out diagnostics at a service station. However, for example, if after a long stay in the garage the car does not start, you should not immediately look for a towing cable. Below we will describe in detail how to test a generator with a regular tester (or, in other words, a multimeter).
To check, we need a multimeter and, preferably, an assistant (a neighbor, a friend, or even, in extreme cases, a wife). It is worth mentioning that the tester, multimeter and avometer are actually the same device; the differences lie only in additional functions.
Sequencing
- First you need to check the generator relay. Overvoltage in the vehicle's on-board network can damage various devices. To maintain the correct potential difference, a relay regulator is used. We will describe in detail how to check the generator voltage regulator. Switch the multimeter to voltage measurement mode. We start the car. We measure the voltage at the battery terminals or generator outputs. The correct value should be in the range of 14-14.2 V. Press the accelerator (here you will need the help of an assistant). The voltage value should not change by more than 0.5V. If the values of the measured parameters differ from those given, this indicates improper operation of the relay regulator.
- We check the diode bridge, consisting of six diodes. Of these, three can be called “positive”, and three can be called “negative”. Half of the diodes have mass at the anode, and the rest at the cathode. To check, switch the multimeter to “sound” mode. If you close the contacts of the probes, a squeak will be heard. We check each diode in both directions. The squeak should only be heard in one. If the diode rings in both directions, it means it is broken and needs to be replaced. In this case, it is advisable to replace the entire bridge at once.
- Checking the generator stator. This block is made in the form of a hollow metal cylinder. The generator winding is laid inside. To check, you must first disconnect the stator leads from the diode bridge. We inspect the condition of the winding. There should be no burning or mechanical damage. We switch the tester to resistance measurement mode. We check the winding for breakdown. For this purpose, we measure the resistance between the stator housing and any of the winding terminals. The value should be as large as possible, ideally tending to infinity. If the tester shows less than 50 KOhm, it means that the autogenerator will soon fail.
- Checking the generator rotor. This unit is made in the form of a metal rod on which the winding is wound. There are rings at one end of the rod. The generator brushes slide along them. We remove the rotor and inspect the condition of the windings and bearings. We check the integrity of the winding with a multimeter. We measure the resistance between the slip rings. Its value should be on the order of several ohms. In case of a short circuit (resistance near zero) or an open circuit, the rotor must be replaced.
This instruction will help you successfully identify a fault generator in the field. The above algorithm can be successfully applied both on most modern cars and on domestic VAZ 2106, 2107, 2114, etc. The main condition is that the on-board voltage is 12V.
We also recommend reading the article on how to check the serviceability of the generator using a test lamp.
How to remove the generator
Many car owners think about how to remove the generator with their own hands without going to a car service center. Of course, repair work related to a car’s electric generator is a rather specific and painstaking process, so it must be considered in relation to a specific make of car, and today we will do this using the example of a VAZ 2114 (see video “How to remove a generator on a VAZ 2113, 2114, 2115" below).
Generator removal process
First of all, it must be said that to dismantle the electric generator from the VAZ 2114, you will need a lift or inspection hole.
To remove the generator, you need to follow these steps sequentially:
- We remove the protective structures from the engine.
- Loosen the tension roller for the drive belt.
- We unscrew the bolts securing the generator one by one: first the one located on top, then the one located below.
- We remove the fastening that secures the air conditioning compressor.
- We remove the drive belt, and then pull out the generator from its seat, moving it to the right, directly to the battery.
- We unscrew the bolt holding the air conditioning compressor located on top.
- We dismantle the compressor (you can pull it out and hang it by the tubes, which have the necessary strength margin to hold it).
- We unscrew the bolts securing the electric generator holder.
- We disconnect all the terminals, after which the electric generator, together with the holder, is dismantled by pulling it down.
Having considered the question of how to remove the generator, we will not dwell in detail on how to mount it back, since, when installing a new electric generator, all the steps described above are repeated in reverse order, paying special attention to adjusting the drive belt
Installation of a new generator
The new generator should be installed in accordance with the installation diagram. First, the generator is installed in its place, then the mounting bolts are tightened. Then the generator belt is put on, which will need to be adjusted later, and all the chips and wires are connected. There is no need to put on the protection yet; you will still need to adjust the belt. When carrying out the adjustment procedure, you must tension the belt strictly according to the installation instructions.
This is interesting: Purpose of the IAC regulator
When installing, you need to pay attention to the condition of the rollers, tension bar and bottom bolt. It is better to replace them immediately if they have play (rollers) and damaged threads (bolts). It should be remembered that the rollers must be installed without distortions.