After successfully installing a 2nd generation LPG on a car, and passing a test to ensure the functionality of its components and the absence of leaks of the propane-butane mixture (detected by “soaking” the connections or using a gas analyzer), the time comes for the need to adjust the equipment for further successful operation. The HBO adjustment is carried out sequentially in several steps, let's take a closer look.
Stages
Adjusting the 2nd generation HBO consists of several simple steps:
- Adjusting the sensitivity of the gearbox.
- Adjusting the propane-butane mixture dispenser.
- Adjusting the idle speed when operating on a propane-butane mixture.
- Delay in the operation of the automatic shutdown when switching the operation of the car engine from gasoline to a gas mixture for carburetor cars. Or the number of revolutions at which the engine will switch from running on gasoline to running on a propane-butane mixture, provided that the fuel type switch button is set to the “automatic” position.
Before starting the adjustment, check:
- There is a sufficient level of coolant in the vehicle's expansion tank. If necessary, liquid must be added.
- Check and, if necessary, adjust the operation of a car engine on gasoline.
- Since the engine, when running on a propane-butane mixture, is very sensitive to air filter contamination, the air filter is replaced with a new one or blown out.
- No gas leaks. It is checked mainly by applying soap foam - by washing all gas compounds. If leaks are detected (in such places soap bubbles form from the foam), the connection is disassembled and the leak is eliminated. Then the reassembled connection must be checked again.
- Reliability of fastening of all clamps and nuts.
- Reliability and correct connection and absence of short circuits of all electrical appliances of HBO2 (electric valves, buttons).
- Check the presence of gasoline in the gas tank.
- Fill the cylinder with a propane-butane mixture.
Adjustment
After completing the checks, we begin adjusting the system.
- By switching the toggle switch on the button for selecting the type of fuel on which the car operates to the “Gasoline” position, we start the car engine in normal mode and warm it up with gasoline to operating temperature (80-90°C).
- While the engine warms up to operating temperature, unscrew the screw/screws on the dispenser to completely open the channel for the gas mixture to enter the mixer.
- We tighten the screw for supplying the mixture to chamber 2 until it stops.
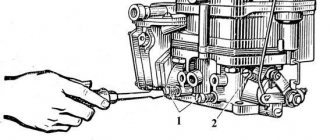
- 1st – idle speed screw; it regulates the amount of propane-butane mixture that will be supplied to the engine when the gearbox diaphragm is closed.
- 2nd sensitivity screw, which regulates the opening moment of the membrane and the gas pressure when pressing the throttle.
- Before starting adjustments, turn screw 1 all the way, then unscrew it 1 turn, screw 2 turn it all the way and unscrew it 3 turns.
- When the engine reaches operating temperature (80-90°C), we move the fuel type switch to the neutral position (for engines equipped with a carburetor) to produce gasoline from the float chamber.
- After the remaining gasoline has been completely exhausted from the float chamber (the engine is trying to stall), we move the toggle switch for the fuel mode selection button to the “GAS” position.
- Using screw 1, we try to set the idle speed to about 750-850 rpm. Preventing the engine from stalling using the throttle.
- After setting a stable idle speed, we begin to carefully tighten screw 2 and look for the moment when the car begins to change its operation, trying to stall.
- Next, by opening the throttle, we bring the engine speed to 3000 -3500, maintain them, and begin to tighten the feed screw on the mixer (with 2 chambers, tighten the feed screw “I” of the 1st chamber) until we hear that the engine becomes “sluggish” - this is a transitional moment .
- After detecting this behavior of the engine, unscrew the feed screw on the mixer by 0.5 - 0.75 turns and leave it like that.
- Again, use screw 1 on the gearbox to set the stable idle speed to about 750-850 rpm. Unscrew the mixture supply screw on the mixer “II” into chamber 2 by 1 turn. We check the settings of the gearbox and dispenser of the car while driving, and if necessary, adjust the settings.
If it is necessary to increase or decrease the speed at which the injection engine itself switches to operating on a propane-butane mixture, you must:
- by turning the adjusting resistance on the switch button, achieve the required value of the desired parameter.
For a carburetor car, the delay time for automatically turning off the gas when starting the engine on a gas mixture is adjusted in the same way by turning the adjusting resistance on the switch button clockwise (decreases), counterclockwise - increases.
Self-adjustment
The first stage of setting up the operation of gas equipment involves adjusting the pressure values that the reducer produces.
To adjust the Tomasetto achille at 07 with your own hands, the instructions suggest using adjusting screws.
Stages of adjusting the gas reducer on a car with a carburetor engine:
- Start the car on gasoline fuel, then switch to gas.
- The sensitivity adjustment screw must be turned all the way clockwise.
- Adjust the idle speed using the appropriate screw.
- Open the gas flow to the maximum using the control valves, accelerate the engine to 3 thousand revolutions per minute.
- Adjust the sensitivity screw until the speed decreases.
- Unscrew again until the rotation speed reaches 3 thousand revolutions per minute.
- Reduce idle speed and make adjustments using the adjusting screw XX.
Carry out a test drive: if there are deviations when braking the vehicle or making sharp turns on the road, adjust the mixture formation using the adjusting screws:
- cover the XX screw until the engine speed is within 100-150;
- set the optimal XX speed values using the sensitivity screw.
Gearbox components. Peculiarities
If we consider the 2nd generation Tomasetto gas equipment, it should be noted that it is famous not only for its simplicity of design, but also for such serious advantages as the ability to independently configure, safety and reliability. In general, Tomasetto Arctic was specially designed for all those car owners who value efficiency.
All those who wished to install such equipment were personally convinced that it was truly worth it. After all, the equipment can operate not only on methane, but also on propane, while showing good results.
Moreover, such products are equipped with a durable metal body, as well as a modern built-in valve. It should be added that this option is ideal for those vehicles on which specialized pipelines with high gas throughput are installed.
If you want to know how to adjust the 2nd generation Tomasetto gas reducer, you should definitely seek help from experienced specialists. After all, only in this case will this operation be performed thoroughly.
By contacting specialists for advice, you can find out how to set up the 2nd generation Tomasetto gas reducer.
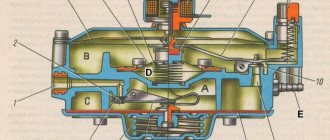
The mystery of 2nd generation gearboxes
Well, it's time for you to let in a little secret!!! This is what our colleagues don’t tell you or simply don’t know about the secret of second-generation gearboxes. An example of what the gearbox looks like can be seen in the photo. This is practically the most common gearbox that is installed on cars with second-generation gas equipment installed. Tomasetto Model AT
So someone suggested or told you (this is not so important) that you should replace or repair your gearbox. Let me remind you that we are talking only about 2nd generation gearboxes!!!!! Not to be confused with gearboxes for the HBO generation 4!!! There's a different story!!!
Naturally, you will most likely decide to repair your gearbox because it is cheaper than buying and installing a new one. This decision is quite natural for any person with average income. But as a rule, unfortunately, you are not given all the information about what happens after the gearbox is repaired. As I already reminded you, this depends on the decency and competence of both the master and the seller.
The point is this!!! For example, there is a gearbox and a new repair kit for it. It would seem that what else is needed, we dismantled the old membranes, threw them out, and installed new ones. Repair kits look approximately like this, look at the photo:
In the photo we see two membranes that they give us and a lot of rubber bands. But the most important thing, as always, is missing!!!! In any gearbox, when we disassemble it, there is a main spring; let’s call it “power spring”. she looks like this, look at the photo:
The role of this spring in the gearbox is almost the most important. It is made of the simplest metal, not hardened. It is responsible for the throughput in the outlet channel, giving, for example, the pressure necessary for the car to operate. Over time, this same spring makes itself known to us when we begin to think about gas consumption in our favorite car. All or many who have installed HBO 2 sooner or later start the car on a “cold engine”!!!!!! Well, in the summer it’s not so bad, but at other times of the year it’s very bad. I will try to explain what happens when starting a car on gas when the engine is NOT warmed up!!! In the cylinder, the gas is in the liquid phase, entering the reducer, which is already heated, the liquid phase turns into a vapor phase and is supplied warm to the engine itself. During this time the gearbox has already warmed up the spring!!!! ours is also warmed up and has taken on a natural shape for running on gas, the new membranes are also ready to work under load. The gas enters the reducer through the filter in the liquid phase and the process of converting the liquid phase into vapor begins.
Here's the opposite situation.
The liquid phase of the gas entered the cold, NOT heated reducer. A spring, like that bottle of champagne that was forgotten in the freezer, begins to change its characteristics that were laid down when it was manufactured at the factory; it contracts!!!! and bends in different directions. New membranes also suffer from this, since the rubber, interacting with the liquid phase of the gas, begins to “stiffen” - it becomes inelastic and rigid. Micro cracks appear and so on. At first, this effect does not greatly affect the operation of a newly purchased or made gearbox. But later everything will fall into place. The car works, sneezes a little)))) And here the most interesting thing is that the antifreeze that is supplied to our gearbox begins to warm up the gearbox operating at maximum load. And our internal parts begin to return to a seemingly normal state. But it was not there!!!! The unfortunate spring is so loaded with temperature differences that it once again begins to change its technical characteristics laid down by the manufacturer. And it simply loses its properties. This also applies to membranes.
Having described to you what and how, it becomes interesting to me whether it is worth repairing the gearbox now after reading it or buying a new one and not fooling yourself and us. Gearbox repair costs an average of 350. A new gearbox with work costs 750. Almost half the cost of the gearbox itself)))))
And so is the moral!!!!! It is cheaper to warm up the car a little on gasoline and extend the operating time of the gearbox. Or make repairs with new membranes but with an old, worn and terribly damaged spring and continue to be surprised that the consumption is terrible.
I hope you found it interesting and useful to learn something that I’m sure you didn’t know. By clicking the play button on the player below, you will hear my commentary in the audio recording. I would like to remind you that this is purely my personal opinion on this problem.
The secret to repairing a 2nd generation gearbox
Or watch a video on how to set up a 2nd generation gearbox
Unit technical characteristics
It is important to add that such a unit is ideal for automotive systems not only of the second, but also of the first generation. This is explained by the fact that the gearbox is distinguished by the presence of a dual control system, which will increase the productivity of the unit as a whole.
Moreover, some devices of this brand may contain not one, but several stages of gas pressure reduction. In addition, there are models containing so-called auxiliary valves, designed to relieve the gas flow at the moment when the pressure in the device begins to increase.
In addition to all that has been said, there are also products on sale that are capable of functioning in those cars that are equipped with a powerful engine.
Gearbox setup and maintenance. What do you need to know?
It is important to understand that the 2nd generation Tomasetto gas reducer is truly distinguished by its reliability, high quality and other equally serious characteristics and significant advantages.
But the adjustment of the 2nd generation Tomasetto gas system should always be carried out exclusively by professionals. Of course, this often does not happen in practice, as a result of which car owners are faced with unnecessary delays.
It is necessary to take into account that before you start the car after purchasing and installing the Tomasetto gearbox, you will need to adjust it. Such devices differ in that they offer two types of settings.
First of all, you need to adjust the pressure value of the second idle level; You can always adjust the gas flow; as you know, it passes through a channel intended for idling.
Attention: Before starting the setup, the specialist will definitely start the vehicle, thoroughly warming it up. Next, you need to set the rpm to 950-1000, stopping the production and supply of fuel.
If such manipulations are not performed, then repair of the Tomasetto gearbox will definitely be required, which is why such details must be taken into account.
Before the gearbox is installed, the specialist will start the car and then adjust the speed. Next, the pumping element is removed, thereby achieving the required number of revolutions. After this manipulation, you will need to eliminate the “suction”, thereby adjusting the car to idle.
Attention: In order to be able to adjust the Tomasetto injector, it is imperative to turn its screw in advance, and then do not forget to return it back. Then you can press the gas pedal, working it.
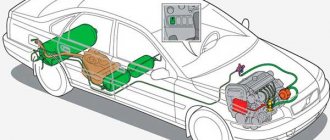
What does the equipment consist of and how does it work?
2nd generation LPG (propane or methane) is used in cars with injection and carburetor engines. Such equipment is best suited for cars up to the 3rd environmental class (Euro 0,1,2). Starting from Euro 3, it is more rational to install the 4th generation of gas equipment.
Device on the carburetor
The second generation kit includes:
- filling valve;
- gas cylinder with multi-valve and level sensor;
- filling, consumable lines;
- reducer with a coarse filter (sometimes a remote filter with a solenoid gas supply valve);
- fuel type selection button;
- gas mixture dispenser (power register);
- device for mixing gas with air (mixer);
- an electromagnetic valve that blocks the access of gasoline to the power unit when switching it to gas.
The operating principle of 2nd generation equipment on a carburetor engine is as follows:
The engine starts and warms up using gasoline. Next, the key is moved to the neutral position to produce fuel from the carburetor float chamber. Thus, the solenoid valve is activated, which shuts off the gasoline supply.
After which the switch is set to the gas supply position, activating the gas valve. So the gas, which is in a liquid state in the cylinder, flows through the multivalve and the main pipeline to the reducer. At this stage, the mixture undergoes preliminary rough cleaning.
When the gearbox warms up from the engine coolant, the liquefied gas is converted into steam. In the vapor phase, the fuel, passing through the power register, mixes with air in the carburetor.
To do this, in the 2nd generation HBO system, an injection mixer (spacer) or gas inserts are installed on the carburetor.
Then the finished gas mixture, entering through the intake manifold and cylinder head valves, is ignited by a spark in the combustion chamber of the engine cylinder.
To switch back to base fuel, the LPG button is moved to the position of working on gasoline, bypassing the neutral position.
Diagram on engines with injector
Here the equipment differs in several components:
- the button is specifically for the injection system, but there are also universal ones;
- a mixer with an anti-popping mechanism is installed in front of the throttle valve;
- petrol injector emulator;
- lambda probe emulator (installation is not required on all machines).
There are no radical differences in the operating principles of both gas equipment schemes. Major changes have been made to the design of the gas equipment due to the presence in a car with an injector of injectors for supplying fuel (or a mono injector - one nozzle for all cylinders). Which are controlled by the standard engine control unit (ECU).
The engine can switch to gas in semi-automatic mode (middle position of the toggle switch). Until the engine reaches a given number of rpm (1500-2000), gasoline is supplied to the combustion chamber. Then the switch to gas occurs automatically.
An injector emulator is needed to turn off gasoline injectors; it also sends a signal to the controller (ECU) simulating their operation. Due to this, the control unit does not display an error (“check engine”) about non-working injectors through an alarm on the instrument panel.
The lambda probe emulator (oxygen sensor) blocks the engine control unit from outputting a false error about a lean fuel mixture. Sensor advantages:
- facilitates setting up HBO due to the display of an indication of the quality of the mixture (poor green, rich red);
- reduces gas consumption by an average of 7-10%;
- allows you to detect real errors in engine operation.
Characteristic
Italy is famous not only for pizza and pasta, but also for its gas installations. Tomasetto is a leading global manufacturer of gas reducers and other gas equipment systems. What is a Tomasetto gearbox? This is a solenoid valve that serves for the correct dosage of gas. This mechanism also warms up the fuel and supplies it to the engine. Moreover, heating is carried out constantly, thanks to warm antifreeze in the system.
After heat exchange, the Tomasetto reducer membrane becomes suitable for gas supply. After all, propane-butane freezes instantly upon contact with air. And it doesn’t matter what the temperature “overboard” is - plus 40 or 30 degrees Celsius. Owners of gas cylinder installations know firsthand how quickly the supply hose turns into frost when the gas is over-enriched. Where is such a mechanism used? A Tomasetto gas reducer is used for the 2nd generation of gas equipment. On the fourth, fuel flows through separate injectors. Here the function of distributed injection is performed by the gearbox itself. This is one of the most expensive parts in the system. Tomasetto gearboxes can be installed on engines with power from 60 to 200 horsepower. However, selection should be made based on the performance of the gas element itself. On its body it is written what power the membrane mechanism is designed for.
Installation of HBO 2nd generation
- After selecting the components, the connection diagram for the 2nd generation LPG to the injector and carburetor will consist of several stages: Preparation of the mounting location for the cylinder. Here you need to provide ventilation holes, you will have to drill the bottom for the tubes, as well as securely fasten the cylinder. In this case, you should stock up on a drill and a drill bit of the required size. Next comes the installation of the cylinder, then the multivalve.
Equipment setup
As an example, consider the configuration option for a popular gearbox from Tomasetto (Tomasetto AT-07 electronic). Adjustment of 2nd generation Lovato gearboxes and its full analogues, such as Atiker and Torelli, is performed in a similar manner.
Before starting work, make sure that all engine systems are in good condition. The air filter has been changed, the ignition has been adjusted, and the coolant level is normal. Drain the condensate from the gearbox, if it is not new, make sure it is in good condition.
In order to adjust second-generation gas equipment with your own hands, you need to warm up the engine to operating temperature on gasoline, switch to gas and turn off the engine. From now on, we will separate the tuning options for different types of engines.
Correct adjustment of 2nd generation HBO on a carburetor with your own hands
- Using a flat-head screwdriver, tighten the screws of the gearbox and dispenser until they stop (without much effort), and then unscrew:
- membrane sensitivity 2-3 turns;
- “greed screw” of the first chamber until fully open, the second by 1 turn.
- Start the engine on gas. Gradually tighten the sensitivity screw to find the moment the speed drops at a lean mixture. Attention! A drop may occur when the mixture is enriched. Therefore, if, when unscrewing the screw, the speed increases, and then falls again, it means that this is working on a rich mixture. Now, by screwing the screw back in clockwise, you need to set the peak of increased engine speed - this way the idle speed will be found (800-850 rpm). If higher, adjust the quantity screw on the carburetor itself to the desired readings.
- Use the accelerator to increase engine performance around 3000 rpm. Use the “greed screw” of the first chamber to set the moment when, when it is tightened, the drop begins, and when unscrewed, the speed increases. Release the accelerator and revoke the throttle; if the internal combustion engine develops low speed (there is a dip), unscrew the screw of the first chamber of the power register by 1/8. At the same time, adjust the sensitivity screw as indicated in point No. 2. Check by re-gasping again.
- The second chamber of the carburetor operates at increased engine speeds from 3000 rpm (depending on the engine brand). Therefore, the “greed screw” of the second camera must be set to approximately the same position as the first.
- Next, you need to carry out control tests on the move under different loads (lifts, sudden accelerations).
Setting up 2nd generation HBO on an injector
- Unscrew the screw of the power register and membrane by 2-3 turns, tighten it until it stops.
- Start the engine. Raise the engine speed to 3000-3500 rpm, by tightening and unscrewing the dispenser, find the peak of maximum engine speed. From this position, screw in the register screw 0.5 turns.
- Release the accelerator and revise the throttle. If the engine starts to choke, unscrew the metering bolt 1/8. And so on until finding the optimal speed set.
- Then, gradually tightening the membrane sensitivity screw, find the moment the speed drops, loosen the screw by 1/8.
In this case, it is convenient to use a lambda probe emulator. The setting can be considered correct when the indication on it (LED) glows red at idle. If this condition is not met, you can unscrew the x/x screw until the engine speed stabilizes. Also, if you have a device (gas analyzer), you can use it to adjust the gas equipment even more accurately.
5. Make further adjustments during sea trials. If the car does not develop enough power, slightly release the gas supply with the register screw.
Setting up the second generation Tomasetto gas reducer
After installing the entire set of gas equipment, you need to check everything for leaks, and before starting the engine for the first time, adjust the gas reducer. In general, the best option would be to entrust the setup to professionals who will bring the LPG to its optimal operating mode in a short time. This will allow you to get maximum power from the installation, as well as good fuel consumption. The worst thing about self-tuning is the responsibility for the resource of the power unit. An incorrect mixture can kill an engine within a couple of thousand kilometers.
Primary adjustment
First you need to warm up the engine to operating temperature. Turn off the gasoline supply and run it out. After which you need to set the default settings of the gearbox:
- Screw in the dispenser of the first chamber to the maximum;
- Turn the dispenser of the second chamber to the minimum;
- Tighten the idle speed screw until it stops, and then unscrew it 5 turns;
- The diaphragm sensitivity bolt should be set to the middle position.
After this, start the vehicle engine.
How to set idle speed
Setting the idle speed is already more complicated than setting the primary adjustments. The choke requires a stable idle of 1800 rpm to be set. Then, turning the idle speed screw, set the maximum speed. At the same time, gradually removing the choke, achieve a stable idle speed of 1000-1200 rpm. This is done gradually by turning the sensitivity and quality screw.
Sensitivity Setting
Slowly unscrew the sensitivity screw. As soon as it begins to affect the idle speed, stop unscrewing it. Then this element is screwed in 1 turn. If the response to the gas pedal is good, then the sensitivity can be considered adjusted.
Dispenser calibration
This operation works best with hands-on adjustment. You need to start driving the car with very little pressure on the gas. Use the dispenser adjustment screw to set the parameters so that there is no failure when starting from a standstill at low gas.