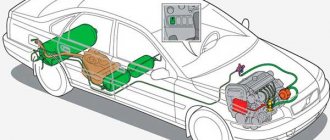
Scheme
The second generation system has the following design:
1. Cylinder 2. Multivalve + Ventilation unit 3. High pressure hoses and pipelines (gas line) 4. Filling device 5. Gas valve with filter (electromagnetic) 6. Reducer (gas evaporator) 7. Gas dispenser 8. Mixer (mixer) 9. Gasoline valve (solenoid) or Injector operation emulator 10. Fuel type switch (gas-gasoline)
The diagram also shows a gasoline valve, but in most cases on injection engines, its installation is practically impossible. It is much easier and more correct to turn off gasoline using an injector emulator.
HBO button for injection engine
The button for switching the 2nd generation LPG to the injector has the index “W” and slightly modified wiring.
The LPG fuel type switch has 3 positions:
- Gasoline only (in this operating mode, the engine runs exclusively on gasoline, the indicator light does not light up or glows red);
- Gas only (this emergency mode is designed to start the engine on gas without pre-warming on gasoline, the indicator lights will flash in this operating mode)
- Automatic (when this operating mode is selected, the car starts in normal mode on gasoline, and when a given number of revolutions is reached, it switches to gas. The display shows the level of gas in the cylinder).
Setting up the 2nd generation HBO button for the injector
The functionality of the switch for an injection internal combustion engine includes:
- indication,
- Built-in emulator with time delay,
- The ability to regulate the number of revolutions at which the engine automatically switches from gasoline to gas.
For automatic operation of the car, you must correctly configure the LPG button, in particular, set the required number of revolutions at which the engine operating mode will change.
The adjustment occurs by rotating the potentiometer clockwise or counterclockwise, which is located directly on the device itself. The optimal speed is considered to be from 1500 to 2500.
Depending on the time of year and weather conditions, the number of revolutions can be changed:
- set lower speeds for the summer period
- higher for winter, so that switching to gas does not occur when the engine is not warmed up.
The button is supplied with:
- A set of wires for connecting to HBO.
- Plastic mounting bracket for attaching the device to a car dashboard or other convenient place.
- Mounting terminals for connecting power supply devices (reducer valve, emulator, etc.).
- Fuse and power cord.
Balloon
Made of 3-4mm thick steel to ensure safety even in case of accidents. Currently, cylinders are produced in various sizes depending on the engine size.
A cylindrical cylinder is the most common shape in first-generation LPG installations.
Cylindrical cylinders, options and cost Toroidal cylinder - designed for mounting in a spare wheel storage area. This shape allows you to conveniently place the cylinder in a car while maintaining useful space, for example in a station wagon. Toroidal cylinders, options and cost There is a variation in the cost of cylinders; toroidal options are best for installation.
Multivalve and Ventilation unit
A multi-valve is installed together with the cylinder. It prohibits filling the cylinder above 80%. Cylinders should not be 100% full.
Free space is necessary in the cylinder to ensure safety. Even if the cylinder is heated to +70 C, which is impossible even if the machine is used harshly, the liquid will fill the residual volume.
Multivalve TOMASETTO 315/30 class A Multivalves, options and cost The cost of a multivalve is within 2000 rubles. There are options for 1500 rubles.
The multivalve also performs other functions:
- Filling during refueling
- Gas level detection
- Gas supply
- Shutting off the gas supply
- Refill volume limitation. (up to 80%)
The multivalve is installed in the ventilation unit. It avoids possible gas accumulation as a result of any unforeseen circumstances.
Ventilation chamber TOMASETTO
The removable cover provides easy access to the multivalve.
Ventilation chambers, options and cost On average, a ventilation chamber will cost 300 rubles.
Hoses and pipelines
Made of copper and can withstand pressure of 45 bar, from 6 to 8 mm in diameter. The cylinder is connected to the multivalve and reducer through this particular pipeline.
Copper pipes, options and cost The pipe must be secured to the bottom of the car, far from the exhaust pipe and the car suspension.
There should be elastic pads at the attachment point to dampen vibration.
A pipeline with a diameter of 8 mm is supplied to the filling line. For all other ligaments - 6 mm.
The rubber hose is used to install the antifreeze connection from the point of insertion into the line to the gearbox and to install the connection between the gearbox and the injectors.
Rubber hoses, options and costs All prices are indicated for 1 meter.
Installation of HBO2
To install a carburetor in a VAZ 2106, we need to open the hood. The valve and reducer are located there. They are connected to each other. The high pressure fuel line must be connected to the valve. Such lines must be made of copper. If it has low pressure, it is necessary to use rubber hoses with gas.
A pipe from the cooling system must be connected to the corrector gearbox. The gearbox can be installed on the right, next to the stove.
For information on adjusting the 2nd generation Tomasetto LPG gearbox, please follow the link.
Note. If you install it near the stove, you will benefit, since the stove will help warm up the gearbox faster.
To establish a connection to the cooling system, you need:
- Disconnect the pipe that is connected to the stove radiator.
- Install it from the pump to the gearbox housing. This is necessary to supply hot antifreeze.
- Install another pipe from the stove tap to the gearbox.
After this, you need to adjust the regulator and start supplying gas to the carburetor. There are two ways to supply gas fuel:
- Using a mixing spacer.
- Using a carburetor insert.
For the second method, you need to make several holes in the carburetor chamber. Threads are cut into them and special fittings are screwed into them. The latter are needed to connect the gas pipe.
You can install HBO2 on the carburetor yourself.
Gas valve with filter
This valve automatically shuts off the gas supply from the cylinder to the engine.
The gas valve is closed when there is no voltage (12v) applied to it. When the electrical circuit is closed, the valve opens and opens the gas supply.
Lovato gas solenoid valve There are arrows on the surface of the valve that indicate the direction of gas flow - that is, from the cylinder to the engine.
Average valve cost -
Gas valves, options and cost The valve is fixed in a vertical position, usually on the wall of the engine compartment.
The valve is also equipped with a filter (to clean the incoming gas). Filters come in different sizes and shapes, depending on the type of valve used.
Filter options The cost of a filter also depends on its type and amounts to 100-150 rubles.
Mixer
Supply the engine with the required amount of gas and air. This happens in various ways through the carburetor diffuser, or by creating a diffuser in the design of the mixer itself.
For each type of vehicle there is a specific mixer model.
Mixer 300-489 FIAT Punto2 Mixers can also be divided into several groups: 1. Mixers installed in the upper part of the carburetor; 2. Mixers - spacers that are installed in the middle part of the carburetor. 3. Fittings, so-called inserts, inserted into the carburetor using drilling. 4. A fork-shaped system consisting of tubes that are inserted into the carburetor without drilling. 5. Mixers for injection systems of various modifications. Faucets, options and costs
Gasoline valve
Blocks the supply of gasoline when the car is running on gas. The valve is closed when no electricity is supplied to it and opens when turned on.
Lovato gasoline solenoid valve It is installed in the engine compartment only on carburetor cars between the gasoline pump and the carburetor.
There are arrows on the valve body indicating the direction of gasoline flow. The valve must be mounted vertically, away from hazardous engine parts.
Gasoline valves, options and cost The cost of the valve is within 1000 rubles.
In most cases, on injection engines, installing a gasoline valve is practically impossible. It’s easier and more correct to turn off gasoline using an injector emulator.
Operating principle of HBO2
The principle of operation of 2nd generation HBO on a carburetor engine is as follows.
The gas is contained in a cylinder equipped with a multi-valve. Fuel is supplied to the valve using the main pipeline. Gas filtration systems are installed there. This is where it can be cleaned of dirt, debris and other foreign elements. Then comes the gearbox. It is connected to a system that is needed to cool the engine. In it, the gas changes form from water to steam. This is achieved through temperature and pressure. The gas is supplied as steam to the engine to be mixed with air.
Now the fuel enters the mixer. There, gasoline and air are mixed to create a mixture. A power regulator is installed on the sleeve. It is needed to regulate the amount of gasoline in the engine. If the mode operates on gas, the gasoline supply will intersect with the valve located on the fuel line.
Note. To prevent the pump from constantly breaking down, a gasoline valve should be placed between the gasoline pump and the carburetor. This is necessary so that the first one contains gasoline necessary for lubrication.
The HBO button is responsible for controlling the system. If the ignition is turned off, the switch is de-energized and the fuel is shut off.
The connection diagram consists of three modes:
- Gaza. When the ignition is turned on, the switch receives energy, opening access to the fuel supply. This is necessary to improve the launch. Pulses will appear on the ignition coil. The switch will see them and open access to the valve. Fuel will flow until the wire stops receiving signals.
- Gasoline. No fuel will be supplied here. Power will be supplied to the gas valve, which will open the flow of gasoline to the engine.
- Transition. Here the supply of both fuel options will be turned off.
You might be interested >> Installing LPG on Lada Largus
Injector operation emulator
When installing LPG, the gasoline supply is interrupted by turning off the injectors. The standard ECU initiates injector shutdown as a break in the injectors, turns on the fault lamp (Check Engine) and puts the engine into emergency mode (the latter rarely happens).
The injector operation emulator is used to prevent the ECU from seeing the injectors breakage.
Let's look at its diagram.
Injector operation emulator circuit When running on gasoline, the circuit is closed, and when running on gas, the circuit opens and runs through the load resistors, thereby not indicating to the ECU that the wires are broken.
The emulator is selected according to the number of engine injectors, usually 2, 4, 6 injector models.
The cost of such an emulator is within 1500 rubles.
Fuel switch
Gas/gasoline switch is a device designed to switch the operating mode of a vehicle from one type of fuel to another at the moment when a certain number of vehicle engine revolutions is reached.
Switch K-5 Tamona All switches are divided into three main groups.
1. For injection engines. This type of switch has three positions: petrol, gas and automatic mode. 2. For carburetor engines with the installation of an electronic gearbox. In these switches, the “GAS” position is equipped with an automatic shutdown of power from the shut-off valves. 3. For carburetor engines with the installation of a vacuum reducer. And on this gas-gasoline switch there are two toggle switches. One for switching the type of fuel, the second for pumping gas before starting the engine.
The cost of switches usually does not exceed 1000 rubles.
Switches, options and costs All switches come with a wiring diagram and mounting kit.
Installation
2nd generation LPG is usually installed on carburetor cars. Very often the price of equipment is a decisive parameter. If the car is not in the premium segment, then there is no point in installing expensive equipment on it.
The cost of all gas equipment with its installation starts from 15,000 rubles.
You can also purchase all the equipment as a mini kit for self-installation. The average price is 6,000 rubles.
Mini kits for HBO, options and cost Typically, such a kit consists of:
| HBO-2 has a number of difficulties when installed on an injection car. |
An experienced technician can always answer your question: is the 2nd generation LPG suitable for your fuel-injected car or not?
The installation of 2nd generation LPG on modern fuel-injected cars was carried out mainly when 4th generation systems had not yet been invented.
The second generation gas equipment fully meets the environmental requirements of Euro-1.
Systems approach Euro-2 standards only in individual cases. This was the main reason why 3rd and 4th generation systems appeared on the market.
1 Cylinder Included in a set with fastening tapes or bolts, depending on which cylinder you chose
2 Multivalve for cylinder 3
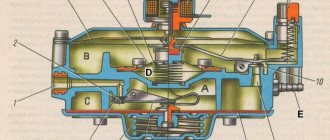
Gearbox
4 Filling valve (it is often sold complete with a multi-valve) (comes with a multi-valve)
5 Fuel shut-off valve (gasoline if the car is carburetor) If the car is not a carburetor, but an injection one, you will need to buy an injector emulator in place of the gasoline shut-off valve (emulators are different, for example, if there are 4 cylinders, then the emulator should be for a 4-cylinder car, and so on .) Most often, 2nd generation gas cars are four-cylinder.
6 GAS-PETROL switch button There are 2 options for the buttons for carburetor and injection cars. When purchasing a button, you need to clarify to the seller that your car is either carburetor or injection. This is necessary in order to correctly assemble the electrical circuit in the future.
7 A mixer for your carburetor or, if the machine is an injection machine, a mixer for your type of injector. It is needed so that we correctly supply the gas mixture to your intake manifold.
Advantages
Correct adjustment of Lovato 2nd generation LPG in the injector and carburetor can be done with your own hands. In comparison with the new type of gas equipment (and 5 generations), the 2nd generation gas equipment gearbox has somewhat lost its relevance. However, this does not indicate that there is no point in using it. Not at all. The present systems have been preserved on almost all cars. And some experts advise using them. The “blame” for this is the outstanding qualities of 2nd generation HBO:
- availability and proven quality of the system. As a result, installation work can be carried out on your own;
- virtually complete absence of electronic components, which radically simplifies adjustment;
- the ability to repair individual components without leaving the garage. Having identified a malfunction, it is not necessary to rush to the service station. Having basic knowledge, you can do all the necessary work with your own hands;
- reasonable price for equipment. The purchase and installation of gas equipment of a higher class is much more expensive. The situation is completely different with 2nd generation gas equipment. Purchasing and further setting up gas equipment for a 2nd generation car really helps out in the current circumstances.
Operating principle and differences between buttons
The 1-2 generation button on the carburetor has two working positions and one neutral.
Changing the fuel type should only occur through the neutral position. If you turn on the gas right away, two types of fuel will enter the combustion chambers and the engine will most likely stall.
Some copies have an indication of the fuel level in the cylinder, as well as an additional button for the pre-start supply of a portion of gas, which is needed to enrich the mixture when starting a warm engine on gas (for example, Lovato, Logo buttons for a vacuum reducer).
A key such as, for example, Stag 2-G already has a pre-start function built into it, with the ability to adjust by time.
In the injection version, instead of the middle position, there is an automatic mode (on some types, such as Stag 2-W, it can be extreme). In this position, the engine starts on gasoline, and when a certain engine speed is reached, the gas supply is automatically turned on.
The transition speed is regulated using a potentiometer on the side surface of the housing. This key can also come with a level indication.
The universal option involves installing a toggle switch on both the injector and the carburetor. The transition between modes is carried out using a jumper/jumper on the case (example SVG switch).
The 4th generation HBO button has an LED indication and 2 operating modes on/off. In the on position, the gas turns on automatically after the reducer-evaporator warms up to 35-45˚C. The temperature is programmed in the controller when setting up the equipment.
Button signals using Stag as an example:
- LED is on/off – the engine is running on gas/gasoline;
- blinks at intervals of 1 second. – the engine is not warmed up;
- flashes every 2 seconds – the system is ready to switch to gas;
- blinks every 4 seconds – the tank has run out of fuel;
- the buzzer beeps three times - the system switches from gas to gasoline due to lack of fuel;
- three short signals 1 long – ECU (control unit) error;
- two short beeps 1 long beep (with the ignition off) – maintenance of gas equipment is required.
In addition, the fourth version of the gas system has an emergency start on gas. The mode is activated as follows: hold the button with the ignition off until the LED lights up continuously. Then, without releasing the key, we start the engine. Deactivation occurs after stopping the internal combustion engine.
Types of buttons (video):
Selection table (with approximate prices):
| Name/labeling | injector/carburetor/generation | Level indication, +/- | Price in rubles |
| REG OMVL Dream XXI King | engineer/4 | + | 1020 |
| Logo 145 | engineer/4 | — | 280 |
| Logo 101 | carb./1.2 | — | 470 |
| Atiker (K01.003.000.020) | carb./1.2 | + | 600 |
| Stag 2-G | carb./1.2 | — | 550 |
| AEB 722 | carb./1.2 | + | 1050 |
| Tamona K-5 | carb./1.2 | — | 520 |
| Lovato | carb./1.2 | — | 590 |
| Torelli | carb./1.2 | + | 630 |
| Stag 2-W | engineer/2 | — | 600 |
| Tamona in-3 | engineer/2 | — | 540 |
| Stag LED-401 | engineer/4 | + | 750 |
| Stag LED-300 | engineer/4 | + | 580 |
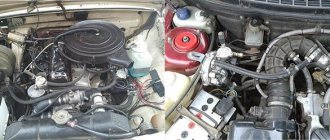
Features of HBO 2 – carburetor and injector
Gas equipment of the 2nd generation on a carburetor is considered ideal, since it is on such engines that “wet” intake manifolds are installed. They have a small volume, which reduces the likelihood of ignition before entering the cylinders. Gas under pressure flows from the cylinder through a multivalve to a shut-off valve, where it is purified using a filter. It enters a heated gearbox, where it evaporates and enters the carburetor in a gaseous state through a power register that regulates the flow.
The gasoline supply is shut off by a solenoid valve in the fuel line. To prevent failure of the fuel pump, the valve must be mounted behind it, since the pump is lubricated with gasoline. Switching to another fuel is carried out by an electric switch, which is de-energized when the ignition is turned off. Cold start is only permissible on gasoline.
Before switching to gas, you need to let the engine run out of gasoline from the float chamber. To do this, the switch is switched to the “Transition” mode. When the thrust begins to fall, the “Gas” mode is set. Before long-term parking, the switch must be set to the “Gasoline” position. This will make the next launch easier.
HBO 2 fits perfectly on the injector, although here the supply is carried out through nozzles. There are no gas engines on this generation, so gas is supplied in front of the throttle valve. The intake manifold here has a large volume due to the air receiver, so there is a risk of ignition. To protect the flow meter and air filter housing from backfire, a special anti-pop valve is used.
On injection internal combustion engines, the supply is controlled by the ECU, which means that the gasoline-gas transition can be realized using electronics. A simple relay is used if there is no self-diagnosis system. If there is, Engine check will be triggered. To prevent this, an injector emulator is used that performs two functions:
- Disabling petrol injectors.
- Simulation of ECU operation.
It uses a lambda probe emulator that controls the mixture composition through the BC. On gas, the oxygen sensor will try to regulate the flow, but will not be able to, since it depends on the settings of the gearbox. The “Check” will light up again if the emulator does not send its signal to the ECU, which simulates the operation of a standard lambda probe.
The mode switch has the following positions:
- Petrol.
- Gas.
- Machine.
In the latter case, switching occurs without driver intervention. Cold starting is also difficult here.
Connection diagram of the 2nd generation HBO button to the injector
Installing and connecting the 2nd generation HBO button with your own hands on a car with an injector sometimes causes difficulty.
In fact, everything is much simpler than it seems. The factory instructions for installing the switch indicate the following pinout:
- the white wire should go to the level sensor on the multivalve (if such an indicator is installed);
- yellow goes to the positive of the gasoline valve (if there is emulation of gasoline injectors, this wire is not connected);
- blue connects to the positive terminals of the gas valves of the reducer and the additional remote valve with filter. The injector emulator also cuts into this circuit;
- red goes to the positive terminal of the ignition coil (necessarily with a fuse);
- black - mass;
- brown to the negative terminal of the coil.
It’s hard to disagree with the first three points. But for the rest we will make recommendations:
- The red wire is best connected to the positive side of the ignition switch. Because the coils may have voltage surges. In order not to disassemble the panel, the contact can be found on the fuse block.
- The black wire should only be attached to the car body, like all negative equipment cables.
- Brown, must be wound onto the central high voltage wire of the coil.
It is advisable to do 10-15 turns, without using electrical tape. The electrical tape dries out over time and falls off; it is better to make a knot similar to tying a fish hook.
If the ignition system consists of separate coils, it is necessary to wind the wire onto the first two armor wires (for a more accurate signal), without breaking the brown one, i.e. first to the first then to the second.
After connecting the button, it must be adjusted. Periodically increasing the engine speed with the accelerator, it is necessary to smoothly turn the potentiometer screw clockwise and back. It is necessary to ensure that the gas supply is turned on in the “automatic” mode when the tachometer reading is 2000-2500 rpm.
Connection diagram
Installation of 2nd generation gas equipment begins with choosing a cylinder and a place for it, laying lines and other elements. It is necessary to select clamps, connectors and hoses according to the actual size and shape. The optimal installation order is as follows:
- Balloon.
- Multivalve.
- Gas valve.
- Gearbox.
- A mixer in the carburetor or a spacer for a monoinjector between the throttle valve and the injector.
- Gasoline valve. Into the gasoline hose between the pump and the carburetor on the left side of the engine compartment opposite the gas valve.
- Refilling device.
After inserting into the cooling system, the connections are sealed, the electrical part is connected, start-up and manual adjustment are performed.
Electrical connection
In the case of a carburetor, there is a little less work. The main emphasis is on connecting the mode switch. It is important to ensure that the gasoline supply is turned off when switching to gas. A diagram of such a connection is shown in the photo.
The switch has five or six wire leads of different colors. The black one is connected to ground (minus), the white one is connected to the multivalve. Red clings to the plus, and brown to the minus of the ignition coil. Yellow goes to the gasoline valve, and blue goes to the gas valve.
With the injector it’s almost the same, except that you can additionally throw several turns of uninsulated wire from the brown wire onto the central wire of the coil, and then insulate everything on top.
The circuit for connecting the injector emulator to the circuit is just as simple.
Selected by the number of nozzles. It is controlled by the mode switch, so it is included in the gas valve circuit. Setting the delay time is done experimentally.
The oxygen sensor emulator closes the signal wire circuit, preventing the control equipment from triggering. It turns on when 12V is supplied to the blue wire going to the gas valve.
Connection diagram of the 2nd generation HBO button to the carburetor
For a carburetor engine, the connection looks similar:
- Red - through the fuse to the ignition coil/switch.
- Light blue (blue) – gas valve positive.
- Yellow – positive of the gasoline valve.
- Black – minus (car body).
- The brown one goes to the ignition coil armored wire. It is needed to transmit an impulse to the key, which determines whether the motor is running or not.
If you still have questions about connecting or selecting buttons on the HBO, ask them in the comments. We will be happy to answer them.
3rd generation gas equipment design
Most elements of the 3rd generation HBO are identical to earlier generations of equipment. The gas is placed in a cylinder with a multi-valve installed on it. To fill the cylinder, a remote filling device is used.
High-pressure pipelines emerge from the multivalve and go into the engine compartment to the gas valve.
Pipelines go from it to the mixer reducer. A gas valve control unit is installed in the cabin.
Pipelines extend from the gearbox to a distributor with a stepper device, installed near the intake manifold. And pipelines to the injectors already extend from the distributor.
The design also includes an injector emulator that shuts off the flow of gasoline into them, while creating a signal to the standard fuel system control unit about their appropriate operation.