1.5. Frequency of replacement of operating fluids and lubricants
| GENERAL INFORMATION |
Engine oil
must be changed every 10,000 km.
For a new car, it is necessary to change the oil after the break-in period (after 2500 km). When changing the oil, you must install a new oil filter (ZMZ-4062 engine) or its filter element (all engines). the oil change procedure , see subsections 2.3.2 , 2.3.2.2 and 2.3.3.3 .
Into the engine crankcase
It is recommended to fill in the same brand of oil as was in the engine. If you fill in oil of a different brand, you must first flush the engine lubrication system with oil of the same brand that will be poured into the engine. To do this, drain the old oil and fill in new oil 2–4 mm above the “0” mark on the oil level indicator (dipstick). Start the engine and let it idle for about 10 minutes. Then drain the oil, replace the oil filter or its filter element and add fresh oil.
Coolant
must be changed once every 2 years or after 60,000 km (whichever comes first).
For the procedure for replacing coolant, see subsection 2.4.4 .
It should be borne in mind that the coolant is poisonous, so you should not suck it into your mouth when pouring it. When working with coolant, it is recommended to use safety glasses and not to smoke or eat. If the liquid gets on exposed skin, wash it with soap and water. Gearbox oil
must be replaced after 60,000 km.
the oil change procedure , see subsections 3.3.2 and 3.4.2 .
Every 20,000 km, you need to check the oil level in the gearbox and top up if necessary. The oil level in the crankcase should reach the edge of the filler hole. If the drained oil contains metal particles or is very dirty, the box should be washed. To do this, pour 0.9 liters of fresh oil into its crankcase. Raise the rear of the car with a jack. Start the engine and, engaging first gear, let it run for 2-3 minutes. Then drain the oil and refill with fresh oil. When checking the oil level, you need to clean the surface of the breather from dirt and turn its cap several times to remove any dirt trapped under it. Oil in the rear axle housing
must be changed after 60,000 km.
The oil is changed in the same way as in a gearbox. After 20,000 km, you need to check the oil level in the crankcase and top up if necessary. The oil level should reach the edge of the filler hole. When checking the oil level, you need to clean the breather from dirt in the same way as you did for the gearbox. Do not reuse drained brake fluid.
Brake fluid
In clutch and brake drives, they must be changed once every 2 years, regardless of the vehicle’s mileage.
Clutch and brake drives use domestically produced brake fluids “Rosa”, “Rosa-3”, “Tom”, “Neva” or their foreign analogues on a non-petroleum basis, the quality level of which is not lower than DOT-3. The use of other brands of fluids, especially petroleum-based fluids, is prohibited
.
Brake fluid is hygroscopic, so it should not be stored in open containers.
The procedure for replacing brake fluid is as follows:
1. Remove the brake master cylinder reservoir cap.
2. Remove the rubber protective caps from the air release valves on the wheel cylinders and place rubber hoses on the valves, the ends of which are lowered into glass containers.
3. Unscrew the valves no more than one turn and, pressing the brake pedal all the way, drain the fluid. As soon as liquid stops flowing out of the hoses, tighten the air release valves.
4. Pour the drained brake fluid out of the vessels and put them in place.
5. Pour fresh fluid into the master cylinder reservoir, unscrew all air release valves one turn and, pressing the brake pedal all the way, fill the brake system. In this case, you need to constantly add fluid to the master cylinder reservoir. After clean brake fluid begins to flow out of the hoses placed on the air release valves, tighten the valves.
6. Bleed the brake system to remove air from it ( see subsection 6.9 ).
7. Close the brake master cylinder reservoir with a plug. Remove the hoses from the air release valves and put protective caps on them.
Transmission repair: step-by-step instructions
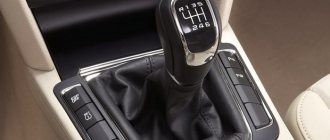
Gearbox device
Repair of the VAZ 2105 gearbox is carried out after disconnecting the minus terminal from the battery. In this case, a manual transmission scheme is used. Then the following are removed:
- panel,
- casing,
- gear lever handle.
To dismantle the last unit, you will need to lift it and use a screwdriver to unclip the latch. Using tweezers, remove the spring from the lever. Next, the damper bushing is removed. To remove the last element, flat screwdrivers are used to release the locking tabs.
The screws are unscrewed around the perimeter, the cover and the protective rubber casing are dismantled. After this, the starter, intake manifold and driveshaft are removed. The speedometer drive cable is disconnected from the VAZ 2105 gearbox. Next, the cylinder is removed from the clutch housing and the bolts that secure the rear support of the power unit are removed.
The next step is to remove the clutch housing inspection cover and place a secure support under the transmission. Using a large flat screwdriver, the gearbox is removed from the studs. After removing the input shaft from the driven disk, the gearbox is dismantled
During this procedure, much attention is paid to the input shaft. It should not hang on the disk, otherwise the part will be damaged
Upon completion of the repair work, the gearbox is mounted in its original place, taking into account the reverse sequence of actions.
An important point is changing the oil in the gearbox. This procedure should be carried out every 35 thousand kilometers or after 3 years of operation of the VAZ 2105.
If you buy a used car, you need to check the condition and level of oil in the gearbox. Lubricant replacement is carried out in the following situations:
- the level of the substance is below the required level,
- presence of silver dust,
- black color of grease.
Oil change VAZ 2105
Change of oil
It is necessary to change the oil on a hot engine so that the oil viscosity is as low as possible. When changing the oil, be careful not to get burned by the hot oil or touch hot engine parts. To completely drain the oil, you must wait at least 10 minutes after opening the drain hole.
When changing the oil, be sure to replace the oil filter, which is removed using tool A.60312. When installing the filter, wrap it by hand. Before installation, be sure to lubricate the filter rim with oil.
When changing the oil, perform the following operations:
- after stopping the engine, drain the used oil and, without removing the oil filter, fill in VNIINP-FD flushing oil to about on the oil level indicator (2.9 l);
- start the engine and let it run on this oil for 10 minutes at minimum idle speed;
- completely drain the flushing oil and remove the old oil filter;
- install a new oil filter and fill with oil that matches the season and the viscosity recommended by the manufacturer.
Oil pump
Removal and installation
To remove the oil pump from the engine:
- Place the car on an inspection ditch, pit or lift, disconnect the wires from the battery and drain the oil from the engine crankcase;
- remove the engine splash guard;
- Unscrew the nuts securing the engine front mount cushions to the cross member and slightly lift the engine with a jack or hoist so that the cushion studs come out of the cross member holes;
- remove the engine crankcase;
- remove the oil pump along with the inlet pipe.
Perform operations to install the oil pump on the engine in the reverse order of removal.
Disassembly and assembly
Secure the oil pump carefully in a vice so as not to damage the housing, and then:
- unscrew the bolts and remove the intake pipe along with the oil pressure reducing valve;
- remove cover 3 (Figure 2) of the oil pump housing and remove the pump shaft with the drive gear and the driven gear from the housing.
To assemble, carefully, without excessive force, secure the pump in a vice and perform the operations in the following order:
- install the drive gear with the shaft into the pump housing, and place the driven gear on the axle in the housing;
- install the housing cover, pressure reducing valve with spring and attach the inlet pipe to the pump housing.
Note. After assembling the pump, when turning the drive shaft by hand, the gears should rotate smoothly and without jamming.
Checking oil pump parts
After disassembling, thoroughly rinse all pump parts with kerosene or gasoline, blow thoroughly with a stream of compressed air, and then carefully inspect the body and cover of the oil pump. If defects or cracks are found, parts must be replaced.
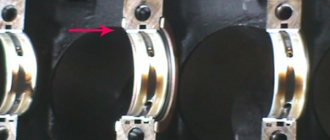
Using a set of feeler gauges, check the gaps between the gear teeth, as well as between the outer diameters of the gears and the walls of the oil pump housing (Figure 3), which should be respectively 0.15 mm (maximum permissible 0.25 mm) and 0.11-0.18 mm ( maximum permissible 0.25 mm). If the clearances exceed the limit values, replace the gears and, if necessary, the oil pump housing.
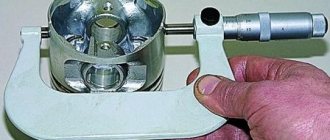
Using a feeler gauge and a ruler (Figure 4), check the gap between the ends of the gears and the plane of the pump housing, which should be equal to 0.066-0.161 mm (maximum permissible 0.2 mm). If the gap is greater than 0.2 mm, replace the gears or pump housing, whichever is worn.
Check the gap between the driven gear and its axis, which should be 0.017-0.057 mm (maximum permissible 0.1 mm), as well as between the oil pump shaft and the hole in the housing, this gap should be 0.016-0.055 mm (maximum permissible 0.1 mm). If the gaps exceed the limits, replacement of worn parts is necessary.
Checking the pressure relief valve
When repairing the oil pump, check the pressure relief valve. Pay attention to the valve and body surfaces as possible contamination or deposits on the mating surfaces may cause binding. There should be no nicks or burrs on the mating surface of the valve, which could lead to a decrease in pressure in the system.
Check the elasticity of the pressure reducing valve spring by comparing the data obtained with those shown in Figure 5.
Oil pump drive shaft and gear
There should be no dents, marks or other defects on the surfaces of the roller support journals and on the working surface of the eccentric.
The gear teeth of the oil pump drive and the ignition distributor must not be chipped; if such a defect occurs, be sure to replace the shaft or gear.
Oil pump drive shaft bushings
Check the inner diameter of the bushings, their pressing into the sockets, and the alignment of the lubrication hole in the front bushing with the channel in the cylinder block (rotating the bushing). The inner surface should be smooth and free of burrs.
Oil change tools
Since you have decided to change the oil yourself, it is extremely important to know what you will need for this:
- Hexagon 12
- 17mm wrench - socket or socket (you may need a full set of wrenches)
- Oil filter puller
Filter puller
- Oil can
- Oil syringe
Oil syringe
- Container for waste (approximately 5 liters)
- Rag
- Screwdriver
- Something sharp, such as a small knife
VAZ oil change - rating, addresses and telephone numbers
1 review • Dobroselskaya street 4g •
The prices are exorbitant, where do the officials go! I don’t know the quality of the repair, I didn’t go, the price was enough!
1 review • Pochaevsky Ovrag street, 7 •
I haven’t gone for repairs yet, but as soon as I can, the prices are super.
Promyshlenny proezd, 5B • • Mon–Sat from 09:00 to 20:00
Verkhnyaya Dubrova, 40B • • daily from 08:00 to 20:00
Kuibysheva, 24a/5 • • daily from 09:00 to 21:00
. It received many positive reviews for its modern, stylish design and wide functionality. You can take any of these cars for a test drive...
Gastello street, 19 • • around the clock
24-hour car service in Vladimir, 24-hour evacuation service, Technical roadside assistance, Free diagnostics! BODY REPAIR!…
Kuibysheva, 24a/1 • • daily from 09:00 to 19:00
Today “AvtoTrakt” is a recognized leader in the specialized market, working for its clients without interruption every day 09-21. The company is proud...
Elektrozavodskaya, 6a • • daily from 09:00 to 18:00
AUTO33.RU – The main automobile portal of the city of Vladimir and the Vladimir region.
Request to establishments - order a service, specify the price
VAZ oil change in Vladimir - prices
- 09/10/2019 Evgeniy: Piston 76.7 D(C) for the VAZ 2108 is required based on availability AutoGlobus: Good afternoon, there is a repair size of 76.4 and the next one is 76.8, the size you requested does not exist.
- Auto parts store VAZ spare parts: Good afternoon, the VAZ 2108 does not have 76.7 pistons, only 76.4 and 76.8
- Evgeniy: you didn’t have it, but I found it. Thank you!
- Vasya diagnostician: Good evening! 1580 rubles taking into account your materials and adaptation of the automatic transmission after an oil change.
- AutoGlobus: Gearbox is available, cost 6390 rub.
- ASPARTA auto parts: Good afternoon! In stock AVTOVAZ – 6000 RUR
Most often, people search for “VAZ oil change,” but there are also other formulations, for example:
- Lada oil change
- Lada oil change
The most popular features of the locations found: paintless dent removal, car alarm repair, chrome plating of car parts, wholesale car accessories, buyback of problem cars, Shanghai Maple, Datsun, Aston Martin, Opel, Ultima.
PJSC AvtoVAZ is a Russian automotive company, the largest manufacturer of passenger cars in Russia and Eastern Europe. Control over the company belongs to the Renault-Nissan alliance and Rostec. The full official name is Public Joint Stock Company AvtoVAZ.