What is a fuel pressure regulator?
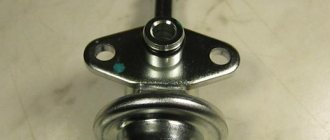
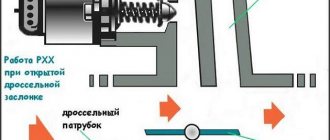
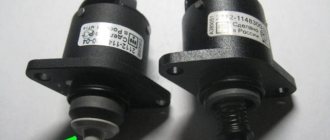
The fuel pressure regulator (FPR) is a vacuum valve; it transfers excess fuel through a return hose into the fuel tank. The RTD is a housing that contains a valve, a membrane and a spring. There are also three terminals in the housing: two terminals for the passage of fuel through the regulator, the third is connected to the intake manifold. As engine speed increases, the vacuum created in the manifold (at the third terminal) overcomes the force of the spring and moves the membrane, thereby opening the valve slightly. Excess fuel gets access to the second outlet and goes back to the gas tank. An RTD is often also called a check valve.
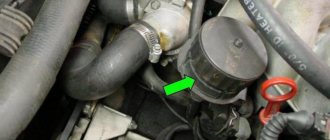
As a rule, the check valve is located on the fuel rail; it can also be embedded in the fuel return hose of the power supply system.
How does the fuel pressure regulator work?
Internal structure of the fuel pressure regulator: 1 - housing; 2 - cover; 3—pipe for vacuum hose; 4 - membrane; 5 - valve; A - fuel cavity; B - vacuum cavity
The fuel pressure regulator is a diaphragm valve, which in systems with fuel recirculation is installed on the fuel rail. Well, in systems where such recirculation is not provided, the RTD is placed directly in the fuel tank.
On the one hand, the fuel pressure regulator is affected by a special spring, as well as pressure in the intake manifold. On the other hand, it is pressed down by the fuel supplied by the pump. When the fuel pressure begins to exceed the spring pressure and the pressure acting on the valve from the intake manifold, the diaphragm valve opens, letting in the required amount of fuel, and as soon as the pressure of the supplied fuel decreases, the pressure regulator diaphragm closes.
In simplified form, it all looks like this. There are two chambers, fuel is pumped into one, and the spring is located in the other. The chambers are covered by a membrane, which opens at pressure values exceeding the action of the spring. It should also be said that in car models of recent years, such a regulator may not exist. Its functions are performed by a special electronic sensor that measures the voltage in the electric pump that supplies fuel. This solution allows you to optimally maintain the required pressure and regulate the fuel supply by directly controlling the pump. But, although such a system is more accurate, nevertheless, it is often a mechanical RTD that is much more reliable and lasts much longer than an electronic sensor, which is subject to various negative influences.
Causes of fuel pressure regulator malfunctions
RDT may fail for several reasons. For example, defective parts are found on Russian-made cars. There are significantly fewer defects on foreign models, but you can purchase a defective RTD by purchasing a non-original spare part.
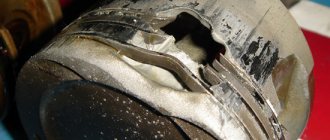
Mostly the check valve breaks down due to natural aging. Let's say this can happen after a hundred thousand mileage or more. It should be noted that check valve failures are not common. Most often, in an RTD, the membrane dries out over time, less often the valve jams, and even less often the spring breaks or weakens.
Sensor failure may occur due to low-quality gasoline. For example, in winter, fuel was filled with water, and water got into the regulator. If the fuel filter is not replaced on time, dirt gets into the parts of the power system, including the regulator. In this case, the RTD valve most often jams. It’s hard to imagine what could happen to the spring, but apparently, it still breaks sometimes.
How does the fuel pressure regulator work?
On the one hand, the pressure in the regulator is generated by a spring and this is combined with pressure from the intake manifold. In the opposite direction, the force is generated by the fuel pump. When the spring compression forces and the energy from the intake manifold are exceeded, the diaphragm valve opens. This cycle ensures the intake of fuel in the required volume. Next, the pressure from the supplied fuel decreases and the pressure regulator membrane closes.
Schematically, functionality is ensured due to design features. Fuel is pumped into one of the two chambers. The remaining one has a spring. The cavities are separated by a membrane that opens when there is a difference in pressure.
It is important to know that some models of modern cars do not have such a part as a fuel pressure control valve.
If there is no valve, its functions are assigned to an electronic special sensor. It measures the voltage in the electric pump that supplies gasoline to the system. Thanks to this solution, it is possible to fix the pressure at the optimal level, as well as remotely regulate the fuel supply. This makes it possible to directly control the pump.
The system, developed on an electrical basis, is very accurate when compared with its mechanical counterpart. However, practice shows that “mechanics” gives more reliability when used in domestic conditions. The block is less exposed to negative external influences.
Characteristic symptoms of fuel pressure regulator malfunctions
By what signs can you determine that an RDT is not working:
- the engine is very difficult to start, you need to turn the starter for a long time and at the same time keep the gas pedal pressed in order for the engine to start;
- The engine idles unsteadily or the speed is very low, the engine often stalls. At the same time, it does not gain power at all; when trying to accelerate, it results in a deep failure;
- The spam engine changes speed sharply, this is especially noticeable at idle:
- Fuel is leaking from the fuel hoses. Attempts to tighten and replace clamps and replace hoses do not help.
How to check the fuel pressure regulator for serviceability
The fuel pressure regulator is not an electrical sensor and cannot be checked using instruments. It should also be taken into account that the RDT cannot be disassembled or repaired. Someone writes that the fuel check valve can be repaired. I would like to see what it looks like and where you can buy a repair kit. Typically, RTDs are inexpensive, and even for that reason they would not be worth repairing if they were repairable.
You can verify that the regulator is working properly by checking the pressure in the fuel system. This is usually done with a mechanical pressure gauge, which is connected to the engine power system.
Measurement is carried out as follows:
- connect the pressure gauge to the fuel system;
- start the engine and look at the pressure gauge readings.
The standard system pressure for a passenger car is usually within 3 kg/cm2. When stopping the engine, the pressure should not drop immediately - the regulator closes the return flow. If the pressure gauge needle quickly goes to zero, the RTD is most likely faulty.
Another way to check: if you manage to pinch the fuel return hose while the engine is running, then if the regulator is working properly, the pressure in the fuel system should increase. The indication of the arrow of the device depends on the degree of compression. But there are foreign cars where it is impossible to clamp the return line - instead of rubber hoses there are metal tubes, or the hoses are very short.
In some cases, by squeezing the return hose, you can verify that the RTD is faulty without a pressure gauge. But this is only due to one sign - when the engine idles and does not develop speed at all. If, when the return line is compressed, all cylinders begin to work and the engine acquires the required power, then the RTD is definitely faulty and needs to be replaced.
How to check the fuel pressure sensor
Depending on what fuel supply system is used for the car, there are three ways to check the sensor for functionality without dismantling the fuel rail:
- mechanical method for old-style cars with rubber fuel discharge hoses for gasoline internal combustion engines;
- multimeter;
- pressure gauge.
Dismantling the rack and subsequent diagnostics of the regulator is a more reliable way to check the quality of the mixture, since all adjacent components and wiring are checked together with the DDT. In most cases, diagnostics are carried out at a service station, since you will need to use a special stand. Self-diagnosis in the garage without dismantling the rack requires a tester and is carried out in 15 minutes.
Mechanical diagnostics of an old-style regulator
For gasoline internal combustion engines in which a rubber pipe is used in the fuel removal system, the sensor is located at the inlet of the pump. The check is carried out only on a cold engine.
- Start the engine.
- Remember the nature of its operation (a faulty sensor causes the motor to trip).
- Pinch the fuel outlet pipe with pliers for 1–3 seconds.
If the fault is in the regulator, the engine will restore its operation, the speed will become smooth, and jerking will disappear. If, after the outlet pipe is closed, the motor continues to operate incorrectly, the fault may be in clogged filters or worn contacts, although the sensor is working properly.
Diagnostics with a multimeter
Using a tester, they check the performance of the RTD and the quality of power from the block. Checking the electrical signal to the block is carried out in steps.
- Remove the block from the sensor.
- Set the multimeter to voltage measurement mode.
- Set the black lead of the tester to “minus”, attach the red probe to the connector of the block.
Operating principle of the fuel pressure regulator
To understand how a fuel pressure tester works, you need to know how it works. It consists of the following parts:
- Fuel pump;
- Pressure regulator;
- Electronic control unit pump;
- Fuel lines;
- Baka;
- Fuel filter;
- Injectors;
- Inertia switch.
Thanks to its design, the regulator controls and maintains the same fuel pressure relative to atmospheric pressure. Where is the fuel pressure regulator installed? Install it in the fuel tank.
Features of the device for monitoring fuel pressure in a system with fuel recirculation
The RTD is divided by a membrane into two chambers:
The valve holder itself is connected to the membrane and presses the valve to the seat. The fuel pressure, which is supplied to the chamber through special inlet passages, acts on the membrane from below. The pressure of the spring and the intake manifold acts from above. Sometimes the pressure can exceed the spring force. In this case, the valve is opened slightly, allowing gasoline to flow into the return pipeline. In this case, the pressure in the intake manifold must be taken into account.
During operation of the fuel pump, fuel leaves the tank, heading towards the filter. There it is cleaned and goes to the regulator. The regulator maintains the effective pressure in the system without stopping. The main thing is that all actions must occur correctly.
The device itself is located inside a steel case. It must also be able to withstand high pressure. The device mechanism itself consists of a diaphragm and also has a check valve. It prevents the fuel, which is under pressure, from returning to the line.
Replacing the fuel pressure regulator yourself
The equipment that we will talk about is referred to among car enthusiasts as a bypass (or check) valve.
This valve controls the distribution of pressure in the vehicle (fuel system), based on the load value and changes in the speed of the automobile engine. The location of this device on the fuel rail (rail).
When to sound the alarm
There are some main symptoms of problems with RTD:
— significant increase in fuel consumption;
— the engine refuses to idle and stalls;
— when driving, the engine operates unstably, jerkily;
— the vehicle cannot be accelerated.
What causes a breakdown of the diesel regulator?
One of the quite common problems with RTDs is the weakening of the spring that presses on the membrane. Thus setting the wrong tone in the operation of the bypass valve. They also talk about possible valve jamming. Everything described above naturally leads to unstable operation of the “heart of the car”, and it literally choke.
Checking the diesel regulator using a pressure gauge
Let's get ready for work. You need to change into work clothes, because... you will have to work under the hood. unscrew the fitting plug and twist the spool. Now you need to attach a short hose with a pressure gauge to the fitting. For reliability, secure the measuring device with a clamp and start the engine.
We read data from the device. They should be set at 2.9-3.3 kgf/cm² (285-325 kPa). The pressure has been established, now we can disconnect the vacuum hose from the check valve. The pressure gauge should display a value of 3.1-4.0 kgf/cm² (205-395 kPa).
If the parameters are within the specified limits, everything is fine. Otherwise, we will have to replace or repair the fuel pressure regulator itself.
Replace the bypass valve with a new one
The sequence of actions during work to replace the diesel regulator is as follows:
— relieve pressure in the fuel system;
— disconnect the vacuum hose from our valve;
- remove the fitting;
— We directly dismantle the regulator.
Attention! The fuel will be discharged under pressure! Be careful and use protective equipment. After relieving the fuel and equalizing the pressure, return the control valve to its original position.
We install a new check valve in the reverse order. It is worth taking a closer look at the sealing gasket. If it loses its elasticity, it should be replaced with a new one.
In general, the fuel pressure regulator itself, which is difficult to replace, as it turned out, is nothing at all.
How does the fuel pressure regulator work? RTD operating mode
It must be remembered that the level of fuel pressure in the ramp itself depends on the vacuum in the suction manifold: the less discharge, the greater the pressure. The main mode of operation of the regulator is idle. Just at the moment of operation at this speed, the vacuum begins to reach a low point, and the pressure level in the fuel rail leads to the highest indicator. This value is applied to the regulator body in order to correctly monitor pressure during diagnostics of the supply system.
Important: if the pressure regulator cannot be repaired, it should be replaced with a new one. To avoid this, it is necessary to check it as often as possible and monitor the pressure. This will allow you to avoid breakdowns in time and save your money on purchasing another pressure regulator. There is no guarantee that the new regulator will not avoid such problems.
Important: despite the operating mode of the engine, the RTD must always respond to changes in it
How does the fuel regulator work? RTD operating mode
The main operating mode of the RTD is idle. It is at this moment that the vacuum of the fuel mixture reaches its lowest point, and the pressure in the fuel rail reaches its highest. It must be taken into account that the pressure in the ramp directly depends on the degree of vacuum of the fuel mixture inside the suction manifold: the lower the vacuum, the higher the pressure. During idling, pressure and vacuum indicators reach maximum values. The maximum pressure value is applied to the RTD body to monitor the pressure during diagnostics of the fuel supply system.
An important point: in most cases of failure of the RTD, there is no point in repairing it; it just needs to be replaced with a new one. To prevent malfunctions, the regulator must be regularly checked and the pressure in the fuel system monitored. Regular preventative checks will help avoid breakdowns and save money on the purchase of spare parts. In addition: regardless of the engine operating mode, the RTD must clearly respond to all changes in operation.
We recommend: Replacing valve guides yourself
Signs of a malfunctioning fuel pressure regulator
Over time, the spring in the regulator may sag without creating the necessary force. The fuel will begin to return back to the tank. This will cause a decrease in pressure in the fuel rail. Such a breakdown will lead to a lack of fuel and loss of power in the engine.
If the valve is jammed, the pressure level in the fuel frame will change differently each time. In this case, the engine will not operate regularly, and the car will twitch during acceleration.
The main symptoms of a malfunctioning fuel pressure regulator :
- Uneven engine operation;
- Stopping the engine at idle;
- A sharp increase or strong drop in the crankshaft speed at idle;
- Loss of motor power;
- Poor vehicle acceleration when shifting gears;
- Poor response to the gas pedal;
- Car choking when driving, frequent jerking;
- A sharp increase in consumption.
If you detect at least one of the above symptoms, you should immediately check the device.
Causes of malfunction of the fuel pressure regulator in a car
Cause
What is a malfunction?
The most common malfunctions include mechanical damage to the parts of this unit or clogging in its part. This leads to a malfunction of the fuel pressure check regulator. Such damage may be associated with the obsolescence of the materials from which the mechanism itself is made. In this regard, the pressure regulator returns to normal, but its operation no longer meets standard indicators. For example: vacuum disturbances occur in its closed cavity, which makes it impossible for the engine speed controller to control the engine speed. A weakened inner spring causes low fuel line pressure.
Signs of RTD malfunction
Fuel pressure regulator for VAZ 2110
No matter how reliable a mechanical RTD is, over time its parts wear out and malfunctions and malfunctions occur in the operation of this unit. And now we will look at the main symptoms of such problems.
- increased fuel consumption;
- drop in engine power;
- Unstable engine operation at idle speed;
- jerks and dips when accelerating and changing gears;
- inadequate response of the car to pressing the accelerator pedal;
Let's consider the causes of the main problems of RTDs. First of all, you should check the condition of the spring. Over time, it may lose its elasticity, and as a result, the valve opens earlier than necessary. As a result, fuel is returned to the tank in larger quantities than necessary. The pressure in the system drops and the engine loses power. In this case, the spring should be replaced if the design of the regulator allows it.
Sometimes, especially when working with domestic fuel, the membrane simply becomes clogged and cannot close completely or partially. This again leads to a decrease in fuel pressure in the system and all the ensuing consequences. In such situations, again if the design of the RTD allows, cleaning can be done. But repairs do not always help, since wear of the valve and its parts can cause the regulator to not perform its functions fully even after the breakdown has been eliminated.
Less often, but still, situations occur when the fuel pressure regulator simply jams. In this case, the engine completely stalls, and fuel begins to flow from all possible and impossible holes. Repair in such cases is unpromising and a clogged regulator is easier to replace. But for the fuel pressure regulator to become clogged to the point of complete obstruction, there must be absolutely no fuel, since the system has a fuel filter that is designed to clean the fuel, and since it seriously fails to cope, it is better to change the gas station.
It is possible that the fuel pressure regulator valve becomes partially clogged and begins to operate jerkily. These jerks are transmitted to the operation of the engine and are perfectly felt by the driver, and even by the passengers of the car. In this situation, cleaning the RTD has a much better chance of returning its performance to an acceptable level.
In general, the electronic fuel pressure regulator is less susceptible to fuel quality and other mechanical factors that have a negative impact on this unit, but it also has its own weak points and characteristic vulnerabilities. On the other hand, if you don’t pour frankly bad fuel into the car’s tank, change the fuel filter on time and generally take care of the car, then any RTD will run for a very long time.
How to check the fuel rail? Checking the RTD yourself
Checking the fuel pressure regulator is carried out to identify malfunctions or for prevention. Such checks are carried out based on the recommendations of the car manufacturer. But still, how to check the pressure in the fuel rail? Basically, the check consists of inspecting and checking the pressure of the fuel system at various engine speeds. Then comparisons are made with indicators that correspond to the norm.
It is necessary to carefully inspect the tightness of the connections, the condition of the vacuum hose, as well as the regulator itself. If no damage or defects are found, then the regulator is dismantled by completely disassembling it. If a blockage is detected in this unit, it is washed.
Important: the pressure in the fuel rail should be diagnosed using a pressure gauge. It is connected to a special diagnostic fitting.
How to check the fuel pressure regulator. Diagnostic tools regulate fuel pressure
You can also check the regulator yourself. To do this, you do not need to use any special tools or have any special auto mechanic skills. You will need to pinch or disconnect the valve and observe the force of the jet. Or for a better check, use a pressure gauge.
To measure the RTD pressure in the engine when turning on idle speed, it is worth connecting a pressure gauge, installing it between the fuel hose and the fitting. Don't forget to disconnect the vacuum hose. Below we will look at what pressure should be in the fuel rail of a VAZ 2110.
How do malfunctions of the fuel pressure regulator affect engine performance?
A faulty regulator valve affects not only operation, but also the very start of the engine. If the device is working properly, the pressure in the fuel rail does not drop after the engine stops. If the valve has a malfunction, then the pressure in the fuel rail drops when the engine stops. The engine will not start until the sediment has completely filled the system. And only after reaching the desired level, the first engine start signals may appear. Here everything will depend on the power of the battery. Otherwise, the engine will not be able to start. Therefore, if the pressure in the fuel rail does not hold, this indicates a malfunction!
In addition to the above, gas failures may occur during acceleration of the car, unstable idling, and a general weakening of engine power will begin to appear.
Fuel pressure regulator - why can it break?
To verify the malfunction, you can use one of the testing methods. Many mechanics can tell you the easiest and fastest way to check the fuel pressure regulator with a pressure gauge; we will do this a little lower. Problems usually occur due to the fact that after a certain time the spring that holds the pressure in the pump sags. Thus, it no longer creates the necessary pressure, and as a result, part of the fuel returns back to the tank, and, consequently, the pressure in the fuel rail decreases. As a result, we have a large lack of fuel and loss of power during engine operation.
Also, a number of problems can arise if the pressure valve begins to jam. In this case, the pressure in the fuel frame will begin to change sharply, this will not happen naturally. From here, unstable and unreliable engine operation will be immediately noticeable. You will immediately feel a jerk during acceleration or one of those malfunctions that you could find out above. So, it’s time to figure out step by step how to replace the fuel pressure regulator. First we will also look at how to test the regulator and then remove it.
Replacing the fuel pressure regulator in az 21 10 (and other cars)
To ensure that your car is always on the road and there are no problems with the fuel pressure regulator, you need to take the time for a thorough inspection.
1) Under the hood of the car, open the fitting plug, which is responsible for controlling the fuel pressure at the end.
2) Take a special protective metal cap and carefully unscrew the spool from the inner cavity of the fitting.
3) Then attach a hose with a pressure gauge to it. Secure it to the fitting using a clamp. After this, you should start the engine and check the pressure shown by the pressure gauge. It should not be higher than 325 kPa ( 3.25 Bar ).
4) Carefully disconnect the vacuum hose from the pressure regulator. You will immediately see how the pressure will increase on the pressure gauge. If this does not happen, you should replace the device with a new one. A device that has not been repaired cannot be repaired. But how to change the fuel pressure regulator?!
5) Now you can slightly reduce the pressure in the power system and remove the vacuum hose from the RTD. To do this, you will need to unscrew the reinforcing nut on the fuel drain pipes to the pressure regulator.
6) You need to unscrew the two bolts securing the device to the fuel rail.
7) Now you can remove the regulator from the fuel drain pipe itself. If the ring does not immediately detach and remains in the ramp, remove it. It is put on the regulator before installation. The regulator must be installed in the reverse order, observing the exact sequence.
So now you know the causes of fuel pressure regulator failure and how to replace the fuel pressure regulator. The most important thing is not to rush, and follow the sequence of actions.
Fuel pressure regulator (FPR) is part of the system that supplies the injection engine. This element maintains the fuel pressure in the injectors under various operating modes of the internal combustion engine. The regulator actually plays the role of a diaphragm valve, ensuring good performance and stable operation of the injectors and motor. It is important to know how the pressure sensor works and the signs that indicate its malfunction.
Why do you need a fuel pressure regulator?
On injection engines, the air mass enters the combustion chambers from the intake manifold, and fuel from the injectors. Gasoline is supplied to the nozzles under pressure through the fuel rail. A fuel pressure regulator (FPR) is needed to adjust the pressure of gasoline supplied to the injectors.
On most vehicles, the fuel pressure regulator is a mechanical type device. On some models, the valve is controlled by an electronic unit.
The main components of the RDT are:
- Frame. The product is sealed. This prevents gasoline from leaking from the system.
- Elastic membrane. The diaphragm regulates the pressure.
- Diaphragm rod. Used for free movement of the membrane inside the housing.
- Spring. Keeps the locking mechanism in the closed position.
- Check valve. Prevents reverse movement of fuel.
The purpose of the RTD is to maintain the required fuel pressure in the system at different crankshaft speeds. The operating principle of the regulator differs depending on the type of fuel system of the vehicle. Injection engines come with 2 types of fuel systems.
With fuel circulation
The design provides for the constant movement of gasoline from the tank to the fuel rail and back. In this case, the liquid is supplied to the tank through a separate pipeline (return). The RTD is installed on the rail after the injectors. This makes it possible to maintain the same pressure for all sprayers.
The pressure regulator is connected by the inlet fitting to the rail, and the outlet connection to the return line. The vacuum cavity of the part is connected to the intake manifold.
Pressure adjustment is carried out as follows:
- Gasoline enters the sealed cavity of the device. A check valve prevents fluid from flowing in the opposite direction. The outlet is blocked by a locking mechanism connected to the membrane.
- As the pump pumps fuel, the pressure in the sealed cavity increases.
- On the reverse side of the diaphragm, a vacuum is created in the cavity connected to the intake manifold. This promotes membrane displacement.
- The diaphragm opens the locking mechanism. In this case, part of the liquid flows into the return pipeline.
At idle, the throttle valve is closed, which creates a strong vacuum. The membrane opens the locking mechanism, the pressure in the fuel system decreases. The further the throttle valve opens, the higher the pressure becomes. So the indicator depends on the crankshaft speed.
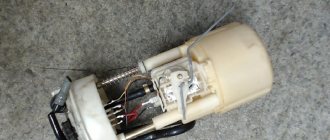
No fuel circulation
The regulator is installed directly in the tank. Excess gasoline is dumped into a container before it is supplied to the main line. The advantage of such a system is that there is no heating of the liquid flowing back into the tank.
This type of regulator is not connected to the intake manifold. The diaphragm moves under the influence of excess fuel pressure. To avoid the formation of a vacuum on the back side of the membrane, the cavity is exposed to the atmosphere.
Purpose of the regulator
The sensor maintains the optimal pressure in the fuel rail, necessary for the correct operation of the injectors in different operating modes of the unit. The RTD determines the intensity of fuel supply and its quantity. Fuel enters the engine cylinders through the injectors.
Dosing accuracy and maintaining the required pressure is ensured by a membrane control valve, onto which springs press at one end and fuel at the other. There are two options for placing an element:
- The RTD is used in power systems with a check valve and is mounted on the fuel rail.
- In designs without “return”, the sensor is installed on the fuel tank.
In the first case, the fuel pump pumps fuel through the line from the tank. The resulting pressure affects the regulator. The device contains two chambers: fuel and spring, which are delimited by a membrane.
Location in the vehicle structure
In modern cars, two layouts of the fuel pressure regulator are used. In systems with a return line, it is installed on the fuel rail, and in designs without a “return” - directly inside the fuel tank (in the pump). The diagram located on the fuel rail involves connecting the regulator to two lines of the system:
Layout of the fuel pressure regulator in the system
- inlet - the supply channel from the fuel tank to the power system;
- return exhaust – channel for draining excess fuel (pressure relief).
In such a system, when the regulator opens, excess fuel enters the return line and then into the fuel tank. This scheme has some disadvantages:
- complexity of the design and the need to install an additional pipeline;
- heating of excess fuel when it enters the ramp, which increases the vapors generated in the tank.
Each fuel regulator has its own factory settings and is suitable for a given car model. There are also universal designs for injection systems, which are equipped with pressure gauges and the ability to manually adjust. They are installed instead of the standard regulator exclusively in the fuel rail.
When the fuel pressure regulator is placed directly in the tank, the required amount of working fluid with a given compression level immediately enters the engine without the use of an additional line. In this case, the excess is also discharged directly into the tank, but it does not enter the engine compartment, which eliminates its heating.
In this case, a constant pressure difference is established relative to atmospheric pressure, and the amount of vacuum in the intake manifold is taken into account by changing the injection duration.
Possible faults
Failures in the power system can occur for various reasons. Therefore, when diagnosing, you need to take into account some features of a regulator failure and symptoms of low fuel pressure. The main features include:
- reduced power, high fuel costs;
- dips and jerks during acceleration and throttle change;
- unstable operation and engine shutdown at idle;
- slow car response when adding gas;
- The car does not pick up speed and does not accelerate.
Signs of low pressure in the RTD on gasoline cars are similar to symptoms of a malfunction in the fuel pump or a broken fuel filter. The system stops working correctly due to loss of spring force. In this case, the fuel does not reach the required level and goes into the check valve. As a result, the engine does not have enough fuel to accelerate and increase speed. Low pressure in the sensor reduces engine power. The electronic control system cannot optimally adjust the fuel for different modes.
Another cause of failure could be a clogged RTD or reduced throughput.
In this case, the engine stalls in any operating mode. A clogged regulator can lead to an excessive increase in pressure and fuel overflow through the connections of the sealing elements.
The fuel pump always takes in fuel with some reserve to prevent a possible decrease in the performance of the injectors and sensor. Therefore, if it is difficult to drain fuel into the return valve, the pressure in the system increases.
Periodic jamming of the pressure regulator also leads to failures.
The car begins to move jerkily, pressure drops occur in the sensor. The cause of the breakdown may also be wear of the valve inside the device. Its service life can be shortened by low-quality fuel with impurities, or by keeping the machine idle for a long time without starting the engine.
How does the fuel pressure regulator (FPR) work and where is it installed?
Vehicle fuel system design
The RTD device is a vacuum valve. Its general structure is a body with a valve, a membrane and a spring. There are three holes in the housing - two of them are the fuel outlet, the third leads to the intake manifold. The principle of operation of the fuel pressure regulator is as follows: when the engine picks up speed, fuel consumption increases significantly and, as a result, a vacuum is created in the third outlet, which collects the spring, lifting the membrane. This opens the valve in the fuel pressure regulator. After creating enough pressure for the set number of revolutions, the check valve redirects the fuel back to the tank through the return hose.
RTD is otherwise called “check valve”.
A decrease or increase in pressure in the fuel line of a car is required when the engine operates at different speeds. For example, at idle speed it requires a very small amount of fuel to operate. Accordingly, the pressure in the system will decrease. And the state of the fuel system takes on a completely different look during significant loads (car acceleration). For high-quality engine operation and sufficient fuel supply under these conditions, a sharp increase in pressure occurs. So where is the fuel pressure regulator located? As standard, it is located in the fuel rail. It happens that its location is changed - for example, the RTD is installed in the return hose or even in the tank. Installation in the gas tank allows you to avoid additional fuel lines, and the check valve simply does not allow excess fuel into the system. But, regardless of its location, the fuel pressure regulator performs the same function - maintaining the required and safe fuel pressure for the vehicle.
Checking an element
In most cases, if problems are detected, it is better to completely replace the fuel pressure regulator. Changing individual elements, cleaning and other manipulations cannot always restore the required performance to the device. The affordable price of the RTD also contributes to the decision to completely replace the component.
The easiest, most accessible and effective way to check the regulator is to measure the indicators using a tire pressure gauge. To determine the idle pressure, the device is connected between the fitting and the fuel system hose. The measurements must indicate pressure within a certain range. The vacuum hose is then disconnected.
As the pressure increases, the indicator should be between 0.3−0.7 Bar. If the value is outside this range, install a new vacuum hose and repeat the test in the following order:
- The fuel pressure on the end area of the ramp is determined after unscrewing the fitting plug. It is also necessary to check the O-ring for integrity and elasticity. If there are defects, then the element or the entire plug must be replaced.
- The umbrella is unscrewed from the fitting; for this you can use a metal valve cap. A hose with a pressure gauge is connected to the part and secured with clamps. After this, the engine is started and measurements are taken. Indicators within the normal range are 2.9−3.3 kgf per square meter. cm.
- The hose is disconnected from the regulator. You need to check the pressure gauge readings; the pressure should increase to 20−70 kPa. If the value remains low or zero, the device must be replaced.
Replacing the regulator yourself
Now let's start replacing. First you need to set aside time, and after putting on work clothes, you can climb under the hood:
- Before removing the regulator, be sure to relieve some pressure in the vehicle's fuel system.
- Then carefully separate the vacuum hose from the regulator and unscrew the nut securing the fuel drain pipe attached to it.
- Next, unscrew the 2 bolts that provide rigid fastening of this module to the fuel frame, then pull the fitting out of the hole.
- Remove the regulator from the fuel drain pipe and with it the sealing ring, which it is advisable to immediately put on the new regulator so as not to lose it.
As a rule, the regulator cannot be repaired and is recommended for replacement. Install the new regulator in the reverse order of disassembly.
If necessary, you can check and replace the O-rings and lubricate them with engine oil.
Renault Vel Satis 2.2 dCi Expression $ › Logbook › Cleaning the fuel pressure regulator
Hi all.
Continuation of my topic on preparing the car for winter. Today we are cleaning the fuel pressure regulator. What it is? We refer to the documentation for our G9T engine, pages 13B-77, 13B-78. Causes
Almost all 2.2 dCi owners sooner or later encounter a problem - the fuel pressure regulator. This did not escape me either. My problem manifested itself in the following way: - when hot at idle it could stall, without any particular pattern and with arbitrary frequency - “breathing” speeds, i.e. When idling, there was a slight twitching of the speed
Finding the problem
Thanks to our wonderful club forum, I found the reasons and a detailed description of how to fix the problem.
Location
— the fuel pressure regulator is located on the front of the fuel injection pump, within easy reach:
Dismantling
— It is MANDATORY to clean the contact area of the regulator to the fuel injection pump from sand and other dirt, do not allow any contaminants to get into the hole (!) — disconnect the “chip” on the regulator — unscrew the 3 bolts securing the regulator (T-25 sprocket) — carefully turning it left and right to remove regulator
Cleaning
- take a large diameter head, I used it on 32 - insert the regulator inside and tap the head on a hard surface until the inside of the regulator begins to come out by inertia - having knocked out the inside, thoroughly rinse and blow through all parts with a cleaner (I used a cleaning agent carburetor) - we assemble in the reverse order, to “press in” I used a 22mm head
(!) When “pressing” it is very important not to use excessive force, so as not to break off the “ears” of the regulator fastening. The end of the inner part can be pre-lubricated with grease.
Source
How to check the fuel pressure regulator
The question of how to check the fuel pressure regulator is asked by owners of not only cars with gasoline, but also diesel engines.
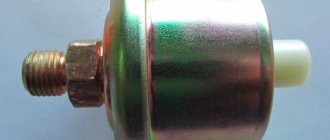
This unit is installed in the fuel rail of both one and the other engine. Sometimes there may be two of them - one each for the low and high pressure circuit. The design of the fuel pressure regulator includes a metal membrane and strain gauges that can change the voltage. In reality, testing devices just comes down to measuring the voltage or resistance they produce.
The principle of operation of the device. Before we talk about checking the fuel pressure sensor, you should carefully understand the principle of its operation. DDT consists of electrical and mechanical parts. The mechanical part is represented by a metal membrane, which bends under the influence of the force created by the pressure in the fuel system. It is also worth noting that on sensors designed for different pressures, the membrane will have different thicknesses. The thicker the membrane, the higher the pressure the sensor can operate at. Some cars use two sensors - on the high and low pressure circuits, with the corresponding name.
DDT consists of electrical and mechanical parts.
The electrical part of the sensor includes four strain gauges that change their own electrical resistance, depending on the mechanical impact on them. They are connected according to the Winston bridge electrical circuit, and voltage is supplied to them through an amplifier. Its output value will vary depending on how much the membrane bends. In fact, checking the fuel pressure sensor involves measuring the voltage at its output.
According to the information received from the sensor, the ECU sends a command to open the fuel valve, which results in a release of pressure due to its bypass from the rail. This will be relevant both for injection gasoline engines and for diesel engines, which are controlled via electronic systems.
Checking the sensor for serviceability
Signs of sensor malfunction . Evidence of a malfunction of this system is:
- The Check Engine light turns on on the dashboard;
- Loss of motor power;
- Excessive fuel consumption;
- Poor engine starting;
- Engine “dips” when operating at high speeds.
Verification methods. There are two ways to check the fuel pressure sensor for serviceability - by removing the fuel pressure regulator, or without doing so. The first method is more complex, but it can be used to check not only the fuel pressure sensor, but also other elements of the system.
In addition, you will need a special stand, available in car workshops, or in the garages of some car enthusiasts.
You can check this type of sensor by simply pressing the fuel “return” for a short time
Checking old-style sensors. You can check this type of sensor by simply pressing the fuel “return” for a short time. This can only be done “cold”, while the engine has not yet warmed up. This method is used only on engines where only long rubber hoses are used. In modern versions of cars they are often made of metal, so it’s simply not possible to squeeze them.
Checking the CommonRail injection pump regulator. First of all, the resistance level of the control inductive coil is checked here. Exact data is taken from reference literature, but approximately it is about 8 OM. If the value differs in one direction, the sensor is faulty and needs to be replaced.
Conclusion. The fuel pressure regulator is a simple, but important component of the fuel system. This applies to both gasoline and diesel engines. If it fails, the engine stops working in optimal mode, and the fuel mixture is not prepared according to the rules, which leads to accelerated wear of the fuel pump. If the sensor fails, it must be repaired or replaced as quickly as possible.
Cleaning the Mono-Motronic fuel pressure regulator
The information is applicable for the repair of cars with a Mono motronic injection system (ABS, AAM, ABD, ABU engines, etc.) These engines were installed on cars:
Volkswagen Passat B4 / Volkswagen Passat B4 (3A2) 1994 - 1997 Volkswagen Passat Variant B4 / Volkswagen Passat Variant B4 (3A5) 1994 - 1997
Volkswagen Passat B3 / Volkswagen Passat B3 (312) 1988 - 1994 Volkswagen Passat Variant B3 / Volkswagen Passat Variant B3 (315) 1988 - 1994
Volkswagen Golf 3 / Volkswagen Golf 3 (1H1, 1H5) 1992 - 1998 Volkswagen Vento / Volkswagen Vento (1H2) 1992 - 1998 Volkswagen Golf Cabriolet 3 / Volkswagen Golf Cabriolet 3 (1E7) 1993 - 2002
SEAT Ibiza 2 / Seat Ibiza 2 (6K1) 1993 - 2002
SEAT Cordoba / Seat Cordoba (6K2) 1993 - 2002
SEAT Toledo / Seat Toledo (1L) 1991 - 1999, etc.
For cleaning we will need: Socket 10 Pliers Torx keys 20 and 25 Clean rag or napkins A little gasoline, water and maybe a little carb cleaner.
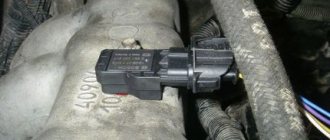
0. Open the hood, we see something like this
1. Disconnect all vacuum pipes from the scroll: two for the cold/high valve on the back side and one for ventilation of crankcase gases from below. We unscrew the three bolts with a 10mm head, lift the snail and move it to the side. The corrugation does not need to be disconnected from it. We get something like this.
2. Just in case, disconnect all connectors. We bleed off the pressure in the fuel system - use pliers to move the clamp on the supply pipe, place a rag or napkins under the junction of the pipe book with the mono-injection body and carefully remove it, slightly turning the pipe back and forth. Gasoline will flow from it. After standing for about 15 minutes, very little spilled out - three napkins successfully absorbed everything.
3. Carefully pull out the 4 wires from the plastic holder, use a Torx-25 wrench to unscrew the bolt securing the injector cap (on which the DTVV lives), carefully lift it up and put it aside.
4. Remove the black plastic ring from the fuel pressure regulator (it was in it that the wires from the DTVV were held), hooking it on the right edge. Again, carefully use a Torx-20 wrench to unscrew the 4 bolts securing the pressure regulator cap diagonally. Be careful - the spring may pop out. It didn’t pop out for me, because everything inside was sour and stuck.
5. Remove the lid and set it aside. Gently and without sudden movements remove the metal cover. It may be dried up, but you should not pull it sharply - both it and the spring from under it may fly away. We lift the lid.
And we see a spring on the membrane
6. Having removed the lid and spring, Her Majesty the Membrane appears to our eyes
7. Use your hand (not a screwdriver or knife!) to pull it out. If he doesn’t want to go, carefully turn it a little and move it, but remove it. We don’t touch it with anything sharp. Having removed the membrane, we see:
8. Using a slightly damp (water or gasoline) napkin or cloth, clean everything - the body, the membrane. Carb-Cleaner does not
splash - it will corrode the hell out of it.
You can use a carb cleaner to wash the spring and regulator cap. But be sure to wipe it dry with a clean cloth or napkin!
so that the membrane does not come into contact with the carb cleaner.
9. When everything is dry and clean, reassemble in the reverse order: Put the membrane in place. On the reverse side there is a slightly movable “pipstick”. We put it in a level position and simply lower the membrane into its seat. Place a spring in the top center and place the cap on top. We put the outer fastener on the lid with the curved center down
and carefully evenly press the fasteners to the body. First we attach 4 bolts diagonally, then fasten them with a Torx-20 key. Tighten not to the point of awesomeness, but with the same force with which they were screwed earlier. We put a plastic ring on top. We thread the wires from the injector cap into the wire holder on the ring, carefully put it in place and fasten it with a bolt - a Torx+25 key. We put on the fuel supply hose, fix it with a clamp. We put on the mono-injection volute, screw in three bolts with a 10-head, connect all the vacuum pipes to the volute ( three pieces) Connect all disconnected connectors. Let's start.
Where is the fuel pressure regulator located?
To find the installation location of the fuel pressure regulator, let’s figure out what it is and what it is needed for. This will help in further searches and diagnostics.
The first thing you need to know is that there are two main types of RDTs - mechanical (old type) and electrical (new type). In the first case, this is a vacuum valve, the task of which is to transfer excess fuel under excessive pressure back into the fuel tank through the corresponding hose. In the second, it is a fuel pressure sensor that transmits relevant information to the ECU.
Typically, the fuel pressure regulator is located directly on the fuel rail. Another option for its placement is the fuel return hose of the power system. Another option is to locate the regulator directly in the fuel tank on the pump module. In such systems there is no fuel return hose as unnecessary. Such an implementation has several advantages, including simplified design (no extra pipeline), excess fuel does not enter the engine compartment, fuel heats up less and does not evaporate as much.
How does the fuel pressure regulator work?
Structurally, the old-style valve (installed on gasoline cars) has its own body, inside which there is a valve, a membrane and a spring. The housing has three fuel outlets. Through two of them, gasoline passes through the pressure regulator, and the third outlet is directly connected to the intake manifold. At low (including idle) engine speeds, the fuel pressure in the system is low and it all goes into the engine. As the speed increases, the corresponding pressure increases in the manifold, that is, at the third terminal of the RTD, a vacuum (vacuum) is created, which, at a certain value, overcomes the resistance force of its spring. This creates the movement of the membrane and the opening of the valve. Accordingly, excess diesel fuel gets access to the second output of the regulator and goes back into the fuel tank through the return hose. Due to the described algorithm, the fuel pressure regulator is often called a check valve.
As for the fuel pressure sensor, it is a little more complicated. So, it consists of two parts - mechanical and electrical. The first part is a metal membrane that bends under the influence of force caused by pressure in the fuel system. The thickness of the membrane depends on the pressure for which the fuel system is designed. The electrical part of the sensor consists of four strain gauges connected according to a “Winston bridge” circuit. Voltage is applied to them, and the more the membrane bends, the greater the output voltage from them will be. And this signal is sent to the ECU. As a result, the electronic control unit sends the appropriate command to the pump so that it supplies only the amount of fuel required at the moment.
Diesel engines have a slightly different fuel pressure regulator design. In particular, they consist of a solenoid (coil) and a rod, which rests against the ball to shut off the reverse flow. This was done for the reason that the diesel engine vibrates very strongly during its operation, which affects the wear of the classic (gasoline) fuel regulator, that is, partial and even complete compensation of hydraulic vibrations occurs. However, its installation location is similar - in the engine fuel rail. Another option is on the fuel pump housing.