Installation and dismantling procedure
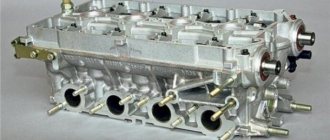
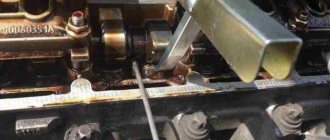
The part called the cylinder head is attached to the cylinder block with 10 screws. They are unscrewed with a 10mm socket wrench. The procedure for dismantling the cylinder head is shown in the first photo.
Reversal sequence (1-10)
The standard screw length is 9 3 mm. If the screw has been pulled out to at least 95 mm, it is replaced with a new one (AvtoVAZ requirement).
During installation, a different scheme is used (photo 2). Each screw is lubricated with machine oil, otherwise the efforts will be reduced to nothing.
The order of tightening the head is indicated in this photo
Tightening torque for cylinder head cover bolts
For VAZ-2112, the cylinder head tightening torque is standardized:
- First pass – the force is 20 N*m;
- Each screw is turned 90 degrees to the right;
- Wait 20 minutes, then turn the screws another 90 degrees.
At first the effort is very small. But at “step 3” it will be difficult to cope with the work. Use the lever.
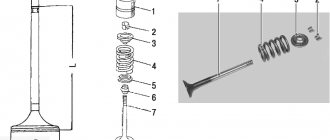
Why are guide bushings needed?
Before installing the cylinder head, perform the following steps: clean the threaded holes, as well as all holes for the bushings (photo 1). Each bushing is installed in place, and only then a gasket is placed on top.
Everything is ready to install the cylinder head
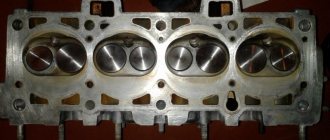
Metal parts adjacent to the gasket must be degreased. We looked at the cylinder head tightening diagram, but the cylinder head itself must be installed correctly:
- We place the cylinder head on the cylinder block;
- By moving the part in different directions, we ensure that the bushings fit into the recesses.
After “step 2” the screws can be tightened.
Sealant
No sealing compounds are used when installing the gasket! Solidol, CIATIM and other lubricants are not even needed. The main thing is that the metal must be degreased. And the cylinder head gasket must be new.
Engine tightening torques for VAZ 2113, 2114, 2115
Tightening torque of the cylinder head of the VAZ 2113, 2114, 2115 engine:
- We tighten the M12XI.25 bolts for the cylinder head connection 4 times:
- tighten the dowels with a force of 2 kgf/m;
- tighten the hardware with a tension of 7-8.6 kgf/m;
- tighten the hardware by 90°;
- Tighten the bolts again by 90°.
- M10 bolts fastening the engine cylinder head tire with a force of 6.7-8.3 kgf/m
- M6 dowel for connecting a cylinder head tire with a voltage of 0.2-0.5 kgf/m
Tightening torque of the camshaft of the VAZ 2114, 2113, 2115 engine:
- Nut M8 fastening the camshaft bearing housing with a force of 1.9-2.3 kgf/m
- M10 bolt for connecting the camshaft pulley with a voltage of 6.7–8.3 kgf/m
Tightening torque for main vases 2114:
- Dowel for connecting the main bearing tires of the crankshaft MlOxl.25 with an impulse of 6.8-8.4 kgf/m
- hardware connecting the oil receiver to the main bearing tire MB with a force of 0.8-1 kgf/m
VAZ engine crankshaft tightening torque:
- hardware fastening the crankshaft pulley M12x1.25 with a force of 9.8-10.8 kgf/m
Tightening torque for VAZ 2114, 2113, 2115 engine connecting rods:
- Nuts of bolts for attaching connecting rod caps M9xl with voltage 4.3 - 5.4 kgf/m
VAZ 2114 flywheel tightening torque:
- Hardware connection for handwheel M10x1.25 with voltage 6.1-8.7 kgf/m
Tightening torque for VAZ 2114 engine pump 8 valves
- Bolt fastening the cooling antifreeze pump MB with a force of 0.8 kgf/m
| VAZ engine tightening torque table | ||
| Name of propulsion devices and parts | Thread | VAZ 2114 engine tightening torques, kgf/m |
| Oil pump connection bolt | MB | 0,8-1 |
| Oil pump pressure reducing valve screw plug | M16x1.5 | 4,6—7,4 |
| Oil pump housing attachment pin | MB | 0,7-0,9 |
| Hardware attaching an oil receiver to an oil pump | MB | 0,7-0,8 |
| Bolt securing the oil pan | MB | 0,5—0,8 |
| Oil filter fitting | M20x1.5 | 3,8-8,8 |
| Catastrophic oil pressure sensor | М14Х1.5 | 2,4-2,7 |
| Nuts attaching the thermostat pipe | MS | 1,6-2,3 |
| Bolt fastening the cooling structure tube flange to the cylinder block | MB | 0,4-0,5 |
| Hardware attaching spare engine parts | MB | 0,7—0,8 |
| Bolt lock nut connecting the front engine support to the spar bracket | M10x1.25 | 4,2—5,2 |
| Hardware fastening the front propulsion support to the engine cylinder block | MlOxl.25 | 3,4-5,2 |
| Dowel nut attaching the left motor bracket to the spar | M10x1.25 | 4,2—5,2 |
| Wing for attaching the left engine bracket to the gearbox housing | M10x1.25 | 3,2-5,2 |
| Hardware nut fastening the bracket to the rear base of the power unit to the propulsion unit | M12 | 6,1—9,8 |
| Nut attaching the rear engine bracket to the body | M10x1.25 | 2,8-3,4 |
Healthy ! Fuse box VAZ 2114
How to tighten cylinder head bolts correctly?
Before you begin installing the cylinder head, you should first pay attention to the condition of its bolts. They must have a good thread and the length meet the required standards.
The normal overall length of the cylinder head bolt is 135.5 mm. If the bolts removed during gasket replacement meet this parameter, they can be reused. If the bolts have lengthened during engine operation, then they can no longer be used and new ones should be purchased.
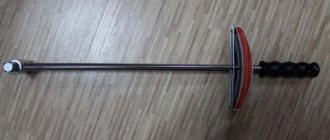
Having dealt with the bolts in this way and installing them in place, you should proceed to tightening. It must be done only with a torque wrench. Tightening bolts “by eye” can lead to very serious consequences, including damage to the engine itself.
And so, how to stretch the head onto a VAZ 2114 correctly? Firstly, you should remember that you should start tightening the bolts from the center to the edges.
This diagram looks like this:
- 7 3 1 4 9
- 8 6 2 5 10
Secondly, tightening should be done in four stages (each of which is performed in exactly the same sequence as indicated in the diagram above).
At the first stage, we tighten each of the bolts with a torque wrench with a force equal to 2 kgf/cm2.
At the second stage, we tighten all the bolts with a force of 8 kgf/cm2.
At the third stage, we tighten the bolts, turning each of them at an angle of 90 degrees.
At the fourth stage, we again turn each of the bolts (still following the diagram given at the beginning) at an angle of 90 degrees.
Once all four steps are completed, tightening the cylinder head bolts can be considered complete.
The tightening of cylinder head bolts should be taken as seriously as possible. All its stages must be performed strictly in the same order and with equal effort at each of them. Failure to comply with this rule can lead to rapid wear of the gasket and the appearance of oil and coolant leaks.
Correct cylinder head tightening order
The tightening force is clearly regulated by the manufacturer and should not be violated.
The procedure for tightening the cylinder head bolts differs depending on the car, although for most domestic cars the instructions are similar.
Niva
In the VAZ 2123, the procedure for tightening the cylinder head bolts is as follows.
It will look the same on all subsequent cars!
The cylinder head is pulled in 4 stages:
- Maximum 20 N-M;
- Up to 85 N-M;
- Rotate the bolts 90 degrees;
- Repeat point 3.
A similar tightening torque is used in the VAZ 2114 8-valve cylinder head, Kalina, Granta, 2106 and 2107.
Niva 21214
In the new revision of the Niva, whose engine was created according to the Euro 3 standard, the tightening force is different. Here is the bolt tightening diagram. As you can see, there is an 11th bolt here, removed from the main battery.
The instructions are similar to the previous one, but the 11th cylinder head bolt is tightened with a tightening torque of 39.1 N-M in one approach.
Removing the cylinder head of a VAZ 2107
Now is the time to remove the timing chain. To do this, loosen the tensioner, or even better, remove it completely. Only after this can you unscrew the bolt that secures the sprocket to the camshaft. But don't forget to straighten the washer before you start unscrewing it.
To prevent the chain from falling, it must be held with a soft wire. Next comes the turn of the camshaft. It is secured to the cylinder head with nine nuts. The shaft is very easy to remove, there will be no problems with it. Then you need to get rid of the exhaust pipe and unscrew the exhaust manifold mounting nuts.
That's it, the withdrawal is almost complete. There are 11 bolts left that secure the head to the block. To unscrew them, you will need to use a socket wrench with a long handle. A dynamometer is not suitable for such purposes.
Tightening torque for cylinder head VAZ 2114 injector 8
After the operational period of the gasket installed in the cylinder block is completed, as well as after a rupture, it must be changed.
The main sign of a seal problem is coolant leaking where the powertrain block connects to the cylinder head.
Replacement procedure
To replace the gasket, it is necessary, first of all, to completely dismantle the entire assembly, remove the seal that has become unusable and reassemble everything in the reverse order. At the final stage, it will be extremely important to tighten the bolts correctly.
The procedure is carried out in the same order for engines with both 16 and 8 valves. First of all, it will be necessary to disable the sensors that control the coolant temperature and oil pressure.
After all this, you will need to remove the drive gear from the camshaft. Before this, the piston located in the first cylinder must be moved to top dead center (TDC).
Only after this is it possible to remove the casing and the drive belt itself, loosen the bolts securing the gear and remove it completely.
Now comes the turn of the electrical cables. In order to remove the block with the ignition wires, you will need to press the latch. The central high-voltage loop is switched off in the same way.
Next, you need to remove the fuel hose coming out of the pump - here you will need to disassemble the clamps holding it. Then the traction of both the air and throttle valve drives from the carburetor is disconnected.
Adjusting the bolt torque
In order to do everything correctly and avoid mistakes, you must strictly adhere to certain rules and follow the order of execution.
Tightening should only be done with a special torque wrench, which allows you to control the tightening torque.
First, using a torque wrench, set the holder to the zero position. This means that the device data is equal to the moment of the original position. Then, you need to look at the indicator of the device when starting the fastener. Rotating the holder, we monitor the indicators. If the moment has not changed, this means that the fastener can be stretched and this is normal, as it should be. If the torque increases rapidly, bolt movement must be achieved. This indicates low stretch of the holder. This means stabilization is needed.
While the vehicle is running, the bolts that secure the cylinder head are constantly experiencing various impacts. They constantly heat and cool, which over time leads to the destruction of the structure of the fasteners.
For all power units there are specific rules that must be followed during operation:
- Strictly follow the data specified in the practical manual for the VAZ 2109.
- Adjustment is carried out only with a torque wrench. The use of another device will not allow this work to be performed correctly.
- Use only good bolts.
Replacement bolt kit
- When starting to work, be sure to check the condition of the holders.
- Strictly adhere to the tightening torque values recommended by the manufacturer.
- torque wrench;
- caliper or ruler.
The most important data regarding adjustments is in the annotation for each specific car. As a result, you must carefully study and adhere to what is written in it. During operation of the vehicle, you must strictly comply with all manufacturer's requirements and systematically diagnose the car. Correct and smooth operation of the VAZ 2109 power unit prevents the need to adjust the cylinder head holders.
Since the cylinder head of the VAZ 2109 is a complex unit, it is necessary to carry out repair work only with absolute confidence in your actions. Strictly observing the order of work. If a deviation in the operation of the motor is detected, immediately carry out diagnostics. This will avoid more expensive repair work.
Required Tools
Tightening diagram
The cylinder head tightening pattern is the same as on traditional models and you need to start from the center. It takes place in four steps.
The diagram according to which the VAZ 2109 should be pulled
- tightening torque 2.0 kgf/m
- tightening torque 7.5 - 8.5 kgf/m
- turn it 90 degrees.
- turn it again by 90 degrees.
To make it clearer, let’s describe this process in more detail:
- Using a torque wrench, tighten the bolts in the sequence shown in the figure to 2.0 kg/cm.
- Then we go around the second circle and reach 8 kgf*m.
- Next, twist it 90 degrees.
- We go around the second circle, twisting another 90 degrees.
Proper lift
Attention! On 16-cl power units, bolts can be reused, but if their length is no more than 95 millimeters.
Otherwise it changes. The length is measured along with the washer. Do not try to replace the torque wrench with another device, otherwise the consequences may be unpredictable.
The cylinder head tightening process
The cylinder head tightening process takes place in several stages. First of all, you need to check the cylinder head bolts. The threads on them must be in excellent condition, and the length of the elements must comply with the standards.
When tightening the cylinder head bolts on a VAZ 2114, the stretched bolts will not allow for reliable fixation, and they also quickly loosen. New ones are not expensive, so it is better to immediately replace worn ones.
First, tighten the bolts by hand until they stop, and then you can proceed to the tightening process. It must be performed in 4 stages:
- Using a torque wrench, we tighten each bolt according to the pattern (from the edges to the center) with a force of 2 kgf/cm2.
- At the second stage, we tighten each bolt with a force of 8 kgf/cm2.
- The third step is to turn each bolt 90 degrees from their position.
- We again turn each of the bolts 90 degrees.
Try to clearly control each of the points, then you will complete the process without errors and receive a guarantee of proper engine operation.
When contacting a car service for such a procedure, you will be charged about 3,000 rubles. The high price is due to the fact that it is necessary to disassemble half of the power unit and use a special tool. But using the guide from the article, you can do the work yourself, while saving most of the money. The process of pulling the cylinder head of a VAZ 2114 (8 valves) itself does not cause any difficulties, of course, if you have prepared all the required tools. The main difficulty lies in the disassembly and subsequent assembly of the engine, but if you have a basic understanding of the configuration of an 8-valve engine, then carry out the repair without any problems.
Signs of failure of the cylinder head gasket of a VAZ 2110
There are no specific warranty periods for the use of a cylinder head gasket. Its durability is influenced by such factors as: the degree of operation of the engine, its model, driving style and other reasons. However, there are several symptoms by which you can determine that the gasket has failed:
- at the junction of the block and the head there are leaks of engine oil or coolant ;
- using an oil dipstick, foreign light impurities or foam-like emulsion , which occurs when antifreeze penetrates through the connection with the cylinder head;
- the color of the exhaust changes to bluish-white, which indicates water entering the combustion chamber of the cylinder block;
- presence of oil stains in the coolant reservoir;
- The engine temperature rises due to the breakthrough of hot gases into the cooling system, which immediately heat the coolant.
Tips for replacing the cylinder head gasket
Removal and installation of the cylinder head gasket is carried out with the crankshaft set to TDC. It is also necessary to ensure that both valves of the 1st cylinder are closed.
It must be remembered that the cylinder head gasket must be changed after each removal of the engine head, even if this is not due to its unsuitability.
The procedure for replacing the cylinder head gasket on a VAZ 2110 on a 16-valve engine is generally similar to how to change the cylinder head gasket on an 8-valve engine, but has several nuances :
- The receiver must be dismantled.
- When removing timing belt pulleys, a mark is placed on two pulleys and two pulleys are removed.
- The fuel rail is removed.
- The order and tightening torques are carried out in accordance with the requirements for a 16-valve engine.
How to use a torque wrench
To obtain the correct tightening torque, you need to understand how to use such a specific tool as a torque wrench.
Before starting work, it must be set to zero. After this, the tool is put on the bolt (or nut) and begins to rotate slowly, tracking the dynamics on the scale. When the force reaches the required torque, the key is removed.
Sometimes it happens that the tool does not show anything at first. In this case, continue rotating. The fact is that over time, its internal mechanisms stretch, but this practically does not affect the accuracy of determining the tightening torque.
Content
From time to time, the cylinder head gasket may fail due to wear and tear of its material or burnout. The main signs that it is time to replace the gasket with a new one are the appearance of local leaks of oil and coolant at the point of contact between the cylinder head and the engine. Tightening torque of the cylinder head VAZ 2114 8 valves: consider the subtleties of the process.
Cylinder head gaskets
It should be remembered that when replacing a gasket, not only the tightening torque of the VAZ 2114 cylinder head is important, but also the entire sequence of operations - after all, the replacement itself is a very important and serious procedure, errors during which can lead to engine malfunction.
Replacement
To change the gasket, you will need to dismantle the assembly, get rid of the worn cylinder head gasket and reassemble the structure in the reverse order, following the recommendations regarding the tightening torques of the cylinder head bolts. We will tell you about all this in more detail.
- Disconnect the wiring from the coolant temperature sensor and emergency oil pressure sensor.
- Remove the thermostat, just remember to drain the coolant first.
- Remove the air filter housing. There is no need to remove the carburetor, because it will not interfere with replacing the gasket.
- Disconnect the exhaust pipe from the exhaust manifold.
- Remove the camshaft drive gear after first setting the piston of the first cylinder to the TDC position. Now you can remove the protective casing of the camshaft drive belt, loosen the gear fixing bolts, securing the gear from turning.
- Remove the camshaft drive belt. Then you can completely unscrew the mounting bolts and remove the gear.
- Press the latch to disconnect the wiring block from the ignition distributor.
- Similarly, turn off the central high voltage.
- Loosen the clamps to remove the fuel supply hose from the fuel pump.
- Disconnect the throttle and air damper drive rods from the carburetor.
- Disconnect the power supply from the solenoid valve.
- Remove the vacuum booster hose from the intake pipe fitting.
- Disconnect the tube from the vacuum ignition corrector.
- Loosen the tension on the clamps to remove the interior heating hoses from the pipes.
- Remove the cylinder head. Using a socket with an extension, the mounting bolts are unscrewed.
- Rock the head a little jerkily, then remove the element.
- Remove the old gasket, clean it of any remaining rubber seal and other contaminants. Wipe dry thoroughly, after which you can reassemble.
- Before assembly, check whether the length of the cylinder head bolts is within the normal range. Ideally, their length is 135.5 millimeters. If the bolts have lengthened during use, then all bolts will have to be replaced.
Replacement procedure
Possible consequences of improper tightening
Removing the cylinder head is an easy process, but setting it up is more difficult. Inaccuracies cannot be allowed; after all, the cylinder head is the cover of the cylinder block, which directly affects the efficiency of the engine.
If the tightening torque of the cylinder head bolts is insufficient, the compression will be too weak.
This results in burnout of the gasket, release of gases and their entry into the compartment with lubricant and coolant.
It is clear that this will lead to a decrease in the efficiency of the power unit.
Why then turn the bolts harder? This is also not worth doing, because they are made of soft metals.
When retightening, cracks, breakage of edges, or even breakage of the thread are possible.
This is why it is important to know how hard to tighten the cylinder head.
By the way, when retightening, you can break the threads in the block itself, which will cause the bolt to spin in one place.
Removing the cylinder head - important points
Before working on the head, you need to remove the timing chain. To do this, carefully loosen its tensioner, and then completely dismantle it. Then comes the turn of the camshaft gear. It is held in place by a bolt - unscrew it. It is important that the chain does not fly off the sprocket - fixing it with a piece of thick copper wire will save you from this trouble.
Now proceed to disconnect the camshaft - it is screwed to the cylinder head in 9 places. Their tightening is not too strong, and therefore there will be no difficulties at this stage. Otherwise, use WD-40 again.
With the shaft removed, disconnect the fuel inlet pipe and exhaust manifold. From this point on, nothing prevents you from working on the head itself - screw in 11 bolts, and the job is done.
The correct tightening torque for the cylinder head on a VAZ-2114
Any, even the most reliable car can fail over time. Unfortunately, no unit or unit installed on it can work forever. Sometimes breakdowns occur in the cylinder block. The least difficult of them is the wear of the cylinder head gasket. A leaky sealing element ceases to provide a tight seal, resulting in lubricant or antifreeze leaks, power drops, or the stability of the engine’s functioning is lost. When replacing a gasket, not only the correct choice of a new one and its proper installation are important, but also such an aspect as the tightening torque. We will describe in detail below what indicators are optimal specifically for the cylinder head installed on the VAZ model 2114, equipped with an 8-valve power plant.
The procedure for tightening the cylinder head of a VAZ 2109
Repairing a cylinder head cannot be called a simple procedure, which requires certain skills and some experience. Repairs require special tools. As a rule, during this work the gasket is changed and the cylinder head tightening torque is adjusted: VAZ 2109 in our case. In order for the adjustment to be performed correctly, you must strictly follow the instructions. With a competent approach, you will successfully carry out the adjustment, achieving the desired result.
- damage to the cylinder head due to engine overheating;
Cylinder head - loss of tightness of the cylinder head gasket;
- the mileage specified in the instructions has been completed.
Adjusting the bolt torque
In order to do everything correctly and avoid mistakes, you must strictly adhere to certain rules and follow the order of execution.
Tightening should only be done with a special torque wrench, which allows you to control the tightening torque.
First, using a torque wrench, set the holder to the zero position. This means that the device data is equal to the moment of the original position. Then, you need to look at the indicator of the device when starting the fastener. Rotating the holder, we monitor the indicators. If the moment has not changed, this means that the fastener can be stretched and this is normal, as it should be. If the torque increases rapidly, bolt movement must be achieved. This indicates low stretch of the holder. This means stabilization is needed.
While the vehicle is running, the bolts that secure the cylinder head are constantly experiencing various impacts. They constantly heat and cool, which over time leads to the destruction of the structure of the fasteners.
For all power units there are specific rules that must be followed during operation:
It is important to know!
Every motorist should have a universal device for diagnosing his car.
You can read, reset, analyze all sensors and configure the car’s on-board computer yourself using a special scanner...
- Strictly follow the data specified in the practical manual for the VAZ 2109.
- Adjustment is carried out only with a torque wrench. The use of another device will not allow this work to be performed correctly.
- Use only good bolts. Replacement bolt kit
- When starting to work, be sure to check the condition of the holders.
- Strictly adhere to the tightening torque values recommended by the manufacturer.
The most important data regarding adjustments is in the annotation for each specific car. As a result, you must carefully study and adhere to what is written in it. During operation of the vehicle, you must strictly comply with all manufacturer's requirements and systematically diagnose the car. Correct and smooth operation of the VAZ 2109 power unit prevents the need to adjust the cylinder head holders.
Since the cylinder head of the VAZ 2109 is a complex unit, it is necessary to carry out repair work only with absolute confidence in your actions. Strictly observing the order of work. If a deviation in the operation of the motor is detected, immediately carry out diagnostics. This will avoid more expensive repair work.
Required Tools
- torque wrench;
- caliper or ruler.
Tightening diagram
The cylinder head tightening pattern is the same as on traditional models and you need to start from the center. It takes place in four steps.
The diagram according to which the VAZ 2109 should be pulled
- tightening torque 2.0 kgf/m
- tightening torque 7.5 - 8.5 kgf/m
- turn it 90 degrees.
- turn it again by 90 degrees.
To make it clearer, let’s describe this process in more detail:
- Using a torque wrench, tighten the bolts in the sequence shown in the figure to 2.0 kg/cm.
- Then we go around the second circle and reach 8 kgf*m.
- Next, twist it 90 degrees.
- We go around the second circle, twisting another 90 degrees.
Proper lift
Attention! On 16-cl power units, bolts can be reused, but if their length is no more than 95 millimeters.
Otherwise it changes. The length is measured along with the washer. Do not try to replace the torque wrench with another device, otherwise the consequences may be unpredictable.
Golden rules of tightening
To properly reassemble the cylinder head, you need to adhere to the golden rules:
- Strictly follow the tightening torque data corresponding to the VAZ 2109;
- Make adjustments only using a torque wrench. Other tools do not allow you to get the desired result;
- To install the cylinder head, use only serviceable bolts that meet the requirements of your engine installed on the VAZ 2109;
- Before work, make sure that the holders are in good condition.
Tightening diagram
In addition to observing the required tightening torques for the cylinder head mounting bolts, one more rule must be observed here.
Returning the bolts to their places is carried out strictly according to the diagram below.
Next, do the work according to the table, and you will do everything right.
Tightening is performed in four circles, following the sequence of work with the mounting bolts indicated in the diagram.
| Tightening circle | Your actions |
| First round | All bolts are tightened using a torque wrench according to the diagram with an applied torque of up to 2.0 kg/cm m |
| Second round | Tightening in the second circle is carried out even according to the diagram, but the torque is applied up to 8 kg/cm m |
| Third circle | Each bolt on the third installation circle must be tightened 90 degrees. |
| Fourth circle | The fourth and final round of tightening the cylinder head bolts requires re-tightening the fasteners an additional 90 degrees. |
Make sure your bolts meet the specifications before following the instructions and diagram. Otherwise, even the most correct, strictly observed tightening will not give any result.
The cylinder head gasket on the VAZ 2109 is a fairly reliable element, but it tends to lose its performance qualities. To replace it, you have to perform far from the simplest operations, but in no case can you ignore the violation of the integrity of the gasket. Otherwise, the consequences will result in expensive repairs, and sometimes even a complete replacement of the engine.
Tightening torque of the cylinder head VAZ 2114 8 valves: correct operation with a torque wrench
A tool such as a torque wrench, which allows you to tighten bolts with equal force, requires great care in operation and certain skills.
An approximate sequence for tightening bolts with this wrench is as follows:
- set the holder to the “zero” position;
- begin smooth rotation of the instrument, while simultaneously monitoring its readings;
- if the tool rotates (especially at the initial stage of tightening) without changing the torque on the indicator, this may indicate a slight internal stretch of the fasteners. This phenomenon is absolutely normal and the rotation of the tool should be continued;
- When the tightening torque corresponding to the required one is reached, the movement of the tool should be stopped.
Instead of using a torque wrench, you should not use any other tool (including a mechanized one, with the ability to regulate the tightening force). After all, only with a wrench can you achieve absolutely precise and smooth tightening of the bolts, thanks to which the gasket will be evenly pressed over the entire surface of the block. This will help maximize its service life, avoid burnouts, oil leaks and coolant leakage.
Tightening torque of cylinder head bolts VAZ 2114
Any, even the most reliable car can fail over time.
Unfortunately, no unit or unit installed on it can work forever. Sometimes breakdowns occur in the cylinder block. The least difficult of them is the wear of the cylinder head gasket. A leaky sealing element ceases to provide a tight seal, resulting in lubricant or antifreeze leaks, power drops, or the stability of the engine’s functioning is lost. When replacing a gasket, not only the correct choice of a new one and its proper installation are important, but also such an aspect as the tightening torque. We will describe in detail below what indicators are optimal specifically for the cylinder head installed on the VAZ model 2114, equipped with an 8-valve power plant.
A set of tools required for work
In order to avoid wasting time looking for this or that tool at the critical moments of replacing the gasket on a VAZ (or actually tightening it), it is better to prepare everything in advance.
You will definitely need:
- wrench with heads and extension;
- Screwdriver Set;
- torque wrench;
- new gasket;
- sealant.
It is better to park the car on a level surface, turn on the handbrake, and additionally secure it with stops.
Work order
Before tightening, you will have to get to the block head. This can be done no earlier than after disassembling a good half of the engine.
Tightening torques for threaded connections of the front wheel drive 2114
Tightening torque of wheel bolts VAZ 2114, 2113, 2115:
- Wheel fastening pin M12x1.25 with a force of 6.7-9.5 kgf/m
VAZ 2114 hub nut tightening torque:
- Front wheel hub bearing wing M20x1.5 with a force of 23-25.2 kgf/m
| List of devices and engine parts | Thread | Tightening torque of threaded connections, kgf/m |
| Clutch attaching the upper support of the front suspension strut to the body | M8 | 2,0-2,5 |
| Bolt connecting the ball joint to the steering knuckle | M10x1.25 | 5,0-6,3 |