The gas distribution mechanism 409 of the UAZ Patriot engine has a complex design. In the event of its breakdown and self-repair, setting the timing mark ZMZ 409 represents the most critical part of the work. Operation of the motor has shown that the timing belt requires little investment, but at the same time, regular attention and monitoring to prevent breakdowns.
We recommend reading about the ZMZ 409 hydraulic chain tensioner.
How does the Patriot timing belt work?
The ZMZ-409 timing belt consists of the following elements:
- crankshaft gear;
- chain tension shoe made of plastic;
- hydraulic tensioner;
- "top" chain;
- driven gear was washed out;
- small drive gear was washed out;
- shoe bolt support;
- second tension shoe;
- second hydraulic tensioner;
- noise suppressor washer;
- "bottom" chain;
- special mark on the gear wheel;
- pin;
- “asterisk” of intake valves on the camshaft;
- upper “calmifier”;
- “asterisk” of camshaft exhaust valves;
- second mark on the gear;
- middle and lower “sedatives”;
- M1, M2 – visual marks on the cylinder block.
Adjusting the “Ideal Phase” sprockets during operation
Checking and adjusting the timing belt phases should be carried out every 30-40 thousand kilometers of the vehicle. To check and adjust, perform the following steps:
- Set the crankshaft to the TDC position of the 1st cylinder.
- Remove the engine valve cover.
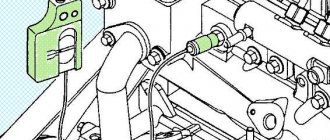
- We check the phases using the “Phase Installation Device”. The template arrow should show the following values: intake shaft - 20 degrees, exhaust - 19 degrees. The permissible timing deviation is 2 degrees. If deviations exceed permissible values, phase adjustments should be made
- To adjust the timing phases, loosen the bolt securing the exhaust camshaft sprocket by 3-4 turns (do not allow the crankshaft to rotate). By lightly tapping the sprocket with a hammer through the mandrel, we loosen the cone fit. By turning the camshaft with a wrench by the square on the body, we set the desired angle (19 degrees).
- Tighten the bolt securing the exhaust camshaft sprocket with a torque of 4.6... 7.4 kgf-m.
- We repeat the same procedure with the intake camshaft sprocket.
- After turning the crankshaft two turns, make sure that the timing timing is set correctly using a tool.
- Carry out further engine assembly.
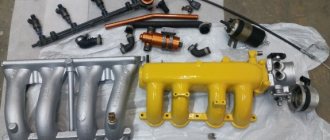
Before you buy a timing kit ZMZ-409, 406, 405 Ideal phase , find out from the seller what kind of kit he sells. The Progress company produces 2 types of sets, one of them has the number 406.3906625-05-E and is equipped with Russian-made chains and bearings (it is cheaper), and the other has the number 406.3906625-05 and is equipped with Latvian-made Ditton chains and imported bearings (such sets a little more expensive). As of November 2021, the manufacturer packaged Russian chains in red boxes, and Baltic chains in blue ones. Possible spelling of catalog numbers: 406.3906625-05, — Common part names: —
Factors indicating the need to replace the chain
The timing chain, like other spare parts, has a specified service life, after which it must be replaced. It is possible to use parts beyond the service life allotted by the manufacturer; however, this will void the warranty and the manufacturer will not be liable for damage resulting from a breakdown.
Factors indicating the need to replace the ZMZ 409 timing chain:
- her physical condition;
- metallic sound in the engine compartment;
- The car's mileage has exceeded 80,000 km since the last replacement.
The double-row chain showed better performance and reliability than the single-row chain.
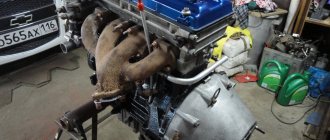
UAZ Patriot › Logbook › Replacing the ZMZ-409 timing chain. part 1. Disassembly.
On a mileage of 33 t.km.
The original toothed-plate chain began to indiscreetly hint at the need for replacement with a diesel rumble when the engine was warm. Driving a car with the prospect of a broken circuit at any moment is not at all interesting. We need to change! I purchased a kit with a phase meter from Progress EURO-4 in the online store. Respect to the store by the way, they communicate well, ship quickly, they sent it to me on the same day after payment and gave me a tracking number to track the parcel. After 8 days, Russian Post delivered the parcel. I received it, everything was well packed in beautiful boxes. The gears are wrapped in oiled paper, they look well made, not polished of course, but I didn’t see any nicks or burrs on the surfaces. As you know, EURO-4 toothed-plate chains for the ZMZ-409 engine are 104 upper links and 82 lower links long. Each chain is in its own box, on the sticker there is information about the chain with the inscription made in Chezh Republic. OK. We open the boxes. The long chain is in a sealed bag, and the bag with the short chain is neatly cut off, as if the chain was shortened in a home-made way and the desired sticker was put on the box. This is all sad, comrades... I carefully looked at the joints of the links of the short chain to find the place of the non-factory connection, but I never found it. The chains appear to be very well made. I googled the vastness of Drive and started disassembling the engine. Before starting work, it is necessary to drain the engine oil and antifreeze, not forgetting to unscrew the coolant drain plug on the cylinder block under the exhaust manifold. If you forget about it, when you dismantle the coolant pump, antifreeze will flow into the pan. It is also advisable to remove the terminal from the battery, I did not do this, so during reassembly, like a true electrician, I created a small fireworks display))) After removing the valve covers, you can measure the phases at the inlet and outlet. In my case, the numbers are as follows: intake - 14 degrees, exhaust 23 degrees. Before you start dismantling the front engine cover behind which the replacement object is hidden, you need to remove not just a lot, but a whole lot of it: Once - clockwise (there is a left-hand thread) and unscrew the viscous coupling with the fan. Two - unscrew the fan diffuser and pull it out along with the fan. You need to pull out the fan diffuser carefully, trying not to catch it like I did and not to tear the delicate radiator tubes
Three - using a 15mm wrench, turn clockwise on the bolt securing the tension roller to loosen the tension and remove the drive belt of the mounted units. Four - remove the tension roller with the tension mechanism assembly (a hexagon is needed), remove the idler rollers. Five - Remove the idler roller support. Six - after being worn out, for ease of operation, remove the air filter along with the rubber pipe to the throttle. Seven - remove the power steering pump together with the mount without detaching it from the hoses and move it aside. Eight - To avoid damage, remove the radiator, as well as the upper and lower pipes from the engine to it. At the same time, for the sake of space, remove the expansion tank. After dismantling the radiator, the air conditioner radiator hanging together with it on common brackets hangs almost entirely on the supply pipes, so we fix it to the TV with plastic ties. Nine - unscrew the viscous coupling pulley and the coolant pump pulley. Ten - using a good strong pulley puller, remove the front crankshaft damper pulley. There are peculiarities of this process; I tried to lock the crankshaft by engaging fifth gear, but to no avail. With this method, there is no rigid fixation, but gradually, over half a turn, the force of turning the CV increases until it stops. Because of this, it turns out that with each movement the central bolt of the puller rotates in the thread by only 10-20 degrees - very dreary. I got out of this situation by resting the head at 14 with one edge against the crankshaft position sensor bracket, and the other edge against the base of the first tooth on the pulley after the empty space. I was very afraid that I would break off a bracket or a tooth on the pulley, the force with which the pulley came off was so great, but fortunately everything worked out.
Required tools for replacement
To replace parts and components of the gas distribution mechanism, the following tools are required:
- hex key 6 mm;
- open-end wrenches No. 10 and 17;
- collars and replaceable heads 12, 13, 14 mm;
- hammer with chisel;
- flat screwdriver.
You will also need additional items and devices:
- container for collecting antifreeze;
- jack;
- sprocket gear puller;
- a protractor for checking the angle and setting the camshaft phases;
- cylinder top dead center position indicator;
- damper pulley flange remover;
- bolt for pressing in the flange and sprocket;
- replaceable nozzle T45 for unscrewing the bolts of the dampers;
- 1/4″ ratchet wrench and 70 and 100 mm extensions.
How to set timing marks on a 409 UAZ Patriot
The setting of the timing marks itself occurs after the mechanism is assembled. The chain, metal gears and other parts are pre-lubricated with motor lubricant.
First of all, the gear is pressed onto the crankshaft. This is a must. Then turn the crankshaft until the mark on it meets the mark on the cylinder block. The first cylinder should be at top dead center. The crankshaft rotates clockwise. Using the indicator, the correct location of the marks is determined.
Where is the chain located
One timing chain is located at the top of the timing mechanism, the second is at the bottom. This arrangement of the timing chains on the ZMZ 409 allows for optimal operation of the power unit.
If you do not keep the tensioners and dampers clean, this will lead to the chain slipping through the teeth. In addition, after 80,000 kilometers the device tends to stretch.
Step-by-step process for replacing the timing chain on a UAZ Patriot
Replacing parts of the gas distribution mechanism of the ZMZ 409 Euro 4 engine consists of a number of steps:
- the radiator of the cooling system is removed;
- the belts are released from the power steering pump;
- The supply hose of the cooling pump is removed from the fitting;
- the fan clutch, impeller, and front cylinder head cover are dismantled;
- the cooling system pump is removed;
- the drive belt is removed from the generator;
- the crankshaft speed sensor is removed;
- unscrew the oil pan plug and remove the crankshaft pulley;
- the hydraulic tensioner cover is removed at the top and bottom;
- the timing cover is removed, then the tensioner lever and gear are pulled out;
- the plastic damper is disconnected;
- The camshaft star gears are removed using a puller.
After completing disassembly, it is recommended to wash the gear and chain with gasoline, wipe and dry. Next, you need to inspect all parts and replace them if cracks, chips, or severe wear are found. The sprockets and gears of the mechanism are subjected to a similar inspection.
To completely remove the drive chain, you will need to drain the coolant.
For the ICE 409, a hydraulic timing tensioner is standard. However, some owners replace them with mechanical regulators. This has its advantages if the car does not have air conditioning: the ability to start the car by tow, independence from the oil pressure in the system. However, if there is an air conditioner, the base plate will require modification; other bolts will be needed instead of the standard ones, as a result of which it will become more difficult to change parts.
Read how to choose a UAZ Patriot 409 alternator belt for an engine with air conditioning
Draining antifreeze from the system
To drain the coolant, it is necessary to install the machine so that there is free access to the engine from several sides. Next, disconnect the negative terminal of the battery from the case (according to the work instructions), after turning off the ignition. Antifreeze is drained into a prepared clean container. Only after this can you disconnect the pipes and remove the radiator of the cooling system.
Disassembling the timing mechanism
Begin disassembling the mechanism by unscrewing the bolts, then remove the cover of the hydraulic tensioner located at the top. The fastener and gasket are removed. By pulling out the spring, the chain tensioner itself is disconnected. The lower tension assembly is disassembled in the same way. The entire timing cover is held in place by 7 bolts, unscrewing which gives access to it. After removing the tensioner shoes, the gears on the camshafts are pressed out. It is best to use special pullers or a hammer with a 12x17 open-end wrench.
Final removal of the drive chain
Before removing the chain, you need to unscrew the guides; each is secured with two bolts. The intermediate shaft star gears are removed by removing the bolts located behind the plate. To do this, a screwdriver is inserted into special grooves on the gear, preventing them from turning. After dismantling the entire chain, it is washed with gasoline.
After removing the drive
After dismantling, all parts are cleaned, the degree of wear is assessed and checked for damage by inspection; failed parts of the mechanism must be replaced.
Build process
The main operations are carried out in reverse order. Step-by-step timing belt assembly process:
- A gear with a seal is pressed onto the crankshaft. The shaft is rotated until the marks on the BC and the seated gear coincide. When the marks coincide, the piston of cylinder 1 should be at TDC. Next, the damper is mounted without tightening the fastening bolts. After this, the chain, thickly lubricated with oil, is wound onto the gear.
- The driven gear is pressed onto the shaft. The locating pin should fit snugly into the hole. Then a chain is thrown onto the gear. The marks on the cylinder block and this “sprocket” are aligned, and the chain must always remain taut as it passes through the damper.
- 2 bolts holding the shaft gears are tightened through lock washers. The applied tightening force should not exceed 2.2-2.5 kgf/m.
- The condition of the chain and the alignment of the marks on the sprocket gear and the cylinder block are checked using the tensioner lever.
- The damper mounting bolts are tightened.
- The upper chain, generously lubricated with engine oil, is attached to the drive gear of the intermediate shaft through a hole in the cylinder block.
- The gear is installed with the timing chain on, and the landing is facilitated by rotating the camshaft clockwise.
- The gear on the camshaft is fixed by inserting a pin into the hole.
- Having screwed in the bolt, use the square on the camshaft to turn it counterclockwise, setting the tension, and then fix the position with the bolt. The bolts are tightened with a torque of no more than 4.6-7.4 kgf/m. At this time, the shafts are kept from rotating by the tetrahedral ends on them. Chain stabilizers, water pump and protective cover are installed. The edges of the cylinder head and its cover are coated with a narrow strip of sealant before installation. During installation, care must be taken to ensure that the seal does not get damaged.
- Check whether the alternator belt needs to be replaced. The bolts securing the covers are tightened with a force of 0.6-1.2 kgf/m. Next, the crankcase ventilation tube and hose are connected to the valve cover fittings. The radiator of the cooling system is secured and the belts are put on.
Signals for replacement
The main signal that the Patriot's timing belt needs to be replaced is extraneous metallic sounds coming from under the hood; such noise can be described as a kind of “clanging”. Due to inexperience, you can confuse the breakdown with knocking valves. Although the 409 engine has hydraulic lifters installed, it is necessary to fill in high-quality oil so that the valve clearance is adjusted correctly. Timing problems in the Patriot are usually characterized by a loss of power at low speeds.
It turns out that if the mileage approaches 80,000 thousand km. and/or the chain stretches beyond the operating range of the hydraulic tensioner - there is only one way out, namely installing a new chain instead of the old one. Otherwise, you risk being left in the middle of the road in the company of a stationary car at the most inopportune moment, somewhere far from home, as is usually the case according to the “law of meanness.”
Replacement process
It is necessary to understand that replacing timing chains on a 409 UAZ Patriot engine is a complex process, especially for engines with Euro 4 toxicity standards. So, for such repairs, first of all, you will need a garage with a pit or an overpass, since access to the engine compartment is a necessary condition below. In addition, you will need a number of tools:
- hex key 6 mm;
- chisel and hammer;
- heads for wrench sizes “12”, “13” and “14”;
- a set of wrenches in sizes from 10 to 17;
- device for setting valve timing;
- add. Accessories: container for draining coolant from the radiator, jack, gear puller.
Position the car so that you can approach the engine compartment from either side. Then, turn off the ignition, disconnect the “—” terminal from the battery. You won’t be able to get to the timing mechanism so easily; you’ll first have to unscrew everything that covers it. Drain the coolant into a container prepared for this purpose, then unscrew the radiator and pipes.
(Optional) Unscrew the oil pan bolts and then remove it after draining the engine oil. This procedure will make it easier to install the timing belt in the future. If you do not want to drain the oil, then unscrew only the front oil sump bolts.
Next, remove the power steering pump belt. The same must be done with the generator + water pump (pump) belts. Remove the supply hose to the pump, remove the cylinder head cover (after removing all the ignition coils). After this, you need to disconnect the front cylinder head cover by unscrewing 4 bolts, and then remove it along with the viscous fan coupling and the propeller itself.
Next, you need to disconnect the water pump, which is secured with three bolts. Remove the crankshaft position sensor (also known as the timing sensor) by removing one bolt that holds it in place. Remove the crankshaft pulley; this may require a three-legged puller.
Disassembling the timing mechanism
Unscrew the bolts securing the upper chain hydraulic tensioner cover and remove it along with the gasket. It is important to do this carefully, because the hydraulic tensioner spring presses on the cover. After removing the spring, remove the hydraulic tensioner itself. The same should be done with the lower hydraulic tensioner. Unscrew the 7 bolts securing the chain cover. Remove the cover carefully, as there is a risk of damage to the gaskets or crankshaft seal.
Unscrew the bolt securing the shoe (number 7 in the diagram) to tension the chain and remove the shoe; do the same with the lower shoe. Now you need to disconnect the camshaft gears (14 and 16 in the diagram) from the camshafts themselves - open-end wrenches for 12 and 17, as well as a hammer, will help here. Or use a special puller.
Unscrew the dampers that interfere with further dismantling. Each damper is held on by two bolts. To remove the intermediate shaft sprockets (5, 6, see diagram), you need to bend the plate and unscrew the sprocket mounting bolts by inserting a screwdriver into special grooves on the gear wheel, thus holding the gears from turning. After dismantling the chain, wash it and the gears in gasoline and inspect for damage.
Timing assembly
The entire mechanism must be reassembled in reverse order. Installation of timing marks on the 409 engine occurs after assembly of the mechanism, when the chain is located on the gears. Before starting assembly, be sure to lubricate the timing chains and gears with engine oil. First of all, press the gear onto the crankshaft, do not forget about the bushing + o-ring that should be there. Rotate the crankshaft until the mark of the gear and block (M1) coincide, the piston of the first cylinder must be at the top (TDC position).
Install the chain guide, put the chain on the crankshaft gear. Position the intermediate shaft driven sprocket so that the pin aligns with the hole. Here you also need to ensure that the marks (M2) match. Install the drive gear of the drive shaft on top, tighten the fastening bolts and bend the edges of the locking plate to avoid arbitrary unscrewing. Next, you need to press the tensioner to tension the chain until the timing marks (12 and 18) coincide with the upper plane of the cylinder head.
After the timing mechanism has been assembled, it is necessary to install in its place all the parts that were initially dismantled. These are cooling hoses, fan, belts, valve cover, water pump. If the pan on your Patriot was attached through a gasket, change it; you can use a heat-resistant sealant instead of a gasket. At the end, pour antifreeze or antifreeze into the cooling system. If you drained the engine oil (removed the pan), then do not forget to fill it with fresh oil. Replace the “—” terminal of the battery and try to start the engine.