Replacing the cabin filter
You can replace the cabin filter yourself. It is responsible for cleaning the air entering the cabin. Many factors influence the frequency of replacement.
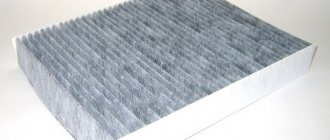
Photo of various cabin air filters for cars.
The cabin air filter performs the function of cleaning the air entering the car through the air ventilation and heating system, as well as through the air conditioner. How and when to replace, where the filter is located - read the answers to the questions in the article.
Other signs indicating the need for replacement
- Unpleasant odors in the car interior;
- Poor operation of the stove and air conditioner, decreased airflow;
- Constant humidity in the cabin.
If your car has a cruise control system, then replacing the cabin filter is a mandatory procedure. A dirty filter will greatly increase the load on the air conditioning system and cause it to fail. Repairing an air conditioner is not a cheap procedure. If, in addition to poor performance, a foreign odor is clearly felt, then replacing the filter alone will no longer be enough. You will have to remove and clean the evaporator. Therefore, at the slightest hint of odor or decreased airflow, change the cabin filter immediately, since it is not expensive.
Replacement frequency
The service life of the cabin filter depends on the manufacturer. Experts advise replacing after 20–25 thousand km. The determining role is played by what kind of terrain you drive on most often - country roads or city roads with congestion.
In the owner's manual for your car, look at the manufacturer's recommendations on replacement intervals.
If you frequently drive in dense city traffic, which means polluted air, you need to replace the filter at least twice a year.
How long does it take to change the cabin filter?
The manufacturer himself sets the service life for his product, but the driver must determine for himself when it is time to change. Typically, the cabin filter is changed after 15 thousand kilometers. Some change based on timing, not mileage. For example, once a year. Even if it was changed a month ago and it’s hard to breathe in the cabin, you can feel carbon monoxide, you should still replace it with a new one. Perhaps it was not installed correctly.
Signs of replacing the cabin filter:
- There is high humidity in the cabin, the air feels damp;
- poor airflow, air circulation, air conditioning and stove do not work efficiently;
- The smell in the cabin is unpleasant, gassy.
Where can the cabin filter be located?
When first replacing a filter, all drivers usually look for where it is installed. The location of the cabin filter can be in:
- A special plastic compartment under the hood.
- Under the hood, under the windshield on the right or left.
- Behind the dashboard, inside the car.
- Behind the glove compartment, inside the car.
Signs of unsuitability
The main symptom appears when the heating, ventilation or air conditioning system is turned on - less air enters the cabin. When turning on the maximum heating level, the stove makes more noise than results.
The appearance of a musty and unpleasant odor in the cabin is a clear sign of an expired filter.
Fogging up of the windows during humid weather means that you need to contact a specialist or check the cabin air filter yourself.
If the above symptoms are not present, check the air filter once a year.
Checking the condition of the cabin filter
The condition of the cabin filter can be determined by indirect signs:
- The first is the appearance of foreign odors in the cabin. It turns out that a clogged filter no longer purifies the air, but, on the contrary, begins to add polluting particles to it.
- The second method of determination is to check the performance of the interior ventilation system. You need to turn on the ventilation motor and check with your hand the air flow it creates. If the air flow is weak, the filter is clogged and cannot pass enough air through it.
- Well, the third method of determining the condition is visual inspection. If it has a large dust deposit, and there is a significant amount of polluting elements between the ribs, then the filter must be replaced.
But in order to carry out a visual inspection, as well as replace it if severe contamination is detected, you need to know where it is located in the car and how to remove it.
Read more about the types and types of cabin filters and their necessity here. What is a car's VIN code and how to decipher it can be found in this article. When and how should you appeal traffic fines?
There are three places where the cabin filter can be installed:
- inside the front panel behind the glove box (glove compartment);
- near the steering column, next to the accelerator pedal;
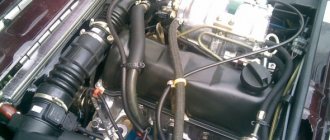
- it can also be placed in the rear wall of the engine compartment.
Let's look at how to remove the filter to determine contamination and replace it in all three places of its installation.
How to make a replacement yourself
On some cars, you need to partially disassemble the interior to get to the cabin filter. It sounds scary, but it's not that bad. You can do this yourself, but don’t try it if you don’t have a clear understanding of disassembling and assembling interior elements.
If you still decide to take on this task, then after replacing, attach a piece of paper to the new filter indicating the date of replacement.
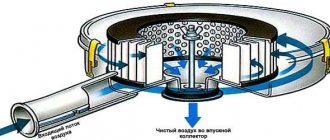
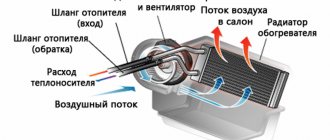
How does the cabin filter work?
Self-replacement technology
It's time to install a new cabin filter. The duration and complexity of the work varies significantly in different cars. This depends on the location of the filter element and the number of parts to be dismantled. Even the same manufacturer can hide the cabin filter in different places. Examples include Opel Vectra and Astra cars.
- For the Vectra model, the automaker chose to install a filter system under the hood of the car. To replace, you first need to remove the rubber seal that connects the left and right parts of the engine compartment. After this, you should lift the plastic grille. The motorist will see the filter element. To remove it, you need to move the latches to the side.
- In Astra, the cabin cleaner is located in the cabin under the glove compartment. You need to start from the recommendations that are set out in the machine repair manual. When removing plastic elements, it is important not to damage the various plugs or panels. Otherwise, the work will end in a spoiled mood.
It will be useful: How to paint car rims with your own hands?
Some manufacturers of filter elements are trying to help car enthusiasts. On the insert, they detail the sequence of actions, supplementing the text with photographs or simple diagrams.
Which to choose
There are 3 types of cabin filter.
- The standard option is characterized by a long service life and low cost. Filters large and small particles of dust and soot.
- A filter made of denser material. Capable of finer filtration. The service life is less than the standard option, and the price is higher.
- A filter with a layer of active carbon provides filtration at the highest level. Filters both small particles and microorganisms with bacteria. It is expensive and has a short service life. This type is suitable for people with immune system problems and allergies.
DIY cabin filter video
Everyone knows about the benefits of cabin filters. Their main task is to clean the air from dust, odors and, in some cases, harmful bacteria. What to do if the car’s basic filter has expired, and it can’t cope, but you don’t have money for a new one. Or you have a domestic car and, in principle, they do not produce carbon elements for the air purification system. In this case, you need to do a little work.
Therefore, we will tell you how to make a cabin filter with your own hands.
Paper version
Make it as easy as shelling pears. To do this, you will need to buy a universal kitchen hood filter in the store and cut a piece out of it to the size of the old one. Then glue it into the frame from the previous one using sealant or hot glue.
Of course, the paper cabin filter is far from the best and it only copes with dust, letting foreign odors into the cabin.
Coal option
There is a lot of information on the Internet about how to make it yourself, as well as how to extend the life of what you already have. What enterprising car owners don’t do: they put nylon stockings on it, stuff it with napkins and foam rubber, vacuum it, etc.
It is absolutely impossible to do any of the above, since the filter elements operate in a hot and humid environment and also absorb fats. Therefore, it is not known how nylon or foam rubber will behave in this situation.
In order to make a cabin filter with your own hands, you will need:
- The frame is from an old one.
- Metal mesh.
- Universal carbon material.
- Sealant or hot glue, knife or other cutting tool.
- First you need to cut out the old filter element, then install a metal mesh in its place. It will then be a support for new material
Such a mesh can be purchased at a regular market or at a car dealership. It is most often used to decorate air intake grilles.
Combined coal option
For some reason, coal elements are not produced on the Volga, so those made by hand are doubly valued.
You can make a filter in the following way:
You will need: a simple padding polyester filter and a universal carbon filter for kitchen hoods, activated carbon.
- We cut two pieces from coal to the size of the old body.
- We break the activated carbon tablets into 4 parts.
- Place pieces of tablets on top of the filter.
- Cover the top with another piece of coal material (cut out in advance) and padding polyester.
- We install the finished structure in its place.
This manufacturing method is quite inexpensive and easy. Even a beginner can handle it, the main thing is that there is a desire to make your car better and free time.
I cleaned the air conditioner evaporator, and to prevent dust and other debris from entering the system, there must be a cabin filter, but since my JDM car was produced for use in its homeland in more gentle conditions, a cabin filter was not provided. I will make the cabin filter myself
.
There are almost as many design options as there are people who have done similar things; in my case, I was guided by the principles
of easy availability of consumables, ease of re-replacement and functionality .
The filter was made and installed a year ago, then I didn’t write, so this post shows how I made it and the immediate results of field tests.
In addition to manufacturing and installing the cabin filter, it was decided to disinfect the air duct and air conditioning system. I read forum articles and reviews and decided not to use compounds positioned specifically for automobiles, but chose an easily accessible, proven disinfectant - Chlorhexidine
.
Who is too lazy to look for what it is: Chlorhexidine is a drug, an antiseptic, in finished dosage forms it is used in the form of bigluconate. Chlorhexidine has been successfully used as a skin antiseptic and disinfectant for over 60 years.
Chlorhexidine is an antiseptic drug, active against gram-positive and gram-negative bacteria (except for Mycobacterium tuberculosis); protozoa; herpes virus. The drug is stable and after treating the skin (hands, surgical field, etc.) with it, it remains on it in a certain amount, which continues to give a bactericidal effect. Used for treating the surgical field and the surgeon’s hands, sterilizing surgical instruments, etc.
— Disinfection is carried out by supplying the solution to the air intake from the outside, setting the blower fan to maximum and, while supplying the solution, let the blowing system work in all modes - to the legs, to the windshield, to the cabin, etc., we also set the air intake from the cabin and supply solution through the cabin air intake; in our case it is located directly above the fan, to the left of the air conditioner evaporator box. — Added 90% Ethyl alcohol to the Chlorhexidine solution. — The solution was supplied using a sprayer from Mister Muscle. — Processed the air ducts from the cabin side.
I washed the filter with the same solution and treated the indoor unit of the air conditioner at home
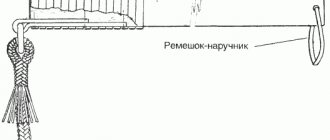
The air intake and the place where we will install the cabin filter is located under the frill on the passenger side.
Yes Easy! In fact. However, first, watch this video of the production of cabin filters in a plastic case from the NORDFIL automobile filter factory. The video is short and interesting, just watch it and then we will continue.
Have you looked? Do you know how much a plastic NORDFIL cabin filter costs? Several hundred rubles. In total, at least for 5000 km.
Well, haven’t you changed your mind about making a cabin filter yourself? No? Then read the instructions from the manufacturer and consider.
First you will need a standard, based on which you will make a double. If you purchase an analogue as such, then do not miss, look at the dimensions of your original cabin filter, down to the millimeter. It’s better to immediately buy the original and take its dimensions as a basis.
The first on the list of components for your DIY cabin filter will be the housing into which the filter element is installed. If you had a cabin filter in a plastic case, then you can cut out a filter element from it and make it, so to speak, reusable.
If you need a body made of rigid non-woven material, and it is not possible to find one, then thick cardboard can be used as an alternative. You also make stiffening ribs from it, if they are provided for in the design of the original. You can sweat a little more and cut the filter element from the old filter housing, remove the adhesive base and use the source again.
Replacing the filter installed under the steering column
Replacing and installing a cabin filter on a Nissan Qashqai
Next, we will describe the operations for removing and replacing the cabin filter installed near the steering column. An example would be the Nissan Qashqai.
The only tool you need is a long screwdriver. To access the filter, you will need to remove the side decorative trim on the center tunnel under the front panel on the driver's side. It is held there by clips, and to dismantle it, you just need to pry off the cover with a screwdriver.
The box in which the filter is installed is located behind the accelerator pedal.
To get to the filter, you need to remove the cover from the box, secured with locking latches. To do this, pry up the lower latch with a screwdriver and remove the cover.
It will be useful: The new alternator belt is whistling, what should I do?
Extraction is carried out after preliminary squeezing it with your fingers. To make it easier to install a new filter, it is compressed on the sides, having previously found out which side it should be installed. After placing the filter, you need to straighten it by pressing the end with your fingers.
Next, the lid is placed and secured with latches, and after which the decorative trim is installed in place.
How to make a cabin filter with your own hands
I cleaned the air conditioner evaporator, and to prevent dust and other debris from entering the system, there must be a cabin filter, but since my JDM car was produced for use in its homeland in more gentle conditions, a cabin filter was not provided. I will make the cabin filter myself
.
There are almost as many design options as there are people who have done similar things; in my case, I was guided by the principles
of easy availability of consumables, ease of re-replacement and functionality .
The filter was made and installed a year ago, then I didn’t write, so this post shows how I made it and the immediate results of field tests.
In addition to manufacturing and installing the cabin filter, it was decided to disinfect the air duct and air conditioning system. I read forum articles and reviews and decided not to use compounds positioned specifically for automobiles, but chose an easily accessible, proven disinfectant - Chlorhexidine
.
Who is too lazy to look for what it is: Chlorhexidine is a drug, an antiseptic, in finished dosage forms it is used in the form of bigluconate. Chlorhexidine has been successfully used as a skin antiseptic and disinfectant for over 60 years.
Chlorhexidine is an antiseptic drug, active against gram-positive and gram-negative bacteria (except for Mycobacterium tuberculosis); protozoa; herpes virus. The drug is stable and after treating the skin (hands, surgical field, etc.) with it, it remains on it in a certain amount, which continues to give a bactericidal effect. Used for treating the surgical field and the surgeon’s hands, sterilizing surgical instruments, etc.
— Disinfection is carried out by supplying the solution to the air intake from the outside, setting the blower fan to maximum and, while supplying the solution, let the blowing system work in all modes - to the legs, to the windshield, to the cabin, etc., we also set the air intake from the cabin and supply solution through the cabin air intake; in our case it is located directly above the fan, to the left of the air conditioner evaporator box. — Added 90% Ethyl alcohol to the Chlorhexidine solution. — The solution was supplied using a sprayer from Mister Muscle. — Processed the air ducts from the cabin side.
I washed the filter with the same solution and treated the indoor unit of the air conditioner at home