Features of the red dot sight
A feature of many red dot sights are open optical parts - lenses and mirrors. In the case of closed structures with a durable tubular body, the risk of damage is minimal. The difference between open sights containing a lens in a small frame is the high probability of damage to the sight due to external mechanical influence.
Collimators must be used carefully, despite manufacturers' assurances about the high strength of their products. Although quality scopes can withstand significant abuse, you should avoid knocking them or dropping them on the ground. To use the collimator as efficiently as possible, you will have to spend time fixing it correctly and zeroing it.
Types of collimators
Collimator sights are divided into closed and open. Initially, there was a serious difference between them:
- Closed devices in the classical sense were called collimators that did not have a transparent lens. The shooter did not see the space behind the sight with the eye with which he looked at the front sight. In this regard, it was necessary to use two eyes at once. One (usually the left one) inspected the space ahead, and the second was aimed at the collimator mark. Using binocular vision, the brain compares these two images, and the shooter sees a front sight with a target in front of him.
- An open sight was a device with an open front bar and clear lenses. Through such a sight, the shooter could easily see the target. In this regard, firing a weapon could be carried out using one eye.
With the development of technology, the need for closed sights gradually disappeared. Engineers realized how big the difference was between an open and a closed device and stopped producing the latter. Nowadays, most hunters use open collimator sights, in which the lens is mounted on a small frame that does not have a protective auxiliary structure around it.
Installation
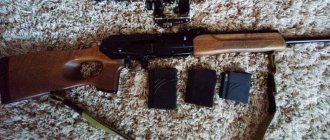
Mounted collimator sight on a rifle
Most red dot sights are mounted on one of two systems - a dovetail or a Picatinny rail (or a Weaver mount, which is almost the same thing). Most rifles come with one of these options out of the box, allowing you to mount the collimator without any problems.
To install it on a pistol, you will have to stock up on special adapters that are fixed in the area of the trigger guard.
Some models of air pistols and revolvers already have a built-in mount for mounted sights.
To correctly install the collimator on a weapon, you must adhere to the following sequence:
- ensure that suitable fasteners are available;
- attach an adapter, if necessary;
- install the sight on the weapon mounting mechanism and secure it with a screwdriver or a special key that comes with the collimator. The fit of the sight should be as tight as possible, but not too tight. If you overtighten the mounting screws, you can strip the threads or bend the guide rails, which will damage the design and make warranty service impossible;
- check the functionality of the collimator by testing it in all modes provided by the manufacturer.
You can watch the process of installing a scope on an air rifle in the video:
Despite the fact that the installation is not carried out on pneumatics, the video clearly demonstrates the use of special adapter strips. After the sight is securely secured, you can proceed to preparing and zeroing the weapon.
What is cold shooting?
How to zero a collimator without firing a single shot? Such a procedure is quite possible. In addition to the usual method of zeroing a weapon, there is also cold zeroing. To do this, you need to insert a special laser with a tube into the barrel, which can be purchased at a specialized hunting or weapons store.
As a result of using such a device, a corresponding laser marker will appear on the target, which indicates the point of impact of the ballistic projectile with millimeter accuracy, without taking into account the decrease in trajectory during flight. However, a bullet fired from a smooth-bore weapon has enormous speed, so the decrease in trajectory due to gravity at low distances can be neglected.
After installing the guide laser, it is necessary to adjust the position of the aiming marker on the red dot sight. After this, the device is considered zeroed, however, for reliability, it is recommended to check the accuracy of the settings using hot zeroing, firing several live cartridges from the weapon. Even if the cold method does not give accurate results, it will still allow you to save the amount of ammunition when zeroing a red dot sight on a smoothbore weapon.
Selecting a position and distance
Unlike ordinary amateur shooting, the zeroing procedure should take place in the most convenient conditions. This will help eliminate the influence of extraneous factors on the results of the shot. In the shooting area the following should be kept to a minimum:
- gusts of wind;
- local changes in humidity (for example, the passage of a bullet’s trajectory over a pond, swampy area, puddles);
- close traffic of vehicles and trains (including metro).
An experienced shooter can accurately zero a weapon while in a “standing” position and holding it suspended. If you don’t have the required experience, then it’s best to shoot from a rest position. For a pistol, a “sitting” position is suitable, and with a rifle you can shoot while sitting or lying down.
Ideally, the weapon is secured motionless in a vice. This is useful when you need to find out the accuracy of the shot, but it is difficult to implement without special clamping equipment (it is better not to use a regular vice).
Please note that for spring-piston pneumatics, the “lying down” position is extremely inconvenient in terms of reloading. You should also pay attention to the ground coating so that dust raised by the wind does not get inside the mechanism.
Another significant nuance is the safety of others - there should be no people or animals in the direction of the shooting. It is best to shoot at a range or in front of a hillside. In the latter case, the bullets will hit the ground and will not harm objects located behind the hill.
When shooting an air gun, it is preferable to start at ten meters. Firstly, this is a standard distance for pneumatics, and secondly, when subsequently shooting at other distances, it is most convenient to make adjustments for every 10 meters of distance to the target.
Operating principle and difference from other types
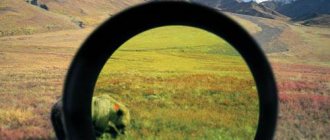
When using a weapon with a standard open sight, the shooter has to combine three objects on one axis at once: the front sight, the rear sight and the target. Only after this condition is met can a person be sure that the ballistic projectile will fly exactly to the target. This method significantly reduces the aiming speed and almost completely eliminates the possibility of firing while moving.
The optics provide good accuracy, but shooting while moving is absolutely impossible due to the strong vibration of the mark. High accuracy is achieved only with a stable position in one place and even breathing. Therefore, optical sights are used for shooting at long distances.
A collimator sight has a number of advantages over these two types. Firstly, it allows shooting at close and medium distances. Secondly, the speed of aiming increases significantly due to the absence of the need to combine several objects on the same axis. The accuracy of aimed fire while moving also increases.
In long-range shooting conditions, the collimator is not as good as optics. The device simply will not allow the shooter to aim at an object from a distance of more than 200 meters, since the red dots on the lens will completely cover the silhouette of a deer or wolf. Therefore, the sighting range ranges from 10 to 150 meters, depending on the model.
Also, do not forget that the collimator will require a power source to operate. In most cases, this role is performed by ordinary batteries or a mini-battery. Therefore, its advantage over other sights remains exactly until the charge runs out. After this, aiming will simply become impossible.
Target selection
Target with concentric circles and the central one painted black
There are special paper targets for pneumatic weapons, the holes in which are easy to navigate. You just need to know the width of the dimensions - concentric rings that give the shooter points from 1 to 10 for a hit. Standard rifle targets may be too small for a novice shooter, so it is better to choose a larger diameter for the first time.
When choosing the shape of a target for shooting, you should pay attention to the standard concentric rings, the middle of which is painted black (from “seven” to “ten”). By measuring their width, it will be easier to make adjustments when zeroing and transferring fire to other distances.
The target is attached to the bullet receiver. In the simplest case, it is a wide wooden board that should not be penetrated by a bullet. You can also purchase a special bullet receiver with a remote control for changing targets, like in shooting galleries.
When securing a target, think about the environment - try not to shoot unnecessarily into the ground or water, since lead bullets are quite toxic if left in nature for a long time. Also, you should not attach targets to living trees - do not spoil the ecosystem in vain.
The type of sights popular today among hunters and airsoft players is collimator sights. In this article you can get acquainted with Hakko red dot sights, one of the best-selling among other manufacturers. Characteristics, video reviews and photos of models. Information and reviews about the Sightmark SM13003B red dot sight can be found here. Reviews of popular models, installation on pneumatics, device.
Step-by-step zeroing process
Aiming a red dot sight on a smoothbore weapon may not be so easy. After all, even the slightest error in calculations can lead to a ballistic projectile being deflected several centimeters to the side. When hunting, when a wild boar or elk is running towards you, such errors will be unacceptable, so we recommend following the algorithm below:
- Before zeroing the collimator, you should place the weapon in a stable position so that swinging your hands has the least impact on shooting accuracy. It is best to use a special fixing machine or bipod. In a pinch, any horizontal flat object or sandbag will do.
- We position the barrel in the direction of the target, which is located 10-15 meters from the shooter’s position.
- We fire three precise shots while exhaling.
- Based on the shooting results, you can easily determine the deviation of the bullet's trajectory from the place at which the shooter was aiming. The collimator sight is adjusted using special screws, the movement of which corrects the position of the marker.
- We fire three more shots with the adjusted sight.
- If the results of repeated shooting are acceptable, then the target is moved to a distance of 30 meters.
- We repeat shooting and adjusting the sighting device in accordance with the results of the hit.
- When the accuracy of shooting at a target at a distance of 30 meters is satisfactory, it should be transferred to a distance of 50 meters and repeat the procedure.
This algorithm of actions is repeated until the zeroing of the collimator sight is completed. The last “frontier” may be the hundred-meter dash. A target located at a distance of more than 100 meters must be hit using optical sights.
We zero the collimator sight
The shooting itself is carried out in several stages, namely:
- approximate ignorance of the weapon to the target. In this case, you can use the direction of the bore or accompanying mechanical sighting devices. It is advisable to carry out the initial zeroing on larger targets in order to see hits even if there is a strong discrepancy between the aiming point and the average point of impact;
- performing a series of shots. A series usually means 3, 5 or 10 shots. For the initial zeroing, it is enough to limit yourself to three or five shots;
- determination of the horizontal and vertical deviation of the average point of impact from the center of the target - the aiming point;
- calculation of the required correction in accordance with the instructions for the sight. Corrections are usually made by special flywheels that change the position of the collimator in the horizontal and vertical planes;
- carrying out another series of shots. The point of impact should be close to the center of the target. If necessary, you can introduce additional corrections, and then make sure the sight is aligned correctly (shoot another series).
There is nothing to worry about if during zeroing you do not fit into two or three series. At first, do not try to ensure an exact hit in the top ten. “Work” on a paper target until you see an improvement in shooting accuracy (a decrease in the spread of hits relative to each other).
The video shows zeroing a collimator sight on a firearm (the essence is almost the same as on a pneumatic rifle):
After zeroing, it is advisable to check the quality of the collimator installation. To do this, you need to remove the sight from its mounting location, and then repeat the installation procedure. High-quality sights retain their settings even after repeated installation and removal cycles.
What is a collimator?
A collimator sight is a device designed for aiming at medium distances. The operating principle of such a unit consists of several optical effects, which are complemented by simple electronics. A light source is directed into the reflector lens, after which a whole stream of rays is formed in the direction of the arrow. At this time, the person holding the weapon in a combat position sees in front of him several dozen dots collected into a single pattern. Depending on the displacement of the weapon’s axis, these points move along the lens, which allows you to quickly and accurately target an object and fire a shot.
Crossbow->sight->what and how?
What scope to install on a crossbow? How to sight a crossbow? Types of crossbow sights? Where to buy a scope for a crossbow?
Like almost any ranged weapon, crossbows have sighting devices. Due to the ballistics of the arrow, a crossbow sight must meet some special requirements. The main one is the presence of ballistic corrections with the optical design of the sight, which allows the shooter to send the projectile accurately at different distances (without introducing adjustments using “adjustment drums” or, more interestingly, “by eye”).
It’s also nice when the sighting device can be used as an integral rangefinder.
I’ll list what else is “good” - in principle, these are banal truths for other scopes - wide field of view, resistance to loads, water resistance, etc.
Sights used on modern crossbows.
*Open sight:
A typical representative on the Russian market is the scorpion crossbow sight (and similar ones), which works according to the classic principle of bringing the front sight and rear sight slot together on the target line.
Among the advantages it is worth noting - ease of installation and configuration, as well as low cost, versatility of use on different models. Among the disadvantages - 1 exact shooting distance + small corrections “by eye”. But this is an outdated open sight design.
Let's see what BadRiverOutdoors came up with, dammit:
Well, actually, in my opinion, this is the most successful and high-quality version of an open sight. There are several front sights for different distances, there is an adjustment of the rear sight for a specific crossbow. In the adjacent pictures you can see the same sight with an installed rangefinder profile “tailored” for the average whitetail deer (somehow the Americans are all “dancing” from him - apparently the most popular *)
*Collimator sight:
A little about the operating principle of these devices - collimation, the creation of a thin parallel beam of light (in our case). The light source emits radiation in the form of an aiming mark, which, reflected from a specially designed front lens (partially concave, with a certain reflection coefficient), is projected into the observer’s eye. Adjusting the point of emission of radiation shifts the mark in the eye of the observer and the corresponding position of the barrel or, in our case, the guide.
Among the advantages it is worth noting - a wide field of view, a simpler aiming scheme than optical and open (point and shoot), for me the fact that the stamps themselves are “beautiful” is important (I love how they “glow”).
It is also not uncommon to have “colic” with a changeable brand.
Among the disadvantages, we note that these sighting systems are still designed for firearms and rarely have a ballistic mark. Dependence on batteries, some “fragility” (compared to open sights), fear of moisture (cheap).
Very few companies produce collimators “tailored” for crossbows.
This is roughly what a regular crossbow collimator looks like.
Some companies had the brains to make 4 points:
Let us separately highlight the Holographic crossbow sight from EoTech - in my opinion, this is the coolest (but also expensive) crossbow sight of this type. Such sights do not use the collimation effect, but a hologram.
All collimators are convenient to use only at close distances because... the markings do not allow you to target them at a large range of distances, and the lack of optical magnification does not allow you to clearly aim at long ranges (magnifers will of course help - but a small range will still remain).
Optical sights:
The most popular devices in my opinion. There is a huge selection, etc.
The best crossbow sights have a wide range of reticle ranges.
Let's go - number 1 on the world:
Well, that’s all. Of course, there are other reticles suitable for crossbows that are often used (for example, RangeFinder), but there are few lined crossbow sights specifically at point-blank range (personally, I only highlight these two).
But due to the fact that these devices are not available in the Russian Federation - and their cost was impressive even in the days of the dollar at 34 rubles), we often have to work using a grid.
Rangefinder grid (right above me):) - also has a good layout, but the “log” in the middle is terribly annoying. And our “brothers in communism” stubbornly do not want to do it on glass or at least reduce the thickness.
While “Uncle Tom” has already done everything with a bang.
I’ve undeservedly avoided sights - because I’m interested in shooting not only at 20 m, but also at 100, and at the same time I don’t want to make adjustments to the sight settings. For sports and recreational shooting (primarily), the grid layout is very important.
Collimators and optical sights with a reticle of 3-4-5 pins (marks, marks, points, distances) - often with a difference of 5-7 meters, are primarily intended for hunting when the shooting distance is often known and limited to 30-50 meters (although any It happens).
Some crossbows ("scorpions", "cheetahs", MK-hi old, etc.) are equipped with a built-in tilt regulator of the aiming bar. This allows the use of any type of sight on such models - ballistics adjustments are made by tilting the aiming bar (unfortunately, the bar has specific play, and models using such locks with bars are outdated)
Naturally, “a holy place. “And now the HHA company has released an entertaining device for upgrading a crossbow.
With the help of this adjustable bar, you can easily set the aiming point in the range of 0-80 meters. And in total, with one of the best sights, you can shoot at 150-160 meters, which has been done in several videos and quite successfully. Normally, yes, 160m aiming?)
Well, we bought a scope and what?
We place the sight on the sighting bar (for optics, first place the rings, and then the pipe. The gap between the clamping half-rings should be equal, and ideally tightening should be done with a device with a dynamometer).
Any sight of any type has adjustment mechanisms (drums, all sorts of ratchets, twisters, etc.).
Let's say we shot from 10 m and the arrow goes to the left and down => we correct the aiming mark (or the section of the reticle - center cross) UP+RiGHT/
Basically, the markings on the correction organs UP/DOWN and LEFT/RIGHT literally mean “arrow up or down - left or right”, BUT in particularly promising samples the meaning “Up or down and left or right - GRID” is found, which is projected onto shooting has the opposite effect for the projectile (reticle up, projectile down), so here you need to look at what works and how it works (I’m glad that such products are rare).
When making adjustments, you should take into account the click price of the drum - for example, 1/4″ (minute of angle, MOA) at 100 yards. A minute of angle of 1 MOA at 100 yards has a size of 2.65 cm; at 100 meters the size is 2.91 cm.
This means that with 1 click of the drum, the reticle at 91 meters (100 yards) will move 0.66 cm - or 0.72 cm at 100 meters.
It should be taken into account that when correcting with drums, the click price does not change depending on the distance, BUT the linear size of 1MOA changes, i.e. at 50m 1 MOA = 1.45 cm (the corresponding click of the drum at 1/4 will be counted from the size of 1.45 cm).
Let's say when shooting at 10m, the arrow falls 15cm down and 10cm to the right. At 10m, the size of the 1st minute is 0.29cm. 1 click is equal to 1/4 (let's say, maybe 1/2). Now, divide 15 by 0, 29 we get approximately 51.7 MOA.
Multiply by 4 for a total of approximately 205 drum clicks with a division of 1/4.
Or approximately 102-103 clicks with a 1/2 MOA cylinder
We shot the central cross or dot at the required distance (let's say 10m). Next, we test little by little (if there is no ballistic map of the sight) and shoot the rest of the following marks (crosses, dots, marks) - we remember or write down and get a map of our aiming reticle. Now leaving at the line (sport hunting), knowing the distance, you can confidently fire a shot according to the brand or level.
Rules of operation, care and storage
This sighting device is quite easy to damage. The lenses on the collimator do not withstand any external influence very well, after which scratches or cracks remain on them, reducing the quality of aiming. They can only be wiped clean with special wipes. Never use improvised means for this, as some fabrics leave scratches on the delicate glass of the lenses.
Batteries must be inserted into the device before shooting and removed after shooting. Such actions are carried out in order to protect the electronic sight from possible damage in the event of battery failure. Therefore, be sure to remove the batteries from the device before storing it.
To transport the collimator sight, it is recommended to use special cases that protect the device from possible physical impact. It is not advisable to transport a collimator over a long distance attached to a weapon.
source
Do-it-yourself scope repair - highlights
The time has come to study the mounting of the basic components of the optical sight. Please note that this is a fragile device, so you need to disassemble it with extreme caution. It starts to act up after about one and a half thousand shots. To prevent future problems, tighten the mounting screws and watch for horizontal alignment.
This video explains how an optical sight works and how to repair it (Leapers 3-9×40 model):
Attaching the lenses
Lenses for hunting weapons have a large diameter, designed for shooting at short distances (150-200 meters). Hunting optics have many rubbing surfaces that wear out over time. Backlashes, mechanical displacements and optical parallaxes occur.
The lenses are attached using sealant. After disassembling the sight according to our instructions, you reach the ring nut that holds the crosspiece. The next procedure is as follows:
- squeezing out the cassette (do not lose the pressure spring);
- unscrewing the front nut, lens and guide screws (2 pcs.);
- removing the adjustment lenses from the inner cylinder (this must be done carefully, without giving the cylinder a vertical position);
- remembering the location of the lenses;
- repair.
If the tuning lens (usually the front one) has a loose locking ring, the threads will have to be lubricated with sealant. After waiting for it to dry, reassemble the entire structure in reverse order.
Pressure spring
During repair operations, you will inevitably encounter a pressure spring, which you need not only to preserve, but also to ensure its functionality.
A little advice: you can unscrew the nuts (if you don’t have a repair kit at hand) with pointed tweezers.
Loose screws and nuts (if they do not tighten well) should be placed on sealant. Now the repaired structure, together with the spring, must be pushed back into the pipe - this is a rather labor-intensive process. One end of the spring should end with teeth, the other should be completely smooth.
If necessary (presence of jags), the second end of the spring must be sanded. The spring is installed in the central part of the sight - between the holes intended for the adjustment drums. The tube slides onto the cassette with the assembled lenses, while the spring must be held through the holes.
Lubrication
Not all parts and components of an optical sight require lubrication. And even more precisely, only the rings need this. It is highly undesirable for grease to get on the surface of the lens. For the lubrication procedure you will need:
- The vertical correction drum is turned all the way down, and the horizontal drum is turned all the way to the left.
- The vertical and horizontal drums are clicked (“up” and “right”, respectively).
In this case, it is necessary to count the number of clicks over the entire range. It’s best to do this in splendid isolation—household members can throw off your mental calculations. In addition, a rifle occupying the kitchen table (on a special machine) is not the most positive sight for a wife. - Let's assume that you are 300 clicks away from the extreme positions of the drum. Count halfway (in this example, 150 clicks). This is the middle of both ranges. The sight is “zeroed” - its optical and mechanical axes are combined.
To reduce the risk of repair work, protect your scope from bad weather - heat, humidity and direct sunlight. Cover the lenses with caps, avoid mechanical damage and contact of harmful substances (lubricants, alcohol solutions) on the lenses. Periodically (after 1000-1500 shots) check the internal fastenings. Have a good hunting!
There are things that can be very helpful for successful air rifle or rimfire hunting. Or even with a crossbow, there are also such amateurs.
One of these things is an optical sight
. After all, open, regular or diopter, cannot provide the required accuracy.
Of course, any such thing can be easily bought. However, many are interested in making a useful thing with their own hands. Making an optical sight is a very troublesome and intricate task. But quite accessible for independent implementation.
Implementation
The implementation, of course, may be different, but it is based on a single theoretical basis. Let’s turn to it, the theory.
An optical sight is a small telescope with a Kepler optical system, complemented by an aiming reticle (mark) and a wrapping element. (Galileo's system is not suitable because it is afocal.)
The simplest scheme is this. The first lens is the lens. An aiming mark (reticle) is installed in the focal plane. It appears as clear as the target image by being positioned precisely in focus.
At the other end of the scope tube is the eyepiece lens. They look into the eyepiece from a distance of 5-7 centimeters, no less.
Therefore, you need at least three lenses in total (although they put more in scopes to ensure high quality). The sights end up being quite long because you have to take focal lengths into account.
A little practice about optical sights
There is a lot of talk about the aperture of the lenses used. Like, if it is good, you can hunt in the twilight. This is true. However, on a bright sunny day you will need filters and lens attachments. Especially in winter, when everything around is glittering with snow. There is no way to make a light filter - then there is no need to chase the aperture ratio.
Now a little about practice. Focal lengths and the location of the reticle can be determined experimentally. Place everything along a regular ruler, move the lenses and grid until you get a high-quality image, see how many millimeters are there - and then design the pipe.
The scope must provide at least four times magnification. Anything less will not be effective enough.
Reticle
The reticle is usually made by gluing hair to a ring. Then it is glued into the focal plane. To ensure that the crosshair is exactly in the center, the ring is placed on graph paper. Or at least on a squared piece of notebook paper. Otherwise you won’t be able to glue it evenly.
Instead of hair, a thin thread will do. Very thin, woven from nylon. True, it may not have to be glued, but welded. Or the wire from a coil of broken miniature headphones, also quite thin.
Making the reticle is the most difficult stage, truly a jewel. It’s better to make several at once, so that you can quickly change them later (if the previous one, for example, is torn by a lens that fell off due to vibration).
You can also make a mesh from needles, but thin enough ones are unlikely to be found. Although, there is a lot of room for experimentation. The pipe itself and its fastenings too.
If it is impossible to make a thin reticle, it turns out thick, then you can try to install it in the focal plane of the eyepiece lens, rather than the objective.
The best brands of collimators for carbine
Owners of short-barreled weapons often speak positively about light models, most often closed-type.
The following models received good user ratings:
· for maximum accuracy with minimal weight, you can purchase a gearbox for the DOCTER Sight II+ carbine. This is a reliable and accurate option, just like military models. The brightness of the tag automatically adjusts to the type of lighting. The 3.5 MOA mark is ideal for hunting; at 100 m it covers no more than 10 cm of prey;
· collimator for carbine “Sightmark SM13001” is a universal lightweight sight of the popular brand from the “Mini-shot” line. Suitable for rifled and smoothbore carbines with Weaver mount. Since it has low power consumption, it is suitable for winter hunting;
· "Aimpoint Micro H1" is considered the lightest of the closed collimators. It handles even strong recoil perfectly. There is no parallax in this case at all;
· the Sightmark SM26003 carbine sight is a mini-variation with a wide panoramic view. With its help, you can adjust the brightness of the mark for a clear view of the aiming point and the hunting object under different types of lighting. This is an excellent choice for a raid.
These models are used by amateur hunters, professional athletes, and experienced military personnel. And everyone who knows how to correctly use collimators on a carbine is confident in the convenience and importance of having this accessory.
Often, complaints come from people who have not mastered and sighted the device correctly or have skimped on the quality of equipment.
Adjustment
“Zeroing” the sight (adjustment)
is the process of bringing together the mechanical and optical axes. The need for adjustment arises after purchasing a new sight - the shooter is not yet sure of the correct range set by the adjustment drums. The sequence of actions for adjustment is as follows:
- The vertical correction drum is turned all the way down, and the horizontal drum is turned all the way to the left.
- The vertical and horizontal drums are clicked (“up” and “right”, respectively).
In this case, it is necessary to count the number of clicks over the entire range. It’s best to do this in splendid isolation—household members can throw off your mental calculations. In addition, a rifle occupying the kitchen table (on a special machine) is not the most positive sight for a wife. - Let's assume that you are 300 clicks away from the extreme positions of the drum. Count halfway (in this example, 150 clicks). This is the middle of both ranges. The sight is “zeroed” - its optical and mechanical axes are combined.
To reduce the risk of repair work, protect your scope from bad weather - heat, humidity and direct sunlight. Cover the lenses with caps, avoid mechanical damage and contact of harmful substances (lubricants, alcohol solutions) on the lenses. Periodically (after 1000-1500 shots) check the internal fastenings. Have a good hunting!
It is best to entrust the repair of an optical sight to a specialist, but if one is not nearby, we take matters into our own hands. This article will generally help you understand the structure of optical sights, learn how to disassemble them and carry out simple repair work. Please be patient and attentive - we are plunging into the precise world of optics.
Before we delve into the insides of the optical sight, let’s understand its technical structure. The sight consists of the following components:
- Lens.
This is a complex system consisting of several lenses. One of the key parameters of a lens is aperture; it directly depends on its diameter. The outer lens is coated with an anti-reflective coating. - Sighting reticle.
Thanks to it, you aim your weapon accurately. The reticle is localized in the focal plane of your scope (ocular or objective). The simplest grids are half-cross and cross. - Wrapping system.
It consists of a pair of lenses that reverse the image, making the picture “straight”. - Eyepiece.
An enlarged direct image is fed to the eyepiece, thanks to which the shooter examines the target. In rifle scopes, the focal length of the eyepiece is about 50-70 mm. Often the eyepiece is equipped with a rubber eyecup. - Mechanism for entering horizontal/vertical corrections.
Combines two points - aiming and hitting. Two types of correction mechanisms are common - tactical drums and permanent correction devices. The drums are equipped with a scale along the axis of which the handwheel rotates. When adjusting, the arrow is guided by characteristic clicks. - Illuminated aiming reticle.
Modern sights are equipped with an LED that illuminates the central part or the entire reticle. Some scopes have a brightness adjustment that allows you to adjust the acceptable level of illumination. - Frame.
Usually the body of your optics is plastic, sometimes it is made of a lightweight and durable alloy. The housing connects the components of the sight into a common structure that is resistant to overloads that occur during shooting.