Valve adjustment value
If we talk about an internal combustion engine, we can briefly describe the cycles of its operation. This is intake, then compression, after which fuel combustion occurs, and stroke 4 is the release of exhaust gases. On the standard Kalina 2 engine and other VAZ cars, 4 valves are used for each cylinder. Two are responsible for exhaust and two for intake. The principle of their operation is simple: when the camshaft rotates, both intake ports open simultaneously, and after a certain time, two exhaust ports open.
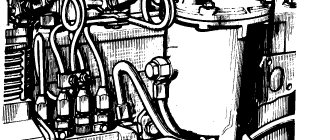
Valve mechanism design
The intake stroke involves the downward movement of the piston. At the same time, the intake valves open, supplying a dose of a mixture of air and gasoline into the cylinder. At the next stage, the piston begins to rise up and the intake valves close. Thus, the compression stroke occurs. Having reached the top point of the cylinder, the piston is sharply thrown back by igniting the mixture with a spark plug. Once the piston reaches extreme bottom dead center, the exhaust valves open. When it begins to rise upward, exhaust gases are pushed out at the same time.
Accordingly, without valves, the operation of an internal combustion engine is virtually impossible. Their function directly depends on the correct rotation of the camshaft. And to be precise, the appendages on it, called pushers.
As for valves, the most important parameter of their operation is the thermal gap and the correctness of its adjustment. After all, every little detail is important for the stable functioning of the gas distribution mechanism.
Purpose of thermal gap
When this gap is properly adjusted, the tappet and camshaft lobe are pressed against each other as hard as possible to ensure perfect contact between the surfaces. It is necessary to take into account that all internal combustion engine parts are mainly made of different alloys and metals (aluminum, copper, cast iron compounds). The pushers, camshaft and valve group itself are also metal. As you know, any metal tends to increase in size when heated strongly. As a result, the gap that exists on a cold power unit differs significantly from that on a warm one. Simply put, the valves are either too tight or the surfaces are not in close contact.
Adjusting the gaps is the installation of special gaps between the valve and the piston, taking into account the expansion of metals when heated. These values are so small that microns are used to measure them. However, different values are used for exhaust and intake.
Each automaker, including AvtoVAZ, has regulations according to which the required indicators are set. This is what people call valve adjustment. The manufacturer clearly regulates the frequency of such a procedure: at least once every 50,000 km. Typically, special adjusting washers are used for these purposes, which are changed at the top of the pushers.
An increased or insufficient thermal gap has an extremely negative effect on the operation of the gas distribution mechanism. In general, the operation of the entire engine is disrupted.
Differences in load on exhaust and intake valves
Almost all elements of an internal combustion engine are subject to severe thermal loads, the valve group is no exception. The diameter of their rod does not exceed 5 mm. And when fuel burns, thermal energy is released, and the temperature in a short period of time can reach 2,000 degrees. A larger gap is established on the exhaust parts due to stronger heating from the release of hot exhaust gases. This means that the metal expands at such temperatures more than at the inlet.
Consequences of untimely adjustment
If thermal gaps are not adjusted, two main problems can arise. The first involves excessive clamping. The second, on the contrary, consists of too large gap values.
Valve adjustment procedure
Adjusting the hand brake of the Lada Granta
Adjusting valves using a feeler gauge
The car engine is designed in such a way that it has 2 valves per cylinder. This is necessary so that 1 valve starts the flammable liquid, and 2 gets rid of it. This entire process is regulated by a gas distribution mechanism. Valve clearances play a special role in this process. When the engine starts and reaches operating temperature, its moving elements expand.
Increased valve clearances reduce engine power. This can be judged by hearing a metallic sound when the engine idle. Thus, incorrect valve adjustment will lead to increased fuel consumption and the need for expensive repairs of individual elements of the engine system.
The clearances are adjusted on a cold engine. You can check its operating temperature using a flat probe of the required thickness. Procedure:
Adjustment must begin by turning the engine rocker arms in the desired direction. Then you should raise the cylinder piston to the “dead” point. In this position, the engine valves are closed. To check the correctness of the actions performed, you need to slightly rock the valves. They must be in a free state, i.e. don’t run into anything (the same goes for cars with air conditioning). Then you should lower the nut on the adjusting screw. Using a feeler gauge, you can adjust the desired distance between the valves, i.e. adjust the gap. The next step is to tighten the locknut.
It is important to keep in mind that over-tightening may reduce the clearance. After each turn of the nut, check the size of the gap with a feeler gauge.
The best option is when the probe passes into the valve with little effort.
Pros and cons of various engine modifications
8 valves; volume 1.6 liters
The engine is well known to car enthusiasts. Its quality and reliability are beyond doubt. Positive aspects of the engine:
- It is regulated in almost every car service;
- There are no problems with purchasing spare parts;
- If the belt breaks, the valve does not “meet” the piston. No breakdown occurs;
- Excellent traction when in low gear.
The negative aspects include:
- High noise and increased vibration during operation;
- Constant valve adjustment is required;
- A car with such an engine is not equipped with air conditioning.
16 valves; volume 1.4 liters
Positive aspects of the engine:
- Lowest fuel consumption;
- Quietness and absence of vibration during operation;
- Able to quickly accelerate a car;
- No need to adjust valves.
The negative side can be called:
- If the belt suddenly breaks, the valves bend on the pistons. In this case, in addition to the valves, the entire piston group will have to be changed;
- After 40,000 km, oil consumption increases.
16 valves; volume 1.6 liters
Positive aspects of the engine:
- Works very quietly;
- There is no vibration;
- The most powerful engine;
- No valve adjustment required.
The negative side includes:
- bending of valves due to sudden belt break.
Causes of pinched valves
The first factor is most often observed on those cars whose owners have equipped their cars with LPG equipment (gas equipment).
Gap too small
As you know, the valve has a plate - its widest part, which is located directly in the combustion chambers. On the reverse side it is attached to the cylinder head. As the car's mileage increases, the chamfer on the surface of the plate and the mounting location begin to wear out. As a result, when the rod is raised, the pusher is pressed too tightly against the camshaft cam. This is how compression occurs.
Process Features
Lada Kalina of the first and second generations differ not only in appearance, but also in the engine. The adjustment is also, albeit slightly, different. It is only needed on an engine with 8 valves, the design of which has not changed, so there is no difference in the procedure for installing thermal clearances on the first and second generations. On engines with 16 valves, this process does not make sense, since from the factory the design includes hydraulic compensators that maintain the optimal clearance without additional intervention.
The procedure is to change the values of the intervals. Work is carried out with the engine stopped by rotating the crankshaft manually clockwise. This process will require special washers, which are installed in the niches of the pushers. All you need to do is select the right size washer.
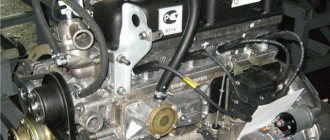
Valve adjustment process
The process of adjusting valves on an engine
Before moving directly to the adjustment process, it is worth noting that this operation is carried out only on a completely cooled engine. Experienced VAZ drivers recommend waiting at least one night.
To make the adjustment, you will need a few tools, namely a set of keys and sockets, as well as a valve cover gasket and a special feeler gauge.
So, let's proceed directly to the operation:
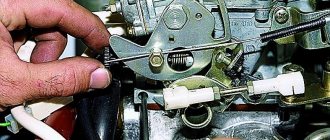
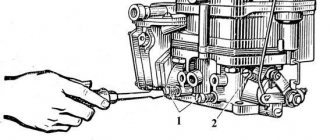
- We disconnect and move to the side the tip of the throttle valve drive.
We dismantle the cable and bracket for fastening the throttle position
Unscrew the clamps and remove the crankcase ventilation hoses.
Remove the valve cover and bearing caps to adjust the valves
We dismantle the timing belt protective cover to get to the crankshaft pulley
Turn the crankshaft clockwise
We adjust the gaps using feeler gauges
Special tool for adjusting valves and replacing shims
Using tweezers, remove the adjusting washer
What types of shims are there?
A set of adjusting washers for all occasions
For cars of the VAZ family there are 125 sizes of shims, but not all are used.
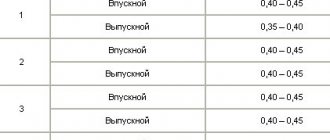
Therefore, let’s consider the most popular sizes of spare parts that are installed on these engines (if you don’t want to run to the auto store again later): 3.30, 3.35, 3.40, 3.45, 3.50, 3.55, 3.60, 3.65, 3.70, 3.75, 3.80, 3.85, 3.90, 3.95, 4.00, 4.05, 4.10, 4.15, 4.20, 4.25, 4.30, 4.35, 4.40, 4.45, 4.50;
Adjusting washers in two sizes: 3.95 and 3.30
What are the consequences of untimely valve adjustment?
When the entire replacement process is considered, it is worth recalling what the consequences of untimely adjustment of the valve mechanism may be:
- Wear of camshafts. Thus, incorrect clearance can lead to premature wear of the camshaft cams.
- Damage to valve tappets when adjusting washers hit them.
- General wear of all elements of the head and timing mechanisms.
- In some cases, it may happen that the timing belt breaks and bends the valves.
After using the car for a long time, its owner may notice that the engine is no longer performing as well as it was before. In principle, all changes in engine operation should always alert the driver, since this is often fraught with quite serious consequences. In most cases, adjustment of the VAZ-2110 valves (8 valves) is required if the following symptoms are present:
- excessive noise when starting the engine after the car has been idle for a long time;
- lack of compression in the cylinders (a noticeable decrease in engine power);
- oil leaks through the cover gasket;
- regular “shots” in the muffler or carburetor;
- increased fuel consumption.
We adjust valves on Lada Kalina 8 valves with our own hands
The issue with adjusting thermal clearances is a classic one: everyone should be able to change the washers on the pushrods of an 8-valve valve. But there is “bad advice” that applies to the VAZ-21116 engine: they say that for exhaust valves it is better to make the gap equal to 0.40, and let the tolerance be 0.05 mm. In fact, the requirements have not changed since the 11183 engine: the average numbers should be 0.20 and 0.35. Following “bad advice”, you get one thing - the engine “knocks” when cold. And this is for a value of 0.40! You still need to be able to set it, but it may turn out to be 0.45... And then our adjustment will kill 4 of the 8 valves on the Lada Kalina. We are talking about the Kalina 2 family, where the only 8-valve engine was the 21116 engine.
The following is a video where valve knocking is recorded.
Do-it-yourself valve adjustment
If your engine valves are knocking, it's time to adjust them. Don’t rush to go to a service station for this; try to perform this simple procedure on your own. If you learn to adjust the valves yourself, then you will save from 500 to 1000 rubles on this procedure, this is exactly the amount that the service station asks for. Osipov Mikhail, VAZ 2112, Toyota Camry, driving experience 11 years.
Hi all! My name is Mikhail, now I’ll tell you a story about how I managed to exchange my two-wheeler for a 2010 Camry. It all started with the fact that I began to be wildly irritated by the breakdowns of the two-wheeler, it seemed like nothing serious was broken, but damn it, there were so many little things that really started to irritate me. This is where the idea arose that it was time to change the car to a foreign car. The choice fell on the melting Camry of the tenth years.
Yes, I had matured morally, but financially I just couldn’t handle it. I’ll say right away that I am against loans and taking a car, especially not a new one, on credit is unreasonable. My salary is 24k a month, so collecting 600-700 thousand is almost impossible for me. I started looking for different ways to make money on the Internet. You can’t imagine how many scams there are, what I haven’t tried: sports betting, network marketing, and even the Vulcan casino, where I successfully lost about 10 thousand ((The only direction in which it seemed to me that I could make money was currency trading on the stock exchange, they call it Forex. But when I started delving into it, I realized that it was very difficult for me. I continued to dig further and came across binary options. The essence is the same as in Forex, but it’s much easier to understand. I started reading forums, studying trading strategies. I tried it on a demo account, then opened a real account. To be honest, I didn’t manage to start earning money right away, until I understood all the mechanics of options, I lost about 3,000 rubles, but as it turned out, it was a precious experience. Now I earn 5-7 thousand rubles a day. I managed to get the car buy after half a year, but in my opinion this is a good result, and it’s not about the car, my life has changed, I naturally quit my job, I have more free time for myself and my family. You’ll laugh, but I work directly on the phone)) If If you want to change your life like me, then here’s what I advise you to do right now: 1. Register 2. Practice on a Demo account (it’s free). 3. As soon as you get something on the Demo account, top up your REAL ACCOUNT and go to REAL MONEY!
I also advise you to download the application to your phone, it’s much more convenient to work from your phone.
Adjusting engine valves (VAZ 2110-12 engine 8 valves): 1. Open the valve cover and remove the timing belt cover (instructions).2. We install a device for adjusting the valves. You can buy it at any Auto store for 500 rubles.
3. Place marks on the crankshaft and camshaft. Then check the timing belt tension, if necessary, tighten and turn the camshaft 2.5 teeth clockwise.
Place your mark. Then we count the teeth 11-mark, 10.5-mark, 11-mark and proceed to adjustment starting from the first mark
5. Determine the gap using a feeler gauge.6. We take out the puck and look at what is written on it. Next, we take a special kit, or we count and write down which washer is needed. There is nothing complicated, and the whole process took no more than 30 minutes. Technology:
- remove the valve cover;
- lift one wheel with a jack;
- install a device for pressing the valves;
- We consider where the intake and exhaust valves are;
- turn the wheel until the shaft elbow is at the top, measure the clearance of the first valve;
- We consider what kind of washer is needed, if there is one, we install it. For this purpose, there is a special cam that holds the seat pressed, thereby providing almost free access to the washer. We take it out with tweezers or a clamp.
We work similarly with all other valves. The gap is adjusted by selecting the thickness of the adjusting washers. To do this, measure the thickness of the washer with a micrometer. The thickness of the new adjusting washer is determined by the formula: H = B+(A–C), mm,
- where A is the measured gap;
- B – thickness of the removed washer;
- C – nominal gap;
- N – thickness of the new washer.
The thickness of the washer is marked on its surface with an electrograph. We install the new washer in the pusher with the marking down and remove the lock. Check the gap again. When adjusted correctly, a 0.20 or 0.35 mm feeler gauge should fit into the gap with slight pinching. Consistently turning the crankshaft half a turn, we adjust the clearances of the remaining valves in the sequence shown in the table:
| Angle of rotation of the crankshaft from the alignment of the marks, degrees. | Fists | |
| exhaust (gap 0.35 mm) | inlet(gap 0.20 mm) | |
| 40–50 | 1 | 3 |
| 220-230 | 5 | 2 |
| 400-410 | 8 | 6 |
| 580-590 | 4 | 7 |
Valve adjustment on a VAZ 2110-12 with a 16-valve engine is not performed because hydraulic compensators are installed there. If knocking noises occur, replace it. Our readers recommend!
In order to get rid of constant fines from cameras, many of our readers successfully use Special Nano Film for license plates. A legal and 100% reliable way to protect yourself from fines. Having familiarized ourselves and carefully studied this method, we decided to offer it to you.
Our readers recommend!
In order to get rid of constant fines from cameras, many of our readers successfully use Special Nano Film for license plates. A legal and 100% reliable way to protect yourself from fines. Having familiarized ourselves and carefully studied this method, we decided to offer it to you.
| Valve adjustment work |
| Adjust the valves yourself... |
- How I adjusted the valves from the my2110.ru forum
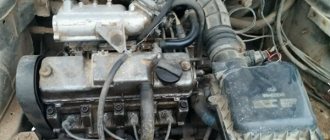
- engine
- engine repair
Preparing for work
You will need a set of tools and accessories:
- a set of socket heads with a wrench and a ratchet;
- syringe for removing engine oil;
- figured and flat screwdrivers;
- special tool for recessing valves;
- a series of special probes;
- tweezers;
- long-nose pliers;
- adjusting washers.
The procedure is actually simple and can be done independently, without the participation of specialists. To save time or if the process seems too complicated, it is better to use the services of a car service. Such work does not cost that much: the standard figure does not exceed 800–1000 rubles, depending on the region.
Instructions for adjusting gaps
Before starting this operation, it is necessary to cool the engine. Afterwards, the bolts securing the cylinder head are unscrewed and the latter is dismantled. Further work looks like this.
- Remove the casing that covers the timing gear drive.
- Unscrew the spark plugs (this will make it easier to rotate the engine crankshaft).
- The surface under the head is cleared of oil using a syringe.
- If the camshaft has severe wear on the pusher cams, damaged and worn elements must be replaced.
- In place of the block head, a special device should be installed on the mounting studs, which will help to push the valves down.
- The pistons are set at dead center. To do this, the crankshaft is turned with a knob until the mark on the rear timing cover coincides with the mark on the pulley.
- After the marks match, the crankshaft rotates a few more teeth, and the first piston will be installed at top dead center.
- Using a feeler gauge, the gaps are measured first on the first cam, and then on the third. To do this, take a probe whose size is no more than 0.35 mm. If the dipstick passes without resistance, you should select another washer.
- Through a special groove in the upper edge, the washer is picked up and removed. In order to see the groove you need to move the pusher a little.
- Using a special device, the valve is recessed downwards; in this case, you should hold the pusher with a flat-end screwdriver, inserting it not into the groove, thus preventing its arbitrary rotation.
- After fixing the pusher with tweezers, the washer is removed and another one of suitable thickness is installed in its place. On one side of each washer there is a special marking indicating the size. The washer change is completed, the screwdriver is removed, the valve is returned to its place, and the gap is measured using a feeler gauge.
Ideal valve adjustment on Kalina involves inserting the dipstick into the gaps with little force (within reason). After this, you need to turn the engine again by one revolution of the crankshaft pulley and carry out a control measurement of the gap. Thus, all clearances are checked and adjusted, with the obligatory rotation of the crankshaft before each measurement. After the operation, you need to fill the engine oil to the required level, you will also need to replace the Kalina valve cover gasket, and then secure the valve cover and timing drive with fasteners.
The operation, if you look at it, is simple. You must strictly follow the step-by-step instructions, and even a beginner can handle this procedure.
Correct adjustment is immediately noticeable: the gas distribution mechanism works smoothly, the engine does not make noise, which means the car’s “heart health” is in order. At least for the next 50–60,000 kilometers, thermal gaps will not have a negative impact and no additional work will be required. And they will certainly be the result of incorrect or untimely adjustment.
Necessary tool
In the case of an 8-valve power unit, it may be necessary to carry out adjustment work every twenty-five thousand kilometers. But to do this you will need to have a certain set of tools available.
- First of all, we are talking about a set of shims. As a rule, such washers are supplied in thicknesses from 3 to 4.5 millimeters with an interval of 0.05 millimeters.
- In addition, you should have a dipstick at hand at a similar interval.
- And, of course, do not forget about adjustment devices. Its main feature can be considered that such a device will greatly facilitate the majority of work on replacing washers in the cylinder head.
It’s possible without a special device, but it’s much easier with it
Sequence of work on an 8-valve engine
Before starting work, you need to completely cool the engine.
Some specialists do not begin adjustments until the car engine has been idle for a day.
This needs to be unscrewed
- It is desirable that its temperature be between 20 and 30 degrees Celsius. For this purpose, you can use a standard fan, for which it will be enough to disconnect the connector from the temperature sensor, which is located near the thermostat, and turn on the ignition.
- After this, remove the spark plugs. This must be done in order not to damage the timing belt while the camshaft is moving.
- You will also need to unscrew the timing belt cover to completely remove it. Carefully disconnect all the pipes from the valve cover, removing them from the car.
- If there is oil around the valves (and most likely there is), then it needs to be removed from there using a regular syringe or a rubber bulb. For the most part, the oil is located in close proximity to the valve lifters.
Pump out the oil near the valves
We remove the washer in this way using special tools
Checking the coincidence of the mark with the timing belt position (the casing is removed)
The arrow marks the groove for tweezers
Adjusting the valves of vases
Many myths and legends have developed around such a necessary procedure as adjusting the valves on the VAZ 2109, 2114 and 2108. At first, carburetor ones then became injection ones, but the design of the gas distribution mechanism did not change. Until the 2011 release, even the thermal gaps remained the same. Only with the advent of the light ShPG did the gaps become a little larger. The seats are metal-ceramic, and the pistons are light. The frequency of valve adjustment remains the same at 30,000 km.
On a new car, it is necessary to adjust the valves in the first 3,000 km, then at 15,000 and every 30,000 km. If you do not adhere to periodicity, the valves may burn out and the seats in the head may sag. In addition, traction is lost and fuel consumption increases. Thermal clearances on vases 2108, 21083, 2109, 21099, 2110, 21102, 2111, 21114, 2112, 2113, 2114, 2115, 1113, 11113, 2170, 2190, Priora, Granta (with engine 1118 3), should be like this:
Thermal clearances on new modifications since 2011 for VAZ 8 valve Lada Granta, Kalina 2, Priora, with engine 21116
- Graduation 0.4 mm;
- Inlet 0.25 mm.
Do-it-yourself valve adjustment on the Lada Grant. Expert advice
The Lada Granta Sedan/Liftback is equipped with two engine modifications: 8 and 16 valves. The difference between one and the other is obvious: the number of valves, power, acceleration dynamics.
At the same time, only 16-valve units are equipped with hydraulic compensators. They are designed to automatically adjust the gap between the camshaft cam and the foot.
In 8-valve engines, there is no automatic valve adjustment on the Grant. The owner must periodically visit a service station for preventive maintenance and replacement of worn elements of the timing mechanism.
Gap calculation
In order to find out the size of the washers, there is an adjustment formula:
H – thickness of the new washer;
B – thickness of the washer that was removed;
A – existing gap;
C – nominal clearance (0.2 or 0.35)
We check the gaps with a feeler gauge. It is advisable to have several of them in increments of 0.02 - 0.03 mm.
Correct valve adjustment guarantees a long engine life.
Preparatory stage before adjusting the valves on the eight-valve Lada Granta
Required tools and materials:
- a set of washers for adjusting the gap. Thickness from 3.0 to 4.5 mm in increments of 0.5 mm;
- a metal feeler gauge for adjusting the gap, which is purchased at a car store or car market;
- device for adjusting valves of Lada Grants . Not supplied as standard, must be purchased separately;
- medical tweezers;
- surgical clamp;
- set of automotive tools, set of heads.
Special devices - it’s easier with them
Why do you need to adjust valves?
With mileage, the metal valve stem tends to stretch and contract. The seats in the cylinder head sag, which is why the thermal gap changes. And it is physically needed of a certain value due to the design features of the engine. The consequences of untimely adjustment are not reversible. A clamped valve during operation of an eight-valve engine loses its seal, and the avalanche flow after ignition burns its edges and the cylinder head seat, which is recessed into the body of the head. This type of repair is expensive and does not come with a warranty. It is better to regulate in time, especially since the cost of tuning an 8-valve engine at 600 - 800 rubles per 30,000 km is not so significant.
With correctly adjusted clearances, the car will drive freely, without loss of traction, consuming less fuel. Under no circumstances should you adjust it to hot. Just cool the engine to 30-40 degrees. Otherwise, you can make a mistake and jam the valves.
There are times when the valves have been adjusted, but the knock remains. The reason may not be gaps. On a cold engine, piston skirts and cups and pushers in the body of the head can knock. There can be many reasons, so don’t rush to conclusions, but check everything carefully. There is a special device - a stethoscope, with which you can easily listen to engine noise.
How to adjust valves
To adjust the Kalina valves, you need a set of necessary tools:
- several screwdrivers and long-nose pliers;
- heads for unscrewing bolts;
- wrench, probes and ratchet;
- tweezers and a syringe, which will be needed to remove excess oil;
- adjusting washers and a device to accurately recess the valves.
You need to start by checking the engine: it must be cold. 20° is the right temperature for the gaps to be set perfectly.
The valves are replaced after the valve cover is removed, that is, the fastening bolts are removed, the spark plugs are unscrewed so that the engine turns better, and the camshaft and crankshaft are aligned to the marks. The camshaft must contain cams without wear. The head must be free of oil; it is better to use a syringe. You need to attach a tool to the studs to recess the valves.
Then the pistons of cylinders I and IV should lock at the top point. There are several methods, one of them is that the crankshaft does not need to be rotated 3 times and adjusting only 2 clearances, but in one revolution it is possible to adjust 4.
Extreme care is required: the four camshaft cams will definitely be in a position raised from the valve, and this is where the gaps need to be measured. Usually these are I, II, III, V valves. If the gaps are different from the nominal ones, adjustment is needed, and a washer and a formula will help, with which you can find out its thickness by summing the thickness of the removed washer, the nominal gap and the changed gap.
The adjusting washers, which are located in the Lada Kalina car, are removed, and a strip is put on their cover studs. It is strengthened with nuts. Now you need to recess the valve - be sure to all the way. At the same time, a thrust lever is inserted under the camshaft. This must be done to keep the pusher pressed. The slot on the pusher should be in front at this time, then it is easier to pry and pull out the washer. This is where long-nose pliers come in handy.
The new washer must be inserted into its intended place and pressed down with a lever, so it will sit in the recess. The pusher stop retainer should not yet be in place.
The remaining 4 valves require such adjustment. The crankshaft is rotated one turn at 90° until the measurements match, and everything is repeated as the first time. If adjusted correctly, the feeler gauge will fit into the gap freely, without tension.
Then the spark plugs are installed in place, oil is poured in, the gasket located under the valve cover will have to be replaced, and the cover secured. The sensors on Kalina should show the correct operation of all mechanisms. Now you can hit the road in your favorite car.
Adjustment procedure
The procedure for adjusting the valves on all modifications of the 8-valve vase is the same. There are differences only in injection Grant cars, Kalina 2 with a Grant engine. They have a lightweight piston group and metal-ceramic seats. In this regard, the gaps differ upward by 0.05 mm. Knowing the order and adjustment scheme, you can adjust the valves yourself. The downside is the lack of a set of washers for adjustment. It’s expensive to go to the market to buy them every time, and it’s also expensive to buy the entire range.
Here is a detailed diagram of valve adjustment for VAZ 2108, 2109, 2114, 2115
- First you need to cool the engine. You can use an additional cooling fan from any VAZ car. Place it on top so that the airflow is towards the internal combustion engine and turn on the 12 V power supply;
- When adjusting 8 valve engines (11186, 11113 oka, 1118, 1111) with a mechanical throttle assembly, unscrew the throttle cable from the intake manifold receiver;
- Disassemble the valve cover, timing belt side casing. Disconnect the large and small breather hose going to the throttle body pipe;
- Pump out the oil near the valve cups using a syringe or bulb. It is most convenient to use a regular medical syringe with a white silicone hose at the end;
- Install a device for adjustment - a rack for pressing the valve, also called a ruler;
- Set the first adjustment position. Turn the camshaft clockwise to the mark and tighten 2-3 teeth. For cars with a lightweight piston group (Granta, Kalina 2, Priora), turn strictly by the crankshaft. If you turn the camshaft, the timing belt may slip, and if this is not noticed and the engine is driven, the valves may bend;
- Adjust in the following sequence: 1 outlet and 3 inlet valves;
- Rotate the camshaft 90 degrees. Adjust 5 outlet and 2 inlet valves;
- Rotate 90 degrees. Adjust 8 exhaust and 6 inlet ports;
- We make the last turn by 90 degrees and adjust the 4th exhaust and 7th inlet valves;
- Reassemble in reverse order. We install a new gasket under the valve cover to prevent oil from leaking out.
- On carburetor engines, everything is done in a similar order. First you need to unscrew the filter housing and the suction cable. The frequency is the same as on the injector 30,000 km.
Preparatory work before adjusting valves
Go ahead. Before you begin adjusting the 8 valve engine on the Lada Granta, it is necessary to carry out a number of preparatory work.
1 Step. We hang up the right front wheel and engage 5th gear.
At the first stage, you can immediately jack up the right front wheel (so that it can be easily turned) and engage fifth gear. This will make it more convenient to “turn” the engine to rotate the camshaft and align the marks on the camshaft pulley and the plastic timing case. Don't forget to keep the car stationary. To do this, put the car on the handbrake or place chocks under the rear wheels.
Photo 1: Jacking up the front right wheel
Step 2 Remove the valve cover and upper timing case
To remove the valve cover of the Lada Granta, you must first disconnect:
At the same time, unscrew all the spark plugs (to make it easier to rotate the camshaft) and unscrew the top part of the plastic timing case. It is secured with four 5mm hex . The photo below shows the procedure.
Photo 2: Unscrew the support bracket, disconnect the pipes, unscrew the spark plugs
Photo 3: Remove the timing case and unscrew the valve cover nuts
Photo 4: Removing the valve cover
3 Step. Aligning the marks on the camshaft pulley and the plastic timing case
Turning the front right wheel clockwise (preliminarily jacked), we align the mark on the camshaft pulley with the mark on the inside of the plastic timing case (timing mechanism), as in the photo below.
Photo 5: Aligning timing marks
In this position, valves 1, 2, 3 and 5 remain unclamped, available for gap measurement and subsequent adjustment.
Photo 6: Measuring gaps on 4 valves at once
Although the camshaft cams of all adjustable valves are in different positions, this does not interfere with adjusting the clearances. The image below schematically shows how, at different cam positions, the clearance remains the same.
Photo 7: Schematic illustration of different cam positions at which the clearance remains unchanged
4 Step. The size of the gaps on the intake and exhaust valves of the Lada Granta
According to the information letter of JSC AVTOVAZ No. 44-12, the manufacturer recommends setting the following clearances on 8 valve engines:
Schematic arrangement of valves
Photo 8: Schematic arrangement of intake and exhaust valves
5 Step. Measuring valve clearances
Before you begin measuring the gaps and subsequent adjustments, use a medical syringe and a piece of tubing from the dropper to pump out excess oil in the wells (around the pushers). Photo below.
Photo 9: Pump out excess oil with a syringe
Let's start measuring the gaps from the 1st valve. Since the first valve is an exhaust valve, its nominal clearance should be 0.40 mm. In the set of feeler gauges, select size 0.40 and try to insert it between the camshaft cam and the adjusting washer. In my case, 0.40 did not enter, neither did 0.35 and 0.30 and 0.25, but only 0.20. It was this size (0.20 mm) that became the “gap determined by the feeler gauge” or the actual gap.
Photo 10: Gap on 1 valve 0.20 mm
We take measurements in the same way on valves 2,3,5. For valves 2 and 3 (since they are intake valves), the nominal clearance will be 0.25. It is with a probe of this size that we begin measurements. For valve 5, we measure the gap in the same way as for valve 1, since it is also an exhaust valve. It is better to write down the data so as not to forget.
6 Step. Removing the shim
Photo 11: Device for adjusting valves for 8 cells. engine
To begin, rotate the pushrod so that the slot on the pushrod is in the “access zone.” It is through this slot that you will have to pry the washer with an awl to remove it. During adjustment, the valve is not clamped, so the pusher turns very easily, see photo below.
Photo 12: Rotate the pusher for easy removal of the washer
Next, using the device, press 1 valve all the way down. In this case, it is not enough to simply move the lever behind the camshaft cam, only slightly pressing the valve. In this case, the latch (or stopper) will not fit and you will not be able to fix the pusher to remove the adjusting washer. The lever of the device must be pressed down until it stops. See photo below.
Design Features
After modernizing the 21114 engine taken as a standard, the 11183 engine has the following design nuances:
- “high” cylinder block – height increased by 2.3 mm compared to 2110;
- fasteners - the holes are threaded with M12 standard pitch;
- crankshaft – original, steel, forged, crank radius increased by 2.3 mm;
- cylinder head gasket – thickness 1.2 mm, regular;
- combustion chamber – increased to 26 cm 3 due to two-stage milling;
- catcollector - short tubes, round block shape.
To reduce manufacturing costs, a connecting rod-piston group, a pulley and a crankshaft flywheel from the 2110 engine are installed in the engine. The volumes of the combustion chambers are increased for the engine with the sole purpose of ensuring a compression ratio of 9.6 - 10.0.
The manufacturer does not provide hydraulic compensators in this internal combustion engine, therefore, on the one hand, the use of lower quality oil is allowed. On the other hand, the savings in the operating budget when using cheap lubricants are “eaten up” by the costs of periodically adjusting the valves in a service station, since the manufacturer recommends doing it more often.
The main attachments are driven by their own belts. The design of tensioners (for example, a generator) leaves much to be desired. But the internal combustion engine allows you to increase power in the following ways. Moreover, a reasonable boost does not require major repairs to be carried out more often than the established deadline.
Even without improving the performance, the engine is high-torque and torquey, and produces 200% of the service life declared by the manufacturer. The available repair dimensions of the piston group make it possible to increase the service life, taking into account several overhauls, up to a million kilometers.
All steps for adjusting valves inside and out
First, taking a Phillips screwdriver, loosen the clamps on the three supply hoses. These hoses are connected to the cylinder head cover. Each clamp is clamped with a Phillips screw (see photo).
We remove everything unnecessary
After disconnecting all the hoses, you can remove the receiver mounting bracket. You will need a 10mm socket wrench to unscrew the three nuts.
The second extra part is the bracket
If even the studs are turned out, it doesn’t matter, they can be screwed back in. Use the same “10” wrench to unscrew the nuts on the cover.
The pushers are already visible!
There are washers under the nuts, which are important not to lose.
On any car, including the Lada Kalina, valve adjustment is carried out as follows: rotate the crankshaft pulley, moving the camshaft to the desired position. The camshaft pulley needs to be opened - to do this, the casing is removed.
Preparing for the test
Use a 6mm hex key to unscrew the fasteners of the top cover. The number of screws here is four.
Upper casing covering the timing belt
When the cover is removed, perform the main action:
- You need to rotate the crankshaft using the screw securing the generator pulley to align the marks (see photo). You will need a key “17”.
Camshaft pulley, marks
Check the gaps, replace the washers
Now on the Lada Kalina we regulate not 8 valves, but two. The gap between the washer and the pusher is measured with feeler gauges (photo 1). For the intake valve the numbers should be 0.20 mm, for the exhaust valve - 0.35 mm. The tolerance is 0.05 mm.
Measuring and preparing for replacement
If the gap does not meet the required one, a special device is screwed to the studs (photo 2). Then do this:
- The valve pusher is turned with the slot towards itself;
- The valve is recessed down, for which the “fang” is inserted between the washer and the cam;
- A clamp is installed between the pusher and the camshaft.
The meaning of what has been said is clear from the photo.
Procedure for replacing one washer
The “old washer” is removed and replaced with a new one. Pre-measure the thickness of both washers. Use the formula R = B + ( A – S), where:
- R – thickness of the replacement washer;
- A – measured value of the gap;
- B – thickness of the “old washer”;
- S – 0.35 or 0.20 mm.
Please note that the inscriptions on the washer are on one side. Let this side look down!
Rotation angles and access sequence
In practice, it is convenient to use the table:
| Pulley rotation angle from position “0” | Exhaust valve | Inlet valve |
| 40-50 | 1 | 3 |
| 220-230 | 5 | 2 |
| 400-410 | 8 | 6 |
| 580-590 | 4 | 7 |
Advantages and disadvantages
The advantage of the 11183 engine is the cylinder head of the original design. However, it was subsequently further modified into the ICE 11186, adding volume to the combustion chambers. The downside is the generator belt tensioner - the drive is constantly over-tightened, a deflection of 10 mm is not ensured without slipping, so the belt life is reduced and it has to be changed more often. This defect was corrected only in the next version of the motor 11186.
The integrated catalytic collector assembly in the engine was initially unfinished:
- the tubes of the four channels are short;
- flows converge inside the block at almost one point;
- exhausts collide and create opposition to each other;
- the shape of the block did not allow changing the arrangement of the tubes.
When installing the engine on the Lada Granta, the cabin heat exchanger was connected to the thermostat in series. All the coolant passed through it along a small circuit, the response temperature error was 5 degrees instead of the required 2 degrees.
What cars was it used in?
The manufacturer AvtoVAZ used engine 11183 to equip several car models:
- Lada Kalina – station wagon, sedan, hatchback;
- Lada Kalina II – second generation in similar bodies;
- Lada Granta – sedan, hatchback;
- 21101 – four-door sedan;
- 21112 – five-door station wagon;
- 21121 – short five-door hatchback;
- 2113 (since 2011) – three-door hatchback;
- 2114 (2006 – 2013) – five-door hatchback;
- 2115 Lada Samara-2 (2007 – 2012) – compact sedan.
Improved engine characteristics ensured the demand for cars of a similar configuration.