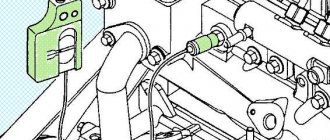
Checking the injector without removing it from the engine
To check the serviceability of the injector, turn off the ignition and remove the negative terminal of the battery.
Using an awl or a thin screwdriver, snap off the spring clamp of the block
Disconnect the connector from the injector.
By connecting an ohmmeter to the injector terminals, we measure the winding resistance
The winding of a working injector should have a resistance of 15–16 Ohms between the central and side pins of the connector
We carry out further tests on the injector removed from the engine.
Removing the injector
Relieve the fuel pressure in the power system. Turn off the ignition and remove the negative terminal of the battery.
Disconnect the idle air control connector.
We remove the air supply duct and the air damper drive cable from the throttle pipe (see How to remove and install the throttle assembly of a Gazelle car).
Using a screwdriver, loosen the clamp of the lower (outlet) hose of the idle air regulator.
Using a screwdriver, loosen the clamp and remove the crankcase ventilation hose.
Use a screwdriver to loosen the clamp and remove the vacuum brake booster hose.
Using a screwdriver, loosen the clamp and remove the fuel pressure regulator hose.
Using a 13mm wrench, unscrew the nut securing the end of the ground wire to the first stud of the intake manifold.
Similarly, disconnect the wire from the last stud of the intake manifold. Then, unscrewing the remaining nuts of the intake manifold studs with a 13mm wrench, remove the receiver
Use a screwdriver to loosen the clamp
Remove the supply hose from the fuel rail fitting.
Using a screwdriver, loosen the clamp and remove the crankcase ventilation hose from the idle air system pipe.
Using a screwdriver, loosen the clamp and remove the drain hose from the fuel pressure regulator fitting.
Using a 10mm wrench, unscrew the two screws securing the fuel rail to the intake manifold and remove the rail
Using an awl to pry the spring latch of the block, disconnect the connector from the injector
Remove the injector from the manifold.
Install the nozzle in reverse order.
Checking the injector removed from the engine
When voltage is applied briefly from the battery, a distinct click should be heard.
Remove the sealing collar from the nozzle flange and connect the nozzle with a rubber hose to a clamp with a source of compressed air (a compressor with a pressure gauge or a foot pump).
Having lowered the nozzle sprayer into kerosene, we supply air to it at a pressure of 3 kgf/cm 2
For a working nozzle, air should not pass through the nozzle.
We check the quality of atomization of the fuel injector by: Connecting the ground wires that were removed from the intake manifold studs when removing the injectors.
By tightening the nuts with a 13mm wrench, we ensure reliable contact with ground.
Place the fuel rail supply hose onto the injector flange and tighten the clamp with a screwdriver
We connect two wires at least 1 meter long to the injector terminals.
After making sure that the ignition is turned off, connect the negative terminal of the battery.
Turn on the ignition and, after waiting for the fuel pump to stop working, turn off the ignition.
Having secured the nozzle above the container, we briefly connect the wires to the terminals of the battery.
The injector should produce a conical spray of finely atomized fuel.
If the injector does not work, change the polarity of the wires.
Relieve the pressure in the fuel line by applying voltage to the injector.
Drain the gasoline into a suitable container.
We replace the faulty nozzle.
We install all the parts in the reverse order.
Source
Replacing injectors GAZ 3110
| Execution order | |
| 1. Reduce the pressure in the power system if the engine has just been stopped (see subsection 2.6.1). | |
| 2. Disconnect the wire from the negative terminal of the battery. | |
| 3. Remove the receiver (see subsection 2.1.7.2, point 2). | |
| 4. Loosen the clamps and disconnect the fuel supply hose 1 from the fuel line 3 of the engine. Disconnect fuel drain hose 4 from the pressure reducing valve. Disconnect the connectors with wires from connectors 5 of the four injectors. Unscrew the two fastening bolts 2 and carefully remove the fuel line 3 of the engine, removing the injectors from the holes in the intake pipe. The injectors are fixed in the holes of the intake pipe only with the help of O-rings. | 5. Remove the injector from the engine fuel line. The injector is fixed in the hole in the fuel line only with the help of an O-ring. |
| 6. Install the new injector in reverse order. |
Video about “Replacing injectors” for GAZ 3110
Removal of injectors from the ramp and assembly
Washing injectors How to wash injectors on a VAZ, GAZ, UAZ
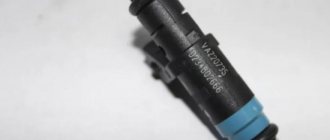
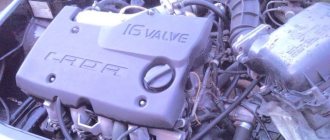
Injectors for engines installed on GAZelle
The popular GAZelle car of various modifications has been traveling on Russian roads since the early 90s of the last century. During this time it has undergone many changes. Under its hood are several ZMZ (Zavolzhsky Motor Plant) gasoline engines - 402, 406 and 405. The most successful of them was the injection 405 model, with a power of 152 hp. With. In addition, diesel units are used - the Russian licensed GAZ 560, as well as a Cummins 2.8 ICF, 120 horsepower, Chinese assembled, designed in the USA. Cummins have been installed on GAZelle “Business” and “Next” modifications since 2010. An integral part of injection and diesel engines are fuel nozzles.
Parts that make up a gasoline injector
Injectors spray the fuel mixture inside the combustion chambers under high pressure. This ensures complete combustion of the mixture. The nozzle of the electromagnetic injector, which sprays fuel, opens and is locked by a shut-off needle. The locking element is controlled by the electromagnetic field created by the electromagnet winding. If voltage is applied to it, under the influence of the field the needle rises and releases the nozzle, overcoming the force of the pressure spring. An additional filter is installed at the fuel supply inlet.
Video: how an electromagnetic injector works
Injectors for the ZMZ 405 engine
At first, injection internal combustion engines were equipped with domestic sprayers produced by GAZ. But they were forced to abandon them, since these injectors quickly failed. They were replaced by imported ones produced by German companies Bosch, Siemens or analogues - for example, ZMZ Deka.
ZMZ Deka injectors are used for ZMZ 405 engines
The injection distribution is controlled by an electronic unit (ECU), which alternates pulses to the windings of the injection electromagnets. Being an intelligent device, the control unit constantly monitors and improves the efficiency of the fuel system. The fuel supply to each cylinder is synchronized by the engine crankshaft. When the engine starts, fuel is supplied asynchronously, that is, regardless of the position of the crankshaft. The injectors are unpretentious to the quality of gasoline - just like the 405th engine model.
Injectors for Cummins 2.8 ICF engines
Cummins diesel engines do not like low-quality domestically produced diesel fuel. Therefore, it is recommended to install only imported original injectors on them. Although their price is high, sprayers from German manufacturers are capable of working reliably for 100-120 thousand km of travel. To prevent them from failing prematurely, you need to install only original filters recommended by the manufacturer into the fuel system.
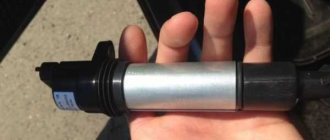
This is what an injector for a diesel engine looks like
The presented sprayer is a closed type device. Its device is similar to the circuit of an electromagnetic gasoline injector. Open type injectors are also used. Their spray hole is not closed by a shut-off needle. Such devices are less reliable and do not last as long. Closing nozzles go through four stages of the working process:
- the needle closes the injector nozzle, diesel fuel is not supplied;
- the needle rises, diesel fuel begins to be injected into the combustion chamber;
- the nozzle is fully open, fuel is atomized as much as possible;
- closing phase - the needle lowers, closing the nozzle, the supply of diesel fuel stops.
The latest modifications of Cummins engines are equipped with a Common Rail fuel system. Piezoelectric atomizers are used for it. Their response speed is several times higher than that of electromagnetic injectors. Thanks to this, the supply of diesel fuel is better dosed and its overconsumption is eliminated. The supply of diesel fuel is controlled by a piezoelectric element that can change its size under the influence of an electrical impulse. The piezoelectric crystal controls the valve that regulates the flow of fuel to the injector nozzle.
Types of injectors for cars of the GAZelle family
Injectors and a pump are the main elements of the fuel system of GAZelle cars. To ensure fast and accurate fuel injection, manufacturers install Bosch or Siemens mechanisms on the engine.
Injectors are selected depending on engine size
Elements installed on GAZelle engines can be open or closed, as well as with several holes.
In closed devices, the fuel pump is separated from the chamber by a needle. In open ones there is no such division - therefore they are less productive and have less resource, like closed ones.
The work of a part consists of four repeating steps.
- The valve mechanism is closed - the injector does not work.
- The valve opens and fuel enters the cavity of the device.
- The valve opens completely - fuel is supplied quickly.
- The valve closes and fuel injection stops.
Devices for the ZMZ-405 engine
At first, injectors produced by GAZ were installed on ZMZ-405 engines. However, due to their rapid failure, manufacturers subsequently switched to foreign analogues. ZMZ-405 runs on gasoline and is unpretentious in terms of fuel quality. Therefore, not original Bosch or Siemens injectors are often used, but their cheaper analogues. Thus, ZMZ Deka models are very popular.
The ZMZ-405 engine often uses not original Bosch or Siemens injectors, but their cheaper analogues
Cummins engine parts
The Cummins diesel engine is quite picky about fuel quality. If the quality is poor, the devices quickly fail. Therefore, owners of GAZelle Next and GAZelle Business need to choose exclusively original mechanisms. The service life of such injectors ranges from 120 to 160 thousand km.
Owners of GAZelle Next and GAZelle Business should install original injectors
Basic malfunctions and diagnostics of injectors on GAZelles
If the vehicle was operated using high-quality fuel, filled at the same gas stations, the engines and injectors will last a long time. You can drive tens of thousands of kilometers without problems by regularly changing the original fuel filters (every 10–15 thousand km) and cleaning the injectors of toxins. If there is a malfunction inside the fuel system, it has certain symptoms:
- starting a cold engine is difficult or it does not start;
- at idle speed the engine is unstable and stalls;
- popping sounds are heard from the exhaust system;
- the engine “troits”, one of the cylinders does not function;
- engine power and acceleration dynamics decrease;
- failures in engine operation are observed;
- fuel consumption increases sharply;
- Black smoke comes out of the exhaust pipe.
Injectors are the most susceptible to malfunction. Despite the fact that the fuel passes through a mesh filter and then through two fine filters, over time the nozzles become dirty.
Cleaning can be done independently or at a service center. In addition, injectors have a service life during which parts wear out. If washing and cleaning the injectors does not bring results, it is better to replace them with new ones.
How to remove injectors on GAZelles from ZMZ 405 and Cummins
Once you have determined that one or more nozzles are faulty, it is best to replace them with new ones or repair them. Based on the low quality of gasoline and diesel fuel, sprayers rarely last longer than 100 thousand kilometers on diesel engines. On gasoline engines - up to 80 thousand km. The replacement procedure is not complicated. Even a novice motorist can do this.
Removing injectors from ZMZ 405 injection engines
First of all, you should prepare the tools necessary for work:
Actions are performed in a certain order:
- The car is installed on level ground.
- The pressure in the fuel line is relieved. To do this, turn off the power to the fuel pump so that it does not function. The engine starts and runs until all the remaining fuel is burned. The engine should stall.
- The negative wire is disconnected from the battery.
- The air supply duct and the cable that controls the air damper drive will be disconnected from the throttle pipe.
- The clamp is loosened and the lower outlet hose is disconnected from the idle air regulator.
Use a screwdriver to loosen the hose clamp. Remove the sleeve ventilating the crankcase.
The fasteners are loosened and the crankcase ventilation hose is removed. The brake system vacuum booster tube is disconnected.
The clamp is loosened and the vacuum booster hose is disconnected. The clamp is loosened and the fuel pressure regulator hose is removed.
The fasteners are unscrewed and the fuel pressure regulator hose is removed. Using a key set to “13”, unscrew all the nuts from the intake manifold studs. The negative wires are removed, followed by the intake manifold.
All nuts and ground wire ends are removed. The gasoline supply hose is disconnected from the ramp fitting.
The fuel hose is disconnected from the ramp. The crankcase ventilation hose is removed from the idle air system pipe.
The hose ventilating the crankcase is removed. The fuel drain hose is disconnected from the fuel pressure regulator.
The hose is removed from the pressure regulating device. The mounting screws are unscrewed and the fuel rail is removed.
The fastening screws are unscrewed and the ramp is removed. The spring latch of the block is pryed off with an awl, and the control cable connector is removed from the injector socket.
The control cable connector is removed from the nozzle socket. The nozzle is removed from the manifold.
The injector is removed from the manifold socket.
Installation of a new atomizer and assembly is carried out in the reverse order.
How to Remove Injectors from Cummins Diesel Engines
It is very easy to dismantle the injectors on a Cummins engine. The car owner will be able to remove the injectors, even if he has not done this before. It is enough to have:
- wrenches for “17” and “13”;
- thin slotted screwdriver.
First you need to thoroughly clean the niches in which the injectors are installed from dust and dirt. This is best done with compressed air supplied from a compressor.
Then follow a few simple steps:
- Using a slotted screwdriver, remove the clamps that hold the diesel fuel return drain hose.
- The electrical connectors of the injectors are removed; to do this, you need to press their latches.
- Use a wrench set to “13” to hold the fixing nuts of the fittings, and at the same time use a wrench set to “17” to unscrew the nuts of the fuel pipes.
Locations of clamps and nuts that need to be unscrewed and removed
To move the fuel pipes to the side, you need to loosen the nuts securing them to the ramp. The injectors are carefully removed from their sockets so as not to damage the rubber seals located at the bottom of the injectors. To do this, you need to slightly move them from their place and turn them with your hands, swinging them in different directions with little effort.
The injectors are carefully removed from their nests.
Installation of the nozzles is carried out in the reverse order. If the seals (cuffs) of the fixing bolts and injectors are damaged, they should be replaced with new ones.
Video: dismantling injectors from a Cummins engine
Self-repair of GAZelle injectors
New injectors for gasoline and diesel power units are not cheap. Therefore, instead of purchasing new fuel nozzles, you can repair them. Diagnostics, cleaning and replacement of worn-out spare parts of a faulty injector will cost much less than purchasing a new original injector. Injectors are subject to repair if:
- The lifespan of the sprayer is less than that for which it is designed;
- There is no visible damage to the spray hole.
the injector body is not deformed or damaged - there are no cracks or chips;
Cleaning, purging and rinsing nozzles
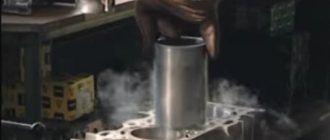
Fuel injectors should be cleaned and flushed throughout their service life. The frequency of this operation is every 30 thousand kilometers. After 100 thousand km, flushing will no longer help; the injectors will have to be changed. Cleaning can be carried out either in service centers or independently. The best way to get rid of dirt and deposits is to expose the sprayer to ultrasonic radiation. In addition to this method, service stations clean injectors on special stands, subjecting their bodies and nozzles to washing. And they also produce fuel additives that clean the fuel system, including nozzles.
The most practical cleaning method, which can be carried out even in the field, is self-washing with special liquid compounds. For such cleaning, you can use a can of carburetor cleaner. External carbon deposits are removed using a cloth moistened with the same composition. You can carefully remove solid carbon particles around the nozzle with a needle. The best effect is obtained if you first soak all the injectors in liquid to clean the injector.
The nozzle is cleaned both outside and inside
There are several cleaning methods using available tools. One of the most convenient, which is used for diesel sprayers, will require the following parts:
- foot pump with pressure gauge;
- battery and two multi-colored wires;
- carburetor or injector cleaning fluid.
The flushing process is simple and requires only a few repetitive steps:
- The hose is removed from the pump and connected to the fuel fitting of the injector.
- Carburetor or injection cleaner is poured into the free end of the hose.
- The hose is carefully connected to the pump so as not to spill liquid.
- The pump creates pressure, which affects the cleaning composition.
- Wires are connected to the battery.
- Voltage wires are briefly connected to the control terminals of the injector socket, opening and closing the spray nozzle.
It is important not to reverse the polarity of the wires. The control socket usually has a designation where the plus and minus terminals are located. The injector is flushed until the nozzle sprays liquid well.
Video: self-cleaning a gasoline injector
Replacing rubber seals and rings
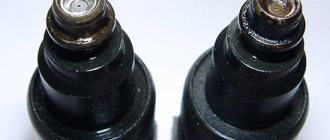
At the bottom of the sprayer body there is a seat for a rubber seal. A copper sealing washer is located slightly above the spray hole. The rubber gasket ensures a stable position of the sprayer relative to the engine cylinder block. As soon as it loses its elasticity, a characteristic knock appears, which is often heard in diesel engines with high mileage. Therefore, new cuffs are installed as soon as the injectors are changed or repaired.
The sealing collars are changed each time the injectors are removed from the engine.
To remove used rubber bands and install new ones, a medium-sized slotted screwdriver is sufficient.
A rubber seal is installed in this hole.
Copper sealing washers seal the injector spray hole located in the combustion chamber. They come complete with new injectors. Replacing these washers with the nozzle removed is very easy.
New injectors are equipped with copper sealing gaskets
Injectors are the most important part of a car's fuel system. The stable operation of the engine depends on their proper functioning. If you regularly clean the injectors from dirt and carbon deposits and change the fuel filters, the nozzles will last a long time. Their service life can reach and even exceed 100 thousand kilometers, with appropriate care and the use of high-quality fuel.
Source
Gazelle 405 injector does not work
If I changed it, everything remained intact, it was as if a new cylinder head had been installed, the spark plugs, wires, coils were all as they should be, but the engine farted and slammed. In the winter, on the advice of a mechanic, they changed one, it was clearly leaking.
I decided to change everything except the replacement part. There were Bosch, 4 holes, number 107 at the end. I got one from somewhere and the first one for 990 rubles, the rest 1300 plus pennies.
Now it whispers, the consumption has become 13, it pulls and flies. I don’t understand why there is gas at all.
Well, I realized the benefit of an intake consisting of two parts. The main thing is to remove the injectors by pressing on the clamp bracket; when installing the injector ring, we dip it into engine oil like the Kama Sutra - first we insert them into the cylinder head, then we catch the ends with a ramp. I don’t recommend pressing it in with bolts; it’s better to put it on by hand, wiggle it and tighten it. At the same time I tied up my braid.
Honestly, this is the first breakdown, I changed it to a Chrysler, but they were fresher from the donor
Malfunctions of the injector (nozzles) occur on both diesel and gasoline engines. In the design of the power supply system of an injection engine, the nozzle is an element that is responsible for injecting a sprayed portion of fuel into the combustion chamber under a certain pressure.
Precise dosing, tightness and timely operation of the injection nozzle ensure stable and proper operation of the engine in all operating modes. If the injector “flows” (passes excess fuel at a time when its supply is not required), the efficiency of fuel atomization decreases (the shape of the torch is disrupted) and other injector malfunctions occur, then the engine begins to smoke gray or black smoke, loses power, consumes a lot of fuel and etc.
Read in this article
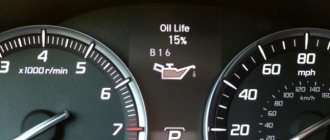
Which indicates possible problems with the injector
Let us immediately note that there can be many reasons for unstable engine operation, ranging from a clogged fuel filter, a broken fuel pump, a failed spark plug or a faulty coil, to loss of compression, problems with the timing belt, etc. Along with this, one of the main signs of injector malfunction is difficulty starting the engine, especially when cold, as well as gasoline or diesel consumption (depending on the engine type), which increases noticeably. It is also necessary to note the unstable operation of the internal combustion engine in idle mode, similar to the so-called “triple” of the engine.