Cars admin26.02.2020
Front-wheel drive VAZ cars of the tenth family (VAZ-2110 sedan, VAZ-2111 station wagon and VAZ-2112 hatchback) were equipped with various engines. Among them were carburetor and injection, 8 and 16 valves.
Ignition was also used in two types: from a central distribution module or using independent ignition coils. We present to the reader's attention one of these engines: the VAZ 2112 engine, production began in 1997.
Passport details
Initially, the 12th was produced in 2 versions: 21120 and 21124. The characteristics of the 16-valve VAZ 2112 engine of these modifications are given in the following table.
| Engine model | 21120 | 21124 |
| Type | Gasoline 4-stroke | |
| Configuration | Inline 4-cylinder | |
| Nutrition method | Injection distributed injection | |
| Number of valves | 16 | |
| Working volume, l | 1,488 | 1,596 |
| Productivity, l. With. | 93 | 89 |
| Geometric dimensions Ø × L of the piston, mm | 82×71 | 82×75,6 |
| Compression | 10,5 | 10,3 |
| Maximum torsion moment Mkr, Nm | 140/3800 min -1 | 131/3700 min -1 |
| Toxicity standards | Euro-3 (on later engines - Euro-4) | |
It follows from the table that the technical characteristics of the two versions are quite similar, with the exception of the higher torque of the 120th engine.
Power core
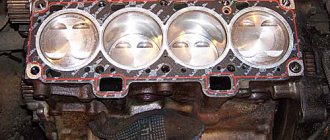
The VAZ 2112 engine was not created from scratch. Its design with a 16-valve gas distribution mechanism (GRM) repeats the model 2110, and the cylinder block (BC) is a copy of the “eight” (21083). This can be verified by comparing their geometric parameters: bore diameter and center distances.
True, the blocks are not interchangeable, since they differ in the diameter of the cylinder head (cylinder head) mounting screws. Unlike parts 21083 and 2110, the BC has additional oil channels in the main bearings to supply oil to the lubricating nozzles. Through these devices, additional lubrication of the lower part of the cylinder surfaces is carried out, as well as cooling of the piston bottoms.
Now a little about how the 120th and 124th engines differ from each other. VAZ 21120 contains BC 2112 with a height of 194.8 mm, and 21124 contains BC 11193. The height parameter of the latter is 197.1 mm (the so-called “high” block). The 124th crankshaft has a longer stroke compared to the 12th. For motor 2112, the elbow has a size of 35.5 mm (stroke 71), and for motor 21124 it has a size of 37.8 mm (stroke 75.6). As a result, the working volume of the 124th version is 1.6 liters, versus 1.5 for the 120th.
The pistons also differ from each other. Both have counterbores to ensure the exit of the valve plate. However, on the 120 engine their depth is deceptive. It is designed only for the normal functioning of the timing belt, and in the event of a toothed belt break, the “meeting” of the valves with the pistons becomes inevitable. The 124th drive has everything in order; eliminating the incident will only require replacing the belt without disassembling the power unit.
Replacing the pistons on the 21120 engine with 124s will allow you to avoid the troubles associated with a broken belt. True, the power of the VAZ 2112 engine will be somewhat less.
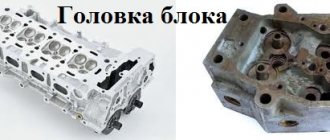
Installing the cylinder head: procedure and general recommendations
The first condition for correct and reliable installation of the cylinder head is the cleanliness of the seat. Thoroughly clean the plane of the block on which the cylinder head is placed. Cleaning is first carried out with a sharp object, and then with special automotive cleaning agents that will help remove the remaining antifreeze and oil.
Pay special attention to the holes into which the studs are screwed. Oil, water, and debris get into them. And then, when the cylinder head is pulled along the studs to the block, they can create microcracks in the cylinder block due to the fact that excess pressure is generated when screwing in the studs. When the engine heats up, gases will be forced through these microcracks, the gases will pierce the gasket between the cylinder head and the block, and water from the cooling system will flow into the oil. A complete engine overhaul is guaranteed! And that's the best case scenario. Therefore, it is recommended to carefully check the holes before screwing in the studs and be sure to blot them by taking a clean rag and using a screwdriver to get to the very bottom.
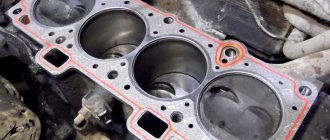
When the area under the cylinder head is clear, proceed with installation. Installation of the cylinder head begins with the correct installation of the gasket, which is located between the cylinder head and the cylinder block.
The holes in the block must clearly coincide with the holes in the gasket; only in this case is its installation considered correct.
And the cylinder head must be well cleaned of carbon deposits, dirt, oil, and antifreeze. If there is a suspicion that the cylinder head has been subjected to overheating or another impact that has led to deformation, then it is checked using a special device and then, if necessary, ground.
When installing the cylinder head in place, it happens that the gasket “moves out”, so keep an eye on it.
The cylinder head is considered to be installed in place when it is “settled” on the guides, and hoses and wires do not interfere with it. After this, begin the screwing procedure. To avoid mixing up the bolts, they must be marked in advance. The internal bolts are smeared with oil, so it is difficult to confuse them with external ones, this will be a kind of mark.
If you don't have air or power tools, you can tighten the cylinder head bolts with a good old brace.
The bolts are only tightened with a hammer, but not completely tightened; there is a special torque wrench for this. Only with its help can you check the correct tightening torque, which is recommended by the manufacturer.
It is recommended to set the first tightening torque to 2 kg. The main thing is to be sure to adhere to a certain order of tightening the bolts, in pairs from the center to the edge. In this case, the head will not warp.
The second tightening torque should not exceed 8 kg. The tightening order remains the same, from the center to the edges, in pairs. After the bolts are tightened to 8 kg, we make two additional turns, both 90°. First, we go through the bolts the first time, turning the torque wrench 90 °, then a second time.
After final tightening, the cylinder head is considered mechanically installed, but not yet operational. For it to be working, it is necessary to connect all the “periphery”, i.e. hoses, pipes, etc. It is recommended to immediately, so as not to return to this later, connect the temperature sensor wire and set the timing mark.
Then we proceed to install the valve cups. Before installation, they must be cleaned of dirt and lubricated. Clean and lubricated glasses should slide into place easily.
In order not to confuse the sequence of installation of glasses, when removing them, they are placed in a certain order. After installing the glasses, be sure to lubricate the “bed” on which the camshaft will then lie.
Something else useful for you:
The lubricated and clean camshaft is put in place. You can fasten it immediately with an oil seal. Experienced mechanics, in order to simplify the process of setting camshaft marks, sometimes still use the old-fashioned method. When installing the camshaft, the first and third camshaft journals should be facing you.
Next we reinstall the camshaft cover. Lubricate the places where the camshaft will lie (bed), and do not forget about one nuance. At the ends you need to remove the old sealant and apply a new one, then it will hold the oil well.
When installing the second part of the cover, we repeat the process. Now we attach the nuts, and do not forget about the washers that should be under each nut.
The tightening torque of the camshaft cover nuts should not exceed three kilograms. Experienced repairmen can eventually perform the tightening process without a torque wrench. Then a tin protective cover is placed.
Then we put on the camshaft gear, but before that, make sure that you do not forget to put a key on the camshaft, which keeps the gear from turning.
Other differences
The engines also differ in their “inhalation” design. The 120th intake consists of two aluminum parts: a manifold (“horn”) and a receiver, connected to each other by rubber corrugations. Unit 21124 is “decorated” by an intake system made of plastic and consisting of a single part.
The ignition system is designed differently. The VAZ 2112 is equipped with an ignition distributor module, and on the 21124, individual coils are installed for each cylinder. Due to differences in intake and ignition systems, valve covers also differ.
The 1.6-liter unit has some other differences from its brother: the pressure regulator has been moved from the fuel rail to the pump, the catalyst is located directly at the cylinder head, there are 2 oxygen sensors (Euro-3) instead of one (Euro-2) for the 1.5 liter. The split timing case design makes it easy to replace the timing belt.
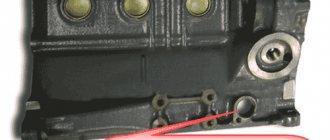
People often ask: where is the serial number of the engine on the VAZ 2112? Indeed, the number located under the air filter is quite difficult to detect. It is located at the rear end of the BC, under the thermostat housing. To find the required numbers, you need to release the air filter mount and tilt it slightly to the side.
If corrosion makes it difficult to read the serial designation, you should use fine abrasive sandpaper and then wash the area with WD-40.
Possible faults
With proper care, the engine unit of the 12th family works flawlessly, because the basic design was created in collaboration with the German company Porsche, an authority in the field of engine building. The only “jamb” is the use of a belt drive. D
The problem is not even in her, but in the fact that the VAZ people stubbornly refuse to take into account Russian realities. The use of a timing belt requires high-quality spare parts, which, unfortunately, we can only dream of. And not everyone carries out regulated maintenance, relying on the well-known Russian “maybe”.
What's the result?
It is quite obvious that the further selection of the cylinder head gasket will also directly depend on the depth of grinding, not only in terms of materials of manufacture (for example, metal or reinforced paronite), but also in terms of thickness. This statement is also true if, after milling, there is a risk that the timing valves will be too long.
Qualified work on checking for leaks, repairing cracks, boring and grinding the cylinder head or cylinder head allows you to obtain a tested and fully functional part, which, after installation on the car, will be the key to the further proper operation of the internal combustion engine. For example, a professionally repaired and correctly installed head will last for more than tens of thousands of kilometers, provided that general recommendations during operation and timely maintenance and repair of the engine are followed.
How to independently determine that the cylinder head gasket has burned out. Recommendations for pulling the cylinder head after replacement. Which gasket is better to choose?
Grinding in valves: how to do it yourself. Why and when do you need to grind valves? How to grind valves, what grinding paste to choose. Recommendations.
Why do antifreeze or antifreeze enter the engine cylinders and what to do in such a situation. How to determine the presence of antifreeze in the cylinders yourself, repair methods.
What malfunctions are indicated by the emulsion on the oil dipstick and oil filler cap? Ways to independently determine the causes of this problem.
Repairing a cast iron or aluminum engine cylinder block using a liner. Types of sleeves and how the sleeves are inserted into the block. Tips and tricks.
When it is necessary to bore the engine crankshaft, what is crankshaft boring for? How the crankshaft is bored, features of the selection of liners.
Repair and maintenance of the power unit
A specific case of repair work is given as an example. Repair of the VAZ 2112 engine was required for several reasons: you have to constantly add antifreeze, the lubrication indicator blinks, and the hydraulic compensators click. We preliminarily carried out a compression measurement, which showed a difference in the cylinders of up to two atmospheres.
During the disassembly process, the causes of the malfunction were identified:
- burnout of the cylinder head gasket, as a result of which antifreeze went into one of the cylinders;
- corrosion of the cylinder head mating plane;
- wear of the crankshaft main journal liners;
- wear of exhaust valve guides;
- sintering of the insides of the catalytic collector.
Description of engine restoration procedures:
- milling the head plane and the mating plane of the block;
- repressing exhaust valve guides;
- mechanical processing (without lapping) of valve seats;
Installation of new parts:
- pistons of size group C (instead of the original B);
- piston rings;
- crankshaft bearings and thrust half-rings;
- oil seals and gaskets;
- cooling pump;
- valve stem seals;
- metal cylinder head gasket from Priora;
- toothed belt complete with tension roller from Power Grip;
- INA hydraulic pushers;
- NGK spark plugs;
- “spider” 4-1 made of stainless steel;
People often ask: what kind of oil to pour into a VAZ 2112? In the described case, after assembly, Lukoil Lux 10W40 engine oil was filled in.
Changing the oil on a VAZ 2112 requires 3.3 liters of fluid, and with a concomitant filter change - 3.4, although the total volume of the lubrication system is 3.6 liters.
Cylinder head repair
With the question “Who is to blame?” figured it out. Further, directly according to Chernyshevsky, we will solve the following problem: “What to do?” There are many options, depending on the nature of the malfunction. Sometimes it is necessary to replace the entire “head”, sometimes only the gasket, valve, etc. In the early stages of a malfunction, you can get by by adding a special additive Suprotec Active Plus to the lubricant. It will protect friction pairs: rod - valve guide, journals - camshaft bearings, cams - pushers, etc.
Additive Suprotek Active Plus Gasoline for gasoline engines
Additive for gasoline and gas engines with a mileage of more than 50,000 km. Can be used for forced and turbocharged engines.
more reviews
Diagnostics
Any repair begins with diagnostics. An external inspection does not make it possible to identify all faults, so it is necessary to remove the cylinder head. The assembly must be completely rebuilt, checking the degree of wear of each part. Defective elements must be replaced with new ones.
It should be taken into account that modern engine models differ greatly in design, so you need to remove the cylinder head of a VAZ differently than a similar unit from a Mercedes or Subaru. Detailed instructions for each modification are contained in the vehicle repair manual.
General rule: first, all cylinder head bolts are loosened by half a turn (maximum one), starting from the middle ones. If one bolt is completely unscrewed while the others are tightened, the part may become deformed.
Valves
Replacing the valves is only possible with the cylinder head removed, otherwise it is impossible to remove them. You also need to remove the timing camshaft. It is recommended to unscrew the spark plugs to avoid accidentally damaging them.
To “dry out” the valve, you need to buy a special tool. Some “old school” craftsmen perform this operation with a hammer. We strongly do not recommend this method, as it can cause serious damage to the valve.
The removed part must be cleaned of carbon deposits and carefully inspected. If wear has exceeded the permissible level (information is indicated in the repair manual), the valve must be replaced with a new one. If the wear of the element has not reached a critical level, you can clean and grind it.
The valve seat also needs to be checked for burnouts. If cavities cannot be eliminated by lapping, the part is processed with a cutter using a drill, and then ground in using a special abrasive paste.
An important point: if you do not have sufficient skills in working with metal, and car engine components in particular, it is better not to take risks. Leave cylinder head repairs to professionals. Unqualified actions can aggravate the situation.
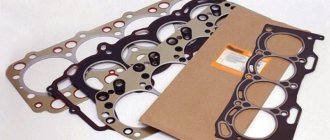
Pad
If the cylinder head gasket is damaged, replacement is required. There is no way to repair this part. Of course, epoxy resin glues everything, but next time you won’t be able to just disassemble the engine.
When installing a new part, the cylinder head must be tightened very carefully and carefully. It is necessary to use a wrench with a dynamometer to strictly observe the torque applied. Information is provided in the repair manual for each motor model.
Replacing the cylinder head
In case of particularly serious damage, only replacing the cylinder head with a new unit will help. The item price varies greatly for different models. For example, for VAZ cars, it is from 12,000 to 30,000 rubles. Of course, you can buy a used part: it will cost almost three times less, but you will need to carefully check it for hidden defects.
When replacing the gasket or the cylinder head itself, be sure to buy a set of new bolts! Don't try to save money on fasteners.
Tuning options
Those who like to “grab” are interested in the question: how much additional horsepower can a tuning engine get? Tuning a 2112 engine is performed in different ways:
- Replacing the cam shafts with tuning ones (STI-1, STI-2, STI-3.1, Stolnikov 8.9) coupled with the installation of a lightweight ShPG, enlarged throttle valves and 4-2-1 “pants” will allow boosting the 120th engine to 120 hp. With;
- if you modify the cylinder head and install wide-phase camshafts, the increase will be 130 - 140 hp. With;
- installing a crankshaft with a long crank (37.8 mm), modifying the combustion chamber in the cylinder head and using T-shaped valves will increase the power to 150 hp. With.
Fans of “classic” Lada cars install the VAZ 2112 engine on rear-wheel drive cars: VAZ-2105, -2107. So that the unit can be located under the hood, even part of the engine compartment partition is cut out.
The generation of 12 engines turned out to be “long-lasting”. In addition to the brands described above, others were later developed: VAZ-21126, −127, −129. They are still installed today on LADA Priora, LADA Kalina, LADA Granta cars.
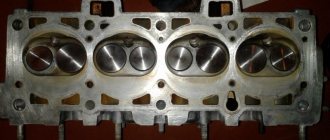
4.22. Cylinder head parts: 1 – cylinder head; 2 – intake camshaft; 3 – oil seal; 4 – exhaust camshaft; 5 – camshaft bearing housing; 6, 8 – sealing rings; 7 – guide pipe; 9 – block head cover; 10 – bracket for fastening the wiring harness; 11 – plugs; A – distinctive belt of the intake camshaft
Maintenance and diagnostics of the cylinder head
For the proper operation of an internal combustion engine (and without a cylinder head it will not work), every motorist is required to comply with the regulations for servicing the car. Also an important factor is compliance with internal combustion engine temperature standards. Motor operation is always associated with high temperature and significant pressure.
Modern modifications are made of material that can deform under high pressure if the internal combustion engine overheats. Normal temperature conditions are described here .
Cylinder head malfunctions
Since the engine head is only a part of its structure, breakdowns most often concern not the part itself, but the mechanisms and elements that are installed in it.
Most often, the cylinder head is removed during repairs if the cylinder head gasket is punctured. At first glance, replacing it seems like a simple procedure; in fact, this procedure has several subtleties, which is why repairs can be expensive. A separate review was devoted to how to correctly change gasket material .
The most serious damage is the formation of cracks in the housing. In addition to these faults, many car mechanics, when talking about head repair, mean the following repair work:
- The thread in the spark plug well broke;
- The camshaft bed elements are worn out;
- Worn valve seat.
Many breakdowns are eliminated by installing repair parts. However, if a crack or hole has formed, they rarely try to repair the head - they simply replace it with a new one. But even in difficult cases, some manage to restore the broken part. An example of this is the following video:
Source
VAZ 2110 engine lubrication system:
1. Disconnect the wire from the negative terminal of the battery.
2. Drain the oil from the engine crankcase.
3. We also remove the camshaft drive belt.
4. Remove the oil sump from the engine.
5. On an engine with a fuel injection system, disconnect the block with wires from the crankshaft position sensor.
6. Using two screwdrivers, remove the pulley from the crankshaft.
7.If the key does not stay in the crankshaft groove, remove it so that it does not get lost.
8. Unscrew the bolts (there are 3 of them) that secure the oil receiver (remember that there are flat washers under the bolts) and remove the oil receiver.
10. Next, it is necessary to replace the sealing ring of the oil receiver, which has torn or lost its elasticity.
11. Unscrew the bolts (6 pieces) that secure the oil pump to the cylinder block, and remove the oil pump along with the gasket. Please note that there are flat washers under the bolts.
12. We rotate the oil pump drive gear in order to correctly install it on the crankshaft: the protrusions on the drive gear should coincide with the flats present on the crankshaft.
13. Before installing the pump, lubricate the working edge of the oil seal with engine oil. When installing the pump, carefully tuck the working edge of the oil seal onto the crankshaft journal using a wooden stick. Then fasten the pump mounting bolts. Then we install all the parts that were removed in reverse order. Check the tension of the camshaft drive belt.
If everything is done correctly, all defects in parts are identified and they are replaced, then the lubrication system of the VAZ 2110 should work without interruption. By the way, when removing the oil pump, it is advisable to replace the front crankshaft oil seal.
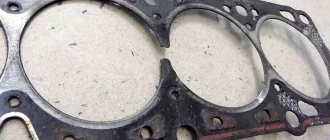
Cylinder head gasket defects
No manufacturer can absolutely guarantee a long service life, since the formation of defects is influenced by many factors - engine condition, car model, driving style. Among the main defects, it is worth highlighting breakdown and burnout of the element in question. Why does the cylinder head gasket break, and what reasons can cause a burnout?
Cylinder head gasket failure and its causes
Almost all drivers do not notice a burst gasket until a serious breakdown makes itself felt. Parts of domestic cars are more susceptible to breakdown, since traditionally their quality is much lower than imported ones.
The need for repairs may be indicated by the presence of steam under the hood and noise when the engine is running, which was not there before. These signs of a broken cylinder head gasket indicate an external breakdown.
An internal breakdown is much more dangerous due to its invisibility. The problem can be detected by measuring compression in the cylinders, and drivers often perform such diagnostics when the engine is shaking.
Air bubbles in the radiator fluid and the presence of white steam in the exhaust pipe also indicate a problem. Oil may leak at the joints in the engine.
When it comes to causes, driving negligence is one of the most common. Let's look at them in more detail:
This is interesting: How to stop registering a car? Procedure for processing documents in 2021
Cylinder head gasket burnout and its causes
As for burnout, the problem area is considered to be the area between the water jacket and one of the cylinders. As the burn gets worse, it spreads further. Among other possible options, it is worth highlighting the area between the cooling channel and the oil channel. If we are talking about a new engine, there is only one cause of burnout, and it is overheating, even if it is minor. A driver without experience will not pay attention to the first symptoms of a breakdown, and only worsening symptoms will force him to pay attention to the problem.