How injectors are designed and work
YouTube channel "Mikhail Nesterov"
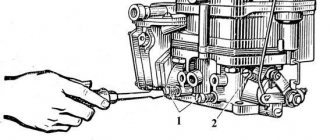
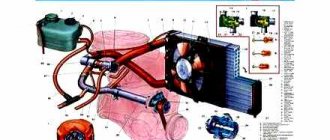
There is a solenoid needle valve located inside the fuel injector body. It is held closed by a return spring. When pulses are supplied from the electronic control unit (ECU) to the excitation winding, the valve opens. At this moment, the fuel is atomized and mixed with air, burned in the combustion chamber.
The correct proportions of the air-fuel mixture and its ignition depend on the quality of gasoline atomization. During normal operation of the injectors, the fuel is crushed into small particles, easily mixed with air and burned.
How to clean injector nozzles yourself
According to some drivers, the easiest way to clean injectors is to add a small amount of technical acetone to the gas tank. This substance can quickly wash away carbon deposits, as well as remove water remaining in the engine along with exhaust gases.
The proportions of acetone with fuel depend on the quality and octane number of the latter. If gasoline has a minimal amount of impurities, 30 milliliters of acetone per ten liters of fuel will do.
Note! You should not get carried away with adding acetone. An increase in octane number leads to an increase in engine load. Failure to comply with the correct proportions will result in a complete replacement of the motor.
How to clean gasoline injectors at home: video
To visualize the procedure for cleaning injectors, watch the video below.
Why do injectors clog?
Impurities in the fuel, short trips and difficult operating conditions lead to carbon deposits forming on the needle and internal surfaces of the injector. This plaque clogs the channels. The solenoid valve opens for a long time and more gasoline enters the combustion chamber than necessary.
YouTube channel "Auto-theme"
All this leads to an over-enrichment of the fuel mixture, poor ignition and misfires. Unburnt gasoline enters the exhaust system and burns out inside the catalyst, which becomes clogged and melts at high temperatures. At the same time, engine power decreases, detonation appears, and fuel consumption and exhaust toxicity increase.
Signs of clogging of the direct injection injector(s).
As practice has shown, on engines with direct injection, the electronics are more sensitive than the car owner! And even at the initial stages of injector clogging, errors immediately begin to appear - lean mixture P0171 and misfires - P0300, P0301, P0302, P0303, P0304. At a more severe stage of injector clogging, the engine begins to adjust, starts poorly, and vibration appears. Also, the degree of clogging of high-pressure injectors (direct injection) can be assessed visually through an endoscope.
There are no high-pressure test benches for testing FSI direct injection injectors as such. For dealers and car manufacturers, cleaning high-pressure injectors is not a profitable procedure; it is much more profitable for them to sell you new injectors.
Thanks to cleaning the injectors, the fuel system and the entire engine as a whole will work flawlessly!
PRICES
| Name of works | Cost of work |
| Cleaning and diagnostics of injectors | 600r/pcs. |
| Cleaning and diagnostics of high pressure injectors: FSI, SCi, IDE, JTS, SIDI, HPI, HPDI, GM, Ecotec, CGI, DISI, GDI | 1000r/pcs. |
| Fuel filter replacement | from 500r |
| Glow plug replacement | from 800r |
| Injection pump (fuel pump) diagnostics | from 2000r |
| Injection pump (fuel pump) repair | from 4400r |
| Fuel tank replacement | from 2300r |
| Fuel tank cleaning | from 2000r |
How to understand that you need to flush the injectors
Car manufacturers recommend cleaning every 30 thousand kilometers. Problems with the injectors will be indicated by corresponding errors on the on-board computer. The same thing will be shown by diagnostics of fuel equipment in a car service center.
But with a high probability, flushing is needed regardless of mileage, if at least three symptoms from the list appear in your car:
- poor starting (especially in winter);
- unstable operation at idle speed;
- reduction in engine power;
- slow acceleration;
- dips when pressing the gas pedal;
- increased fuel consumption.
How to determine whether injectors are dirty
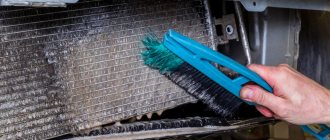
Chemical compounds gradually turn into various deposits, including resinous ones. And during the combustion process, pollution appears that is clearly visible externally. If a dark coating is visible, then this is the resulting dirt, which can be independently diagnosed and eliminated.
How often should the injector be flushed?
Such chemical compounds include benzene, olefin, sulfur and other substances that quickly turn into deposits and look like a black-brown crust. It cannot be removed using conventional methods. It is for this reason that it is also not easy to wash the injector with your own hands.
It is obvious that the service station will carry out the cleaning procedure efficiently. Specialists and professionals will get down to business. They will clean the entire system through which fuel flows using professional equipment (for example, ultrasound). However, it will cost a lot of money.
To determine the condition of the injectors and make sure that the injector needs help, it is important to pay attention to more than just dirt. Fuel consumption almost always increases, the car jerks while driving, especially in the winter season. All this directly indicates the deplorable state of the injectors.
| Stages of injector contamination | Signs |
| Low pollution | Injector performance drops by 5-9%. Fuel consumption increases: a couple of liters for every 100 km, but overall the engine works fine. |
| Average pollution | The overall performance of injectors is reduced by 10-20%. Fuel consumption increases significantly, the engine begins to run unevenly (tighten up), and emissions also become uneven. Acceleration dynamics deteriorate and a characteristic unpleasant odor appears from the exhaust pipe. |
| Heavy pollution | Injector performance drops by half. The engine is literally trying to “jump” out from under the hood. At idle, one or more cylinders may stop functioning altogether, and popping noises may be heard in the air filter housing when the gas pedal is pressed sharply. Symptoms of the second stage are also present, but in a more pronounced form. |
How to clean injectors yourself
Method 1: fuel additive
A typical bottle of fuel additive for flushing / drive2.ru
The simplest and relatively gentle cleaning method using special additives. More suitable for preventing the formation of deposits inside all elements of the fuel system - from the gas tank to the injectors.
The disadvantage of such additives is that on cars with high mileage they lift all the dirt from the gas tank and pipelines. As a result, the filters and the injectors themselves become clogged, which leads to even more disastrous consequences.
You will need
- Fuel additive-injector cleaner.
How to do
- Pour the product into the tank immediately before refueling according to the proportions in the attached instructions.
- Operate the vehicle as normal.
- For the best cleaning effect, it is advisable not to stand in city traffic jams, but to drive along the highway.
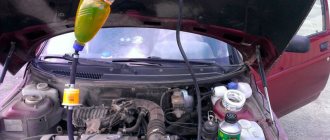
Method 2: flushing the injectors on the engine
This cleaning method is more difficult, but also more effective. It not only cleans the injectors, but also additionally decarbonizes the piston rings and also increases compression. Flushing is carried out with the engine running, which runs on detergent instead of gasoline.
The main disadvantage is that the quality of washing cannot be controlled. Other disadvantages include the entry of aggressive substances into the exhaust tract and potential damage to the catalyst. After using some products, spark plugs may need to be replaced.
You will need
- Injector cleaner;
- fuel filter;
- two-liter plastic bottle;
- wire;
- 1 m of fuel hose with a diameter of 10–12 mm;
- 3 clamps with a diameter of 9–14 mm;
- 2 nipples from a tubeless tire;
- bolt M12;
- screwdriver or drill;
- drill with a diameter of 12½ mm;
- tire compressor;
- spark plugs (if their replacement is recommended in the flushing instructions).
How to do
- Drill one hole each in the cap and bottom of the bottle. Install the nipple with the valve turned out into the cover. The nipple will supply liquid to the ramp.
- Insert the second nipple assembly into the hole in the bottom. You will need it to pump in air later to create pressure.
- Place one end of the hose onto the nipple in the cover, and install the other on the fuel filter, according to the arrow on the body. Tighten the ends of the hose with clamps. Wrap the bottle with wire so you can hang it.
- Warm up the engine to operating temperature and turn it off. Disable the fuel pump by removing the corresponding fuse.
- Start the engine. Let it run to relieve pressure in the rail. Wait until the engine stops.
- Disconnect the fuel supply hose from the line and connect it to the filter of an improvised flushing receiver. Pour the wash into the bottle, close the cap and hang it on the hood.
- If the car has a return fuel line, plug it using a bolt of suitable diameter and clamp it with a clamp.
- Use a compressor to pump air into the bottle until the pressure reaches 2–2½ bar.
- Start the engine and let it idle for 15 minutes, maintaining the pressure in the bottle at the same level.
- Turn off the engine and wait about 15 minutes for all deposits to soak off.
- Start the engine again and use up any remaining flushing fluid while maintaining the RPM between 1,000 and 1,500.
- Remove the bottle, the return plug and connect everything as normal. Don't forget the fuse.
- If the flush is aggressive and affects the spark plugs, replace them.
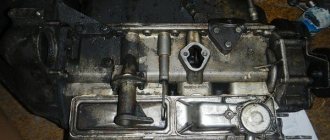
Method 3: washing and removing the injectors
The most difficult method, which involves removing the fuel rail and injectors. At the same time, it is the most effective and targeted - there is no harm to other elements of the system. For flushing, the operation of an injector is simulated, and a carburetor cleaner is used instead of gasoline.
The only disadvantages of this method are the difficulty of dismantling the ramp and injectors, as well as the need to replace microfilters and o-rings.
You will need
- Aerosol cleaner for carburetors;
- syringe 5 mm³;
- 9-volt Krona battery;
- 1–2 m of wires;
- doorbell button or other without fixation;
- 4 alligator clips;
- screw with a diameter of 4 mm;
- pliers;
- repair kit for injectors (only rubber rings and a filter are allowed).
How to do
- Remove the throttle assembly and fuel rail. Disconnect the injector wires and remove them.
- Pour some cleaning liquid directly into the bottle cap and place the nozzles there for 15-20 minutes to dissolve the carbon deposits. You can use the same cleaner to wash the throttle assembly while it is removed.
- Connect the battery contacts and the injector with wires and clamps, observing the polarity. Cut one of the wires and install a bell button in the gap.
- Make an adapter from the body of the syringe by placing the thin end on the aerosol tube.
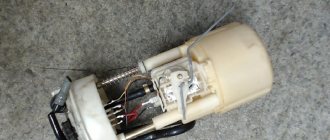
- Remove the microfilter from the first injector: screw a screw into the fuel channel and pull it out with pliers.
- Place the syringe on the nozzle side of the sprayer. Press down on the valve of the cleaner bottle and at the same time press the bell button several times.
- Place the syringe on the nozzle from the reverse side. Press the valve and press the bell button intermittently until the liquid begins to spray out in an even pattern.
- Repeat steps 5–7 for each injector.
- Replace filters and rubber seals by lightly tapping them.
- Reinstall the injectors and ramp, reassemble all parts in reverse order.
Cleaning options
There are several ways to wash the injectors; the first and most primitive is to assemble a small stand for washing the injectors.
To do this, you will need a 2-liter plastic bottle, a clean fuel filter, a compressor for pumping air, a pair of nipples, a meter-long hose and, finally, clamps.
Now you can start assembling. Let's take a bottle and make two holes in it, in the lid and in the bottom. It is advisable to use a 13 mm drill. We insert nipples into the holes, and install a nipple with the valve unscrewed into the lid.
We take the hose and put it on the nipple without a valve, and secure it with a tie. On the other side of the hose, you need to install a fuel filter and secure it with a tie.
Here you need to fill the bottle with a special cleaner. On average, 1 liter of fluid is enough for a two-liter engine. Now you need to warm up the car and turn it off, after which you need to relieve the pressure in the fuel line and disconnect it from the injectors.
We disconnect the fuel pump from the power supply, and the return to the tank must also be turned off. We take the assembled device and connect it to the injectors. A compressor must be connected to the second nipple to create pressure in the bottle, about 3 atmospheres.
Changing the engine oil with your own hands - step-by-step instructions on how to correctly, quickly and easily change the oil in the engine and transmission (125 photos and videos)Do-it-yourself speed controller - how to make a simple adjustment device or smooth descent (120 photos)
- Can a non-owner apply for compulsory motor liability insurance?
We leave the bottle hanging and go start the car. Now the engine is running on the cleaner, and after 15 minutes you need to turn off the engine, wait a little so that the liquid begins to eat into the nozzles, peeling off all the dirt, and finally start the car again and wait until the bottle is completely empty of liquid.
Finally, turn off the device and assemble the fuel supply system back to its original state. In general, this scheme for washing injectors is very simple to assemble and execute, and you will definitely be satisfied with the result.