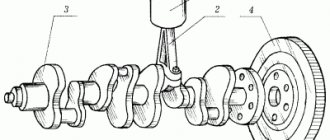
Piston
Cast from aluminum alloy. To improve run-in, the outer surface of the piston (Fig. 5) is coated with a layer of tin. To compensate for uneven thermal expansion, the piston skirt has a complex shape. The piston has a conical shape: the upper part has a smaller diameter than the lower part. Therefore, it is necessary to measure the piston diameter only in a plane perpendicular to the piston pin and at a distance of 52.4 mm from the piston bottom.
The hole for the piston pin is shifted from the axis of symmetry by 2 mm to the right side of the engine. Therefore, in order to correctly install the piston into the cylinder, there is a “P” mark shown in the figure near the hole for the piston pin, which should be facing towards the front of the engine.
Based on the outer diameter, the pistons are divided into five classes every 0.01 mm, and according to the diameter of the piston pin hole - into three categories every 0.004 mm. The piston class (letter) and piston pin hole category (number) are indicated on the piston crown.
Spare parts include pistons of classes A, C, E. These classes are sufficient to select a piston for any cylinder, since pistons and cylinders are divided into classes with some overlapping sizes. For example, a class C piston may be suitable for class B and D cylinders. In addition, when repairing engines, pistons are usually replaced on worn cylinders, so a class C piston may be suitable for a slightly worn cylinder that was class B. The main thing when selecting a piston is to ensure the necessary installation gap between the piston and cylinder.
Since 1986, repair size pistons for all engine models have been manufactured with an outer diameter increased by 0.4 and 0.8 mm. Until 1986, pistons of the following repair sizes were produced: for engines 2101 - with an increase of 0.2; 0.4 and 0.6 mm; for 21011 - with an increase of 0.4 and 0.7 mm.
The pistons of engines 2101 and 21011 are easy to distinguish from each other by appearance. In addition to the fact that they have different diameters, the 2101 pistons have a smooth bottom, while the 21011 pistons have a cylindrical recess on the bottom with a diameter of 55 mm and a depth of 1.9 mm.
Piston pin VAZ 21213, 2101-07, 2121, 2123 (blue, green, red)
Dear customers, in order to avoid mistakes when sending a set of piston pins, in the “Comment” line indicate the model and year of manufacture of your car, the class of the piston pin (blue color - 1st class, green color - 2nd class, red color - 3rd class th class).
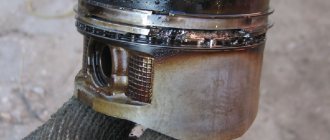
The clouds of bluish smoke escaping from the exhaust pipe give the driver many unpleasant thoughts. This most often indicates an unpleasant, but inevitable moment in the life of a car - engine repair.
When the car has traveled approximately 150 thousand kilometers, noticeable wear of the piston group occurs.
The connecting rod and piston group - connecting rod, piston with rings, connecting rod or main bearings - is the most important component in the engine. If the technical condition of these elements in the engine is inappropriate, the following is observed: reduced compression, the possibility of jamming.
The piston pin is designed to articulate the piston with the upper head of the connecting rod. It is made hollow (in the form of a thick-walled tube). In order for the fingers to work reliably when transmitting large forces, they are made of steel (alloy or carbon). The pin is secured in the piston bore by two spring retaining rings.
By diameter, piston pins are divided into three classes at 0.004 mm intervals.
The class of the piston pin is marked with paint on its end:
blue color - 1st class
green color - 2nd grade
red - 3rd grade
The piston is cast aluminum. During manufacturing, the weight of the pistons is strictly maintained.
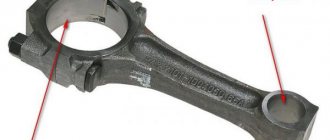
Connecting rod VAZ 2101-07
Dear customers, in order to avoid errors when sending a set of connecting rods, in the “Comment” line indicate the model and year of manufacture of your car, the connecting rod class by weight and by the hole in the upper head.
The clouds of bluish smoke escaping from the exhaust pipe give the driver many unpleasant thoughts. This most often indicates an unpleasant, but inevitable moment in the life of a car - engine repair.
When the car has traveled approximately 150 thousand kilometers, noticeable wear of the piston group occurs.
The connecting rod and piston group - connecting rod, piston with rings, connecting rod or main bearings - is the most important component in the engine. If the technical condition of these elements in the engine is inappropriate, the following is observed: reduced compression, the possibility of jamming.
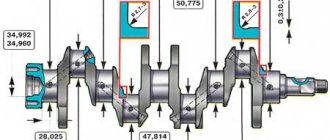
1 – arrow for orienting the piston in the cylinder; 2 – repair size; 3 – piston class; 4 – piston pin hole class; 5 – connecting rod classes by weight and by hole in the upper head; 6 – cylinder number.
Connecting rod – steel, forged. The connecting rod is processed together with the cover and therefore they are individually non-interchangeable. To avoid mixing up the caps and connecting rods during assembly, they are marked with the number of the cylinder in which they are installed. A steel-bronze bushing is pressed into the upper head of the connecting rod. Based on the diameter of the hole in this bushing, the connecting rods are divided into three classes every 0.004 mm (the same as the pistons). The class 5 number is stamped on the connecting rod cover.
The piston pin is designed to articulate the piston with the upper head of the connecting rod. It is made hollow (in the form of a thick-walled tube). In order for the fingers to work reliably when transmitting large forces, they are made of steel (alloy or carbon).
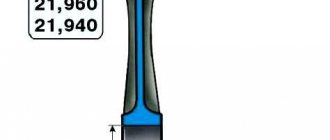
Based on the outer diameter of the piston pins, they are divided into three classes at 0.004 mm intervals. The class of the piston pin is marked with paint on its end. Based on the diameter of the hole for the piston pin, pistons are also divided into three classes every 0.004 mm.
| Piston pin hole class | 1 | 2 | 3 |
| Piston pin hole diameter(mm) | 21,982-21,986 | 21,986-21,990 | 21,990-21,994 |
The piston and its corresponding cylinder must belong to the same class, just as the piston and piston pin must belong to the same category.
Signs of a malfunction of the connecting rod and piston group:
– increased gasoline consumption;
– engine compression dropped below 10 kgf/cm2;
– oil consumption has increased. Over 1000 kilometers, the oil level decreased from the maximum to the minimum;
– the color of the exhaust gases has changed to a bluish tint.
Other article numbers of the product and its analogues in catalogues: 21010100404500.
VAZ 2101, VAZ 2102-03, VAZ 2104, VAZ 2105, VAZ 2106, VAZ 2107.
Any breakdown is not the end of the world, but a completely solvable problem!
AvtoAzbuka online store, repair costs will be minimal.
Just COMPARE and BE SURE.
Don't forget to share the information you find with your friends and acquaintances, because they may also need it - just click one of the social networking buttons located above.
Source: avtoazbuka.net
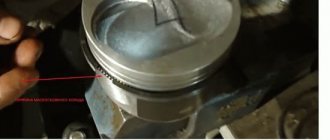
Installing rings on the piston
Once again, to what was said above, I repeat - this instruction implies that replacing the piston rings of a VAZ 2101 is done only with your own hands, in a private garage. Therefore, by default, we do not have any “sophisticated” tools and use available materials to install the rings on the piston and the entire piston with rings into the cylinder. In our case, this is... a tin can.
- We cut out metal strips from a tin can and install them around the entire circumference, at even intervals;
Advice! One strip should be under the “lock” of the ring to prevent scratches.
- We move the desired ring along the metal strips to the bottom until it is opposite its seat;
- We lift the strips up, while the rings fall into the groove;
- The operation is then repeated for all rings.
Of course, you can perform this action with your bare hands, but the risk of breaking the rings and scratching the piston is too great.
Installing a piston into an engine cylinder
Lubricate the piston rings with oil, insert them into the cylinder block from above and, using a homemade mandrel, insert the piston into the cylinder.
Attention! During this procedure, make sure that each piston fits exactly into the cylinder from which it was taken and is in the same position as before. The cylinder markings must be on the lower connecting rod heads.
Vazovsky “one and seven”
VAZOVSKY “ONE AND SEVEN”
VAZOVSKY “ONE AND SEVEN”
There is an opinion among motorists that the new 1.7-liter Niva engine is just a “bored” VAZ 2121 engine with a displacement of 1.6 liters. In fact, 21213 is essentially a new unit. The head of the research and development department of East German VAZ engines talks about it
The new engine was conceived as the most powerful for the then prestigious “Seven” - accordingly, its index in the design documentation was 21073.
In its current form, the engine never made it to rear-wheel drive models, but it turned out to be very useful for the modernized Niva, significantly increasing its power capacity or, more simply, adding agility. The increased torque (see Table 1) and its other characteristics made it possible to reduce the gear ratios of the main pairs from 4.1 to 3.9 and introduce a fifth, increasing stage in the box. The real result is the best dynamic performance of the modernized Niva: acceleration to 100 km/h in 19.21 seconds (was 23.25) with approximately the same fuel consumption. And, of course, more power allows you to reach a higher maximum speed of 137 km/h (previously 132 km/h). The engine borrowed its new designation from the VAZ 21213.
While we were talking about an engine with a carburetor, there is also an option with central fuel injection. In addition to Nivas, it is installed on classic Lada cars (models 21214, 21074, 21044), and our car enthusiasts are familiar with them only thanks to re-export.
How to balance connecting rods
And you can easily balance the connecting rods yourself at home. But here the difficulty arises in correctly balancing the connecting rod itself. Because in addition to the fact that the connecting rods must be of the same total mass, the upper part of the connecting rod and the lower part of the connecting rod must also be the same in weight. There are special scales for this at the factory, but there are no such scales at home.
I came up with a way to balance connecting rods at home using simple scales, I use simple medical scales, which I also use to weigh gunpowder when loading hunting cartridges. What's good about these scales is that they provide weighing accuracy down to the milligram.
The process of balancing connecting rods is as follows.
First, weigh all the connecting rods without connecting rod cushions and find the lightest connecting rod, you will have it as a template to which you will begin to adjust the weight of the remaining connecting rods. Just be sure to mark the connecting rods with the cushions so as not to confuse them; each cushion must return to its own connecting rod.
Next, also find the lightest pillow; this will also be a pillow template to which you will adjust the weight of the rest of the pillows.
Photo. Connecting rods before balancing. Connecting rods VAZ 08
The question arises of where exactly to grind off the metal on the connecting rods and pads.
On pillows everything is simple, the metal is ground or drilled from the very bottom of the pillow.
Photo. Connecting rod cushions before balancing. Connecting rods VAZ 08
But with connecting rods, everything is not always simple, although the metal from the very top of the connecting rod is also ground off normally, but sometimes you put the connecting rod to the connecting rod, and the heavier connecting rod at the top is ground off less than the lighter one. This means that if the top of a heavier connecting rod is visually smaller than a lighter one, grinding down the top will make it even lighter.
Photo. Balanced connecting rods. The arrow shows where the metal was ground off
Therefore, pay attention to where there is visually more metal and grind off the metal.
Photo. Balanced connecting rod pads. The arrow shows where the metal was ground off
Balanced connecting rods thus provide excellent engine dynamics, resulting in more power and more economical gas mileage.
Photo. Balanced cranks with cushions.
Tuning
Recently, tuning connecting rods have appeared; their advantage over conventional connecting rods is that they are lighter. Tuning connecting rods are made from light but strong metal alloys, and since the weight of the connecting rods plays a big role for the engine, the lighter the connecting rods, the faster the engine. For example, take a heavy stone and quickly lift it up and down, and then a light one, and you will understand that it is faster to raise and lower a light stone than a heavy one, and for the engine it is easier for the crankshaft to raise and lower light connecting rods.
Engines are boosted in different ways, they are equipped with turbocharging, special gas installations, etc. But this leads to overloading of engine parts, and such engines usually quickly fail. And if you put lightweight connecting rods in the engine, then, on the contrary, its resource increases, plus agility and power are added. For me, it’s much more interesting to drive a standard engine, but it’s easy to overtake new cars of the same class, while other drivers think that the car has a more powerful engine.
Tuning connecting rods can be easily bought online, but it’s true that they are more expensive than standard ones, but if you want to make your engine more playful, install tuning connecting rods, or lighten the standard ones by removing excess metal and adjusting them by weight, but don’t overdo it.
Shortened connecting rods
I’ll explain why shortened connecting rods are needed, since there are idiots who are ready to install them on any engine, believing that the engine’s power will immediately increase.
VAZ engines are divided by model and by piston stroke, for example, in the 2101 and 21011 engines the piston stroke is ten millimeters shorter than on the 2103 and 2106 engines. Therefore, if you want to make the 2101 engine equal in power to the 2103 engine, and since in these engines the diameter The piston is 76mm, which means you can make an engine from the 01 engine into an engine with the power of 03. To do this, for the 01 engine they buy a crankshaft from the 03 engine, and so that the pistons do not extend 10mm higher than the cylinder, shortened connecting rods are installed. But the pistons also have to be modified by grinding down the metal skirts below the piston pin so that it does not rest against the plumb line of the crankshaft. That’s just why shortened connecting rods are needed, and the engines turn out to be even faster than 03. But don’t think about buying a chain for an 03 engine, but install a chain for an 01 engine, since you have not increased the height of the engine block, but only increased the piston stroke.
An incident from life, a young guy drove up to me in a VAZ 2107 with a 2106 engine and asked if I recently had the engine done by a motor mechanic, but after repairs, the car doesn’t start well, it barely pulls, it consumes gasoline, but does not consume oil. I asked him what they did to the engine, he said they bored out the crankshaft (that’s good), bored out the block for new repair pistons (also good), and the mechanic also advised me to buy shortened connecting rods, he said that it would be very good. I laughed for about five minutes and told him, but now you can drive even on 66 gasoline, which has not been produced for a long time, there will never be detonation. Of course, the boy was not laughing, but I wasn’t laughing at him, but at the stupid master.
I explained to him that now his pistons do not reach the top of the cylinder by 10mm, and thus the engine has become very derated. Go to the mechanic who assembled the engine, let him remake the engine at his own expense and install normal connecting rods.
Selection of piston for VAZ 2101 cylinder
In this article we will look at a guide with which you can select a piston for a VAZ 2101 cylinder with your own hands
. You need to do everything step by step and then the pistons will work like a clock.
If a used engine has a gap exceeding 0.15 mm, then it is necessary to re-select the pistons to the cylinders so that the gap is as close as possible to the calculated one.
ATTENTION:
According to the outer diameter, the pistons are divided into five classes (A, B, C, D, E) every 0.01 mm, and according to the diameter of the piston pin hole - into three categories every 0.004 mm. The piston class (letter) and piston pin hole category (number) are stamped on the piston bottom.
Spare parts include pistons of classes A, C, E. These classes are sufficient to select a piston for any cylinder, since pistons and cylinders are divided into classes with some overlapping sizes.
The previous article was about how to remove and install VAZ 2101 bumpers. Good luck!
'; blockSettingArray[3]["setting_type"] = 3; blockSettingArray[3]["element"] = ""; blockSettingArray[3]["directElement"] = ".b-related"; blockSettingArray[3][“elementPosition”] = 0; blockSettingArray[3][“elementPlace”] = 2; blockSettingArray[4] = []; blockSettingArray[4]["minSymbols"] = 0; blockSettingArray[4]["minHeaders"] = 0; blockSettingArray[4]["text"] = "; blockSettingArray[4][“setting_type”] = 1; blockSettingArray[4]["element"] = "img"; blockSettingArray[4][“elementPosition”] = 1; blockSettingArray[4][“elementPlace”] = 2; blockSettingArray[5] = []; blockSettingArray[5]["minSymbols"] = 0; blockSettingArray[5]["minHeaders"] = 0; blockSettingArray[5]["text"] = "; blockSettingArray[5]["setting_type"] = 3; blockSettingArray[5]["element"] = "p"; blockSettingArray[5]["directElement"] = "#comments"; blockSettingArray[5][“elementPosition”] = 0; blockSettingArray[5][“elementPlace”] = 2; var jsInputerLaunch = 15;
vazgarage.ru
Piston sizes VAZ 2101
Initially, from the factory, the VAZ 2101 car engine is equipped with a piston stroke of 66 (mm) and a compression ratio of 8.5 units.
Piston sizes for VAZ 2101:
A piston is the main part of an internal combustion engine that converts the energy of compressed gas into the energy of translational motion.
To select this part, the modification and year of manufacture of the machine are taken into account, as well as the piston stroke and the degree of compression of the air-fuel mixture in the combustion chamber.
Piston parameters for VAZ 2101 1.2 MT:
- Piston stroke: 66 (mm);
- Compression ratio: 8.5;
- Piston diameter: 75.94 – 75.99 (mm);
- Years of production: 1970 – 1988.
Important: as a rule, the pistons on the VAZ 2101 are made of aluminum alloy with tin coating.
Other names:
Other designations for foreign markets: Lada 1200, Lada 1300 (corresponding to VAZ-21011), Lada 1200S (corresponding to VAZ-21013).
Piston pin VAZ 2101 dimensions
Repair of VAZ 2101 (Zhiguli): Pistons and connecting rods
- Repair manuals
- Repair manual for VAZ 2101 (Zhiguli) 1970-1985.
- Pistons and connecting rods
3.9.1 Pistons and connecting rods
Main dimensions of the piston, connecting rod, piston pin and piston rings Piston The piston is made of aluminum alloy and coated with a layer of tin to improve run-in. The piston skirt is oval in cross section and conical in height. Therefore, it is necessary to measure the piston diameter...
3.9.2 Device features
Main dimensions of the piston, connecting rod, piston pin and piston rings Piston The piston is made of aluminum alloy and coated with a layer of tin to improve run-in. The piston skirt is oval in cross section and conical in height. Therefore, it is necessary to measure the piston diameter...
3.9.3 Pressing out the piston pin PERFORMANCE ORDER 1. The pin must be removed on a press, using a mandrel A.60308 and a support with a cylindrical recess into which the piston is placed. Before pressing out the pin, remove the piston rings. 2. If the removed parts show little wear and are not damaged, they can be used again...
3.9.4 Cleaning PERFORMANCE ORDER 1. Remove carbon deposits formed on the piston bottom and in the grooves of the piston rings, and remove all deposits from the lubrication channels of the piston and connecting rod. 2. Check the parts carefully for damage. Cracks of any nature on the piston, piston rings, pin, shaft...
3.9.5 Selection of piston to cylinder The calculated gap between the piston and cylinder (for new parts) is 0.05–0.07 mm. It is determined by measuring the cylinders and pistons and is ensured by installing pistons of the same class as the cylinders. The maximum permissible gap (if parts are worn) is 0.15 mm. If the engine has been in service...
3.9.6 Checking the gap between the piston and pin
The pin is pressed into the upper head of the connecting rod with tension and rotates freely in the piston bosses. Warning According to the outer diameter, the fingers are divided into three categories every 0.004 mm. The category is indicated by a colored mark on the end of the finger: blue mark – first category, green – second, red – third...
3.9.7 Checking the gaps between piston grooves and rings
PERFORMANCE ORDER Height gap 1. Check the height gap between the grooves and rings by inserting the ring into the corresponding groove (1 – piston ring, 2 – piston, 3 – set of feeler gauges). 2. The nominal (calculated) clearance for the upper compression ring is 0.045...
3.9.8 Checking the gap between the connecting rod bearings and the crankshaft The gap between the connecting rod bearings and the crankshaft can be checked by calculation by measuring the parts. The nominal design gap is 0.036–0.086 mm. If it is less than the limit (0.1 mm), then you can use these liners again. If the gap is greater than the limit, replace the liners on these necks with a new one...
3.9.9 Piston weight control
Scheme of removing metal from the piston to adjust its mass. The arrows indicate the places where metal can be removed. In terms of mass, the pistons of one engine should not differ from each other by more than ±2.5 g. If there is no set of pistons of the same weight group, you can remove part of the metal…
3.9.10 Assembly of the connecting rod and piston group
PERFORMANCE ORDER 1. Since the pin is inserted into the upper head of the connecting rod with tension, heat the connecting rod to 240° C to expand its head. To do this, place the connecting rods in the electric furnace, pointing the upper heads of the connecting rods into the furnace. 2. In an oven already heated to 240° C, the connecting rods are placed on...
3.9.11 Checking the pin press fit
Assembled piston-pin-connecting rod set installed on fixture A.95615 for testing pin extrusion 1 – indicator pin in contact with the end of the rod; 2 – head of the rod in contact with the finger; 3 – threaded rod with groove; 5 – rod nut; 6 – pack…
3.9.12 Parallelism of the axes of the lower head of the connecting rod and the piston pin
Checking the parallelism of the axes of the piston pin and the lower head of the connecting rod 1 – assembled connecting rod-pin-piston set; 2 – retractable knives; 3 – stop; 4 – caliber Check PERFORMANCE ORDER 1. Before installing the assembled connecting rod and piston group on the engine, check...
↓ Comments ↓
1. Technical data 1.0 Technical data 1.1 Main overall dimensions of the VAZ-2101 car 1.2 Main overall dimensions of the VAZ-21011 car 1.3 Main overall dimensions of the VAZ-2102 car 1.4 Technical characteristics of cars 1.5 Controls and monitoring devices 1.6 Ignition switch 1.7 Ventilation and heating controls salon
2. Operation and maintenance 2.0 Operation and maintenance 2.1. Vehicle operation 2.2. Vehicle maintenance
3. Engine 3.0 Engine 3.1 Features of the device 3.2 Possible engine malfunctions, their causes and methods of elimination 3.3 Removal and installation of the engine 3.4 Disassembly of the engine 3.5 Assembly of the engine 3.6 Bench tests of the engine 3.7 Checking the engine on the car 3.8. Cylinder block 3.9. Pistons and connecting rods 3.10. Crankshaft and flywheel 3.11. Cylinder head and valve mechanism 3.12. Camshaft and its drive 3.13. Cooling system 3.14. Lubrication system
4. Fuel system 4.0 Fuel system 4.1. Power system 4.2. Carburetor
5. Ignition system 5.0 Ignition system 5.1 Setting the ignition timing 5.2 Gap between the breaker contacts in the ignition distributor 5.3. Checking ignition devices on a stand 5.4 Possible ignition malfunctions, their causes and methods of elimination
6. Starting and charging system 6.0 Starting and charging system 6.1. Battery 6.2. Generator 6.3. Starter
7. Transmission 7.0 Transmission 7.1. Clutch 7.2. Gearbox 7.3. Cardan transmission 7.4. Rear axle
8. Chassis 8.0 Chassis 8.1. Front suspension 8.2. Rear suspension 8.3. Shock absorbers 8.4 Possible malfunctions of the chassis, their causes and methods of elimination
9. Steering 9.0 Steering 9.1 Features of the device 9.2. Inspection, check and adjustment of steering 9.3. Steering mechanism 9.4. Steering rods and ball joints 9.5. Pendulum arm bracket 9.6 Possible steering malfunctions
10. Brake system 10.0 Brake system 10.1. Features of the device 10.2. Checking and adjusting brakes 10.3. Clutch and brake pedal bracket 10.4. Main cylinder 10.5. Front brakes 10.6. Rear brakes 10.7. Rear brake pressure regulator 10.8. Parking brake 10.9 Possible brake malfunctions, their causes and methods of elimination
11. Electrical equipment 11.0 Electrical equipment 11.1. Electrical circuit diagrams 11.2. Lighting and light signaling 11.3. Sound signals 11.4. Windshield wiper 11.5. Heater electric motor 11.6. Control devices
12. Body 12.0 Body 12.1 Features of the device 12.2. Repair of the body frame 12.3. Paint and varnish coatings 12.4. Anti-corrosion protection of the body 12.5. Doors 12.6. Hood, trunk lid, bumpers 12.7. Body glazing and windshield washer 12.8 Instrument panel 12.8. Removal and installation 12.9. Seats 12.10. Heater
13. Features of repair 13.0 Features of repair 13.1. Car VAZ-21011 13.2 Cars VAZ-21013 13.3. Car VAZ-2102 13.4 Cars VAZ-21021 and VAZ-21023
14. Appendices 14.0 Appendices 14.1 Tightening torques for threaded connections 14.2 Tools for vehicle repair and maintenance 14.3 Used fuels, lubricants and operating fluids 14.4 Basic data for adjustments and control
automend.ru
3.9. Pistons and connecting rods VAZ 2101 1970-1985
3.9.1 Pistons and connecting rods Main dimensions of piston, connecting rod, piston pin and pistons
motorsmarine.ru
Other parameters of VAZ 2101:
| vaz 2101 pistons – detailed dimensions |
| General parameters of VAZ 2101 pistons | ||
| Drawing General General view of the pistons | Models Total number of models presented | |
| Modifications The total number of all modifications of all VAZ models presented in our database | ||
| (drawing) | 4 units | 8 units |
| VAZ 2101 pistons parameters | |
| Parameter Piston parameter | |
Data is presented in millimeters (mm)
Caution: the above data are the official figures of the manufacturer, however, please note that the information is for reference only and does not guarantee absolute accuracy.
Source: razmery.info