Lada 2108 Long-term Long-term construction › Logbook › Assembling the internal combustion engine: Cylinder block.
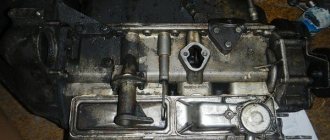
Previously, I already wrote a “bortovik” about assembling the motor, but the entry was brief, or rather only a list of parts that were used during assembly. As a result, plans changed, and therefore the block was disassembled and the forged pistons were sold. This time we will describe the entire assembly process in more detail. As I wrote earlier, the block was sharpened for the first repair, for forging. After selling forged pistons, I decided to install cast pistons from STK, but the difference is that a thermal gap of 7 acres (ideally 6 acres) was made for forging, while 3 - 5 acres are made for casting, depending on the operation of the engine. For a long time I thought about whether or not to sharpen the block for 83 mm pistons, but in the end I decided not to torment the block with boring, but to leave the cylinders bored for the first repair. Before assembling the block, I bought piston rings with a diameter of 82.5 mm to measure the gap in the ring locks installed in the cylinders, the gap in the ring locks in all four cylinders was 0.40 mm, that is, it was within tolerance (see picture), after which pistons for first repair
Motor designer" or how to assemble an engine correctly? part 2
ALEXANDER KHRULEV, Candidate of Technical Sciences SERGEY STARYKH
The litmus test that allows you to distinguish a professional minder from an amateur is the attitude to control and measurement operations when assembling a unit. And it’s not just that measuring the geometry of each part requires patience and scrupulousness. It is necessary to understand the meaning of these operations, and for this, the mechanic must clearly know the technology of repair operations that are not directly included in the engine assembly process, for example, how to grind a crankshaft or bore and hone a cylinder block.
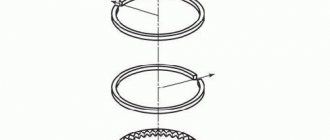
Instructions for correct installation of piston rings on the piston
To make it more convenient to control the process of installing the rings on the piston, it must be securely secured in a vice, this makes it easier to work and does not require outside help. Having securely secured the piston in a vice, we proceed to installation. We take a set of piston rings and select the oil scraper. It is dressed first, as it stands lower than the rest. First, the oil ring spring is installed, then the ring itself is carefully installed on the piston. It is not recommended to squeeze the oil ring too much to prevent it from bursting.
Oil ring spring
After this, we begin to install the compression rings one by one. To correctly follow the order, you should carefully look at the special marks on the rings; it indicates where the top side is.
Move the ring locks apart at 120° C relative to each other (as recommended in the instructions for installing piston rings). As in the case of the oil scraper ring, do not squeeze the compression rings too much so that they do not burst.
To ensure that the rings easily fit into the cylinder, we use a special crimping device (homemade).
The nut on the device is first loosened, then it is put on the rings and the nut is tightened. As a result, the rings are recessed into the piston grooves and easily fit into the engine cylinder. Before this procedure, it is recommended to lubricate the inside of the crimping device with machine oil so that the process of passing the rings into the cylinder goes smoothly.
The nut of the crimping device should be tightened moderately so that it rotates around the piston with little effort. Then, using a hammer, lightly tap the crimping device so that it is flush with the piston.
After this, the piston can be “released” from the vice, turned over with the yoke up, and removed (the yoke).
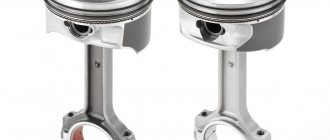
We take the connecting rod bearings, wipe them from the oil in which they are preserved, and install them on the connecting rod, while ensuring that the special marks (bulges) match correctly. The bearings with the connecting rod must be flush and not protrude at the edges.
Having thoroughly wiped the liners from the old grease in which they were stored, we lubricate them again with fresh engine oil. This will then make it easier to start the engine until the lubrication system pressure returns to normal. After this procedure, the piston with rings is ready to be installed in its rightful place.
For a more correct and easier installation of the piston in place, install the crankshaft in a position where the piston should be at the lowest point.
There is a special mark on the top of the piston that needs to be turned towards the “front” of the engine.
Important! The front of the engine is not always the front of the car. The engine in some cars is located transversely to the engine compartment.
Mark on the piston
The piston must be installed evenly, focusing on the adjacent pistons that were installed earlier (or have not yet been removed).
Using a hammer, lightly tap to ensure uniform contact of the crimping device to the motor block sleeve. When the “crimp” fits tightly and evenly to the edge of the sleeve, you need to use the end side of a hammer (the softer it is, the better) and gently but firmly tap the piston into the sleeve.
Using an oil-lubricated “crimp”, the piston and rings easily and confidently “slip” into the cylinder, then with gentle blows of the end of the hammer we “push” the piston to its lowest point until it stops.
After the piston is in place and the technician is convinced that the installation is correct, proceed to the final fastening of the connecting rod to the crankshaft.
Having turned the engine over (and it is better to do this using a special device), we begin the process of attaching the connecting rod. After making sure that the connecting rod and liner are sitting in their place (on the crankshaft journal), we proceed to the final fastening process.
To properly tighten the connecting rod bolts, you must first tighten and tighten the fastening bolts by hand, and lightly tighten them with your fingers (as far as “health” is enough). Next, if you follow the rules, use a torque wrench, which will allow you to tighten the bolts securely, but without “fanaticism,” which can then affect the operation of the engine.
The tightening torque of the nuts must correspond to 50 Newton meters; a corresponding scale is available on each such wrench, and in modern versions of torque wrenches it is even electronic. Tighten the nuts gradually and evenly, first a little, one nut, then the second, and so on until a torque of 50 Nm.
As a result, the yoke installed on the connecting rod should look like this.
After these procedures it is MANDATORY! take a wrench and turn the crankshaft to check if the liner has bitten the shaft journal.
The VAZ engine does not have the most complex design, so almost every car owner can independently replace any engine part, saving a considerable amount from the family budget on engine repairs. Guided by our instructions, car enthusiasts can independently replace parts not only in the engine, but also in any part of the car.
Do not forget that the repair process is carried out on a clean engine, with working tools, using original spare parts and materials (lubricants, oils, etc.). Work should be carried out in a well-lit room so that marks and symbols on parts can be clearly seen.
Video: ICE theory: installation error of a low-removable piston ring
Cast iron
It is characterized by high strength, wear resistance and a low linear expansion coefficient. The latter property makes it possible for such pistons to operate with small clearances, thereby achieving good cylinder sealing. However, due to their significant specific weight, cast iron parts are used only in those engines where the reciprocating masses have inertial forces constituting no more than a sixth of the pressure forces on the bottom of the gas piston. In addition, due to low thermal conductivity, heating of the bottom of cast iron parts during engine operation reaches 350-450 °C, which is especially undesirable for carburetor options, as it leads to glow ignition.
Installing the piston into the cylinder block
- Before installing the piston into the cylinder, it is necessary to thoroughly wipe the crankshaft connecting rod journals and cylinder liners with a rag and rotate the crankshaft so that the journal of the inserted piston is in the bottom dead center (BDC) position.
- Insert the liner into the lower head of the connecting rod so that the guide antenna on the liner fits exactly into the special groove on the connecting rod head.
- Lubricate the liner with machine oil, place a special guide mandrel on the piston to compress the rings and lower the connecting rod into the cylinder. How to correctly install the piston into the cylinder in accordance with the signs is written above. If there is no guide mandrel, then squeeze each
the ring will have to be done manually, gradually pushing the piston into the cylinder. - After the piston has entered the cylinder, carefully install the lower connecting rod head onto the crankshaft journal. We insert the liner into the bottom cover of the connecting rod so that the guide antenna on the liner fits exactly into the special groove on the connecting rod cover and lubricate the liner with machine oil.
- Install the connecting rod lower end cap to the lower part of the crankshaft. At the ends of the lower connecting rod head and the cover there must be digital indications of the cylinder number.
- Place the bottom cover of the connecting rod so that the cylinder numbers on the neck and cover are on the same side.
- Secure the connecting rod cap with moderate force and install the safety pins on the bolts.
Replacing the CPG
In order to replace the CPG, do the following: 1) Roll the car into a pit. You can do it while lying under a car, but it’s uncomfortable. 2) Disconnect and remove the battery. 3) Drain the oil and coolant. 4) If it is possible to remove the engine, remove it and place it on the engine table. If not, you will have to do everything by car. 5) Disconnect all attachments, carburetor, manifolds, power steering, injector. 6) Remove the cylinder head. 7) Remove the engine oil pan. Unscrew the connecting rod yoke nuts and remove the connecting rod yoke. 9) Gently tap the hammer handle to knock out all the pistons. 10) Place the removed pistons in kerosene. If you also change the connecting rods along with the CPG, this operation is not necessary. 11) Select the weight of the piston, pin and connecting rod for each cylinder. 12) Using a special puller, remove the liners from the cylinder block.
13) Press in new liners. Depending on the engine model, additional steps may be required. Refer to your vehicle's repair manual for details.
14) Assemble the pistons and connecting rods by tightening the yoke nuts. Weigh them again. If the difference is more than 3-5 grams, you will have to grind off the excess until the weight returns to normal. After this, mark the nuts and yokes and remove them.
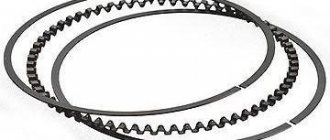
15) Place piston rings on the pistons. Try not to break them. The rings must be the right size. The gap of the ring installed in the sleeve should be within 0.2-0.9 mm. 16) Using a mandrel, insert the pistons into the cylinder block, observing the direction. So that the recesses on the pistons coincide with the valves. 17) Clean the connecting rod beds and bearings. Lubricate the liners with oil and install them in the bed. 18) Place the connecting rods onto the crankshaft. 19) Clean the yokes and liners, lubricate the liners with oil, and install them in the yokes. 20) Place each yoke on its own connecting rod and tighten. 21) Clean the mating surface of the cylinder block and cylinder head. 22) Install a new cylinder head gasket. 23) Install and tighten the cylinder head. 24) Install and tighten the gasket and engine oil pan. 25) Place and connect all attachments. 26) Fill with coolant and oil. 27) Install the battery. 28) Start the engine and run it at idle speed for eight to ten hours. 29) Run the car in motion.
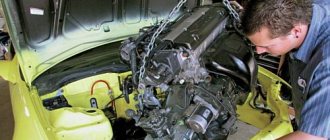
Any driver can replace the CPG. This article describes the replacement procedure and some secrets that will allow you to properly repair the motor.
https://auto-garazh.com/zamena/zamena-tsilindro-porshnevoy-gr…
Did you like the article? Subscribe to the channel to stay up to date with the most interesting materials
Subscribe