Homemade engine protection
I want to make engine protection. Who made it, how and what. Maybe you can give me an idea!
Mazda Familia 2001 BJ5W ZL-DE 5MT Toyota Town Ace 1995 CR31 3C-T AT 4WD practicing auto repair
can be made from a sheet of iron. or give 2-3 thousand to the office and they will give you protection.
find the website of an office that installs such protection, there will be photos there.
I did something like this from a sheet of three, I just bent it and welded the ears, then put it on the bolts, on our fucking roads I tore it off, didn’t install it anymore, replaced the struts and put tires on 14, the car rose and started driving more carefully .
There is no need for this protection IMHO.
the dog barks - the caravan moves on
Message from
FreemanThere is no need for this protection IMHO.
on the asphalt
Yeah... with our asphalt, it’s better with protection...
Mazda Familia 2001 BJ5W ZL-DE 5MT Toyota Town Ace 1995 CR31 3C-T AT 4WD practicing auto repair
Posted by
kotofanichon the asphalt
The crankcase is covered with skis
the dog barks - the caravan moves on
Last edited by Sidoy-Nvkz; 04/18/2012 at 09:05.
Everything will be fine …. maybe not soon, maybe not even very soon, maybe not even for you, but it will happen!
Posted by
kotofanichon the asphalt
Exactly, once I really wanted there to be protection. I was going fishing across the field, along a well-worn track. But the field was freshly cut from corn. I really felt sorry for my FC ((Next time I’d rather even walk 1-2 km. But on the asphalt, this protection somehow seems to be on the side.
Mazda 323F 2000 ZL 1.5 (88 hp)
Message from
SERGAFAN 007I want to make engine protection. Who made it, how and what. Maybe you can give me an idea!
FIRST, HELLO! (****** in the mouth, why wasn’t everyone instilled with such a habit in childhood - how to say hello????????) SECONDLY, we open the ALMANAC OF KNOWLEDGE, look (well, this is for those who can read, of course ) and find Protection for Mazda in makeshift conditions!
MAZDA spare parts for other foreign cars WWW.24SHOPIK.RU https://baza.drom.ru/user/stas26/
Installing protection is not such a problem, if only you had the desire and put your hands in the right place.))) I have one, it works 100%: https://drive2.ru/cars/mazda/familia/...52763043/#post
Last edited by ovkoz34; 04/18/2012 at 17:45.
mazda 2L manual transmission 4WD on throttles www.drive2.ru/cars/mazda/familia/familia_bj/ovkoz34/
Message from
SERGAFAN 007I want to make engine protection. Who made it, how and what. Maybe you can give me an idea!
In Novosibirsk, finding factory protection is not a problem; you need to think through a homemade one - you can get good vibration at speed.
Sheriff is protecting your car! https://baza.drom.ru/9754498.html
Message from
VKost'In Novosibirsk, finding factory protection is not a problem; you need to think through a homemade one - you can get good vibration at speed.
To prevent vibration, a damper is installed and the vibration is damped. What's the problem?
The photo below shows a pin that rigidly blocks the inter-axial differential? In what position is it on and in what position is it off?
Mazda Familia S-Wagon 1999 BJ8W, FP 1.8L, 135 HP, 4WD Full-Time
https://reviews.drom.ru/nissan/bluebird/64060/ So I wrote down how I made it for my device, there is not enough data, but if you want to ask something, write, I will answer.
I am so lazy that I deliberately get up early so as not to do anything else!
this protection in the event of an accident (ugh ugh ugh three times) will prevent the pihl from falling to the ground and it will go into the bowels of the cabin...((so the benefit is doubtful!
Renault DUSTER 2.0 135 horses 14′ AT Renault LOGAN 1.6 87 horses 09′ MT
Posted by
TRANS58this protection in the event of an accident (ugh ugh ugh three times) will prevent the pihl from falling to the ground and it will go into the bowels of the cabin...((so the benefit is doubtful!
where do you get all these crazy thoughts about the fact that the internal combustion engine falls somewhere during an accident? I’ve seen so many photos of broken cars, standing still and still standing.
MAZDA spare parts for other foreign cars WWW.24SHOPIK.RU https://baza.drom.ru/user/stas26/
Posts 1 page 30 of 31
Share12007-12-20 19:00:07
- Author: covic
- C200
- From: Moscow
- Registered: 2007-12-20
- Invitations: 0
- Posts: 70
- Age: 47 [1974-04-08]
- Time spent on the forum: 20 hours 11 minutes
- Last visit: 2012-02-21 17:30:50
Actually she is
Share22007-12-20 19:01:12
- Author: covic
- C200
- From: Moscow
- Registered: 2007-12-20
- Invitations: 0
- Posts: 70
- Age: 47 [1974-04-08]
- Time spent on the forum: 20 hours 11 minutes
- Last visit: 2012-02-21 17:30:50
For some reason the bottom doesn't fit.
Share32007-12-20 19:16:20
- Author: Igor
- Moderator
- From: St. Petersburg
- Registered: 2007-07-05
- Invitations: 0
- Posts: 8023
- Gender: Male
- Age: 53 [1967-11-15]
- Spent on the forum: 1 month 18 days
- Last visit: 2013-08-08 00:42:11
Well done for posting it. In the remote areas of our mother Russia, someone will need it. And those who want to buy, let them buy.
Edited by Igor (2007-12-20 19:17:50)
Share42007-12-20 19:19:30
- Author: covic
- C200
- From: Moscow
- Registered: 2007-12-20
- Invitations: 0
- Posts: 70
- Age: 47 [1974-04-08]
- Time spent on the forum: 20 hours 11 minutes
- Last visit: 2012-02-21 17:30:50
yeah. I'll take a look again at the weekend. This info is from two years ago. but I travel with my protection, it warms me
Share52007-12-21 11:05:23
- Author: covic
- C200
- From: Moscow
- Registered: 2007-12-20
- Invitations: 0
- Posts: 70
- Age: 47 [1974-04-08]
- Time spent on the forum: 20 hours 11 minutes
- Last visit: 2012-02-21 17:30:50
it will be clearer this way.
Share62007-12-21 12:07:20
- Author: Igor
- Moderator
- From: St. Petersburg
- Registered: 2007-07-05
- Invitations: 0
- Posts: 8023
- Gender: Male
- Age: 53 [1967-11-15]
- Spent on the forum: 1 month 18 days
- Last visit: 2013-08-08 00:42:11
covich and there is nothing on the side of the protection? I have a standard plastic one, and there are shields on the side. The bottom of the engine and from the wheels is closed
Share72007-12-21 12:12:09
- Author: covic
- C200
- From: Moscow
- Registered: 2007-12-20
- Invitations: 0
- Posts: 70
- Age: 47 [1974-04-08]
- Time spent on the forum: 20 hours 11 minutes
- Last visit: 2012-02-21 17:30:50
covich and there is nothing on the side of the protection? I have a standard plastic one, and there are shields on the side. The bottom of the engine and from the wheels is closed
so in the second photo the shields are visible. They are standard, plastic.
Share82007-12-21 12:30:47
- Author: Vaska
- C280
- From: Moscow
- Registered: 2007-09-29
- Invitations: 0
- Posts: 482
- Gender: Male
- Age: 35 [1986-01-22]
- Time spent on the forum: 16 days 11 hours
- Last visit: 2013-01-24 21:03:16
I also have some other shields, or you are simply missing some - I can’t see the engine from the arch!
Share92007-12-21 12:40:23
- Author: covic
- C200
- From: Moscow
- Registered: 2007-12-20
- Invitations: 0
- Posts: 70
- Age: 47 [1974-04-08]
- Time spent on the forum: 20 hours 11 minutes
- Last visit: 2012-02-21 17:30:50
I also have some other shields, or you are simply missing some - I can’t see the engine from the arch!
but no, it looks like it has a normal hang. It's just the shooting angle.
Share102007-12-21 16:12:33
- Author: NightRider
- C36 AMG
- From: Moscow
- Registered: 2007-06-19
- Invitations: 0
- Posts: 732
- Gender: Male
- Age: 36 [1984-09-24]
- Time spent on the forum: 2 days 5 hours
- Last visit: 2009-05-06 23:22:15
I wish you that you never hit big bumps, pieces of iron, stones, cobblestones and other obstacles with your creation. it seems to be made well, but there is a flaw, you will get caught by some thread or some other obstacle with your protection, you will not only change it but also the radiator mount, if the radiator remains alive, then thank God, if not then that too, plus a lot more can be assembled if you fly in correctly. Because not a single Mercedes CRANKCASE PROTECTION IS ATTACHED TO THE FRAME OF THE COOLING RADIATOR HOLDER! I have already written in detail about such experiments and how our craftsmen, in quotes, made such a defense. I bought it out of ignorance, well the people at the service center dissuaded me and said, “It’s better to put on a boot. then there is an option in sliding, you will pass and the radiator will be intact. She still has this protection lying around. I've almost found a welder who will remake it for the correct mounting. Draw your conclusions!
How to make engine protection yourself
Every experienced or novice car enthusiast knows that installing engine protection significantly increases the level of safety of its operation. But, firstly, it is not so easy to find, and ordering it from a workshop is too expensive. Therefore, if a person knows how to work with tools, he can make the protection himself and save a lot on it.
In factory production it is made by stamping. The main difference between such a part and one made by yourself is the stiffening ribs, which are made using a press. Before purchasing a steel sheet, a car enthusiast, first of all, should pay attention to its thickness; it should not be less than 4 millimeters.
Engine protection requirements
The requirements for crankcase protection are determined by the safe operation of the vehicle and the need to maintain speed characteristics. These include:
You should purchase crankcase protection for the vehicle model for which it is manufactured. Then installing it yourself will not require much effort. In the future, there will be no problems when changing the oil and other maintenance, since the factory holes will provide easy access to engine components.
There are also patterns for each model, but making the protection yourself will take an unreasonable amount of time and effort. The holes in the steel sheet will need to be cut with a grinder, and it will have to be secured by welding.
Let's make the crankcase protection ourselves.
Good day. I want to make crankcase protection for my fili, because it’s winter, because my wife drives, because it’s really necessary. I ask those who have done it themselves to help. Drawings. thoughts, experiences. I want to buy a sheet of aluminum 4-5 mm thick and sculpt it. And I don’t even know what it’s like to sculpt. I’ll ruin the material, but it’s worth a lot of money.
Aluminum protections are good, but ***** expensive
Guys, I bought a sheet of ordinary 4mm iron for pennies. I attached the cardboard to the bottom, cut it out, trimmed the outline of the cardboard on a sheet of iron, cut it out with a grinder, bent it to the place where it was glued, screwed it on the back with the bolts that hold the beam, in the front under the towing eye in the middle, sanded, primed and painted! One of these days I’ll make a plastic mudguard, I’ll close all the holes, and it’ll also serve as insulation! I'll finish it and post photos!
I don’t know about you, but we require a minimum of 2500 per fielder for a sheriff, and this is 2 mm steel protection. Actually, it is for the sake of economy that the question is raised.
ps: By the way, I lean this 2 mm one on the floor with my hands, but with 5 mm aluminum this is not the case. So to say that aluminum is an easy-to-bend metal, you need to understand that we take it 5 mm, and steel 2-3 mm, if it’s thicker, then the springs will need to be changed, because you’ll feel like there’s a guy sitting on your bumper. (2 mm width adds 13 kg)
does it seem to be suitable for “ten”? or am I wrong?
I installed the protection from below from the good old VAZ2110, modifying it a little with a grinder. The budget is 668 rubles. It contains five kilograms, no less. I can’t tell you how it feels, my sister is exploiting me. You need to cut off the rear corners with a grinder (so that the swinging arms do not interfere), drill two holes in the center in front for the towing eye, and cut off the front ears a little (then you will screw them to the front end with self-tapping screws). The rear is held on by three self-tapping screws (like 6) in the subframe. In total, it is held on by two self-tapping screws on the front (ears), two eye bolts, and three self-tapping screws on the rear to the subframe. I riveted two large holes in the protection with a tin so that dirt would not fly
Source
Why is engine crankcase protection needed?
The answer to the question is already clear to any experienced driver with experience driving a vehicle. The steel used in the manufacture of the crankcase does not stand up to criticism in terms of effective protection and resistance to mechanical stress. Very often, hitting a medium-sized stone at low speed can make a hole in it. Damage to a running engine will cause engine oil to leak out in a matter of seconds.
Damage to a car engine sump can have the most disastrous consequences. Especially if the driver did not promptly detect a violation of the integrity of the pallet. The risk of damage to the working elements of the motor increases many times. Engine repair in this case can cost a pretty penny.
Engine crankcase protection for a grenade or solaris or any other brand of vehicle is basically the same. To some extent, there may be individual design changes. The installation process is not difficult and does not require the use of special tools. If you prepare all the necessary tools, its installation can be completed within one hour.
When choosing protection for the engine crankcase, you need to pay attention to a number of parameters. They are important and show the effectiveness of using protection of a particular design.
When choosing crankcase protection, you need to pay attention to the following parameters:
Reliability.
The material used to make the protection should not be suspiciously light. If there are a lot of technological holes on its surface for fastening or ventilation, it will not be able to withstand a decent impact and will quickly become unusable and require replacement.
Workmanship.
Modern manufacturers of crankcase or sump protection can use any materials for its production. The only criterion in this case is the quality of production. Even if plastic is used, it must have a solid appearance without sagging, cracks or minor damage. The metal protection should not show signs of corrosion or deformation. All these little things can subsequently play a negative role in protecting the crankcase.
Weight.
When choosing protection for a pallet, you must pay attention to weight. In this case, it is necessary to maintain a middle ground and not give preference to overly heavy or suspiciously light protective elements. Do not overload the front of the machine. For example, the optimal weight of metal protection for a motor is no more than 10-12 kilograms.
Rigidity.
The rigidity of the crankcase protection determines its ability to deform under mechanical stress within a minimum range without touching the crankcase surface. When choosing protection for the oil pan, do not forget about ground clearance. The installed protective element should not reduce it, as this will create problems when the car is moving.
When choosing protection for the crankcase of a car, you must take into account that each brand of car has its own version of the protective element.
That is why you need to pay attention to the following points:
- location of the hole for attaching the protective element;
- placement of the engine oil drain hole;
- oil sump ventilation;
- car manufacturer's recommendations.
Article: 2110-2802030Н
Order code: 013390
- Buy with this product
- show more
Titanium protection offered on the domestic spare parts market is lighter, but has a higher stretch coefficient and, accordingly, does not provide the maximum guarantee of maintaining the integrity of the engine and gearbox.
To protect against counterfeiting, the assembly is marked with a yellow label indicating the drawing part number and the manufacturer's address.
Owners of VAZ models know that the VAZ 2110 crankcase protection installed at the factory is far from ideal. It is still suitable for short trips in urban conditions, protecting the engine compartment from dirt and water. But on country roads its effectiveness is highly questionable.
Many motorists completely remove the protection, arguing that in the forest or on a river it does more harm than good, because the VAZ crankcase protection reduces the ground clearance of the car. Let's try to understand its purpose and possibilities for increasing efficiency.
Where is the engine crankcase located and why is it there?
What is a protective casing, what is its purpose and what are the requirements for it? Engine sump protection is a metal sheet of a certain shape that is installed at the bottom of the engine compartment of a car. Its main purpose is to reliably isolate the power unit from mechanical damage and to block access to it as much as possible from road dirt and dust.
In turn, the pan protects the crank mechanism from various contaminants and serves as a reservoir for engine oil. It is attached to the crankcase with bolts, and for sealing, a gasket made of soft, oil-resistant material is installed between them. At the bottom of the pan there is a special drain hole, closed with a threaded plug. Sometimes the protection is confused with plastic shields, which are installed on some foreign cars by manufacturers. They can most likely be called anthers or mud flaps, since they only save from dirt.
Instructions for making protection with your own hands step by step
The manufacture of homemade crankcase protection occurs in several stages, namely:
- first, the car should be driven onto a lift or pit;
- Now you can start taking measurements of the bottom where the sheet will be installed;
- the obtained data is transferred to a prepared sheet of steel, aluminum or plastic;
- Before you start cutting out cuts and shapes, you should think about how to attach the shield to the car. At this stage, there is no need to drill holes in the body, frame or other parts of the car;
- now it is necessary to find suitable threaded connections, this could be a torque rod bracket;
- On the protective mechanism, two types of brackets are sometimes used. The first is to make the lugs as an extension of the steel sheet. If this option does not work, the bracket will have to be made separately from pieces of metal.
Blueprints
To make a drawing of an engine crankcase protection, experience is required. Otherwise, the product will not fit or will be attached incorrectly, which will only damage the car. To solve this problem, you can try to find drawings on the Internet. But for them to be accurate, you should conduct your search taking into account the model of your car.
Engine crankcase repair - we fix the damage ourselves
In what cases is engine crankcase repair required? Crankcase failures mainly occur as a result of mechanical damage, such as:
- broken connecting rod bolts;
- piston skirt breakage;
- when water is used in the cooling system, in winter when it freezes, the channels through which the coolant circulates rupture;
- As a result of engine overheating, deformation of the internal partitions of the cylinder block is possible.
Of all these types of damage, only a few can be repaired. For example, an external crack on a cylinder block can be sealed using argon welding. Most internal defects, such as deformations, cannot be repaired. In this case, the cylinder block must be replaced.
When repairing the oil pan, everything is much simpler and not so bad. If the car does not have reliable crankcase protection installed, then it is likely that sooner or later the pan may be damaged by a stone flying out from under the wheels. Most often it is broken through by running into some obstacle. And since the ground clearance of modern passenger cars generally does not exceed 15 cm, this phenomenon has already become commonplace on our roads.
In some cases, when the damage is minimal (a small crack or a microscopic hole), repairs can be carried out on your own, even on the road. To do this, you should use the so-called cold welding, which is sold in most auto parts stores.
This is done very simply. First, you need to drain all the oil from the crankcase into a suitable container. Next, degrease the damaged area with gasoline and apply a small layer of paste. If everything is done correctly, then in literally half an hour you will be able to continue your journey. At least to the nearest service station.
Communities › Auto tuning › Blog › Anti-Theft - Secret Engine Lock with Your Own Hands
Protection against theft is an important consideration for any car owner. Therefore, in this post I will show how to block the engine with your own hands using a secret button.
The car I install the secret lock on is Ravon R2. The location of the anti-theft device discussed with the client is the handbrake lever. The secret button should not work all the time. If desired, the engine is not blocked, allowing you to start the car without any obstacles every time.
Anti-theft connection diagram:
I will use a button with a fixed position as a secret.
I also use a 12V relay with two groups of switching contacts. I use this option because I already had blanks. You can use a regular car relay with 1 group of contacts.
I wanted to block the ignition wire. Getting ready for installation. I insulated the relay with soldered wires. I soldered wires to the button and made a connector.
I cut out a plastic plate and attached a button to it. I also insulated everything.
In the car I remove the plastic tunnel of the handbrake. I fix the button on the handbrake lever.
The wire was partially laid in a corrugation so that it would not break. The rest was sent through the tunnel with standard wires.
I also attached it to the standard harness under the dashboard. Further along the steering rack and connected to the wires from the relay. I built 2 wires from the relay that will go under the hood. There I will do the blocking, in the fuse block. I run the wires through the rubber seal.
On the ignition switch connector I connected to the purple wire with a blue stripe. +12 V appears on this wire when the ignition is turned on.
The blocking relay itself was attached to the standard wires. I tied the black wire from the relay to the black wire in the connector on the headlight range control.
In the fuse box, under the hood, the yellow wire that goes to the starter relay coil has broken. In this car, the ignition switch is controlled via the CAN bus. Therefore, I took the switching potential on the lock to power the relay, and brought the lock itself under the hood.
Having completed all the connections, we be sure to check the functionality of the secret - whether we are locking the engine correctly.
As you can see, a secret button is a simple, but sometimes very unexpected and effective protection against theft. If you have questions, ask them in the comments!
All options for secret buttons can be viewed in the playlist -
Auto electrician Sergei Zaitsev worked for you!
DIY crankcase protection for Lada Granta
Crankcase protection is a very important item when it comes to protecting the main components of your vehicle. It protects the engine and other parts of the machine from damage. The device itself can be either metal or durable plastic. Here are some protection features:
- The crankcase protection serves as a barrier against mechanical damage to the main components located under the bottom of the machine.
- Anti-corrosion function. Rain, snow, as well as powder on icy roads negatively affect the condition of the underbody of the car, causing corrosion. Crankcase protection on the Lada Granta allows you to prevent premature corrosion, protecting important components of the car. It itself is powder coated and treated with an anti-corrosion agent.
- Machine safety. Thanks to the stiffening ribs that the crankcase protection has, it will be impossible for ill-wishers to get close to the main components of the car.
Types of crankcase protection structures
The crankcase guard is mainly made of composite materials or stainless steel.
There are also plastic structures, but they are often unreliable and can crack even with a slight impact. Therefore, if you choose a material to protect the crankcase, you should not save, because the safety and reliability of your car depend on the funds invested in it. Quite often they praise the inexpensive metal, bent steel “Sheriff” crankcase protection. Has a thickness of 2 mm. Features good
quality of workmanship. The welds are almost invisible, they are made very carefully. The coating is powder paint, which, in turn, will provide good protection against corrosion. It is very convenient, we note, the presence of all factory holes and fastenings. There is no need to drill or finish anything yourself.
How to install crankcase protection on a Lada Granta with your own hands
The process of installing crankcase protection on a Lada Granta yourself is not very labor-intensive (it can take about 40 minutes). But to avoid any difficulties with installation, you need to be properly prepared.
We will need a set of wrenches: a ratchet wrench, an open-end wrench 19 and a pair of sockets 17 and 19. If you have a crankcase protection from a Lada Kalina, then that will also work. However, keep in mind that protection for automatic and manual transmissions varies. Please check this factor before purchasing.
Let's start the installation process:
- First you need to drive your car onto a pit or repair ramp, otherwise you will not have access to the bottom of the vehicle. Be sure to place wheel chocks under the wheels and apply the handbrake.
- It is likely that the front wheels may be in the way. To do this, you need to dismantle them by lifting them with a jack, but first place a wheel chock under the rear wheels. You can use ordinary bricks or wooden blocks.
- Let's crawl under the car. If you have a standard serial protection installed, remove it with a wrench, unscrewing the bolts around the perimeter. After removal, be sure to wipe off any dirt from the bottom of the engine. If necessary, wipe it with an anti-corrosion agent to protect the motor from rust. While access to other components of the car is open, it is recommended to clean them, since dust and dirt negatively affect the anti-corrosion properties of all parts of the car.
- Half the work is already done. A new crankcase protection needs to be installed. We take the same screws unscrewed from the previous protection, and then use them to fasten them back to the bottom of the Lada Granta. Before installation, it would be a good idea to treat the screws with grease or other lubricant. If you need to dismantle them again, it will be easier to do this, since the protection on the bottom is in aggressive conditions. From the front of the car, the crankcase protection is attached to the so-called crabs. On the other hand - for the lever supports.
So we finished installing the crankcase protection on the Lada Granta ourselves. You can see that even a person without car repair experience can handle such volume and complexity.
It is important to remember that if you use too cheap and low-quality materials for protection, then in due time they will not save the engine from mechanical damage. The engine of a car is the most expensive component in it and requires good maintenance. No matter how positively they speak about plastic crankcase protection for Grants, they always have low strength, thereby being inferior to metal ones. Upon impact, the metal protection will simply bend, and the plastic will burst, or even shatter.
Some car enthusiasts independently strengthen the protection structure with additional stiffeners, welding them on top of serial metal. However, for most cases, 2 mm of metal thickness is sufficient, and you do not need to modify the protection you have already purchased.
How to install crankcase protection with your own hands
Crankcase protection is a fairly simple operation; this part is installed very quickly and without any particular difficulties. At the preparatory stage, we remove what remains of the old protection, which has become unusable.
We drive the car onto a viewing hole or lift. The second option is more preferable, this way it will be more convenient to install the crankcase protection yourself.
After dismantling the old protective element, if present, we clean the mounting holes from dirt. It is advisable to provide good lighting to this part
car
.
To reliably fix the crankcase protection and ensure resistance to breaks, we use bolts. This is especially important with heavy metal protection.
We install crankcase protection without fail using damping gaskets. Thanks to them, vibration of the protective material will be dampened while the car is moving. Often drivers who do not use cushioning materials complain that the protective elements make quite audible noise while the car is moving.
This description shows that in practice, engine protection is made and installed with your own hands in a very simple way - to do this, the main thing is to want it. Tools and materials can be bought or borrowed for a while, and skills are acquired in the process - the main thing is to do everything logically and consistently.
This post may contain affiliate links. This means I earn a small commission from links used at no additional cost to you. See my privacy policy for more information.
Purpose and design
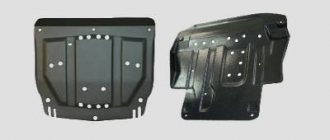
The crankcase guard is a piece of metal or composite material (fiberglass, carbon or Kevlar) that covers the bottom of the engine compartment. It is attached to the elements of the car body, if provided for by the design. The crankcase and gearbox protection is designed to prevent impacts with the engine sump and gearbox housing on uneven road surfaces and stones that sometimes appear on the roadway.
Since the engine oil pan, as well as the gearbox, is most often made of steel sheet less than a millimeter thick, in most cases it cannot withstand a serious collision with an obstacle. You cannot drive a car after such an incident, since oil will leak out through the hole formed, and the unit, working without lubrication, will quickly become unusable. On a car with a longitudinal engine, as a rule, only the engine sump is closed. Since the clutch housing and gearbox are located behind the engine, obscured by its sump. If the power unit has a transverse arrangement, then the crankcase protection, together with the engine, also covers the gearbox with the clutch cover.
Structurally, any engine sump protection is a thick plate with mounting brackets, which has one or two holes for draining used oil. If the engine layout does not allow the removal and installation of the oil filter from above, the crankcase protection must have a hole for its replacement from below.
Choice
To choose the right protection for your car, you need to know how similar-looking products differ. Oil pan protections from different manufacturers for a particular car model cannot differ significantly in their geometric dimensions, with the exception, perhaps, of the thickness of the plate, which for metal products should not be less than 3 mm. This means that you only have to choose the material from which the engine crankcase protection is made. Pros and cons of metals that are most often used for manufacturing.
- Steel. Crankcase protection made of steel is most often found on sale. The advantages of a shield made of this material: low cost, sufficient strength and rigidity, as well as good maintainability. Disadvantages: heavy weight and poor corrosion resistance.
- Aluminum. The advantages of such crankcase protection: low weight, excellent anti-corrosion resistance. Cons: strength and rigidity leave much to be desired. Low maintainability due to the fact that this metal can only be welded with a special welding machine using argon.
Composites
The general properties of composite materials are high strength and low weight. However, despite the fact that the car crankcase protection can withstand a fairly significant load distributed over its area, a strong blow to one point, as a rule, punches a through hole in it. The thickness of car engine protection made of composites is usually from 8 to 12 mm, which is slightly greater than that of metals. Therefore, the gain in mass is not as great as it might seem at first glance. The limiting parameters of each composite depend mainly on what fibers it is reinforced with. Below are some examples of composite materials used to make car crankcase protection.
- Kevlar. It uses para-aramid fibers for reinforcement. They have high strength and heat resistance, as well as low specific gravity. For example, the breaking force of these fibers ranges from 280 to 550 kgf/mm², versus 50-150 kgf/mm² for steel. And its density (about 1.5 t/m3) is significantly less than that of steel, which is on average 7.8 t/m3. The color of crankcase protection made from this raw material is greenish-golden. This is the best and most expensive composite material for the manufacture of car engine oil pan protection.
- Carbon. Reinforced with carbon fibers. They have a breaking force of 250–500 kgf/mm2 with a density of 1.75 t/m3.
- Fiberglass, also called FRP. The glass fiber included in its composition breaks at a force of 170 kgf/mm2 and has a density of 2.52 t/m3. Although its parameters are inferior to the two previous materials, they are still somewhat better than those of steel. And the cost of protecting the engine crankcase from this material is noticeably lower than from carbon fiber or Kevlar.
Lightweight car engine crankcase protection made from composites is often installed on sports cars. Where there is no struggle for seconds, steel products are also suitable.
Possible problems
There are several situations when the crankcase hits the road surface. Their consequences can be very different.
Therefore, let's look at the most common situations and determine what you, as the driver and owner of the car, should do.
A dent has formed, but the breakdown is not visible
There is a high probability that as a result of such damage the breather, that is, the oil receiver, has broken.
You should not rejoice prematurely if no traces of oil leaks are found after the impact.
The breather for the “ten” is often made of plastic or aluminum. Its design includes an oil pickup tube. It is located slightly above the tray - about 5 centimeters. Therefore, the place where the tube breaks may be higher than the existing oil level.
If such an impact occurs, immediately turn off the car and stop.
Next, you should check the breather for a break:
- Start the engine by performing a test run. If the oil sensor light does not go out, there is a high probability that the breather will break;
- Turn off the power unit;
- Add oil to the crankcase, then start the engine;
- If at the same time an oil stain appeared under the car, the breather still broke. You will have to call the evacuation service;
- If the oil pressure sensor light goes off, you can hope that nothing happened to the breather after the impact. You can continue moving on your own. Only to a service station.
In such a situation, often the repair consists of simply replacing the breather. This is not so easy to do, but it is still easier compared to overhauling the engine.
The dent on the block is insignificant, there are no signs of breakdown
With such impacts, the breather breaks off extremely rarely. But the gap between it and the pallet may decrease. Because of this, the performance characteristics of the car are reduced, and the car may not withstand heavy loads.
What could cause such a nuisance? Oil hunger. For the engine, this is no better than a broken breather, and maybe even worse. You will not be able to get the necessary information from the ECU, since the control system for the systems on the “tens” is quite primitive. It is far from a fact that the corresponding error code will appear on the on-board computer.
It’s good if the oil pressure warning light on the dashboard does not light up. In this case, continue driving on your own and head to the nearest service station. You will need to remove the pan, level it, or replace it completely. At the same time, be sure to check the current condition of the breather.
Carter struck
If the standard mudguard has a hole, oil flows out of the sump and forms a whole puddle of lubricating fluid under the car, this is bad.
IMPORTANT! Under no circumstances should you attempt to start the engine if you find a puddle of oil under the crankcase.
If you are in motion and see traces of oil following you, stop as quickly as possible and turn off the engine. Call a towing service.
Key Features
To get started, you need to prepare the tools: a tape measure (or something else to take measurements), an angle grinder (grinder), a drill with drills and bits, a set of wrenches, welding and a steel blade.
In the factory, the protection is made by stamping, and there are stiffening ribs on it, which cannot be produced without a press. Therefore, when choosing a steel sheet, you must take into account that it should be thicker than the factory one, its thickness should be approximately 4 millimeters.
If you need to make bends in the sheet, then you need to clamp the sheet between the metal corners in the clamps and bend it using a fork lever. If possible, it is advisable to heat the bend area with a gas cutter.
It is clear that the more space is closed under the engine, the better. Maximum coverage will provide additional protection to the engine crankcase and engine compartment from dirt, snow and water.
Stage 1
- The first step is to drive the car onto a pit, overpass or lift to ensure easy access.
- Measurements are taken of the bottom where the protection will be located, and the dimensions are transferred to the prepared sheet of metal. In this case, it is necessary to take into account the necessary free space for turning the wheels and free movement of various mechanisms, in particular, suspension arms and drives. At a minimum, a 10 mm gap must be left. Also, you must try to maintain the shape of the space being closed so as not to leave gaps and to exclude protruding parts of the metal, for example in wheel arches.
- Before you start cutting out the shape and cutting, you need to think about how to attach the shield to the machine. At the same time, it is not advisable to drill holes in the frame, body or other parts of the car. It is necessary to find suitable threaded connections, for example, torque rod brackets. On the protection itself, there are two options for mounting brackets:
- Make the eyes as a continuation of the sheet metal. In this case, when measuring the bottom of the car, it is necessary to take them into account and mark them. Then drill holes of the required diameter and, if necessary, bend them.
- If it is impossible or difficult to manufacture the above fastening, the bracket is made separately from leftover metal. These can be of various forms - corners, plates, brackets, etc. They are attached to the car with threaded connections, and they can be attached to the protection by welding. For greater rigidity, parts should be welded overlapping, and in no case joint to joint.
Stage 2
- When the future protection is cut out and the brackets are made, it can be installed by attaching a couple of bolts. Check for excess metal, gaps with moving parts and with the engine oil pan, and alignment of mounting holes. During this procedure, you can mark a hole for the hatch to drain used oil and, if necessary, to access the oil filter.
- Depending on the size, the hatch is cut out either with a crown or with a grinder. It can be made open, but then dirt will get through it into the engine compartment. In order to avoid this, four holes are drilled on the upper side of the sheet along the perimeter of the hatch and nuts are welded to them, into which the bolts securing the hatch will be screwed.
- As a final touch, the protection can be primed, painted and, after drying, the homemade engine protection is ready.
Read also: Inflating wheels on a Tuareg
As a result, we can conclude that making engine protection with your own hands is not such a difficult task. The main thing is to have a desire. Tools and necessary equipment can be purchased or rented, and skills can be acquired on the job.
Many drivers with at least minimal driving experience will tell you about the need for crankcase protection - and they will be right. Because of pebbles, gravel, and other objects that come across on the roads, the crankcase pan may be punctured. To prevent this, you need to install a special shield. Owners of rare car models may experience some difficulties in finding engine crankcase protection. For example, a high price in stores, the high cost of ordering in workshops, or even difficulties with searching. In such cases, a reasonable solution would be to make the protection yourself.
This is done using certain tools - a tape measure (or other measuring accessory), an angle grinder (grinder), a drill with a set of drills and bits, a set of wrenches, welding and a steel blade.
Factory-made protection, made by stamping, is distinguished by stiffening ribs - they are made using a press. Therefore, when choosing a steel sheet, you should pay attention to its thickness - it should be about 4 millimeters.
If you make bends on the sheet, we clamp the sheet between the metal corners in the clamps and bend it using a fork lever. If possible, it is better to heat the sheet at the bend using a gas cutter.
Installation Rules
Usually, when installing a new protection on an injection VAZ 2110, the factory mudguard is left and the fastening is carried out on top of it, believing that double protection will not harm. However, many people prefer to throw away the mudguard, believing that such a “sandwich” additionally collects dirt and also accumulates ice in winter.
Actually, installing the protection yourself takes no more than half an hour, and is done like this:
- On a pit, overpass or lift, we “apply” the protection to the intended place;
- We screw the front mudguards to the crankcase protection;
- We screw the self-tapping screws to the side member brackets;
- We screw the protection to the mudguards;
- We fasten the five nuts in front to the front bumper.
DIY installation
At the second stage, when the engine crankcase protection and brackets are made, installation can begin, tightening no more than two bolts. Now you should check the product for excess metal and the presence of gaps in places where they should not be. At the same time, do not forget about the coincidence of the remaining mounting holes.
Depending on the dimensions, the hatch is cut out with a grinder or a crown. If it is left open, dirt will enter the engine compartment. To get rid of this problem, from the top of the sheet, around the perimeter of the hatch, you should drill 4 holes and weld nuts to them, which will be used to tighten the bolts securing the hatch. At the last stage, the protection should be primed and painted. When it dries, the work can be considered completed.
Where can good crankcase protection be sold?
Previously, most spare parts were sold only at car markets, now all the best can be bought on the Internet. If you really want, you can even order from the manufacturer. When purchasing protection, you first need to decide for yourself whether you need powerful steel armor or whether a light carbon fiber shield is enough. If off-roading means rare trips into nature for you, then you are unlikely to need iron protection. When purchasing, it is important to pay attention to the manufacturer. It is not recommended to buy unknown brands; most likely they want to sell you a Chinese counterfeit. But, for example, the protections have proven themselves to be excellent over the years of operation.
Engine crankcase protection - a homemade economical option
It is important for every motorist to be confident in his car. In addition to the technical side, attention should be paid to the mechanical strength of the most vulnerable parts. One of them is the oil pan of the power unit. On a country road, when driving over rough terrain, you can unexpectedly run into a bump, stump, or stone. The result is often a penetration of the metal pan.
To prevent such unpleasant situations, protection is installed in such places at the plant. A standard design is often not enough.
Making an additional protective sheet with your own hands is not that difficult. First you need to make a diagram, cut out individual elements, attach fasteners from the corner to the side members or subframe. The entire work will take a maximum of three days.
Replacing protection
It may also be necessary to replace the installed protection. Often, having bought “native” protection, many drivers replace it with steel ones. It may also be necessary to install new protection if there is severe mechanical damage to the old armor. The iron engine protection is very reliable, but may not withstand some cobblestones. Replacement is similar to removal and installation.
This is interesting: Purpose of gearbox lubrication
Product delivery options
Note! Below are the shipping methods available specifically for this product. Payment options may vary depending on the shipping method. Detailed information can be found on the “Delivery and Payment” page.
Parcel by Russian Post
Available payment methods:
- Cash on delivery (payment upon receipt)
- Using cards Sberbank, VTB, Post Bank, Tinkoff
- Yandex money
- QIWI
- ROBOKASSA
Shipping throughout Russia. Delivery time is from 5 to 12 days.
Parcel by Russian Post 1st class
Available payment methods:
- Cash on delivery (payment upon receipt)
- Using cards Sberbank, VTB, Post Bank, Tinkoff
- Yandex money
- QIWI
- ROBOKASSA
Shipping throughout Russia. Delivery time – from 2 to 5 days. More expensive than regular delivery by Russian Post, approximately 50%. Parcel weight up to 2.5 kg
Express Parcel EMS
Available payment methods:
- Cash on delivery (payment upon receipt)
- Using cards Sberbank, VTB, Post Bank, Tinkoff
- Yandex money
- QIWI
- ROBOKASSA
Shipping throughout Russia. Delivery time – from 3 to 7 days. More expensive than regular delivery by Russian Post, approximately 100%.
Transport companies
Available payment methods:
- Using cards Sberbank, VTB, Post Bank, Tinkoff
- Yandex money
- QIWI
- ROBOKASSA
Delivery is possible to any locality where there is a representative office of the transport company. Delivery time – from 2 to 10 days. Sending large parcels is approximately 50% more profitable than by Russian Post.
Courier delivery in Togliatti
Available payment methods:
- Cash upon receipt
- Using cards Sberbank, VTB, Post Bank, Tinkoff
- Yandex money
- QIWI
- ROBOKASSA
Delivery time from 1 to 12 hours.
Making your own protection
For some car owners, standard engine protection is not enough. They often order non-standard protections to order or make them themselves. Manufacturing is a fairly simple process and will not take more than three days. A schematic drawing is made and protection elements are cut out, usually from 3 mm steel. To bend the steel, you need to make cuts with a grinder (then you will need to weld them). Powerful fasteners from the corner are attached to the subframe or side members. Further everything is the same as when installing standard protection.
To install engine protection, you can contact a service station or do it yourself. In any case, your car's engine will be protected from unpleasant surprises on the road. And you can choose the degree of protection yourself, depending on the operating conditions.
Every iron horse has a heart - it is a motor or an engine, and as soon as it starts to mope, the car refuses to work. If in the Middle Ages knights protected both themselves and their horse with metal armor, then modern car owners install special boxes to save engines.
How to install engine protection, whether it is possible to make it yourself, the technical details of installation - we will try to answer all these questions.
How to profitably exchange a used car
To guarantee the legality of the used car exchange service and its objective cost, the purchase and sale process should be carried out at a trusted auto center. Here the client will be offered:
- Diagnostics of the old model, on the basis of which its cost will be determined;
- Selection of cars for exchange, completely new or with a clean mileage history: all cars undergo forensic examination, therefore the car dealership will never sell a car with a “dark past”;
- Legal support of the transaction: the client enters into a notarized agreement and, if necessary, can use the credit services of the car dealership’s partner bank;
- Efficiency of the service: the client does not need to look for buyers for his vehicle; he does not need to settle issues with the traffic police or the bank. The listed functions are the task of the auto center.
Read here! Block head grinding
Thus, with minimal documents, it is possible to buy an improved car within one to three days. The used car exchange service makes it possible to regularly change the owner’s vehicle fleet by purchasing its best models.