Signs of malfunctioning fuel pump
Knowing the signs of problems, you can have time to correct the situation before the device completely fails. There may be several of them:
- Unusual engine sound. It is worth checking the pump even if the disturbance (noise) lasted only a short period of time, and then engine operation continued as usual.
- Reduced engine power. This is best felt during sharp climbs. Engine malfunctions during startup and acceleration. It is worth checking the device if you are sure that the problems are not caused by the battery or starter.
Video: Problems with the fuel pump
When should you check your fuel pump?
It is necessary to check all potentially faulty components one by one, and the fuel pump first.
Problems when starting and running the engine are not always associated with the fuel pump. Sometimes the signs of a fuel pump breakdown are the same as those of a faulty fuel pressure regulator , injectors or jets, spark plugs and high-voltage wiring. Even experienced specialists who know by heart all the signs of a “dying” pump cannot unambiguously determine the type and cause of the breakdown the first time, and it is necessary to check all potentially faulty components one by one. In this case, the fuel pump is usually checked first. In this case, there are two types of malfunction - the fuel pump does not work at all or does not produce the required pressure. In the first case, the malfunction can be recognized by ear, since it should start when the ignition is turned on. In the second case, you need to know how to check the pressure of the fuel pump. Here you need to use a special pressure gauge. We list the main symptoms of a fuel pump malfunction:
- the engine does not start;
- the engine is unstable;
- the engine lacks traction during sharp acceleration;
- The engine lacks traction at low speeds.
We recommend: Replacing the fog lamp on a Lada Priora (VAZ Priora)
Causes of malfunctioning fuel pump
Fuel pumps are different. It all depends on the specific brand of car and the characteristics of the pump itself.
Knowing the causes of problems in the vehicle’s fuel system is a necessary condition for its successful repair. Problems may arise for the following reasons:
- Wiring problems: Wires have become dirty, rusted, or melted. As a result, the electric voltage decreases and fuel pumping becomes more difficult.
- Debris and dust getting into the gas tank. Rust in the tank. As a result, the fuel becomes unclean and causes problems. Poor quality fuel also pollutes the gas tank.
- Filter dirty. Fuel pressure decreases and the functions of the device are weakened.
- Driving with an empty tank. This leads to a decrease in pressure and overheating. It dries out and becomes damaged.
To effectively treat a living organism, it is important to know not only the symptoms, but also the causes of the disease. It’s the same with the operation of car systems: you need to find out the causes of problems in the operation of the fuel pump
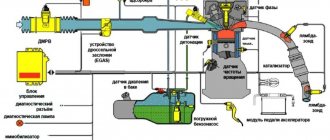
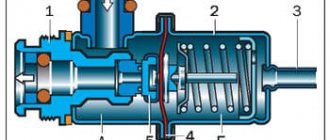
The gasoline pump is one of the key elements of the automobile fuel complex. It is responsible for transferring fuel under pressure to the injectors (when the car uses a system in which fuel is injected) or to the carburetor. Like other parts of the car, the pump may stop working properly.
Video: How the fuel pump works
The device can be mechanical or electrical. It all depends on its functional characteristics and structure.
How to check functionality
This is easy to do at home. First you need to remove the pump and place it in a vice. Then connect a hose to each branch pipe. One hose must be directed into an empty container, and the other into a container with gasoline. The mechanism must be pumped by hand. If the fuel moves from hose to hose, then you can be happy. This means everything is fine. If this does not happen, then most likely the part needs to be replaced.
Video: When the fuel pump is sick
Knowledge of the operation of all vehicle systems and experience in troubleshooting them will help save money and provide invaluable assistance in the event of a breakdown far from populated areas.
The fuel pump does not pump: reasons
If the fuel pressure is below the permissible level and the pump stops working, you need to figure out the reasons why the fuel pump is not pumping fuel.
If there is no noise from the pump, that is, it does not turn on when the ignition is turned on:
- You need to check the 12 Volt power supply, the ground on the fuel pump chip. If the relay does not operate, add the electronic control unit “brains”. If there is no voltage, find and eliminate the cause in the vehicle's electrical circuit.
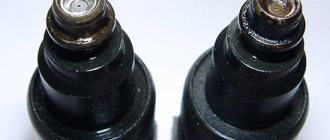
- Next, if there is voltage and ground, check the integrity of the wires inside the pump; to do this, you need to remove it from the tank and disassemble it. A common occurrence on VAZ modules is burnout of the chip in the fuel pump housing. Then you have to change both the chip and the top connector on the module body.
- If everything is in order here, but the engine does not start, connect 12 volts from the battery to the module and check the noise of the pump. If the fuel pump doesn't work, it's dying. Replace the fuel pump motor.
If the fuel pump works but does not pump gasoline, check:
- Rail fuel pressure
- Clogged pipelines, fine and coarse filters.
- Fuel pressure regulator for performance. It is located on the ramp or in the fuel pump module in the tank.
It is common for water in the tank to turn into ice in winter. Accordingly, the pump works, but does not produce the required pressure.
If the electric fuel pump works, then it doesn’t work:
- Disassemble the pump module
- Check the chip for contact burnout, as shown above.
- Check the relay and contacts on the brains.
There are times when the fuel pump stops working while driving. This is a very unpleasant situation, especially in the city, in traffic and traffic jams.
When the fuel pump is replaced and it burns out again, you need to check the fuel system completely.
How to check relay operation
What is a fuel pump relay? This is a special device that ensures the supply and termination of electrical power to the fuel pump at the command of the electronic control unit (ECU). On vehicles equipped with an automatic transmission system, a relay will be activated when the heavy acceleration mode needs to be activated.
Where is it located? The location of the relay depends on the model and make of the machine. On some vehicles it is located close to the injection control unit. On others, it's under the dashboard near the fuse box. There are other options.
Signs of problems at work
The fuel pump is controlled using a relay as follows: the key inserted into the lock is turned, thus turning on the ignition; After this, the fuel pump runs for about two to three seconds. This is enough to build up pressure in the fuel rail. A click should then be heard, indicating that the relay turns off the mechanism. After this, the pump will operate if two conditions are met: the engine is rotated by the starter at startup and the motor subsequently operates independently. When the ignition is turned off and the engine stops, the relay immediately or after one second turns off the fuel pump.
There are models where the relay limits the speed of the internal combustion engine if its number approaches the maximum. Fuel stops flowing to the engine and the speed drops. The power supply to the pump is then restored.
There are fuel systems in which the fuel pump starts working not when the ignition key is turned, but when the car owner opens the door. This helps to start the engine and create the required pressure inside the fuel system in advance.
Due to malfunctions in the relay, the device is deprived of the necessary power. It may buzz or hum for a very long time. It does not stop working a few moments after reaching the required pressure level in the fuel system. If there is a malfunction in the relay, the engine may not start at all because the pump does not pump fuel. When the car constantly hums or hums, the relay gets stuck and the battery energy is wasted to continuously rotate the pump motor.
How to check it yourself
First of all, you need to find the fuel pump fuse and its relay to check their operation. The relay may become hot and operate untimely or not operate at all due to problems with the fuse.
Checking the fuel pump relay yourself
The simplest relay models have 4 contacts. Two go to connecting wires from the fuel pump motor. The other two are designed to receive a control signal from the electronic control unit. We check the presence of power at the control contacts of the relay coil - terminals 85 and 86, by alternately touching the negative contact of the battery. If there is power on one of the contacts, the lamp will flash, which means the control circuit is working. The relay contacts are numbered in accordance with DIN 72552 standards. For this reason, their purpose on the wiring diagrams of all cars will be similar. If control terminals 85 and 86 are working properly, you need to check the presence of voltage (twelve volts) on leg 87 of the fuel pump control relay relative to ground. If the light does not light up, you need to check the integrity of the circuit fuse and wiring
The simplest test method is to install a working device. Another way is to connect a control light in place of the relay. When the ignition key is turned, the light should light up.
Even during the test, you can install a jumper on the terminals. If after turning the ignition key the pump starts to work, this indicates problems in the operation of the fuel pump control device.
Another method of testing a relay can be considered using the example of the VAZ 2110. The fuel system pump relay in this car is located near the fuse. For diagnostics, you need to take a multimeter or test lamp with a current not exceeding 0.25 A.
After this, you need to measure the current voltage at the terminals of the device one by one. At the same time, it is important to fix the contact going to the mass. This way you can definitely find out whether the relay needs to be replaced. If the light does not light, then the fuse is fine. In this case, you need to examine the wiring leading from the relay to the electronic control unit.
It should not be ruled out that there may be malfunctions in the motor control unit. In addition, you need to know that the relay may malfunction; it may not function normally or become stuck due to malfunction or poor installation of the alarm. The reason for this is that the security and anti-theft interlock devices stop the power supply to the fuel pump.
Video: Disassembling and ringing the fuel pump relay
Checking the serviceability of the fuel pump on the injector
When, when you turn the ignition key, you hear a slight buzzing, a slight hum, this is how the fuel pump works, pumping gasoline creates pressure in the system. If, when you try to start, there are no such signs of the fuel pump working, then you can assume a malfunction of the electrics, the pump itself or its individual parts. Therefore, let’s look at how you can check the operation of a gas pump using a step-by-step logical chain. Starting from whether power is supplied to the fuel pump and ending with whether the fuel pump pumps at all, and if so, what pressure is created in the fuel rail.
Step 1: Checking the fuse
Checking the fuel pump fuse involves inspecting the integrity of the conductive plate and, if broken, replacing it. But if there is no new fuse, then wind one strand of copper wire around the fuse contacts. If it burns out again, it means the problem may be in the wiring.
Stage 2: Checking the relay
To check the fuel pump relay, remove it from the socket and connect a 12 volt light bulb according to the diagram. If the light bulb works, the relay itself is also working properly. An alternative is to use a multimeter in ohmmeter mode to measure the resistance of the relay coil winding. One probe is connected to terminal 85, and the other to 86. The device will show a break if the relay has failed.
Make sure that the terminals are not oxidized - this will negatively affect the power supply to the fuel pump engine!
Stage 3. Checking the power supply to the BN
Checking the fuel pump voltage is done using a multimeter . The probes of the measuring device in voltmeter (from 0-20 volts) must be connected to the power terminals of the fuel pump. Turn on the ignition and take readings on the device. 12-12.5 volts is normal operating voltage. If there is voltage, but the pump does not work, check the electric motor.
Stage 4. Checking the fuel pump motor
To prevent damage to the electric motor, we supply 12 volts directly from the battery to the fuel pump terminals. It works - we check its performance, check valve, measure the pressure with a pressure gauge. If it doesn’t work, check the coil for a break.
When voltage is applied to the terminals of the gasoline pump, does it not work? Let's check the stator winding: take a tester (multimeter) and switch it to ohmmeter mode, it should show resistance, otherwise there is a problem with the winding and it needs to be replaced. If there is a resistance reading, the problem may be that there is a short winding on the fuel pump body. The tester probe goes to the positive terminal, the second one goes to the body. If it shorts, there will be no break.
Step 5. Checking the coarse filter
By removing the coarse filter (see vehicle technical documentation) from the fuel pump, you can even visually determine how dirty it is. If there is a large amount of deposits, it is recommended to replace the filters; if the problem occurs on the road, use a brush and gasoline to clean it.
Step 6: Check the check valve
The check valve must constantly prevent the movement of liquid in the opposite direction. During operation, its performance decreases, which reduces its technical characteristics.
1 way . Checking the check valve involves measuring the pressure with a pressure gauge. It needs to be connected to that part of the system that is directly involved in supplying fuel to the internal combustion engine. Pressure readings should not exceed 3 kg/sq.m. see (true for passenger cars). And when the engine is stopped, the pressure should not drop sharply.
Checking and cleaning the check valve
Method 2 . To check the operation of the fuel pump check valve without a pressure gauge, you need to clamp the return line and watch how the engine operates. If the check valve is faulty, the internal combustion engine will operate at higher speeds (provided there are no other problems).
3 way . Combines diagnostics and cleaning of the check valve at the same time. Remove and inspect it—clogging that requires cleaning can be seen with the naked eye. You can blow out the valve with a dense stream of air, but it is better to pass water through it under pressure. This way you combine checking the valve with cleaning it. If after this the valve does not work, it needs to be replaced.
Step 7. Pressure check
In order for diagnostics to correctly determine pressure readings, you need to reset the initial fuel pressure by turning off the fuel pump fuse.
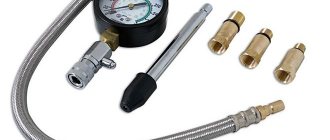
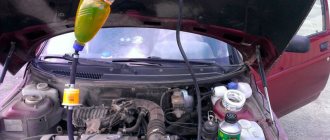
Checking with a pressure gauge how the fuel pump pumps
How to check a fuel pump with a pressure gauge
You can check the fuel pump with a pressure gauge for serviceability as follows: connect the device to the fuel rail. The output is through the edge of the hood onto the windshield, where we install the device securely.
We record measurements in:
Static position . Turn the ignition key and look at the pressure gauge readings, they should not exceed 3.7 atm .
Dynamics . We turn on third gear (speed about 50 km/h), observing the pressure gauge data. When driving, if the problem is pressure, the readings will be either below 3 atm. , or above 3.7 atm .
What to do if it starts buzzing, humming and stops pumping
This is another serious problem. Electricity is supplied to the pump, but the required pressure is not built up in the fuel line. The pressure at which the device can operate must be more than three bar. The exact figures depend on the make of the vehicle.
Pressure is generated in the fuel rail. It should be equal to 300 kPa or more. In order to measure it, a pressure gauge is used. In this case, it is necessary to take into account the norms for a specific machine. Let's take the injection VAZ as an example. At the moment when the ignition key is turned, a pressure of 3 atmospheres is created, during idling - 2.5 atmospheres, while pressing the gas - 2.5–3 atmospheres. In this way, you can reliably determine problems in the operation of the fuel pressure regulator in the rail, a problem in the operation of the fuel pump associated with its breakdown or expiration of its service life. This will also help you find out if the filters are dirty.
Fuel rail pressure: how to check, what it should be, symptoms of a malfunction
Diagnosis of the fuel system cannot be completed without checking the pressure in the fuel rail. If there are problems with the fuel supply, this will affect the overall operation of the engine: its start-up, acceleration, idling and other modes. The driver can check the pressure in the fuel system rail independently; no special diagnostic equipment is required; a simple pressure gauge is sufficient. In this article we will look at how to check the pressure in the fuel rail.
When to check fuel rail pressure
If problems arise in the fuel system, with a high degree of probability they can be associated with rail pressure.
The following main malfunctions can be identified that indicate the need to check the pressure in the fuel system:
- The car began to consume significantly more fuel;
- The engine operates unstably at idle, including stalling;
- The motor is tripping;
- Engine exhaust contains high CO content.
The malfunctions listed above are also typical when a number of other problems occur. In particular, before checking the pressure in the fuel rail, it is recommended to make sure that the electronic control unit is working properly.
How to check fuel rail pressure
To check the pressure in the fuel system of a car, you will need to acquire a pressure gauge with a measurement limit of no more than 7-10 atmospheres. Such a range is recommended due to the fact that with a larger maximum measured pressure on the device, it will be difficult to determine the minimum values, that is, an error will arise.
In addition to the pressure gauge, for measurement you will need to acquire a rubber tube that can seal the connection between the device and the fuel rail. It is also recommended to purchase a clamp to tighten the connection.
Before starting diagnostics, turn off the engine and open the hood. To check the pressure in the fuel rail, you need to do the following:
- Pull a rubber hose onto the threaded connection of the pressure gauge;
- Remove the cap from the fuel rail, and then the nipple. Please note that if the car engine was running shortly before starting work, it is recommended to “bleed off the pressure” before unscrewing the nipple. To do this, you need to take a rag and press it on the spool, as a result of which the remaining fuel will come out;
- When the nipple is removed from the fuel rail, you can tighten the second side of the rubber hose;
- If there are clamps, tighten the hose connections to the device and the ramp;
- Next, start the engine and make sure that the system is well sealed and no gasoline is leaking through the hose connection to the ramp;
- After this, you need to check the engine under various conditions, taking readings from the pressure gauge:
- When the engine starts;
- Idling;
- With the tube removed from the fuel pressure regulator;
- When the drain tube is pinched.
- The results obtained must be compared with the reference ones.
What should be the pressure in the fuel rail?
Depending on the characteristics of the engine, the pressure in the fuel rail will vary. You can find out the system pressure values for a specific car from books on the technical operation and maintenance of the car or on specialized forums. Here are approximate pressure values in the fuel rail:
- Engine start: at least 3 atmospheres;
- At idle: about 2.5 atmospheres;
- With the tube removed from the fuel pressure regulator: about 3.3 atmospheres;
- With the drain tube pinched: about 7 atmospheres.
Please note that after pumping fuel into the ramp and turning off the engine, the pressure should drop to a level of 0.7 atmospheres and stay there for some time. If the pressure immediately drops to zero, there is a high probability of problems with the fuel pressure regulator or fuel pump. Also, problems with the fuel pump will be indicated by a drop in pressure when the speed increases.
In a situation where the fuel pump cannot create the necessary pressure in the system for a long time, you need to check the fuel filter and the fuel pump mesh. Also pay attention to the compression in the engine cylinders.
In addition, pressure problems can be caused by more serious problems, such as improper operation of the throttle position sensor or mass air flow sensor.
( 417 votes, 4.52 out of 5) Loading...
Source: https://okeydrive.ru/kak-proverit-davlenie-v-toplivnoj-rampe/
Fuel pump pressure problems
The easiest way is to purchase your own pressure gauge to measure the pressure in the fuel system. Then you won’t have to pay for this service at the service station.
The pressure in the pump may not reach normal. Because of this, the engine simply does not start or starts with great difficulty, jerks, works intermittently and fails. If the reason is a problem with the pump itself, and not the filter, then most likely you need to clean the mesh designed for rough cleaning. Then you won't have to change it.
Problems also arise due to a breakdown of the relay, electric motor or fuse of the fuel pump, or a malfunction in its ground.
Other reasons why the device does not hold pressure:
- hole in the fuel system;
- problems with the check valve;
- malfunction of the pressure regulator;
- the injectors are leaking.
Using a pressure gauge you need to connect to the fuel system. Then you need to start the car and set the pressure level. If the pressure is 2.9 kg/cm², then the engine must be turned off and then started again.
Use the valve on the pressure gauge to close the line and immediately turn off the engine. If the pressure is normal, the fuel pump and valve are working properly. If after opening the valve the pressure drops, then the injectors or fuel pressure regulator are not working properly.
The valve may be stuck in the pressure regulator. You need to start the car, remove the tube from the intake manifold. If the pressure immediately begins to rise, the valve must be returned to its place. The pressure should now immediately begin to drop. And repeat this several times. Turn off the engine. If the pressure holds, then everything is fine.
Video: Checking the pressure in the VAZ fuel rail
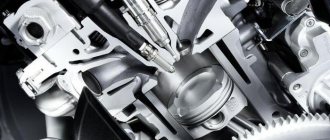
Fuel pump diagnostics
Without exaggeration, a car’s fuel pump can be called one of the most important components, since it ensures a uniform supply of fuel to the engine. Agree that without such an important detail, driving a car would be problematic.
Previously, instead of a gas pump, simple hoses were used, which operated according to the well-known law of communicating vessels of Archimedes, and this made serious adjustments both to the design of the car and to the ride quality - the pressure in the system was impossible to regulate.
There are currently two types of fuel pumps in use:
- mechanical;
- electric.
The first type is used in carburetor engines and its main task is to maintain constant pressure in the fuel system. Electric ones are more advanced; they are installed on cars with an injector; the pressure and volume of fuel entering the engine are regulated using electronic sensors.
As experienced motorists say, the gas pump can operate in two modes:
- works;
- does not work.
This is, of course, a joke. It would be possible to add an intermediate stage - “it works, but poorly.” What does this mean?
Symptoms of a fuel pump failure
It is easy to guess that if the fuel pump starts to work intermittently, then the problems will be very serious - fuel will be supplied to the system incorrectly. As a result, the following surprises can await us while driving:
- problems with starting - when you press on the gas, you feel dips, traction disappears, then suddenly appears, the car “undermines”;
- the car starts the second or third time, although the starter works normally;
- at high speeds the car twitches - this is due to an uneven supply of gasoline;
- loss of traction;
- the engine stalls when you press the gas - this is the last stage when the fuel pump really does not work.
What causes all these problems? The pump has failed or the fuel filter is clogged.
The fuel filter is a separate issue; in almost all systems it is located behind the fuel pump; therefore, unrefined gasoline passes through the pump, which may contain a large number of small mechanical particles.
And although such problems are not terrible for the fuel pump, over time they still appear - the fuel pressure drops, the pump operates noisily.
This is especially pronounced when starting the engine - the starter takes the lion's share of the battery's power, the voltage in the network drops, and a worn-out pump is unable to provide a sufficient flow of fuel. As a result, the engine stalls.
Checking the fuel pump - diagnosing problems
You can check the fuel pump in different ways: external inspection, measuring the pressure in the fuel system, using a tester or a light bulb - the choice depends on the type of pump.
External inspection can only be used for carburetor cars, since their fuel pump is mounted outside the tank. It should also be said that such cars may have two pumps to operate in different modes. They can be located either under the hood or directly in the gas tank area.
If during a visual inspection you find that there is a fuel leak or you smell gasoline, this may indicate wear on the gaskets. In this case, you will need a repair kit, as well as a set of tools for dismantling the pump and disassembling it. The following parts may need to be replaced:
- nylon mesh filter;
- suction and discharge valves - they are checked by supplying air to the discharge fitting of the pump; serviceable valves should not allow air to pass through;
- the diaphragm assembly and the spring that compresses them - the diaphragms must be without damage, the spring must be elastic;
- pusher - there should be no damage or hardening on it.
The pressure is checked using a pressure gauge, which is connected to the fuel rail, and the pressure gauge dial is placed on the windshield.
With the engine running and idling, the pressure gauge readings are checked - they must correspond to the data from the instructions - 300-380 kPa. This value should remain stable even when moving. Try accelerating to third speed and see if the pressure gauge readings have changed - if they have dropped, it means the pump does not maintain the required pressure level.
In addition, the pressure in the system may also drop due to fuel leaks from the fuel hoses. A visual inspection for leaks will be required. Such problems are corrected by replacing hoses, filters, and so on.
The problem may also be that the pump relay is malfunctioning. You can check it by connecting it to the light bulb connectors or using a screwdriver with an indicator. When the ignition is turned on, the indicator lights up - this means the problem is not in the fuel pump.
You can carry out such checks yourself, but in specialized services mechanics will be able to easily diagnose any breakdown, because traction can drop and the engine stall not only because of problems with the fuel pump.
In this video you will learn why the pump does not pump, as well as how to troubleshoot problems associated with it using specific examples.
This video is about checking and testing the fuel pump.
( 1 ratings, average: 5.00 out of 5)
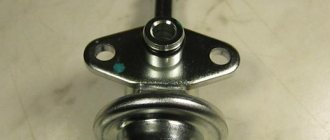
Problems with the operation of the vacuum type device
The vacuum pump may malfunction. This can happen for several reasons:
| Problems | Causes | Solution |
| Insufficient vacuum | Insufficient oil level | Add oil to the required level |
| The oil has become dirty | Dirty engine. The higher the alkali content in the oil, the faster the engine cleans and the oil turns black. | Replace the oil with clean oil. If the alkali content is high, replacement is required after 5,000 kilometers. |
| The oil fill hole is clogged | Small particles on the surface of the lid | Clean the inlet and rinse the filter |
| The integrity of the hoses is compromised | Wear, mechanical damage, hose connection failure | Check hoses and their connections |
| Insufficient pump power | Loss of voltage from the generator to the pump due to unsuccessful implementation of standard wiring, insufficient device size | Replace the wiring or purchase a new part of the required power |
| Oil started leaking | The integrity of the oil container is damaged | Replace container |
| The cover of the hole for draining the oil does not fit well or the rubber ring has become unusable | The thread of the cover is torn off, the ring is worn out | Replace the cover and replace the gasket |
| Oil splashes | Permissible oil level exceeded | Drain some of the oil to the desired level |
| The pressure at the air evacuation fitting has been exceeded | Insufficient pump power | Install a more powerful pump |
| The pump is hard to start | The temperature has become too low | The device must be turned on and off several times in a row or the oil must be heated |
| Breakdowns in the electrical part of the pump | Voltage surges, short circuit | Check and eliminate breakdowns |
| Garbage has accumulated inside | Dirt in the gas tank | Examine the contents and remove the blockage, clean the gas tank |
Car won't start after DIY replacement
This is a fairly common problem. It must be said that the car should not start immediately after replacing the pump. The pump first needs to create operating pressure in the system. To do this, you need to turn on the ignition for a short time (a few seconds). The key must be inserted into the lock, but not turned. The lights on the dashboard should light up. Then you can rotate the engine with the starter for five to ten seconds. If nothing works out, then you should take a break for half a minute and repeat your actions.