Carburetor assembly 2105, 2107 Ozone
After complete disassembly of the 2105, 2107 Ozone carburetor, it is necessary to reassemble it. Assembling the Ozone carburetor requires knowledge of certain features for the correct installation of parts. Let's look at them.
For assembly you will need tools - Phillips and slotted screwdrivers.
How to assemble a carburetor 2105, 2107 Ozone
We assemble the three main parts of the carburetor one by one (cover, body, throttle body), then connect them together.
— Assembling the carburetor cover Ozone 2105, 2107
Details about the process of assembling the cover: “Assembling the upper part - the “cover” of the carburetor 2105, 2107 Ozone.”
— Assembling the Ozone carburetor body
Details about housing assembly: “Assembling the carburetor body 2105, 2107 Ozone.”
— Assembling the throttle valve block of the Ozone carburetor
The assembly of the throttle valve block for different modifications of the Ozone carburetor may differ in some details (carburetors with and without EPHH and a microswitch). Read more: “Assembling the lower part of the throttle valve block of the carburetor 2105, 2107 Ozone.”
— Attach the throttle valve block to the carburetor body
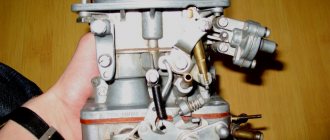
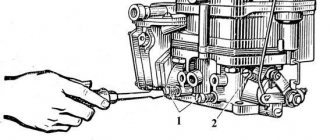
See photo above. One end of the air damper drive rod is threaded into the hole in the lever on the throttle axis of the first chamber. The other one into the upper hole of the three-arm lever. To do this, remove the three-arm lever with the spring bracket by unscrewing the screw securing it. We attach the rod in exactly the same position as in the image.
Attach the telescopic rod to the carburetor
Install the return spring. We hook it to the hook of the bracket and the hook of the locking lever.
Installing the return spring
We put the tip of the pneumatic actuator rod on the finger of the intermediate lever on the axis of the throttle valve of the second chamber. Secure with a locking split washer.
We secure the block with two screws.
Secure the block with two screws
— Attach the upper part - the “cover” of the carburetor to the body
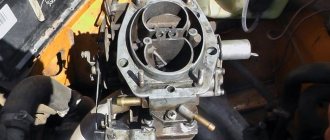
Install the cardboard spacer. We insert the float into the float chamber so that it does not bend the lever or change its position.
Attach the cover to the body
We attach the telescopic rod. One end of it is attached to the hole in the air damper lever, the other is inserted into the groove of the boss of the three-arm lever. To install it into the groove, squeeze the telescopic rod housing with your fingers or a slotted screwdriver.
We insert the tip of the telescopic rod into the groove of the boss on the three-arm lever
We secure the cover to the body with five screws.
We tighten the five screws securing the carburetor cover
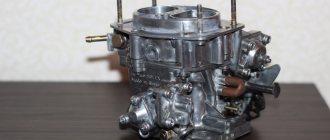
Carburetor 2105, 2107 Ozone is assembled and ready for installation on the engine and subsequent adjustment and tuning.
Notes and additions
— When connecting the body and the lower block, the body and the cover, we ensure that the tubes and holes for them coincide. In no case do we tighten the parts with force; they should fit easily when installed correctly.
Twokarburators VK - More information on the topic in our VKontakte group, on Facebook Twokarburators FB and on Odnoklassniki - Twokarburators OK
More articles on carburetor 2105, 2107 Ozone
— The design of the upper part - the “cover” of the carburetor Ozone 2105, 2107
— Design of the carburetor body Ozone 2105, 2107
— The device of the lower part - the throttle valve block of the carburetor 2105, 2107 Ozone
— Carburetor diagram 2105, 2107 Ozone
— Checking the float in the float chamber of the Ozone carburetor
How to remove a carburetor: step-by-step instructions
To remove the carburetor from the engine yourself, you will need a simple set of tools and preparation of the workplace. To carry out the procedure for removing the carburetor with your own hands, you must prepare in advance:
- 3 mm slotted screwdriver;
- 4 mm cross-head screwdriver;
- wrench 7;
- wrench 8;
- socket wrench 13.
You will need to clear a place near the hood so that nothing interferes with work. To make the procedure easier, it is recommended to unscrew the screws securing the air filter box with a screwdriver and remove it. The following steps are aimed entirely at removing the carburetor:
- First you need to disconnect the wire tip from the DAAZ solenoid valve.
- Using a Phillips screwdriver or a 7mm wrench, you need to loosen the clamp located on the fuel hose. The hose comes out of the carburetor fitting and must be removed and set aside.
- The air damper drive tip screw is also disconnected in the same way. The drive rod must be unscrewed and removed.
- A spring is removed from the first internal combustion chamber, which is responsible for opening/closing the throttle valve.
- All tubes suitable for the carburetor must be disconnected in order: first the tube that goes directly to the economizer, then the vacuum hose and the crankcase ventilation hose.
- Using a slotted screwdriver, remove the end of the throttle valve supply rod in the first chamber.
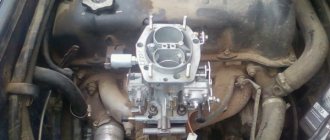
- Next, use a 13mm wrench to unscrew the 4 nuts that secure the carburetor body to the engine manifold. Three nuts are located on the outside of the device, and the fourth is on the back.
- The carburetor is removed from the studs along with the gasket on which it was installed.
Disconnecting all tubes and hoses, removing the carburetor
It is recommended to perform all actions carefully so as not to damage nearby wires and devices.
How to clean carbon deposits from jets, float chamber, throttle valve
Removing the carburetor involves carrying out related work. Most often, the carburetor and its components require cleaning and washing to remove accumulated dirt and carbon deposits . In this case, you need to know how and with what you can clean the various elements of the carburetor at home.
Cleaning the jet involves using copper wire or a toothpick. It will not be possible to completely clean carbon deposits and dirt, but it is quite possible to remove the main accumulations from the nozzle. The use of special cleaning products is not recommended. After removing dirt, you can blow out the jets with a can of compressed air or through a compressor.
The float chamber must be washed with a special carburetor cleaner. They can be purchased at any auto store at a low price. An alternative option for washing is solvent 642. The liquid is poured into the chamber, stirred periodically, and drained after two hours of operation. The camera is thoroughly wiped with a soft, lint-free cloth and dried.
The throttle valve can be washed and cleaned using cleaners or kerosene. It, along with other metal parts of the carburetor, can be lowered into a container with cleaning liquid, kept in the solution for about two hours, then blown out and wiped dry.
Carburetor adjustment
It is important to carry out adjustment work on the carburetor only after thoroughly flushing and cleaning all its components. Adjustment is not particularly difficult; it is important to simply follow the manufacturer's recommendations.
How to adjust idle speed on a DAAZ carburetor
To carry out the adjustment procedure, you will need to place the car on a level surface, then:
- Start the engine.
- Warm up the power unit to the optimal temperature.
- Turn off the engine.
- Using a screwdriver and a quality screw, set the maximum number of revolutions, and use the quantity screw to designate the value of 100 rpm as exceeding the norm.
- Start the engine again and evaluate the existing idle speed settings.
At home, you will have to carry out this procedure more than once to achieve the desired result. As a rule, service stations use a CO2 analyzer, which simplifies carburetor adjustments.
Video instruction: how to make idle stable
How to adjust fuel consumption on a DAAZ carburetor
The use of carburetor power units allows minimizing fuel consumption. However, this will require adjustment of the dosing system strictly according to the manufacturer’s instructions.
Minimizing gasoline consumption is achieved by reducing the productivity of the dosing system - its depletion can most easily be achieved by reducing the diameter of the nozzles. So, on VAZ 2105 carburetors you can install a jet with a diameter of 1.8 mm, and on a VAZ 2107 carburetor - 1.6 mm. That is, the diameter of the throughput device should be 0.05–0.10 mm less than that installed at the factory.
It should be noted that in the first days of operation after replacing the jets, jerks in the operation of the motor are possible. This is a normal phenomenon, since the entire operation of the system is adjusted to an economical operating mode.
Video instruction: how to properly adjust the dampers to reduce fuel consumption
Repairing the accelerator pump on a Solex carburetor
Weak and crooked fuel streams are signs of clogged fuel channels. It is necessary to remove the UN atomizer by prying it by the upper tube with a slotted screwdriver. There is a ball inside the nozzle that acts as a pressure valve. If you shake the atomizer next to your ear, you should hear the beating of the internal body.
The absence of sounds indicates severe blockage. The nozzle should be cleaned with compressed air using: a compressor, pump or pneumatic cylinder. If blowing does not produce results, then you need to add a thin wire to the air. It is also possible to soak the nozzle in acetone for 1-2 hours. The absence of a positive result after cleaning indicates that the sprayer needs to be replaced with a new one.
Accelerator pump passages and valves
While the UN injector is removed, you can check the fuel supply to it. To do this, you should start sharply on the accelerator lever. A strong jet of gasoline will shoot out from the nozzle seat. If this does not happen and the pressure is weak and short-lived, it means that the channels and valves of the UN are clogged. They need to be cleaned.
To do this, pour a little acetone into the sprayer seat. Take a small brush (from spray bottles), a toothpick and clean the channel. The process is accompanied by blowing with compressed air.
You can unscrew the UN cover (with a curly screwdriver) secured with four screws. Then, carefully remove the spring and diaphragm. This gives access to the outlet.
Pour acetone or aerosol carburetor cleaner into the hole and clean the channel with wire. Then apply compressed air into the hole.
In the first float chamber there is a fuel suction channel UN. It must be cleaned in a similar way.
The removed diaphragm should be checked for wear and holes. If signs of defects are found, this element should be replaced with a new one.
Installing the UN cover in its place occurs in the reverse order. However, when tightening the screws, turn the pump lever all the way. This way the diaphragm will stretch and take its working position. Then install the nozzle in place and check the operation of the pump. If the UN is functioning properly, then the air filter housing should be put back in place.
The design of the Solex carburetor accelerator pump is easy to repair and maintain. This fact has earned special attention from fuel system tuning specialists.