Selection of types of jets for Solex 21073 carburetor. Everything you need to know
As a rule, they select the types of jets for the Solex 21073 carburetor while adjusting it on the engine.
Some drivers sometimes think that if a dream has come true, and Solex is finally installed on the car, then all problems will be resolved at once. But it was not there! The main work only begins after installation. Solex, designed to save you money on fuel resources, in order for it to function correctly, it also needs to be finely tuned. It’s good if you know a carburetor mechanic. And if not? You can try to make the adjustment yourself, but for this procedure you need to know at least more information about the carburetor itself.
Content
The engine sucks air through the diffuser, and a certain amount of gasoline through the fuel nozzle. The volume of air and fuel sucked in depends on the volume of the engine. Therefore, the trend is to install a small jet for a larger engine volume. And if you have to install a similar Solex 21073 carburetor on a small engine (for example, 1.5), then the standard jets are poor (that is, they give an unsaturated mixture).
Therefore, we can say that it all starts with the fuel nozzle - its selection and settings. Afterwards, for the second time, you need to pick up an air one for it. Start strictly with the first camera until you have set it up; it is not recommended to work on the second one under any circumstances.
Rule:
We select the jets according to the engine volume. And before starting the setup, it’s best to find a factory Solex that matches the volume of the unit on your car, and rearrange (or install the same) jets from it.
Selection Basics
If we install, for example, Solex 21041 (volume 1.8) on a 1.5 engine. This carburetor has a 24x26 diffuser, fuel volume is 102.5, which is not enough for a 1.5 engine. We are looking for a match between the chambers and the diffuser. We find the closest option: Solex 21073. It has a 24x24 diffuser and a TJ - 107.5. And the first cameras are almost identical. By the way, if the diffusers are almost the same, and the engine volume is smaller, then the intake of gasoline will be less (the jet is rather poor). This means that we need fuel jets (fuel jets) from 110. Let’s get a few.
Next you need to decide
, what do you want to get: economical slowness or costly acceleration. Depending on the decision, we also select a fuel mixture: to adjust the enrichment or leanness of the air-fuel mixture (a lean mixture will lead to gasoline savings, but will affect the acceleration dynamics of the car).
Setting up the carburetor 2108, 21081, 21083 Solex: 3 comments
Either Solex 2108-1107010, designed specifically for the 1.3 engine, or Solex 21083-1107010, designed for the 1.5 engine (fuel consumption may increase slightly with it). The carburetors are identical, differing in the fuel and air jets of the main metering systems.
good afternoon.. I have a VAZ 2109 carburetor - 1.3 l 64 hp.. tell me which carburetors are suitable for me? give a few names and their numbers....we don’t have a choice of carbu artists? THANKS IN ADVANCE
— We check the operation of the accelerator pump.
While the carburetor is removed from the engine, it is possible to fine-tune the flow of fuel jets from the accelerator pump nozzle. Ideally, the jets should not touch the damper, chamber walls, etc., and should fall clearly downwards. Pour water into the float chamber and sharply press the throttle valve drive lever of the first chamber, holding the carburetor in front of you. If the drop of the jets does not correspond to the required one, bend the spray tubes. By performing this operation several times, you can achieve almost perfect operation of the accelerator pump. It is better not to pour water because it will react with the metal of the carburetor, a white coating will form, and this, in turn, will clog the channels. verified by my own experience.
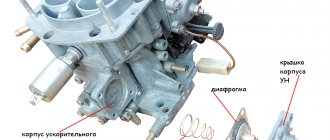
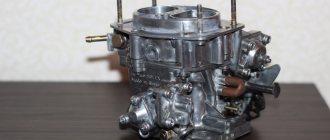
Carburetor jets 21073 Solex
The Solks 21073 carburetor of the Niva 21213 car has several jets in different systems. They allow you to accurately dose fuel, air, and emulsion entering the engine.
Fuel jets of the main metering systems (GDS) of the 1st and 2nd chambers of the Solex 21073 carburetor
The first chamber is 107.5, the second chamber is 117.5. See photo below.
Air jets of the main metering systems of the 1st and 2nd chambers of the Solex 21073 carburetor
The first chamber is 150, the second is 135.
fuel and air jets of the main metering systems (GDS) of the 21073 Solex carburetor
Calibrated hole in the fuel bypass fitting to the gas tank (return fitting)
calibrated hole in the fuel bypass fitting to the gas tank (“return”)
Fuel jet of the idle system (IAC) of the 21073 Solex carburetor
Calibration data - 39-44.
fuel jet of the idle speed system (IAC) of the 21073 Solex carburetor in the solenoid valve (EMV)
Air jet CXX carburetor 21073 Solex
air jet of the idle system (IAC) of the carburetor 21073 Solex
Fuel jet of the transition system of the second chamber of the carburetor 21073 Solex
See photo below. Marking - 70.
Fuel jet econostat carburetor 21073 Solex
econostat fuel jet and fuel jet of the transition system of the second chamber of the carburetor 21073 Solex with tubes
Fuel jet for economizer of power modes of carburetor 21073 Solex
fuel jet for economizer of power modes of carburetor 21073 Solex (economizer cover removed)
Notes and additions
— The location and number of Solex jets 2108, 21081, 21083 and other carburetors of this family are similar to the Solex carburetor 21073. Only their calibration data is different. Read more: “Solex carburetor jets.”
— Solex carburetor jets of various modifications are interchangeable, which creates a wide field for tuning and modification.
More articles on the design of the 21073 Solex carburetor
How to disassemble the “cover” of a Solex carburetor
On our own, without help or advice from “knowledgeable” people, we will disassemble the upper part of the “cover” of the Solex 21083 (2108, 21081) carburetor.
This work is necessary when repairing the “cover” (replacing its parts), as well as cleaning if it is heavily soiled and dirt interferes with its normal functioning.
Necessary tools and equipment
Phillips and slotted screwdrivers
Spanners for “11”, “13”, “14”
Punch 2-2.5 mm
Small hammer
Preparatory work
Remove the top part of the “cover” of the carburetor (you can remove it without removing the carburetor itself from the car’s engine). To do this, with the engine air filter housing removed, disconnect the air damper drive cable, fuel hoses, the end of the wire from the EMC, and then use a Phillips screwdriver to unscrew the five screws securing the “cover” to the carburetor body. Lift it up and remove it.
Self-disassembly of the “cover” of the Solex carburetor 21083 (2108, 21081)
— Remove the parts of the float mechanism
We place the “lid” on the studs on a horizontal surface. Using a drift and a hammer, we knock out the axis of the float lever from the racks. Remove the floats and the needle of the fuel shut-off valve (its loop is placed on the tongue of the float levers).
We remove the floats from the Solex 21083 (2108, 21083) carburetor using a drift and a hammer
Remove the cardboard “lid” gasket. If it doesn't come off well, pry it off with a knife.
Using a key set to “11”, unscrew the needle valve body. We take it out and the copper o-ring under it.
We turn out the needle valve body using a key set to “11”, remove it and the cardboard gasket of the “cover” of the Solex 21083 carburetor
Here are the details of the Solex 21083 float mechanism. There should be exactly that many (no more, no less).
Parts of the float mechanism of the Solex carburetor 2108, 21081, 21083
— Remove the carburetor fuel strainer
Using a key set to “14”, unscrew its plug, remove it and remove the filter.
Removing the carburetor fuel strainer
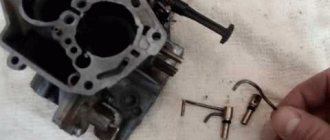
— We dismantle the carburetor solenoid valve (EMV)
We turn it with the key to “13”. To clean, pull the idle air system fuel jet out of the valve tip.
We unscrew the carburetor solenoid valve (EMV)
— Remove the carburetor choke control lever
Turn the carburetor “cover” on its side. Using a “14” wrench, unscrew the screw securing the lever (while holding the lever itself). We disconnect the lever from the cover, being careful not to lose the spring-loaded retaining ball installed under the lever.
Disconnect the choke control lever from the “cover” of the Solex 21083 (2108, 21081) carburetor
— We disassemble the carburetor starting device (PU)
Using an 8 mm open-end wrench, loosen the locknut of the starter adjusting screw. Using a thin slotted screwdriver, unscrew the adjusting screw of the starter. Using a Phillips screwdriver, remove the four screws securing the starter housing cover (the air damper opener mechanism). Remove the cover, diaphragm and return spring underneath it. A cardboard gasket is installed on the diaphragm. Often the diaphragm with the gasket “sticks” to the PU cover and (or). In this case, it is advisable to pry them off with a knife. To remove the L-shaped rod of the diaphragm from the groove on the “cover”, you need to open the air damper, remove the bend of the rod from engagement with the cotter pin on the triangular lever of the damper. Return the air damper to the closed position and remove the rod from the groove.
We disassemble the starting device of the carburetor 21083 Solex
— Remove the carburetor air damper and its axis with a lever
The screws that secure the air damper are slightly tapered to prevent loosening. Therefore, before unscrewing, we lightly file them in places of deformation. There is no need to grind them down too much, since they will still have to be installed back.
Using a Phillips screwdriver, unscrew the screws and remove the air damper from the slot in its axis. Simply by pulling it up with your hand. If it doesn’t pull out, we help ourselves with pliers (while trying not to damage the flap).
Remove the return spring from the triangular lever on the damper. We remove the axle from the hole in the “cover”.
Remove the air damper and its axis
— Turn out the fitting
Using the key to "13".
We unscrew the fuel supply fitting of the Solex 21083 carburetor
— Turn out the studs
Screw two nuts onto the stud. We tighten them and turn out the pin behind them with the key “8”. We do this with each hairpin.
That's it, the “cover” of the Solex carburetor 2108, 21081, 21083 is completely disassembled.
After disassembly, we assemble the upper part (“cover”) of the Solex 2108, 21081, 21083 carburetor according to the assembly instructions: “How to reassemble the “cover” of the Solex 2108, 21081, 21083 carburetor.
Notes and additions
It is advisable to disassemble the carburetor cover in a clean workplace so as not to lose parts or introduce debris into the channels and jets.
Twokarburators VK - More information on the topic in our VKontakte group, on Facebook Twokarburators FB and on Odnoklassniki - Twokarburators OK
More articles on checking and repairing the Solex 2108, 21081, 21083 carburetor
— The device of the “cover” of the Solex 2108 carburetor. 21081, 21083
— Disassembling carburetor 2108, 21081, 21083 Solex
— Assembly of the carburetor body Solex 2108, 21081, 21083
— Float chamber of the Solex carburetor 2108, 21081, 21083
— Solex carburetor clearances
How to choose jets for Solex?
With proper selection of jets for the Solex carburetor, the engine will operate smoothly and stably even under frequent loads. At the same time, you will also be able to save up to 35% of gasoline in city mode. First of all, you should decide on the main element, and then you can move on to the air element. Moreover, engine size is of great importance when selecting. If it is large, then it is better to use secondary jets of small cross-section. The diameter of parts with calibration holes in the first and second chambers may differ slightly.
You can easily find special tables that indicate the optimal ratio of fuel and air jet indices for Solex, and also predict the resulting mixture and even the behavior of the car. For example, if you take a fuel cell of high productivity, and an air cell, on the contrary, of low efficiency, then there will be an over-enriched mixture that will not ignite. A table will help you in the selection, which indicates the optimal diameter of all jets depending on the type of engine and brand of carburetor.
Jet index ratio table
It is very important to decide on the type and size of jets for Solex, but you also need to buy them. At this stage, you need to know what information is hidden by the numbers printed on the top of the elements. It is not uncommon when two designations are applied to the surface of a part, and a certain parameter is hidden in each of them. For example, the numbers “21” and “23” correspond to the outer diameter of the dosing element. By seeing the designation “95” or “97.5” on the main fuel jets, you can judge the performance, since this designation characterizes the throughput of the element. Air elements also indicate their capacity, but this value is usually between “125” and “155”.
Some people are sure that there is no need to rush to select new jets, and you can increase the throughput of a part by boring out its diameter. However, this operation should be performed only on high-precision equipment. In garage conditions, you cannot change the diameter of the jets using a drill or drill, as this will only ruin them. Therefore, if a part does not fit according to some criteria, you should purchase a new element that meets the requirements.
Lada 2108 Project ArhStyle › Logbook › Setting up carburetor 083 with your own hands)
In the first month of driving, the carburetor began to attract attention, the symptoms were basically like everyone else: idle jumps, sluggish dynamics, failures when pressing the gas pedal - let's get to work, removed it, cleaned it and blew it out - the result was not pleasing - the carburetor was overflowing with gasoline, the car stalled, I didn’t keep the rpm below 1500 (Attempt 2: We install everything according to the DAZ 21083 standard, use a repair kit. The result xx jumps, but not much, increased fuel consumption.
We don’t give up, we study theory and practice... Be sure to read the book “Solex Carburetors Maintenance and Repair” , editorial office “On our own” (www.uazbuka.ru/lib/carb/SOLEX.pdf) and watch the video:
We collect the necessary tool:
The position of the air damper is held not only by the “choke” handle, but also by a ball with a spring; if it is missing, the setting will be lost and the mixture will be enriched.
The XX jet should be without deformation, check the solenoid valve 12V, + to the terminal at the end, - to the valve body. The sound should be clear - without jamming; if we suspect it, we change it.
Failure when pressing the “gas” occurs due to the fact that the streams from the UN atomizer hit the wall of the diffuser, flow down and only then transfer the fuel to the intake manifold - we insert the nozzles into the first chamber and bend them so that the streams do not intersect each other and flow clearly between the wall and damper.
There is a second option: buy a UN sprayer from Niva and buy cam No. 4, but for me option No. 1 is better because It's always useful to have an overclocking reserve)
The adjustment is set according to the table. (table), the throttle valve of the second chamber should be almost closed.
In the future, you can play with the jets, but in general I got a decent non-floating XX, good dynamics, no failures and efficiency.
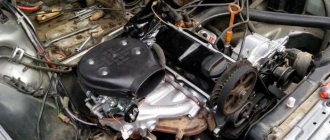
- The hood of the car is opened, all contaminants are removed from the surface of the carburetor, and the air filter is removed.
The VAZ 2108 air filter and sensor are removed
- After cleaning, check the tension of the throttle cable. The tension should not be too strong. At the same time, sagging should not be observed either. To adjust the tension, the tip nut, located on the protective jacket of the cable, is clamped with an open-end wrench to 13, and the lock nut is loosened with another wrench.
- After loosening the cable, the required distance between the tip and the nut is established. The rule is this: when the gas pedal is not pressed, the throttle closes completely. When the pedal is fully pressed, the damper opens completely.
Adjusting the throttle cable of the VAZ 2108 carburetor - After setting the required distance, the locknut is tightened, and the length of the damper cable is securely fixed.
- Now the free play length of the air damper rod is checked. When the drive handle is pressed fully, the damper is in the “open” position. If this is not observed, adjustment is required.
- The bolt that secures the rod to the lever is loosened with a 10-mm open-end wrench.
- Next, the damper lever is rotated, after which the drive handle is recessed into the housing.
- The choke cable is clamped with pliers, pulled out of the protective jacket to the required length, after which the fastening bolt is tightened.
- The drive handle is pulled out, and the closing angle of the air damper is controlled. If it turns out that the closure is incomplete, the fastening bolt is unscrewed again and the protective jacket on the cable moves slightly. These manipulations are carried out until the damper closes completely with the drive lever extended.
The length of the choke cable is adjustable with two open-end wrenches - The carburetor trigger is now adjusted. To do this, the air damper drive handle is pulled completely out of the housing.
- The car engine starts.
- The damper is opened approximately one third using a screwdriver.
The throttle valve is opened a third with a screwdriver - After this, use an open-end wrench to tighten the screw that regulates the volume of the supplied fuel mixture. It is tightened until the engine speed reaches 3300 rpm (readings during adjustment are taken using a tachometer).
- Once the above figure is reached, the damper is carefully closed, after which the lock nut begins to gradually loosen. It must be loosened until the speed reaches 2900 rpm.
- Once this figure is reached, the nut is fixed and the air filter is put in place.
- To regulate the idle speed, the number of crankshaft revolutions is increased to the maximum. This is done using a screw that regulates the quality of the fuel mixture.
Screws for adjusting the idle speed system of the VAZ 2108–2109 carburetor: 1 — mixture quantity adjusting screw; 2 — adjusting screw for the quality (composition) of the mixture; 3 - sealing ring; 4 — adjusting screw plug - Then, using a screw that regulates the volume of the supplied mixture, the number of crankshaft revolutions is reduced until a level is reached that exceeds the optimal idle speed by 100 rpm.
- After this, using a screw to adjust the quality of the mixture, the crankshaft speed is again reduced to the normal value (this is indicated in the car’s operating instructions). This completes the idle speed adjustment.