Why do injectors fail?
Contaminants can enter the fuel system along with gasoline. For cleaning, filters are installed that capture contaminants larger than 20 microns. Such filters are provided both on the fuel line and in the injector itself.
Gasoline contains heavy fractions. They settle on the injector seats, and over time turn into resinous growths. This leads to deterioration of the injectors or their complete failure.
How deposits appear
When the engine stops working, light fractions of the fuel evaporate on hot surfaces. Heavy fractions settle on parts, including nozzles. There is nothing to wash them off - fuel no longer flows.
Over time, the shut-off cone can no longer fit tightly into the seat - therefore, the tightness of the nozzle is broken. This leads to interruptions when starting the engine, as the pressure in the fuel line decreases. Resinous deposits clog the injector nozzle. As a result, the amount of fuel ejected by the nozzle in each operating act decreases.
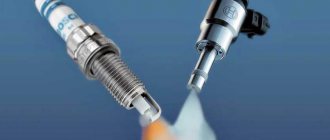
The spray pattern of the injector also changes. The sprayer has its own standards and tolerances. Solid contaminants lead to the formation of an irregularly shaped torch, fuel atomization occurs smoothly, and fuel leaks appear. Often deposits form more intensively on individual injectors, while the load on the “cleaner” ones increases.
Filter contamination
Another main reason for injector failure is dirty filters. Filters are installed along the fuel path and the injector itself has a filter. Its size is small and it is designed only to filter out very small fuel contaminants. If during operation of the fuel system the main filter, which is supposed to catch increasingly larger particles, is clogged, the injector filter instantly becomes clogged. Therefore, timely replacement of fuel system filters is the key to injector performance.
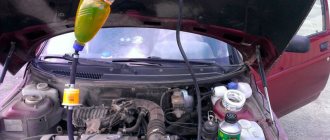
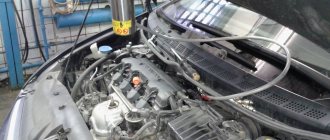
We find out how to check fuel injectors at home on a gasoline engine
Increased fuel consumption on the highway and unstable behavior of the car engine in the city.
This is what the approaching moment looks like when it’s time to start forced engine diagnostics. The next scenario is that it is too difficult to start the power plant even in warm weather. And this is already a reason for urgently intensifying actions regarding internal combustion engines. However, you shouldn’t condemn the injection system right away. First, you need to make sure that the ignition coils are functional and that there is a decent level of compression in the cylinders.
So, we checked everything, the injector remained. Stopping there and starting to pour cleaning additives into gasoline or diesel fuel is the wrong decision. It would be wise to start diagnosing. Experts who know how to check the injector for functionality recommend that you first pick up a multimeter. Using this device, the electrical part of the part is checked, namely the winding resistance. The stage looks like this:
- Remove the negative terminal from the battery.
- Remove the sprayer power supply.
- Bring the working elements of the tester to the contacts of the injection module.
- Measure the resistance.
The numbers on the screen will show the number of Ohms. The serviceable value interval can be found in the instruction manual. In general, the following injectors are considered standard:
- High resistance – 11…15 Ohm.
- Low resistance - 2...5 Ohm.
Is everything ok electrically? If not, we change the fuel atomizer, yes, we move on to comprehensive diagnostics. Her idea is to make sure that the nozzles are spraying and spraying equally. Before the start of the event, prepare measuring cups for each link and dismantle the ramp assembly with injectors. Below is the method:
- Connect the fuel line to the rail and the terminals to the nozzles.
- Place glasses under each piece.
- When turning the crankshaft with the starter, observe the fuel spray torches.
Ideally, the jets should be wide, but on an aged engine such a picture is unlikely to happen. The main thing here is that the amount of liquid in the cups is at the same level. If you know how to clean the injectors without removing them from the engine, then it's time to do it. But in cases where cleaning is powerless, underfilled spray units must be replaced.
Experienced motorists who share their experience on how to check injectors at home in a comprehensive format note an important detail. It happens that one of the sprayers simply does not flow. Almost always this indicates that the part is completely clogged. However, you should not lose optimism without checking the electrical supply. This is done on a removed ramp using the elimination method:
- The sprayer power supply is turned off.
- The node is connected to wires connected directly to the battery.
- The ignition is turned on and monitoring is carried out.
If there is a stream, the problem is in the power supply wiring. No - the link needs to be replaced.
Signs of injector failure
What are the signs that indicate that the injectors are not working properly?
- Difficulty starting the engine. If the car does not start easily after a short stop, there may be a problem with the injectors. This is the most common and obvious symptom of a malfunction of the injectors.
- Interruptions in engine operation at idle.
- The engine shakes or vibrates when accelerating or decelerating, the car moves jerkily.
- Fuel consumption has increased.
- You can hear popping noises or black smoke coming out of the exhaust pipe.
- Increased CO in exhaust gases.
- Increased temperature in the combustion chamber.
If such symptoms are observed, you should check the serviceability of the injectors. Malfunctions in their operation will negatively affect the performance of the engine and gearbox.
Power check
We turn off the engine. First option:
- Remove the power connector for the injector of cylinder 1.
- We connect the multimeter to the DC voltage measurement mode in the range of 0-20 Volts.
- We start the engine and observe the instrument readings. The voltage should be supplied in short pulses.
- If voltage readings appear, the wiring is OK.
- If there is no voltage coming to the power supply, then turn off the engine and call the wires, or look for damage visually.
- We connect the injector of cylinder 1 and repeat the operation with the injectors of cylinders 2-4.
Second option. Two people will be needed. We do the same thing, only turning off all the injectors at once. One person turns the engine with the starter, and the second one sequentially measures voltage pulses at the disconnected injector connectors.
Instead of a multimeter, you can use an LED.
Summary
The injector test begins with measuring the resistance. If everything is in order, further actions depend on the type of engine:
- Gasoline - the sprayers assembled with the ramp are tested for the same performance. If this test is not passed, the functionality of the wiring is analyzed by individually powering the spray module from the battery.
- Diesel - the lines are probed in order to identify temperature- and vibration-loaded fuel lines. They indicate that the corresponding injector is clogged. In Common Rail systems, you can test the injectors for drainage yourself. Excessively large volumes of fuel sent back are unacceptable.
The price tag for diagnosing a Common Rail sprayer is 800 rubles. Pump injectors and PLD sections are tested for 1,000 rubles. Removal/installation is not included in the price. For this work, the master may demand up to 2,500 rubles.
Electrical resistance measurement
This method allows you to check the injectors directly on the car.
- Google the model of injectors installed on your car. Using these data, we find the electrical resistance of the coils inside the nozzle. If nothing is found, no big deal.
- We turn off the engine. Remove the power connectors from the injectors.
- Take a multimeter. Switch it to the 0-200 Ohm (Ω) measurement mode.
- We measure the resistance of each injector. It must be within the passport values. If it was not possible to find out the nominal resistance, then you need to compare the injectors with each other. That is, if 3 injectors showed 10 Ohms, and one showed 20 Ohms, then it is considered faulty.
Hearing test
This is the simplest and most accessible way. However, it requires a lot of experience, because you need to know how the working nozzle “sounds”. To listen, use a rectangular board or a stethoscope. One edge of the “device” must be applied to the nozzle being tested, the other to the ear.
If you hear only uniform clicks, the injector is working properly. If there are knocks, pops, or vibrations of varying intensity, you can definitely say that the nozzle is clogged.
Injector diagnostic stand
Modern service stations are always equipped with stands for diagnosing and cleaning injectors. This method involves removing the fuel rail and injectors from the vehicle. At such stands, complete diagnostics are carried out: checking the power supply, measuring electrical resistance, and checking the performance of the diagnosed injectors. Some people construct similar stands on their own.
Monitor the condition of the injectors, change fuel filters on time, refuel with high-quality fuel at trusted gas stations, undergo maintenance on time and you will not have problems with the fuel system.
Previous post Instructions CONSULT-III plus
Next entry Idle air control (IAC) - how it works, malfunctions, symptoms, check
Diesel test: how to check a diesel engine injector for functionality - Common Rail system
The starting event is an electrical test of the sprayer. The technique is simple: in impedance mode, the tester measures the number of Ohms at the injector terminals. The range of nominal values is specified in the operating instructions. It can be either 11...15 Ohms or 2...5 Ohms. The readings disappear - the part is scrapped.
A positive resolution on electrical testing is a reason to hold on to the fuel lines. With the engine running, the lines connecting the injectors to the fuel rail are probed. The purpose of the experiment is to search for tubes with a noticeably increased temperature and pronounced pulsations. This is evidence that the fuel supply channel in the section between the tube and the cylinder is clogged. This sprayer must be cleaned. If this does not help, then it makes sense to have it repaired or replaced.
A common problem with new heavy fuel power plants is difficult starting. The reason for this is worn out spray devices. Instead of maintaining the pressure set by the electronics, they drain a large amount of diesel fuel into the return line. There is only one way out - change. But first, it’s worth performing a ritual that describes how to check a diesel injector for functionality - don’t throw away the entire set at once.
Diagnosis of drainage is trivial and requires a minimum of equipment: measuring containers with thin tubes. There is no need to buy a special kit. It can easily be made on site from syringes and droppers. Cheap and practical. The procedure itself contains simple steps:
- Remove the drain line from the sprayers.
- Connect the tubes of the mobile installation to the freed fittings.
- Start the engine and let it run for 2...4 minutes.
The lowering link will immediately give itself away - in its measuring container the liquid level will be higher than the rest. Again, you can repair or change it at your discretion.
For your information. When installing new nozzles, a new performance code entry into the ECU is required.