Owners of cars with injection-type engines sometimes face the problem of poor-quality injector performance. Often the culprits of such problems are injector nozzles; their poor performance results in the inability to start the car and turns into a waste of time at the most inopportune moment. But few people know how to check the injectors before a problem occurs. In this article you will learn how to identify the problem, as well as how to clean the injectors with your own hands and get rid of malfunctions.
From the first lessons of driving school (and maybe earlier) we know that the injection system of injection engines differs from carburetor engines. Faced with a problem, many drivers rush straight to auto repair shops or service stations. The problem is not always that serious, and it is quite possible that it can be solved even by a person with the basic knowledge that you can acquire by reading this material.
Injector malfunctions are very similar in symptoms to those of spark plugs.
Symptoms of a faulty injector
To begin with, it should be noted that such a complex mechanism as a car engine (especially in modern models) requires accuracy in definition.
It often turns out that with absolutely similar symptoms characteristic of malfunctioning injectors, for example, difficult starting of the engine on “cold traction” or increased fuel consumption, the reason is not in them, but in the spark plugs that need to be replaced. Before establishing the exact cause and taking any action to eliminate them, you should very carefully check and make sure that the “diagnosis” is correct. The following factors are the most common symptoms of faulty engine injectors:
- there are jerks when driving;
- loss of dynamics during acceleration;
- the engine vibrates and trembles when switching, or when decelerating;
- fuel consumption increases;
- Due to uneven fuel consumption on diesel engines, black smoke may be observed from the exhaust pipe
If you notice any of the problems just mentioned, you need to do a spot check of the injectors as soon as possible. Otherwise, the car may fail at the most unnecessary moment (for example, when overtaking, or in other situations).
How to determine if an injector is not working on a running engine
Let's say you found a sign of a faulty injector and now want to know how to check your engine injectors?
I would like to immediately note that the injectors themselves come in several types (mechanical and electromagnetic) and their design has significant differences, which means their testing methods should also differ. You can check injectors using several methods: checking injectors without removing them from the engine, checking removed injectors, checking injectors at home, checking gasoline or diesel injectors, etc. We will analyze the most popular methods. To find out how to check the functionality of the injector nozzles, it is not necessary to remove them. This method is one of the simplest checks and involves a sound test (or analysis of the noise emitted by the motor during operation). As a rule, clogged or damaged injectors produce a muffled high-frequency noise (the sound usually comes from the cylinder block).
Checking the power supply to the injectors
Checking the power supply to the injectors is carried out if the injectors themselves are working when any of the injectors break down. To check it is necessary to carry out the following procedure:
- disconnect the pads;
- connect 2 wires to the battery, the end of which is fixed to the injectors;
- turn on the engine.
After turning on the engine, you need to pay attention to the possible leakage of the fuel mixture - this may occur due to faults in the electrical circuit.
Checking the resistance on the winding with a multimeter (tester)
Checking the resistance on the winding with a multimeter (tester) also allows you to check the engine injectors without removing them. To do this, you need to make sure the resistance level of your injectors. Next we perform the following steps:
- with the engine off, disconnect the negative terminal from the battery;
- then disconnect the electrical connector on the injector itself (located on the block, in the form of a clamp);
- We set the value of our injectors on a multimeter and connect its contacts directly to the injector itself.
Normally, at high impedance the value should be 11-17 Ohms, at low impedance 2-5 Ohms. If the values do not match, the injector must be replaced.
Basic injector malfunctions
Preparing for grinding in the atomizer Read more: Fuel supply process
6.5 Main injector malfunctions
Malfunctions in the operation of injectors always lead to a deterioration in mixture formation, as a result of which the rate of fuel combustion decreases, afterburning occurs during most of the working stroke, and some of the fuel does not burn completely - all this leads to a decrease in engine power and efficiency.
Injectors must undergo periodic preventive inspections after 500-1000 hours of operation. During inspections, injectors removed from the engine are disassembled, cleaned of carbon deposits, washed, troubleshooted, assembled, checked and adjusted on a bench. Replacement of injectors for inspection and troubleshooting is carried out when signs of poor performance are detected: an increase in the temperature of the exhaust gases and the appearance of dark smoke from the pipe.
Malfunctions and their elimination:
1) The needle hangs up when working on contaminated, water-logged or “dry” fuel, due to mechanical particles getting into the working gap of the injector pair or destruction of the working surfaces of the needle by corrosion. When the needle hangs, the injector begins to operate as open, which is accompanied by fuel leakage and is detected by an increase in the temperature of the exhaust gases and the appearance of a smoky exhaust. The injector is replaced with a spare one. The hanging needle is removed by the shank or pressed out using a special device. After weak “grabs”, it is enough to rinse the needle and spread it in oil. After scuffing, the sprayer is replaced.
2) Blockage of the nozzle holes leads to an increase in the pressure created by the high-pressure fuel pump, which may result in a rupture of the injector pipeline, tearing off of the nozzle or breakage of the high-pressure fuel pump plunger. It is detected by sharply noticeable hydraulic shocks in the nozzle pipe. It occurs as a result of nozzle leakage, in which fuel flows out without atomizing and burns near the nozzle, as well as when working on poorly purified fuel. After disassembly, the holes are cleaned with a special steel needle with a diameter 0.1 mm smaller than the diameter of the nozzle, and then the nozzle and atomizer are washed with clean fuel and blown with compressed air.
3) Wear of the nozzle holes leads to a change in the shape and range of the torch. It is detected by the appearance of smoky exhaust and an increase in the temperature of the exhaust gases. At the stand, the dimensions of the holes after cleaning them are checked using limit gauges. If the holes are oval or their diameters have increased by more than 10%, then the nozzle or the entire sprayer is replaced.
4) Spring breakage occurs due to poor quality material, improper heat treatment, or improper assembly, which causes the spring to become distorted. If it breaks, the needle hangs and the nozzle leaks. During the inspection, the spring is replaced.
Burning of the nozzle tip leads to destruction of the end of the nozzle. Occurs when there is significant leakage of the nozzle, when intense combustion occurs in the immediate vicinity of the nozzle, causing erosive destruction of the end part of the nozzle; due to chemical corrosion from the action of sulfuric acid, which appears at the end of the nozzle when the nozzle is excessively cooled, when the temperature of its outer surface drops below the “dew point”, which happens during prolonged operation of the engine at low loads and during maneuvers. This sprayer is replaced.
6.6 Checking and adjusting the fuel supply advance angle
The timeliness of fuel combustion is determined by the advance angle of the fuel supply. The duration of the auto-ignition delay period, the rate of pressure increase and the location of the combustion line relative to T.M.T. depend on its value. When fuel combustion is shifted to the beginning of the expansion process, the pressure at the end of combustion decreases, the temperature of the exhaust gases increases and heat losses increase, which leads to an increase in specific fuel consumption. In addition, the piston will overheat and the temperature stresses of the cylinder will increase. The pressure at the end of combustion Pz for individual cylinders should not deviate from the values indicated in the diesel engine form by more than ± 5%. To increase Pz, the fuel supply advance angle is increased, to decrease it is decreased. The fuel supply advance angle is indicated in the engine form.
When determining the advance angle of fuel supply by a single-section fuel pump, perform the following actions:
1. Disconnect the fuel pipe from the pump.
2. Install a momentoscope on the fuel pump fitting.
3. Set the fuel pump rack to full fuel supply.
4. Pump the fuel pump manually until air is completely removed from the pump pipeline and the momentoscope.
5. Squeezing the rubber tube, squeeze fuel out of the glass tube to half its length.
6. Slowly turn the diesel crankshaft until the fuel meniscus in the glass tube begins to move; this moment will correspond to the beginning of fuel supply.
7. Measure the angle by which the crank of the cylinder being tested did not reach T.M.T. If the flywheel is not divided into degrees, measure the arc length of the flywheel from the T.M.T mark. of a given cylinder to a fixed arrow-pointer on the block, and then calculate the angle using the formula
where l is the length of the arc from the b.m.t mark. to the pointer arrow, mm;
L – flywheel circumference, mm.
In the absence of a torque scope, the fuel supply advance angle can be checked as follows:
1. Disconnect the fuel pipe from the pump.
2. Remove the discharge valve with the spring from the pump, and replace the fitting or pump cover.
3. Fuel is supplied from the supply tank to the pump.
4. Bleed air from the fuel line and pump, and then cover the hole in the fitting with your finger.
5. Slowly turn the diesel crankshaft until fuel stops flowing out of the fitting.
6. Measure the angle by which the crank of the cylinder being tested did not reach T.M.T.
For greater accuracy, it is recommended to determine the fuel supply angle twice. If the measured fuel supply advance angle differs by more than 1-1.5% from that specified in the diesel engine form, it is adjusted by turning the fuel pump washer on the camshaft.
In this case, perform the following actions:
1. Mark the position of the cam washer relative to the bushing flange with marks.
2. Unscrew the coupling bolts or fastening nut and remove the cam washer from engagement with the bushing teeth.
3. Turn the washer to the desired amount and engage it with the teeth of the sleeve. To increase the advance angle, the cam washer moves in the direction of rotation of the camshaft, and to decrease it, against the direction of its rotation. A change in the position of the cam washer by 2 mm (one tooth) causes a change in the fuel supply advance angle by 3 - 5 ° and the maximum cycle pressure by 0.4-0.6 MPa (4-6 kgf/cm2).
When determining the advance angle of fuel supply by a multi-plunger pump, perform the following actions:
1. Disconnect the fuel pipe from the first section of the pump.
2. Install a momentoscope on the fitting of the first section of the fuel pump.
3. Set the fuel pump rack to full fuel supply.
4. Pump the fuel pump manually until air is completely removed from the pump pipeline and the momentoscope.
5. Squeezing the rubber tube, squeeze fuel out of the glass tube to half its length.
6. Slowly turn the diesel crankshaft until the fuel meniscus in the glass tube begins to move; this moment will correspond to the beginning of fuel supply.
7. Measure the angle by which the crank of the cylinder being tested did not reach T.M.T. If the flywheel is not divided into degrees, measure the arc length of the flywheel from the TDC mark. of this cylinder to the fixed arrow-pointer on the block, and then calculate the angle using the same formula as for a single-section pump.
In the absence of a torqueoscope, the fuel supply advance angle can be checked in the same way as was presented earlier.
For greater accuracy, it is recommended to determine the fuel supply angle twice. If the measured fuel supply advance angle differs by more than 1-1.5% from that specified in the diesel engine form, it is adjusted by turning the fuel camshaft to a certain angle.
In this case, perform the following actions:
1. Unscrew the coupling bolts passing through the oval holes of the drive flange.
2. Rotate the driven flange relative to the drive by several divisions in the direction of rotation of the camshaft or vice versa. The coincidence of the notch on the driving flange with the central notch on the driven flange corresponds to the specified feed advance angle set by the manufacturer. When the flange is turned by one division, the advance angle changes by the value specified in the form (for example, for a 3 D 6 engine - by 6°).
3. Clamp the coupling bolts.
In some cases, for pumps with large wear of plunger pairs, the fuel supply advance angle is checked at the beginning of fuel injection by an injector operating in tandem with the pump being tested. With such a check, the fuel supply advance angles are 20-25% less than those specified in the diesel engine form.
Preparing for grinding in the atomizer Read more: Fuel supply process
Information about the work “Marine internal combustion engine L21/31”
Section: Transport Number of characters with spaces: 82455 Number of tables: 3 Number of images: 17
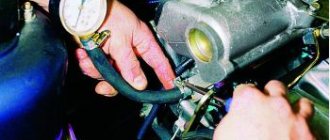
Diagnostics of the operation of injectors on the ramp
To carry out this type of check of the injectors, it will be necessary to dismantle them along with the fuel rail. This is not difficult to do, but it requires some skill. It is best to do such a check together with a partner who, during your diagnostics and measurements, will manipulate the ignition and cranking of the engine.
- after dismantling and fixing the ramp with the nozzles in a stationary state, prepare measuring containers;
- next you need to connect the contacts of the ramp and injectors, and also return the negative terminal of the battery;
- it is very important to place the ramp so that the measuring container can easily fit under each nozzle;
- Gasoline/diesel supply pipes will need to be connected to the ramp;
- before ignition, make sure all fasteners are secure to ensure data accuracy and prevent leaks;
Check using a ramp and disconnecting the injectors - then ignite and crank the engine a little using the starter;
- At this time, evaluate the operation of the injectors: the containers should be filled equally under each of them.
If there is a discrepancy between any of the containers and the others, the injector must be cleaned. In addition, it is possible that fuel continues to flow even after the ignition ends. This indicates that the injector has lost its seal and needs to be replaced.
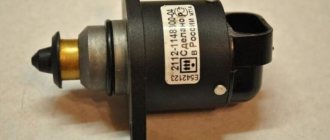
Scheme of operation of an electromagnetic sprayer.
Methods for checking an injector
The more complex the diagnostic equipment used, the more accurately you can determine the causes of what happened and prescribe the necessary measures to eliminate the problem.
Power check
The simplest way to control the pulses arriving at the injector connector is to connect an LED indicator to its power contact.
When the starter rotates the shaft, the LED should blink, which indicates the approximate serviceability of the ECM keys and the very fact of its attempts to open the valves, although the incoming pulses may not have sufficient power.
Only an oscilloscope and a load simulator can provide accurate information.
How to measure resistance
The active nature of the load can be checked using an ohmmeter included in the universal multimeter (tester). The resistance of the solenoid winding is indicated in the nameplate data of the injector, as is its spread.
How to clean injector nozzles yourself at home
We gradually approached the very important question “how to clean the injectors?” I would like to cancel that clogged injectors account for 60% of all malfunctions with them. Due to this prevalence, several methods for cleaning them have been invented, including cleaning injectors at home:
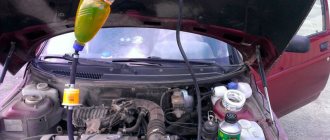
- flushing using additives is carried out without removing the injectors from the engine. A special cleaning additive is added to the fuel tank, which, in addition to the injectors, normalizes the operation of the entire engine. There are a huge number of them, and you have to choose at your own discretion;
- cleaning injectors on an ultrasonic stand (often can be found as “ultrasonic washing” or “ultrasonic injector washing”) is a rather difficult and specialized method, which is based on the cavitation effect. Nozzles in an ultrasonic bath undergo multiple washing procedures and demonstrate good atomization after cleaning;
- According to many drivers, washing a collapsible nozzle However, such a procedure is usually carried out using a washing unit at a service station, or with a syringe at home. For this purpose, a special washing liquid is used.
When electromagnetic cleaning, the spray level is checked many times until the appropriate result is obtained.
Which washing is better: ultrasonic or liquid?
We have repeatedly noticed disputes over which is better: washing injectors with additives or ultrasonic washing of injectors using specialized equipment.
To be fair, it will be said that ultrasonic cleaning is usually carried out if there are corresponding serious problems (unclear engine idling, etc.). Liquid washing of injector nozzles is good because it carries out preventive cleaning of the entire engine (it is good at removing carbon deposits from the valves). However, liquid washing of injectors works great only with the first stage of injector clogging, but problems may arise with subsequent and more serious problems. It is carried out “blindly” as a preventive measure, which means it is not capable of targeting a specific source of pollution.
But the “ultrasonic” method of exposure is most often used when detailed diagnostics are needed to determine the throughput of the sensors of the actuators (usually carried out in workshops using computer calculations). While cleaning much more and better, this type of flushing costs 2-3 times more than its liquid counterpart. However, you should be careful, since old nozzles, damaged by time and improper operation, can completely deteriorate under the influence of cavitation and lose their original tightness (leak during operation).
Diagnostics and prevention of faults
Fuel injection systems differ from carburetor systems not only in efficiency, but also in efficiency. By dosing gasoline during injection, you can achieve an increase in engine performance by 7–10%. But, unfortunately, units with fuel injectors also have their weaknesses.
Signs of breakdown
The following may indicate that your car has something wrong with its fuel injection system:
- malfunctions of the unit in transient and/or idle mode;
- problems starting the engine;
- loss of power and decreased acceleration dynamics;
- dips and jerks when trying to increase the load;
- increased gasoline consumption;
- exhaust system pops and a significant increase in exhaust gas toxicity.
- failure of the oxygen level sensor and catalytic converter.
In all these cases, it is recommended to first pay attention to the condition of the injectors. And, if necessary, clean them or replace them.
How to check injectors?
To find out if everything is okay with the injection system, you can:
- Check the injectors by ear. Just start the engine and listen to the sounds it makes while running. If the cylinder block whistles dully or clicks, then it’s time to disassemble it;
- Check the power supply at ignition. The block is disconnected from the injectors, two wires from the battery are attached to the contacts. If, after turning on the ignition, you notice that fuel is flowing, then the cause of the malfunction is problems in the electrical circuit;
- measure the resistance on the injectors with a multimeter. To do this, you need to find out the impedance of the injectors, reset the negative terminals from the battery and disconnect the electrical connectors. If during the measurement it turns out that the resistance deviates from the norm in one direction or another, the injectors must be replaced;
- contact the service center and carry out diagnostics on a test bench. This will allow not only to assess the general condition of the injectors, but also to determine the efficiency of fuel supply, determine the shape of the torch, etc.
The main cause of injector failure
As a rule, injectors fail not because they have already exhausted the service life declared by the manufacturer. The main cause of breakdowns and malfunctions is a clogged filter. Poor quality gasoline and exposure to high temperatures contribute to contamination of fuel supply elements.
To avoid the accumulation of mineral deposits on the injectors, do not forget to clean them regularly. To do this, you can use various fuel additives and cleaning fluids. It is recommended to carry out the cleaning procedure every 15-20 thousand km.
Injector prevention
You can get rid of the need to wash the injectors yourself by regularly carrying out preventive procedures to ensure pre-cleaning of the injectors. For example, liquid cleaning of injectors is a good idea for preventive purposes. Note that it is not necessary to contact a car service for preventive purposes (although it certainly won’t get any worse), it is enough to do an “enema” and carry out the procedure at home.
In addition, there is an old “grandfather’s” method that many still use today. It involves regularly accelerating a car to a speed of more than 120 km/h, and covering approximately 10-15 kilometers in this mode. High pressure inside the system provokes self-cleaning of the nozzle. The same method also involves accelerating at idle speed to 4000-5000 rpm for three minutes. Although it is less effective than the first.
How to replace fuel injectors?
To replace injectors, it is not necessary to contact a car service center. If you have a set of tools on hand and some free time, you can easily handle this procedure on your own.
Procedure
- Relieve fuel pressure by removing the relief valve. Turn off the ignition and remove the negative terminal of the battery.
- Loosen the clamps on the idle air control, fuel pressure, crankcase ventilation and brake booster hose outlet clamps. Then disconnect these elements.
- Using a 13mm wrench, unscrew the nuts securing the ground wire to the first and last stud of the intake manifold. Disconnect the wire completely and remove the receiver.
- Loosen the clamp and remove the supply hose from the frame fitting.
- Disconnect the crankcase ventilation hose from the idle air system pipe.
- Loosen the clamps and remove the drain hose from the pressure regulator fitting.
- Using a 10mm wrench, unscrew the fastenings of the frame to the intake pipe and remove it.
- Use a screwdriver or awl to pry the latch of the block and disconnect the connector from the injector.
- Remove the injector and replace it by repeating the procedure in reverse order. Before installation, it is necessary to install the O-rings on the injectors, lubricating the seating areas with engine oil or silicone grease.