Why do you need an injector emulator?
The operation of an injection car is impossible without electronics. The ECU of a modern “iron horse” controls the operation of gasoline injectors, correctly dosing fuel injection, and also monitors for all sorts of system problems.
By installing 2nd generation LPG on a fuel-injected internal combustion engine, we actually go back a step and get a carburetor system. For stable operation of the 2nd generation LPG on a fuel-injected internal combustion engine, we need to turn off the gasoline injectors.
In this case, the electronic brain of the car will necessarily diagnose that the injectors are disabled and will display a “check engine” error message. So that this message does not appear, and the ECU “thinks” that the entire system is operating normally and an emulator of LPG injectors is needed.
It should be noted that with the help of this device you can set the necessary time delay when the engine switches from gas to gasoline and vice versa. Typically, the delay time is set individually for each internal combustion engine and driver, and ranges from 0 to 5 seconds.
This is done to smoothly change fuel so that the driver does not notice the moment of transition, and also to prevent the engine from stalling. Thus, the 2nd generation LPG injector emulator performs three main functions:
- When the engine switches to gas, it turns off the gasoline injectors;
- After turning off the gasoline injectors, it emulates their operation, sending the vehicle's ECU a signal for the injectors to operate normally.
- The ECU, seeing that there are no malfunctions, does not display a “check engine” error on the dashboard.
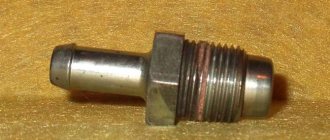
Injector emulator markings
To choose the right injector simulator for your car, you need to know the number of cylinders in your internal combustion engine, as well as understand the labeling of these products.
The basic marking scheme is as follows: Manufacturer, LPG type, emulator type, number of cylinders. For example, the marking “STAG2 E4” means that this product is manufactured by STAG, is suitable for 2nd generation LPG, has electronic control and is intended for 4-cylinder internal combustion engines.
Similar to “Stag2E-6” - manufactured by STAG, suitable for 2nd generation LPG, has electronic control and is intended for 6-cylinder internal combustion engines. It is also imperative to understand which connector should be on the device.
To make sure you don’t make a mistake in your choice, it is best to consult with a specialist at the store where you will purchase the LPG injector emulator. When consulting, be sure to indicate the make and country of the car manufacturer, this will help the specialist select the device you need.
Connecting an injector emulator
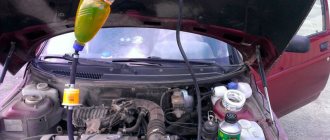
First of all, it is worth noting that it is best to entrust the connection of the 2nd generation LPG injector emulator to an experienced installer, so that if you connect it yourself, you will not damage the car’s electronics.
When connecting the device yourself, be sure to check the following points:
- Most gasoline injectors have a resistance of 100 ohms. Make sure that the device you want to install supports this resistance. Usually the resistance is indicated in the technical specifications of the product.
- Make sure that the connector on the emulator is the same as on your car.
- Make sure that the device supports the number of internal combustion engine cylinders you need.
- Carefully study the connection diagram; it should be included with the device.
The general connection diagram for the injector emulator is as follows:
- The injector emulator usually contains two wires - the blue wire is positive, the black wire is negative.
- The device itself is connected to the standard injectors, between them and the car's ECU.
- When +12 V is supplied, the emulator turns off the gasoline injectors and starts operating normally, taking into account the set delay time.
- +12 V is usually taken from the gas/gasoline mode switch button or solenoid valve.
Conclusion
Installing an injector simulator on a car is not a mandatory procedure when installing a 2nd generation LPG on an injector. But we recommend spending an extra $20 (which is the cost of the device with installation) and protecting yourself from possible problems with the system in the future.
After all, because of the constantly lit “check engine” sign, you can miss a really serious breakdown, the elimination of which can subsequently cost much more.
In conclusion, I would like to once again warn car enthusiasts against installing this device on their car themselves. If you have never done this before, it is better to contact a friend, or entrust this work to a professional who understands it. And if you have any questions or suggestions, feel free to ask them in the x to the article.
, Irpen, Kyiv region. (aka Terkin on the forum)
“The economy must be economical...” Middle-aged people, of course, remember this slogan of the Brezhnev era. Although, it is unlikely that any of them tried to analyze its essence. But two friends, Oleg and Vanya, took this slogan literally when they needed to scam Oleg’s “penny”. This car sat without starting the engine for more than three months - it was first boiled, then puttied, and then painted. After forced downtime, the machine began to “dull” and “eat” oil. The owner of the car, Oleg, knew almost nothing about cars. But his friend Vanya considered himself a “specialist” because he drove a Zhiguli for about 30 years. Therefore, he immediately made a diagnosis - the valve seals had dried out. And everything is fine with the piston group, because the rings have recently been changed. Friends decided to replace the oil seals themselves - why pay someone money when you can save money? That's what the friends did.
Late in the evening, a regular client named Oleg called me and asked how much it would cost to adjust the carburetor on his VAZ 2101? “If you just turn the screw, then a little,” I answered, “only the carburetor is adjusted last. First the engine is built, then the ignition system is adjusted, and only then the carburetor. By the way, what condition is the engine in? - “They made the engine,” answered Oleg. Hearing this “they did,” I muttered something about the fact that the Soviet people spent 70 years building communism, and the result of this action is known to everyone... In short, the meeting was scheduled for tomorrow morning.
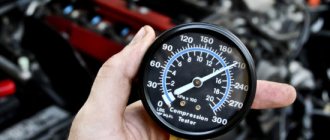
The first thing I didn't like about this car was the sound of the engine. And I can’t even explain why exactly. There was no trouble, but the engine was working hard, it seemed to be choking. I connect the vacuum gauge - the vacuum is low, about 15 inches Hg. Art. (approx. 370 mm), which equals approx. minus 0.5 bar I say: “It looks like there is a problem with the motor.” But Oleg tells me that it was the motor mechanic who sent him to adjust the carburetor. Then I connect the gas analyzer. "S.O." OK. 1%, (with this “S.O.” the motor should work normally), but “S.N.” high – a little more than 1000 rm. (This indicates poor combustion of gasoline). Such "S.N." happens when one cylinder is not working, but then the mixture will be lean. And here the composition of the mixture is normal. Also “S.N.” increases with early ignition timing. Therefore, I connect the strobe light, but the OZ turns out to be normal. To be sure, I check the entire ignition system. As in almost every old car, there are many different, small faults - the breaker contacts are oxidized, the UZSKP (the closed state angle of the breaker contacts) is too large, the centrifugal regulator is stuck, and the spark plugs have different gaps. I remove the distributor and put it in order, then clean the spark plugs, adjust the gaps and ring the explosives. wires. Somewhere in the depths of my soul there is a glimmer of hope that this will help. But no, it didn't help. Although the engine started working more smoothly, “S.N.” still remains high. There is nothing to do, I will check the engine more carefully. First, I use an oscilloscope to check the vacuum in the intake manifold. The plot, when scrolling, is quite decent, but the vacuum is suspiciously good - ok. minus 0.35 bar. Why, then, is the vacuum weak at idle? Once again, more carefully, I analyze the diagram as I scroll. The height of the peaks is very high, which indicates large vacuum pulsations in the intake. Then I screw in the sensor instead of the spark plug and look at the pressure graph of the first cylinder at idle. I immediately pay attention to the hump at the end of the exhaust stroke.
Then I measure the timing phases. It turns out that the camshaft is in a hurry by about one and a half to two teeth. Because of this, the exhaust valve closes before TDC and the exhaust gases that have not had time to escape exit through the intake valve into the intake manifold, creating back pressure and loss of vacuum. I remove the valve cover. Strange, but the marks match. Then I put the piston at TDC overlap and, in order to make sure that both valves are open, I check the thermal clearances of the valves with my hand. The intake valve has no gap, i.e. it is open (as it should be), but the exhaust valve has a gap between the rocker and the valve stem, i.e. the exhaust valve is closed! Although, on the classics, the valve overlap phase = 22 degrees, i.e. 12 degrees before TDC, and 10 degrees. after it, both valves must be open. To check, I supply air to the cylinder. Everything is confirmed - only the intake valve is open, i.e. the exhaust gases, at the end of the exhaust stroke, go back to the intake manifold for re-combustion. It turned out to be some kind of ugly EGR! After all the checks, I interrogate Oleg with passion. And then Oleg “remembered”. It turns out that when his friend Vanya changed the valve seals for him, he forgot to tighten the camshaft gear bolt. And so, about 15 km after the repair, the Zhigul stalled right on the highway. At first, Oleg repaired the engine using a mobile phone, following Vanya’s advice. Then, I started the engine with the help of the phone and some mother. But, although Oleg put the loose bolt and gear back in place, and even set everything to the mark, the engine never started. Oleg had to get home on a “tie”. Already at home, the mechanic simply rearranged the explosives. wires in the distributor cover, after which the engine started. (It’s strange that the mechanic did not ask the question: “Why, with the marks set correctly, did you have to rearrange the wires?”) But, due to the uneven operation of the engine, the mechanic sent the car to the carburetor. “Yeah,” I said to Oleg, “so it turns out you saved on replacing valve seals. How far have you already been? And I think this is just the beginning. After all, I give 100% that you bent the valves.” “But no,” Oleg answered proudly, “I have “five” pistons with recesses. Yes, here’s another thing,” Oleg “remembered” again, “when I was installing the camshaft gear, something fell out of the engine.” And Oleg took out a dented camshaft key from the glove compartment. This is where everything fell into place. It turns out that when Oleg thought that he was aligning the marks, he only turned the gear, and the camshaft itself was motionless. Ultimately, the crankshaft and camshaft ended up in a random position relative to each other...
So, what should I do now? Align the key and somehow push it into place? But then I will be responsible for all future engine failures. Or, first, send Oleg to the motor mechanic without touching anything? But then I didn’t earn anything, since the work wasn’t done, the carburetor wasn’t adjusted and there was nothing to take the money for...
I chose the third option - without installing keys and without even removing the gear, set the camshaft to approximately the correct position, then adjust the carb, and only then send Oleg to the mechanic. So, I loosen the camshaft gear bolt. On VAZs of the first years of production, a special locking washer was placed under this bolt, the edge of which was bent onto the edge of the bolt head. But then, AVTOVAZ decided to save money and stopped installing this washer. After all, the economy should be economical! And, perhaps, if such a washer had been installed, Oleg would not have to “sunbathe” on the track. True, AVTOVAZ did not stop there. If we take, for example, the electrical wiring of the very popular VAZ 2106 model, a new model, then we saved on the cross-section of the wires, and on the signal relay, and on the wire to the right signal, and on the power wire connector near the battery, and on the wires to the door light bulbs , and on the PC492 relay for the handbrake light.
But, let's return to setting the camshaft. Having placed the crankshaft at TDC and trying to base it on the camshaft cams, I determined where it needed to move and rotated the crankshaft there with a ratchet wrench. Then I clamped the camshaft bolt and checked what was happening, checking the gaps on the rockers, trying to catch approximately the middle of the overlap. And now, after the third attempt, I was satisfied with the result. For reliability, I also supplied air to the cylinders, controlling the valve closing moments. When, after everything, I started the engine, Oleg, hearing the sound of the engine, only said: “Oh-oh-oh!” After warming up the engine and then adjusting the carburetor (it took about a minute to adjust), we made a test drive. Oleg said that his car had never driven so well before. But he was probably joking. I think that thirty years ago she still drove better. When parting, I advised Oleg to save wisely in the future and asked him to say hello to the mechanic.
Story #26:
Injection Gazelle with minced gas, when running on gasoline, it troits. By turning off the cylinders one by one, it was determined that the 3rd cylinder was not working. Considering that the engine runs without interruption on gas, the injectors come under suspicion, namely the third of them, which turned out to be dry - no soot, no gasoline. I check the pulses on all injectors, they are everywhere, but what immediately catches my eye is that the pulse on the third injector has a much smaller inductive peak, and there is completely no emission from the return stroke of the injector armature. A comparison with the correct impulse is shown in the figure:
From the oscillogram it can be seen that everything is in order with the power supply to the idle injector, the problem is in the small value of the massaging pulse, or in the injector itself. The stupidest box with the beautiful name “injector emulator” breaks the standard injector control and passes it through itself. It is possible that this is the reason. To test this assumption, I restore normal power to the third injector (bypassing the emulator) and start the engine on gasoline, the interruption disappears - smooth operation. The control of the injectors in the emulator is disconnected using a pair of small-sized relays with two normally closed contacts each. In one of the relays, one contact group failed; in the closed state, the resistance was about 120 Ohms, which prevented the injector from opening. PS For the sake of curiosity, I filmed the signal from a replacement injector located outside the engine. I can explain the difference in the number of oscillations this way - the flow of gasoline dampens the oscillations of the armature, which does not happen when the injector is operating disconnected from the gas line.
What is a 2nd generation LPG injector emulator and how does it work?
When switching to gas fuel, the operating algorithm of a car engine is seriously restructured. With the development of each subsequent generation of gas-cylinder equipment, it is planned to be equipped with smart devices that eliminate moments of incorrect engine operation.
For the same purposes, the 2nd generation LPG injector emulator is installed on cars with injection internal combustion engines. How important is this addition and is it really possible to make an emulator of LPG injectors with your own hands?
What function does the emulator perform?
An injector emulator is a smart electronic design that can fool the standard electronic engine control unit. After the gasoline injectors are forcibly disconnected from the fuel system, the ECU identifies this as a malfunction. There is logic in this, since the “brains” of the unit “do not know” that the gas cylinder installation is being started.
The situation is perceived by standard electronics as a break in the main supply to the gasoline injectors. A “check engine” warning is displayed on the electronic display. The engine operation is automatically switched to emergency mode. This negatively affects the functioning of all components of the power unit.
To avoid such a stressful situation, a connection diagram for the 2nd generation LPG injector emulator is introduced. The device simulates the functions of gasoline injectors. But fuel does not pass through the device; its task is reduced to sending the corresponding signal to the standard ECU.
Emulation begins from the moment the corresponding signal is received from the fuel switch. The 2nd generation LPG emulator facilitates the correct operation of the fuel system using alternative fuel.
A similar scheme is used only on injection vehicles when installing 2nd generation gas equipment (for example, on a VAZ 2112). It is not needed for carburetor systems. Subsequent gas equipment is produced with built-in emulators.
Using the device, a certain time interval for delaying the transition from gasoline fuel to a gas-air mixture and vice versa is set. This period is different for each car model, but no more than 5 seconds. A smooth change of fuel prevents unstable operation of the system and the engine does not stall.
How to connect?
A diagram with a detailed description will help you figure out how to connect an injector emulator. However, the car’s injection electronics are quite “delicate”, so you should connect and configure the emulator yourself only if you have experience and knowledge. Otherwise, there is a danger that the electrical part of the vehicle will not work properly.
To correctly connect the LPG emulator, you should know that:
- Most gasoline injectors have a resistance of 100 ohms, you need to make sure that the technical characteristics of the device allow its use;
- the device connector must match the car model;
- the number of cylinders that the device supports must correspond to the vehicle;
- to connect the 2nd generation LPG injector emulator, you should study the diagram that comes with the device;
- connect the device with two cables, usually blue goes to “plus”, black to “minus”;
- The device is connected between gasoline injectors and the car's ECU.
Installation and adjustment of the 2nd generation LPG injector emulator are carried out simultaneously, otherwise there is a possibility of malfunctions.
Typical ones are the following:
- the ignition system does not work correctly;
- the supply of gas fuel is stopped;
- Unstable operation of the engine at idle when the LPG is active;
- dips when driving or idling.
To avoid such problems, you need to contact specialists who know how to check the 2nd generation LPG injector emulator.
Which emulator is suitable?
The choice of device depends on the number of cylinders and the car model. In the most general classification, devices are divided into two groups: for European and Japanese brands. Cars have different connectors. The following example will show how to correctly understand the markings on devices so as not to make a mistake in choosing.
The designation Stag 2-E4 is deciphered as follows:
- Stag — name of the manufacturer (in this example, Polish);
- 2 - for gas equipment of the 2nd generation;
- E - for European cars;
- 04 - the number of cylinders for which the injector emulator is designed.
Methane gas treatment: when you forgive all the disadvantages
If instead of “E” there is “J”, then the emulator is installed on Japanese cars. For European cars, the connector that comes with the device will not work.
Regarding the issue of homemade structures. There are home craftsmen who understand electronics and can solder devices themselves according to the circuit. You need relays, diodes, a load resistance of 100 Ohms, wires with connectors. Is it worth complicating life? Ready-made devices are affordable, it is not difficult to find the right model. It is enough for the store manager to name the make and model of the gas car.
If you do not equip an injection vehicle with 2nd generation gas equipment with an injector emulator, you may miss a serious breakdown due to constantly ignoring the “check engine” warning sign.
Connection diagram for 2nd generation LPG injector emulator
An injector emulator is necessary to install gas equipment on a car with an injector. Installation and connection of the 2nd generation LPG injector emulator has several mandatory conditions that must be met for the productive operation of the entire system.
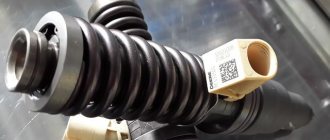
Injector emulator - what is it?
The 2nd generation gas equipment emulator is a special device that simulates the operation of gasoline-type injectors, which allows the mechanisms to function normally.
When the emulating (emitting) injectors are turned on, the gas supply begins. The mechanism is a very important device that maintains the ability to fully operate without errors or damage. Important! If there is no electronic device, the mechanism will fail or refuse to work.
To install the 2nd generation LPG injector emulator and connect it, certain skills are required, since this process will also require configuration. It is better to entrust this process to professional mechanics, since otherwise minor problems may occur, which will manifest themselves in too slow or accelerated operation of the mechanisms.
Important! The gasoline pump does not turn off when switching to gas, since gasoline cools and washes its part of the system, including gasoline-type injectors. There must also be fuel in the gas tank.
In addition, it must be taken into account that engines are heated with gasoline, not gas. Otherwise, the system will shut down or may be damaged.
The injector has a number of necessary sensors. For the lambda emulator, the 2nd generation LPG probe is a very complex mechanism that mainly regulates the EBO when running on gasoline to supply fuel.
When switching to gas, the data transmission chain is broken, and the secondary emulating lambda probe creates a transmission directly to the controller. If you use the primary sensor, the machine will immediately go into an emergency state, since the ECU will show that the sensor is faulty.
The electronics of the injection machine are very sensitive, so it is better to install and configure it yourself, only if you have some experience.
Overall, the emulator has several features that are very important. These functions regulate the operation of the entire transition and further process:
- turning off gasoline injectors;
- transition to operation on gas with imitation of a gasoline injector mechanism;
- deception of standard-type ECUs in the form of simulating the operating process of gasoline injectors;
- exclusion of transition to emergency mode;
- regulation of a number of processes, including those with sensors.
It is also worth considering that an injector with a properly configured electronic mechanism has advantages in automatic mode, that is, the transition from gasoline to gas will occur almost instantly after turning the ignition. But this requires an engine temperature of about forty degrees.
On our website there are articles about various gas injectors:
- Lovato;
- Valtek;
- Barracuda;
- AEB.
Installation and configuration
Installation and configuration of the device are carried out simultaneously, as otherwise problems may arise. Any incorrect connection can lead to the following consequences:
- incorrect operation during ignition, including lack of gas supply;
- unstable operation when idling with gas;
- freezing of the gearbox;
- There are failures in operation or after idling.
It is for this reason that proper arrangement is extremely important. The priority is to re-equip the car when installing the device by specialists who will immediately configure all the elements and characteristics.
For self-installation, the connection diagram for the 2nd generation LPG injector emulator is quite complicated, but with experience, you can do everything correctly. In addition, it is worth remembering a few simple rules:
- the standard resistance of the electronic mechanism should be about 100 ohms;
- the installation of the device must take into account the presence or absence of self-regulation;
- Each injector has its own mechanism, for example, for “Europeans” a device marked EI is suitable, and for the Japanese – JI. This will allow you to select a device with the appropriate connectors and characteristics;
- It is worth taking into account the number of cylinders, since the individual selection of the emulator is carried out according to this;
- The required transition delay limit varies from zero to 5 seconds. The range is set individually according to the engine configuration, immediately after installation.
Once everything is fully equipped, the smoothness of the transition and the move itself is immediately worked out. This avoids most further operational problems.
Malfunctions of the 2nd generation LPG injectors
| Problem | Possible reasons | Search methods | Remedies in case of compliance |
| The internal combustion engine does not run on gas, does not start or starts poorly | Gas is not flowing | Check the gas supply multivalve output | Repair, if repair is impossible, replace |
| Check the output from the gas valve | Blow out the line, replace the filter, replace the gas valve | ||
| Check gearbox output | Carry out repairs, if repair is impossible, replace | ||
| When checking the gas supply, the gas should come out in the liquid phase (white thick fog)!!!!! | |||
| Incorrect amount of gas supplied to the engine | LPG adjustment is broken | Make adjustments | |
| The gearbox has failed | Carry out repairs, if repair is impossible, replace | ||
| The tightness of the intake system is broken | Eliminate air leaks | ||
| Petrol is supplied simultaneously with gas | Check the gas valve | Repair or replace | |
| The injector emulator is faulty | Repair or replace | ||
| Gas reducer freezes | Coolant circulation is disrupted | Low coolant level | Add antifreeze or antifreeze to the level |
| Channels are clogged | Clean the channels | ||
| The tightness of the gas valves is broken | When the engine is stopped, gas escapes from the gearbox | Repair the valves or replace them | |
| Insufficient engine warm-up | Car cooling system is faulty | Warm up the engine to the desired temperature | |
| Contact service for repair | |||
| Unstable engine idle | The idle system on the carburetor is faulty | Check engine idle when running on gasoline | Repair the carburetor |
| Gearbox adjustment is out of order | Perform adjustment | ||
| Filling the reducer with gas condensate | Drain condensate from gearbox | ||
| The engine does not develop speed after idling, failures in operation. | Insufficient gas quantity. | The multivalve, line, and filter are clogged. | Check and clear jams |
| Fuel misfires | Malfunction in the car's ignition system | Check spark plugs, high-voltage wires and ignition coil | |
| There is backfire in the intake manifold. | Fuel misfires | Malfunction in the car's ignition system | Check spark plugs, high-voltage wires and ignition coil |
| Lean gas-air mixture | Air leak into the intake manifold | Find the cause of the leak and eliminate it | |
| Incorrect gas adjustment | Make adjustments | ||
| Malfunction in the gas distribution system | The marks on the timing belt (chain) are knocked off | Install by tags | |
| The gaps between the valves and seats in the engine are broken | Adjust the gaps |
* if you don’t find the problem you need, describe your problem in the comments
HBO injector emulator: what is it and why is it necessary?
The installation of gas equipment involves certain changes in the engine compartment. For the correct operation of the engine on a new type of fuel, quite a few different devices are needed.
Today I’ll tell you about such a thing as an emulator of LPG injectors, without which it is impossible to imagine a 2nd generation LPG and an injection engine. You will learn what this device is and for what purposes it is installed.
An injector emulator (or an injector shutdown emulator) is an electronic device that simulates the operation of gasoline injectors when operating on gas fuel.
How to choose and connect a 2nd generation LPG emulator to an injection machine yourself
Last updated April 2, 2021 at 07:53
The second generation of gas-cylinder equipment is still popular, especially among owners of cars with carburetor internal combustion engines, as well as with injection engines of early production (up to environmental class Euro 3). Since the supply of gasoline in such engines is carried out using injectors, when installing a gas fuel system on a car, an emulator of 2nd generation LPG injectors is installed in its electrical circuit.