Signs of injector malfunctions.
We have given the main signs of injector malfunction, which are relevant for most cars.
- The car jerks when accelerating
- Dips appear during engine operation. It feels like someone is holding the car.
- When driving a car, there is a persistent feeling of loss of power.
- An increase in fuel consumption of several liters for clogged injectors is a common occurrence
If such symptoms appear, or some of them, then there is a reason to think about diagnosing the injector.
If the injectors are faulty, you need to fix this problem as soon as possible, since in the future, if you drive like this, other engine components may suffer, and this will require much greater expenses.
The main signs of injector malfunction on a VAZ-2114: check and signs of clogging
If, while driving, your car lost its dynamics, began to accelerate more slowly, and in general there were interruptions in its stable operation due to difficult starting and increased fuel consumption, one of the injectors installed on the engine may have failed. In this article we will tell you in detail how to check them, and what are the nuances in such work.
Main features
So, signs of clogged injector nozzles:
- misfires at idle,
- the engine is unstable,
- fuel consumption increased sharply,
- slow acceleration of the car when the gas pedal is fully pressed.
Why is it important to identify this malfunction? The injector supplies fuel to the system and is its main element, therefore, extending its service life is of great importance for the operation of the entire engine.
The quality of the fuel has a huge impact on the safety of the injectors. Since gasoline in Russia does not meet European standards, the injector nozzles do not serve the stated 100-120 thousand km.
mileage When the mileage reaches more than 80-100 thousand km.
injectors need to be changed. If a decision is made to change, then the question immediately arises: “What is the cost of injectors for a VAZ 2114?” If you buy “native” VAZ cars, then their cost in 2014 started from 500 rubles.
for one piece. Many drivers believe that it is better to purchase imported ones. Injectors produced abroad are several times more expensive than domestic ones, but their service life also increases.
How to check the injection nozzles of a VAZ 2114
Hi all! One friend told me that the life of the injectors on the “fourteenth” is about 90 thousand, is this really so? The thing is that the engine of my car began to work unstably and the power decreased significantly. So I’m sinning with sprayers. The actual question is: how to check the voltage on the injectors and their performance?
If you notice unstable engine idling, difficult engine starting, especially when cold, increased fuel consumption, then with a high probability we can say that there is a problem with the car's injectors. Checking the injectors on a VAZ 2114 is quite simple. We will need the following tools: a digital voltmeter or a multimeter with resistance measurement functions.
Symptoms of a problem
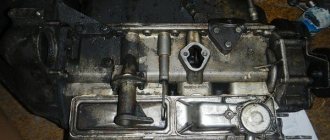
Fuel rail
There are several key symptoms that indicate the presence of such a problem:
- There are misfires at idle;
- Fuel consumption increases sharply;
- There is instability in engine operation;
- The car accelerates more slowly than usual when the gas pedal is fully pressed.
It is very important to identify such a problem, since the injectors supply fuel to the system. Without fuel, engine operation is impossible. It is not always worth replacing them immediately, since they often need to be cleaned.
Injectors for VAZ 2114
On VAZ cars, carburetor engines were replaced by inverter engines. Unlike the previous generation of engines, now the fuel supply to the combustion chamber is carried out not by one unit - the carburetor, but by an entire system. Car enthusiasts call it an injector.
In such an engine, it will no longer be possible to manually regulate fuel consumption or engine idle speed. An injector is a complex system that is controlled by special electronics. It receives and analyzes data from a large number of sensors, and then regulates the fuel supply to the engine.
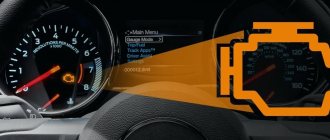
VAZ 2114 is equipped with an injection engine. You can see a “check engine” sign on the dashboard. If this signal comes on, you need to diagnose the vehicle's operation in order to maintain the serviceability of all components. However, if, in addition to the burning icon, other symptoms of deteriorated vehicle performance are recorded, then you need to check the VAZ 2114 injectors.
What injectors are installed on VAZ 2114/2115 cars
In fact, all types of injectors that the VAZ 2114/2115 are equipped with at the factory can be considered interchangeable. Depending on the year of manufacture, injectors manufactured by Bosch and Siemens of different markings were installed on the car.
Model 0280 158 022. The product is compatible only with a 16-valve engine with a volume of 1.6 liters. The nozzle is black and designed to operate at a rational pressure of 3.8 atmospheres.
Model 0280 158 017. An injector with this marking is installed on 8-valve engines with a volume of 1.6 liters. The body is also black.
Modification 0280 158 996 is considered obsolete, because injectors with this marking were installed on cars before the model was intended for 8-valve power units.
Standard equipment of VAZ 2114/2115 injection engines
VAZ20734 is made in an orange case. The model can be installed on a VAZ 2114/2115 of any year of manufacture, but the modification is paired with an 8-valve engine.
Model VAZ20735 is intended for a 16-valve engine. In terms of its features, it is virtually no different from the previous model. The nozzle has a blue marking.
Depending on the marking, it can be used on various types of engines
How to Check Injectors on a VAZ 2115
Content
How to repair and replace injectors on VAZ 2114 cars
Injectors are a mandatory attribute of any vehicle fuel system based on injection-type engines. The injectors play the role of gas atomizers and determine the required amount of fuel that is supplied to the combustion chamber. But during use, the attachments gradually develop. To improve the performance of the entire system and increase engine power, it is recommended to clean and flush the nozzles from time to time.
What injectors are mounted on VAZ 2114/2115 cars
In fact, all types of injectors that the VAZ 2114/2115 is equipped with at the factory can be considered interchangeable. Depending on the year of manufacture, injectors from Bosch and Siemens of different brands were installed on the car.
Model 0280 158 022. Product is only compatible with the 1.6 liter 1.6 liter engine. The nozzle is black and designed for a rational pressure of 3.8 atmospheres.
Model 0280 158 017. An injector with this marking is installed on 8-valve 1.6-liter engines. The body is also black.
Modification 0280 158 996 is considered obsolete, since such marking nozzles were installed on cars until the model was designed for 8-valve units.
VAZ 2114/2115 injection engines standard equipment
VAZ20734 is made in an orange body. The model can be installed on a VAZ 2114/2115 of any year of manufacture, but the modification is paired with an 8-valve engine.
VAZ20735 is designed for a 16-valve engine. In terms of its characteristics, it is actually no different from the previous model. The nozzle is marked in blue.
Depending on the marking, this may apply to different types of engines.
Replacing the nozzle
The difficulty in identifying problems with injectors is that the fuel system is quite complex, and you need to diagnose the performance of all its parts. For example, a malfunction such as a decrease in engine power may have two causes. nozzle malfunction or pump life depletion.
>
READ Where to put the Jack VAZ 2107
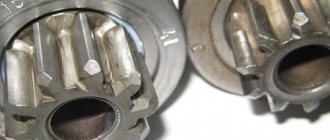
Clogged injectors can cause the engine to jerk while driving or have a rough idle. In addition, increased fuel consumption can be considered a sign of injector failure.
You can check the performance of each nozzle without even removing them. Starting the engine and removing the wires from each nozzle connector in turn is quite simple. If the engine starts to jam or stall immediately after removal, the nozzle is fine. In this case, if the stability of the engine does not change when the wire is removed, then the injector needs to be thoroughly cleaned or even replaced.
How to remove
The procedure for disassembling and installing injectors is not particularly difficult, but it does take a lot of time. It is necessary to prepare a set of tools in advance:
2 wrenches for 17;
flat blade screwdriver;
5 keys.
Before replacing replacement injectors, it is necessary to reduce the pressure in the vehicle's fuel system. This is a necessary measure that will protect your work and eliminate the possibility of injury.
To relieve fuel pressure, turn off the fuel pump. It is located in VAZ 2114/2115 cars in the fuel tank. The easiest way to get to the pump. through the hatch located under the pillow. Do it:
Nozzles are not known
As a transmission attachment, injectors do not know the injector; Engine injectors are unknown. No science
How to remove check, clean the nozzles yourself! (for example, VAZ 2114. 1.6, Siemens Deca)
Take off nozzles
, We check to clean the houses. Be careful, take precautions! I'll turn it off.
The seat must be folded down.
Find the small hatch under the rug.
Remove the screws that secure the valve.
Remove the cover and terminal block from the fuel pump housing.
After this you need to start the engine. The engine will run with the amount of fuel remaining in the system since the pump will not build up pressure once the block is removed. You have to wait until the engine runs out of gas and runs out of fuel.
READ How to Enable Cruise Control on Mitsubishi ACC
The procedure for removing attachments is as follows:
Open the hood of the car and remove the cable from the negative terminal of the battery.
To make disassembly easier, it is recommended to remove the air filter box. This will prevent free access to the engine.
The plastic latch on the motor then comes off and the connectors are disconnected from the throttle body.
In the same way, the connector is removed from the idle air control regulator.
Next, disconnect the connector block from the wiring harness of the injectors themselves.
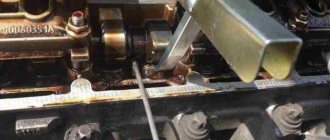
The nozzles can only be removed together with the fuel rail. Therefore, we unscrew the bolts securing the ramp to the body.
After this, you can move the ramp to the side so that none of the nozzles leaves the gap. The wire has been removed from the nozzles and cannot be removed on another ramp.
Remove the ramp and place it in the ideal location. Now you can simply remove all the attachments. they are unscrewed using a plastic lock.
Disconnect the injectors only after removing the ramp
Accordingly, new products are inserted instead of old ones. And further installation work is carried out in the reverse order.
Repair of VAZ 2114/2115 injectors
Repair of injectors includes a number of works:
Replacement of rubber seals.
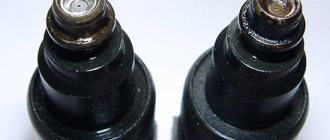
Once the products have been removed from the fuel rail , you should be familiar with any of the four sprays. In this case, if there are signs of leakage on the housing, repair will be inappropriate. You will need to immediately replace the attachment with the newest one. The differences in washing and cleaning procedures between 8-valve and 16-valve engines are minor. Therefore, you can control according to the same scheme.
If the body is clean and free of deformations and cracks, repair work is permitted . To do this, remove the seal from the housing and spray. It is recommended to leave these parts in acetone or solvent for 1.5–2 hours. While the parts are being washed, you can use a vacuum cleaner to clean the fuel rail. Then thoroughly clean the landing tip in the ramp using a toothpick or needle.
Then you can clean the inside of the nozzle. To do this, you will need a roll of electrical tape, a can of carburetor cleaner, and a syringe. An aerosol cleaning liquid is injected into the nozzle cavity through a thin syringe. It is better to wrap the junction of the syringe and the sealing tube with electrical tape. It is recommended to repeat washing the nozzle three times. After the product has dried. Once the body itself, as well as the seal and sprayer, can be assembled after drying, the nozzle can be installed on the ramp.
READ Replacement Wheel Bearing VAZ 2115
A cheap tool will remove dirt and deposits from the nozzle
Before installation, each nozzle is tested for resistance . The tester readings should be in the range of 11-15 ohms.
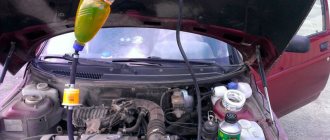
There is also a simple way to clean the injectors without removing the fuel rail. However, this is only relevant if the injectors have not exhausted their entire life (mileage 120-150). Cleaning additives in gasoline are allowed. In this case, all elements of the fuel system will be cleaned, but its insulation does not allow removing dirt and sediment from low-quality gasoline.
The liquid is poured into the tank and, together with fuel, cleans all elements of the system
Replacing rubber rings and gaskets on injectors
Usually, when cleaning or repairing attachments, motorists immediately change all rubber parts. This is due to high wear rates. The cost of rings and seals is very low, but after replacement you can immediately see the stability of the engine.
Rings and seals can be removed with one movement of the hand. However, installing new ones requires precision, since the rubber is easily damaged. The plastic element is first lubricated with gasoline and then stretched in place of the old seal.
Spare parts for VAZ injectors can be purchased at the lowest price
Almost every driver can clean or replace the injectors of VAZ 2114/2115 cars on their own. Difficulties can only arise in the process of unscrewing the fuel rail or connecting wires to the injector contacts. However, with careful completion of each stage of work, even a beginner can independently maintain this element of the fuel system.
Features of the injection VAZ-2115
Main parameters:
- produced at the Volzhsky Automobile Plant;
- year of production - 1997.
Auto design:
- body - four-door sedan (5 seats);
- location - front.
Engine and fuel:
- petrol;
- 1.5 and 1.6 l;
- four-stroke, 77 horsepower.
The transmission is mechanical.
Dimensional characteristics:
- length - 43.30 cm;
- width - 16.50 cm;
- height - 14.02 cm;
- ground clearance - 1.65 cm;
- rear track - 13.70 cm;
- front track - 14.00 cm;
- weight - 1.0 t.
Speed data:
- 100 km/h in 14.00 seconds;
- maximum takeoff run - 160 km/h.
Other parameters:
- gasoline consumption - 7.6 l;
- volume - 43.0 l.
What are the types of injector malfunctions?
On injection engines, two types of injectors are used - electromagnetic and mechanical.
The electromagnetic injector operates on the principle of a valve, which, depending on the signal from the vehicle's control unit, opens, injecting the required amount of fuel into the cylinder.
The mechanical nozzle opens under pressure. It is based on a spring and a needle. It works as follows: when fuel is supplied, a certain pressure is created, the needle rises and fuel is sprayed into the cylinder.
Nowadays, mechanical injectors are practically not used on modern cars, so we will talk about malfunctions of electromagnetic injectors.
Since the nozzle is a fairly simple part in its structure, it can have several faults:
- No signal from the control unit
- Internal winding break or other malfunction
- Contamination of fuel supply channels
As a rule, most often the injectors stop working as they should due to contamination.
Self-check of injectors
Let's start with the fact that automobile injectors are divided into several types, of which two types have found widespread use at different times: mechanical injectors and electromagnetic (electromechanical) injectors.
Electromagnetic injectors are based on a special valve that opens and closes the injector to supply fuel under the influence of a control pulse from the engine ECU. Mechanical injectors open as a result of increased fuel pressure in the injector. Let us add that modern cars often have electromagnetic devices installed.
To check the injectors with your own hands without removing them from the car, you can use several methods. The simplest and most affordable way to quickly check injection nozzles without removing them from the car is to analyze the noise emitted by the engine during operation.
You can identify a faulty injector by ear by the sound of the internal combustion engine if a muffled high-frequency sound is heard from the cylinder block. This indicates the need to clean the injector or a malfunction of the injectors.
Checking injectors without removing them
First of all, with the engine running, you need to feel the injectors with your hand. Normally they vibrate as they constantly open and close. If any injector does not vibrate, this indicates that it is not working.
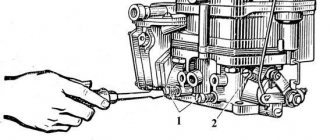
You can also additionally check the operation of the injectors by unscrewing the cap nuts with the engine running. If the speed decreases when unscrewing, the injector is working. If, after unscrewing the nut on any injector, the speed does not change, this indicates a problem with the injector.
There are several reasons for failure:
- the control signal does not arrive;
- No power supply;
- the injector has failed.
At the initial stage, you need to check the power to the injector, connectors, contacts, wiring, etc. If the diagnostics are inconclusive, the injector may need to be replaced.
Step-by-step procedure for checking injectors
When nothing interferes with the operation of the dismantled ramp, we reconnect the power supply and gasoline supply pipes to it. Don't forget about the negative terminal of the battery.
- When everything is connected and ready for testing, we fix the ramp with the injectors so that four measuring containers of the same volume can be placed under them. This is necessary to ensure that the measurements are made as accurately as possible.
- Next, it is best to ask an assistant to sit in the driver’s seat, and if this is not possible, secure the ramp motionless and start the engine yourself.
- While the starter is “spinning” the engine, make sure that the injectors work in the same rhythm and the fuel is sprayed evenly. When carrying out such diagnostics, it is very clearly visible which of the four injectors is “snotty” or does not work at all.
It is noticeable how one of the injectors works differently than the other.
The check ends some time after the injectors are turned off.
The latter should be given special attention if any of the pads does not work at all, because damage to the wiring becomes the reason for this. If damage is present, then it is necessary to replace the nozzle with a new one (see “more about choosing nozzles”).
Procedure for checking injector power supply
- First of all, disconnect all the pads from the injectors.
- Then, we connect two wires to the pre-working block, the other end of which we bring to the “non-working” injector.
- Next, turn on the ignition and if the injector starts working, this means it is necessary to replace the non-working element of the electrical circuit - the block, and if not, then only the injector needs to be replaced.
Resistance faults
- In order to diagnose the injector windings, you must disconnect the negative terminal from the battery and all injector power connectors.
- Next, we connect the multimeter probes to the injector contacts and measure their resistance.
Values are within normal limits.
Recommendations and tips
An indicator of normal operation of the nozzle is a high-quality spray of liquid. Also, after washing the injectors, it is recommended to replace the fuel filters; if necessary, the fuel pump mesh filter is additionally cleaned. This is necessary to prevent dirt from the fuel system from re-clogging the injectors.
Please note that the cleaning method by washing only removes surface deposits. If the injectors on a 2114 or VAZ 2115 have persistent and heavy contamination, it is necessary to perform deep cleaning of the injectors with ultrasound or washing on a bench. In difficult cases, ultrasonic cleaning of injectors is combined with washing to obtain better results.
Cleaning injectors VAZ 2114
To clean the injectors, they need to be removed from the car, this is done as follows:
- From a vehicle with the engine not running, disconnect the battery terminal.
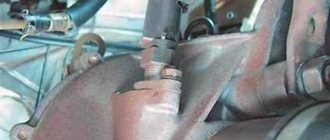
- Relieve pressure in the fuel rail. On the back there is a valve with a cap; by unscrewing it and pressing the valve with a thin screwdriver, you can release the pressure.
- For convenience, remove the air filter pipe.
- Disconnect both fuel pipes.
- Disconnect the connectors from the injectors.
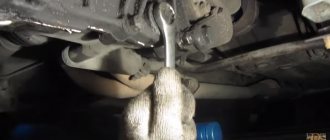
- Unscrew the fuel rail.
- The injectors are removed along with the ramp; in order to disconnect them, you need to move the fixing washer and pull the nozzle.
After removal, you can begin cleaning yourself:
- Remove the O-rings from the injectors and soak for a short time in acetone or gasoline.
- After soaking, carefully clean the nozzles with a needle and remove any other external deposits.
- To clean the inside you will need carburetor cleaning fluid, a syringe, a tube that fits tightly in diameter to the injector inlet holes, and a button with wiring.
- Connect the injector through the button to the battery terminals, as you did when checking.
- Fill the syringe with liquid and connect it to the nozzle using a tube.
- Apply pressure with the syringe and press the button.
- Liquid should spray out of the nozzle.
- Repeat this procedure several times, constantly maintaining pressure with the syringe.
- After washing, it is better to immediately replace the fuel filters.
This method removes only surface deposits; for deep cleaning of VAZ 2114 injectors, send them for ultrasonic cleaning.