Auto working spark plugs
If, as a result of these actions, the problem of engine tripping remains, then contact a specialist and diagnose the ignition system.
This is done using specialized equipment, so it is unlikely that you will be able to accurately make a “diagnosis” yourself.
How to set the ignition on a VAZ 2106? (Step by step instructions + video)
23
While operating a VAZ 2106 car, the car owner may encounter difficulty starting the engine and interruptions in the operation of the power unit. The cause of such malfunctions is incorrectly set ignition timing, which requires timely adjustment. This kind of work is not particularly difficult, so even those car owners who have little idea about repairing their car can handle it. In this article we will tell you how to set the ignition on a VAZ 2106.
How to boost a VAZ engine
To enhance engine power, various technologies are used. Boosting the VAZ 2106 engine is done using tuning.
The most effective way is to install a turbo on a VAZ 2106 and remove combustion products through a direct-flow system.
The VAZ 2106 turbo competes on the roads with many famous brands.
The turbine and turbocharging are installed on the improved six for the purpose of its modernization. At the same time, its power increases significantly. Installing special parts inside the power unit does not give the same effect as a turbine.
The VAZ 2106 turbo is used by fans of high speeds. The replaced tuning car has additional equipment that requires additional costs for the care and monitoring of the operation of all systems, for periodic technical inspection. The installation cost reaches half the price of the machine.
Symptoms of malfunction
Identifying an incorrectly set ignition will not be difficult. If your car has problems starting, the engine runs unevenly, pronounced detonation appears, all this may indicate improper ignition. Also, problems with ignition can also be determined in a folk way: The car is accelerated to a speed of approximately 45 kilometers. Turn on fourth speed and sharply press the gas pedal. After such a sharp acceleration, pronounced detonation and ringing of the so-called fingers appear, which goes away as the car accelerates, this may indicate a faulty ignition.
Step-by-step instructions for performing repair work
You can set the ignition on the VAZ 2106 engine to 4 or 1 cylinder. The operating algorithm is slightly different depending on the cylinder with which the work is being done. Also in this article we will tell you how to set the electronic ignition on a VAZ 2106. First of all, you need to determine which marks will set the ignition. The ignition is set according to the marks on the timing belt. The long mark corresponds to zero ignition, the middle mark corresponds to five degrees of the angle, the short mark corresponds to ten degrees of the advance angle. You can also find a top dead center mark on the pulley rim, and there is also a small bump on the pulley located opposite the top dead center mark. It is according to these marks that you should set the contactless ignition on the VAZ 2106. You need to unscrew the spark plug from the 1st cylinder with a spark plug wrench, close the spark plug hole that appears with a plug or your finger. Using a special key, you need to turn the crankshaft before the compression stroke begins. This compression stroke begins as soon as the piston begins to move upward. Compression can be determined by the pressure in the spark plug hole. You need to turn the crankshaft until the mark on the cover located on the timing belt matches. If you use low-octane fuel, then you need to align the mark on the crankshaft pulley with the long mark, which equals zero advance angle. If you fill the engine with 92 gasoline, then you need to combine the mark with medium risk. Next, unfasten the latches and remove the distributor cover. After turning the crankshaft, the rotor will be in a position where the rotor contact in the distributor is directed towards the first cylinder. Having aligned the marks, you should draw a line from the distributor that passes through the cover latches and is directed parallel to the engine axis. If such an imaginary line does not intersect the cover latches, it is imperative to make the appropriate adjustment: Unscrew the nut that secures the distributor, and then pull the distributor up. When rotating the rotor axis, it should be aligned parallel to the engine axis. We install the distributor in place, fix it with the fastening nut, but do not fully tighten it. Next you will need a test lamp or voltmeter. This device must be connected at one end to the output of the ignition coil, while the second wire from the lamp is connected to ground or to the carburetor. Turn on the ignition and smoothly turn the distributor. It is necessary to turn until the control lamp goes out. If the lamp does not initially light, then no adjustment is required. After this, we begin to turn the distributor counterclockwise. As soon as the warning light comes on, secure the distributor by tightening the nut. Turn on the ignition and install the distributor in place. Checking the correctness of the work done is not difficult. We accelerate the car to a speed of 40 kilometers and sharply press the gas in fourth gear. If such manipulations cause detonation that does not go away when the car accelerates, early ignition is set. The absence of detonation indicates late ignition. When the ignition is set to early, the distributor should be turned approximately one notch. If the ignition is set to late, then on the contrary, it is turned counterclockwise by one division.
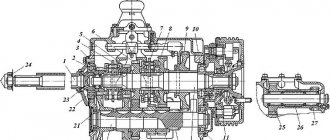
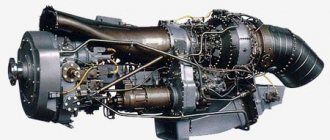
Engine VAZ 2106-1000260. Characteristics of the VAZ 2106 engine.
The engine is four-stroke, carburetor, in-line, with an overhead camshaft. The engine cooling system is liquid, closed type, with forced circulation of liquid. The engine has a combined lubrication system: pressure and splash.
Engine Features.
Engine 2106-1000260 can be used for installation on VAZ 2103, 2106, 2121, 21053, 2107 cars.
The VAZ 2106 engine is the result of modification of the VAZ -2103 engine in order to increase power. The change in engine power was achieved due to the engine displacement by increasing the cylinder diameter to 79mm.
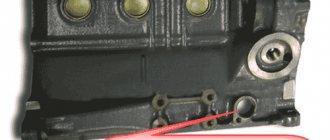
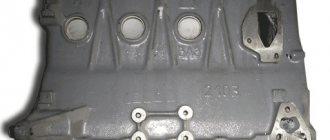
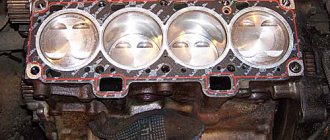
This change led to the appearance of the cylinder block 2106-1002011 with a cylinder diameter of 79 mm. Apart from a different cylinder diameter, the new block is no different from block 2103 (see “Cylinder block”).
Based on manufacturing accuracy, each cylinder, depending on its diameter, is assigned a certain class. Five classes are defined. The difference in size between classes is 0.01 mm. To designate classes, Latin letters are used: A, B, C, D, E. On the lower plane of the cylinder block, next to each cylinder, the designation of its class is applied. The block head remains from model 21011-1005011-10. The change in cylinder diameter required the use of a new head gasket.
On all “classic” engines, the pistons have a similar design, which they inherited from their “Italian ancestors”. The 2106 engine uses pistons from the 21011 engine with a nominal diameter of 79 mm. The model 21011 piston differs from the 2101 piston by the presence of a cylindrical hole on the bottom of the piston and has an increased diameter. During operation, different zones of the piston heat up unevenly. Therefore, to compensate for thermal deformation, the shape of the piston differs from the shape of a regular cylinder. For the same reason, there are steel temperature control plates in the piston bosses. To reduce dynamic loads on the piston, the hole for the piston pin is offset to the right from the central axis by 2 mm. To ensure correct assembly, next to the hole for the piston pin, there is a marking in the form of a “P” symbol. During assembly, all pistons are oriented so that the marks are directed toward the front of the block.
Five classes are defined for piston diameters, with a difference in size of 0.01 mm. Classes are designated in Latin letters, similar to the designation of classes for block cylinders. Pistons, based on the hole for the piston pin, are divided into three size categories - every 0.004 mm (categories are designated - “1”, “2”, “3”). The piston class and piston pin size category are stamped on the bottom of the piston.
Since 1986, two repair sizes for pistons have been determined: with an increase of 0.4 and with an increase of 0.8 mm.
A set of normal size cast iron piston rings is numbered 2106-1000100-10. A special feature of this kit is that the oil scraper ring is chrome plated (unlike kit 2101). Chrome plating is performed to increase the service life of the ring, which was required to be carried out under increased load associated with an increase in engine power. In addition to cast iron piston rings, rings made of steel can be used. The set of steel rings has its own designation - 2106-1004029.
We adjust valves of VAZ 2106
Owners of classic cars designed during the Soviet period often have to deal with the issue of repairing and tuning their car. Due to the high popularity and fairly strong density of cars on the roads of that time, some repair procedures and tuning operations remain quite relevant.
The design difference between classic cars and products of the modern automotive industry is the need to manually adjust many parameters.
The valve adjustment procedure on the VAZ 2106 is necessary for a number of specific reasons. The main reason is the significant heating of the power unit during operation. The laws of physics state that during heating there is a linear increase in the size of solids.
One of the most important elements that require adjustment under operating conditions is the gas distribution mechanism. The key element of this mechanism is the valve.
Valves are usually divided into intake and exhaust; they are responsible for opening access for the penetration of the air-fuel mixture into the working combustion chamber through special windows in the cylinder head. They are also responsible for the release of exhaust gases.
At the point of contact of the valve, a gap is formed, which is usually called thermal. It is this gap that is subject to careful adjustment.
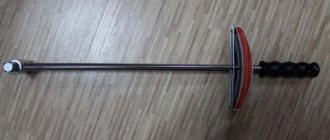
Valve adjustment gauges
The result of incorrect valve adjustment is an increase in fuel consumption and a noticeable decrease in the power characteristics of the power unit.
Advantages of the VAZ 2106 engine over its contemporary competitors
This unit is very successful compared to its predecessors. Its development was based on then modern technical solutions. The engineers were faced with a difficult task - it was necessary to significantly improve the existing engine models of the VAZ plant.
- Thanks to improved cylinder operation and increased unit volume, overall power has been significantly improved.
- The diameter of the cylinder block structure has changed upward.
- Since the cylinder head remained the same, to change the cylinder diameter it was necessary to introduce other gaskets.
- There are cylindrical holes. Each piston heats up evenly and gradually during operation. Thanks to this, the issue of thermal deformation was resolved. The plates that regulate heat are made of high quality steel.
Servicemen consider this power unit to be less reliable compared to the younger internal combustion engines of the classic series, and also prone to overheating and oil burns. But its power is not much higher. It’s good that at least the cost of repairs and spare parts is as low as its predecessors.
This engine does not like cheap oil, so to replace it it is better to use high-quality semi-synthetic type 5W-40 or 10W-40 and change it at least once every 10,000 km. All the features of the procedure are described in the video below.
The factory manual indicates an engine life of 125,000 kilometers, but the owners claim that in reality it is closer to 200,000 km.
Preparation for work and disassembly
I would like to immediately note that this procedure requires time and is conditioned by an understanding of the process. There is a certain algorithm for implementing this task. To begin with, place your car on a level surface and provide free and well-lit access to the engine compartment.
The engine must be cooled and at ambient temperature.
Before starting the adjustment process, you need to prepare:
- a set of different wrenches in sizes “10”, “13”, “14”, “17”;
- 0.15 mm feeler gauge;
- key for turning the crankshaft;
- screwdrivers;
- spare valve cover gasket.
The disassembly process includes removing the air filter, disconnecting all pipes from the air filter cover, removing the choke cable, accelerator linkage and cylinder head cover.
It is advisable to remove the distributor cover so that it does not cause inconvenience during the adjustment process. There will be marks on the pulley and oil seal cover. The crankshaft must be turned until they coincide.
This position indicates that in the 4th cylinder the piston is on the compression stroke.
Removal and installation
How to set the ignition of a VAZ 21213 carburetor
If the distributor fails, it can either be repaired or replaced with a new one. Here everything depends on the specific breakdown.
The sequence of removal and installation steps is as follows:
- First you need to de-energize the car's electrical circuit; to do this, disconnect the battery.
- After this, you need to disconnect the wires from the distribution unit. Having done this, also disconnect the vacuum pipe that goes to the corrector.
- Next you need to find the cable holder that goes to the throttle actuator. This cable must be removed.
- Dismantle the bracket that secures the wires, along with them and the studs. To do this you will need to unscrew the nut. Be careful - there is a washer under the nut, you cannot lose it.
- Having done this, you need to install marks on the housing of the distribution unit and the drive of the auxiliary elements. If you do not put the marks, then after further installation of the mechanism in place you will have to set and adjust the ignition again.
- On the distributor body you can see the connector to which the harness with high-voltage wires is connected. You need to press out the fastening, use a screwdriver for this, and remove the wires. Then remove the rubber plug, which is located in the clutch housing itself.
- Rotate the crankshaft with your own hands until the piston of cylinder 1 reaches TDC. The mark on the flywheel in the hole must coincide with the middle mark located on the housing scale.
- After this, you can unscrew the nuts that secure the distributor and dismantle it.
- As for further installation, it is carried out in the reverse order. When installing the device in place, you must make sure that the distributor shaft is turned so that the outer contact of the runner is located against the terminal that corresponds to 1 cylinder of the internal combustion engine. The terminal itself is located on the cover.
- When installing, combine the risks as we reported above. If you have difficulty installing the ignition, use this article.
Sorry, there are no surveys available at this time.
The procedure for carrying out the valve adjustment process
Table of the sequence of adjusting valve clearances on a VAZ 2106 car:
| Crank angle | Camshaft angle | Cylinder numbers | Adjustable valve numbers |
| 0° 180° 360° 540° | 0° 90° 180° 270° | 4 and 3 2 and 4 1 and 2 3 and 1 | 8 and 6 4 and 7 1 and 3 5 and 2 |
The valves must be adjusted according to a strictly defined sequence. The following data indicates the degree of rotation of the crankshaft to adjust one valve or the other:
- The initial position, when the marks coincide, makes it possible to adjust valves 6 and 8.
- Having turned the crankshaft 180 degrees, we adjust valves 4 and 7.
- Rotation 360 degrees provides access to work with valves 1 and 3.
- A 540 degree rotation allows you to adjust valves 5 and 2.
For convenience, car enthusiasts and craftsmen apply their own marks to the crankshaft pulley. Most often it is divided into two parts, leaving a mark opposite the one made at the factory.
The process of adjusting valves on a VAZ 2106
From this video, you will learn how to adjust valves for a VAZ 2106. Enjoy watching!
During the adjustment process, you should adhere to this algorithm:
- Having maintained the position set according to the marks, we check the gap on cams 8 and 6 of the camshaft. An important fact is that the gaps are calculated starting from the star mark, which is located closer to the windshield. From this cam we begin counting. Next, under the camshaft, slightly above the rocker itself, we place the dipstick. If the probe penetrates freely, then it is necessary to loosen the nut 17 of the rocker where the measurements take place. To avoid any problems with scrolling, you need to loosen the nut by 13. Next, tighten the nut by 17 and the gap is measured again. It is necessary to ensure that the probe, penetrating into the gap, does not bend, but at the same time fits into it quite tightly with a certain force. After achieving the desired result, you can begin adjusting the next cam.
- For approximately 6 strokes, use the key to rotate the engine shaft. The mark on the sprocket should be in the 9 o'clock position and aligned with the mark on the pulley. Next, we adjust cams 4 and 7. The adjustment process is identical to that described above.
- Then we rotate the shaft 180 degrees. The mark on the star is at the 6 o'clock position. The mark on the pulley must strictly coincide with it. In this position, cams 1 and 3 are adjusted.
- By turning the shaft so that the mark is at the 3 o'clock position, we will be able to adjust the 2nd and 5th cams.
- The last step is to crank the crankshaft with the starter, then check all adjustments and tighten the nuts. We reassemble all dismantled elements in the reverse order. If necessary, we replace the valve cover gasket during the assembly process.
Specifics of the work
There is a category of drivers who strive to do all the maintenance and repair work on their car themselves.
This is especially true for owners of domestic cars, and this is commendable.
But such drivers need to realize that a number of works, especially those related to adjustments, require not only theoretical knowledge and experience, but also a kind of “feeling” that comes with time, through trial and error.
Especially such work includes all adjustments carried out on the carburetor, as well as valve adjustment and a number of other adjustments.
Therefore, if you are doing this for the first time, then call a person who has done such work on his car at least 3-5 times, and preferably on the same model as yours.
Also, before carrying out work, check the timing belt tension. It is important.
If you have just arrived at the garage and want to adjust the valves on the same day, then it will take about 5-6 hours for the engine to cool down.
You can immediately begin removing the valve covers and other parts; this will reduce the engine cooling time to 1-2 hours, as the heat exchange between the hot engine and the environment will increase.
It’s better to proceed from the principle: arrive in the evening, carry out the work in the morning.
By the way, don’t forget about the gasket under the valve covers; in 90% of cases it has to be replaced, so you should have a new gasket on hand.
Counting cylinders and valves.
The valves are counted as follows. Stand to the left of the car in the direction it is moving, near the engine. Face the engine.
Cylinders and valves are counted from left to right of the timing chain.
The last will be the 4th cylinder and 7.8 valves, but the adjustment begins with valves No. 6 and 8.
Useful tips
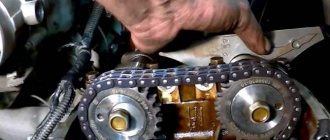
Particular attention should be paid to the timing chain before adjusting the valves. The chain must be installed correctly.
Traffic warning signs. You can find out what these signs are on our website.
This article contains a rating of DVRs with two cameras.
Here you can read how to make panel tuning for a VAZ 2114.
The degree of tension should be carefully monitored.
An uneven knocking sound in the area of the upper part of the valve cover is evidence that the thermal clearances of the valves are increased and their adjustment is necessary. To adjust and measure the gap, it is necessary to use special feeler gauges aimed at adjusting classic VAZ engines.
These probes are wider. Standard feeler gauges are quite narrow and are not able to cover the entire width of the gap in the area of the pressure arms and camshaft cams. This makes it impossible to determine the correct gap size.
In most cases, the cover accompanying the dipstick contains a valve adjustment diagram. It is presented and designed in the form of a table. A well-tuned engine on a VAZ model 2106 is a fairly reliable design.
Adjusted valves reduce engine noise, ensure maximum performance and fuel efficiency. To achieve and maintain the maximum performance indicators specified by the manufacturer, adjustments must be made at a preferable frequency of 15 thousand kilometers traveled.
Repair
How to correctly set the ignition on an ant
Repairing a VAZ 21083 engine with your own hands is quite simple. The main thing is to know the cause of the breakdown. Many owners of cars with a well-known engine have encountered common problems over the years. Thanks to this, it was possible to identify the main symptoms of impaired engine operation and find measures to get rid of them:
- Unpleasant knocking is often the cause of changes in valve clearance. Adjustments are made every 50 thousand km.
- The engine starts to stall. With such a symptom, it is worth measuring the compression.
- The car will not start after being parked for a long time. The reason often lies in electronics. The repair measure is to diagnose the car at a service station.
- Fuel consumption has increased - often this malfunction is the result of carburetor contamination.
Repairing the VAZ 21083 engine in service centers is quite simple due to the high prevalence of the car in Russia.
The best Lada model
VAZ 21099 was equipped with several types of engines. The most widespread power unit installed on VAZ 21099 carburetors was the VAZ 21083 engine. This gasoline 4-cylinder 8-valve engine became the founder of a whole family of engines that were mounted on all cars from the Lada Samara-2, Lada 110 model series " and "Lada Priora". Among its descendants is the naturally aspirated injection VAZ 2111-80. It was this engine that was most often installed on the VAZ 21099 injector.
It is difficult to carry out a major overhaul of the engine of a VAZ 21099 car on your own, but if the malfunctions are caused by breakdowns of attachments or ignition, cooling and fuel supply systems, then they can be repaired without contacting a car service center.
Adjustment of valves
If knocking, unstable operation, or increased vibration occur, you should pay attention to the valves.
If the valve timing of the gas distribution mechanism is disrupted, they do not operate accurately, that is, the full volume of gas does not enter the working area of the cylinders, complete combustion of the fuel-air mixture in the working chamber does not occur, and the cylinders are not purged. This is all accompanied by the appearance of a shock load on the camshaft cams on the drive lever and the shaft rod. Fuel and engine oil consumption also increases. What happens if you drive with unadjusted valves? Answer: rapid wear of engine parts, increasing cost and repair time.
Rubber oil deflectors, also known as oil deflectors, also burn out due to a burnt valve cap, which leads to increased engine oil consumption. If the wear of engine parts is large, then it may be better and easier to do an engine swap with your own hands or at a service station.
Even if your engine does not have a belt drive, but a chain drive, then if you do not change the chain before its service life expires, the valves will bend on the piston, as, for example, in the sr20det engine manufactured by Nissan.
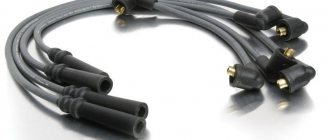
How to connect wires correctly
When replacing high-voltage conductors, they are first connected to the ignition distributor. The distributor cover is convenient in that it is always installed in one position. There is a special mark on it, thanks to which it will not be difficult to place the part in place. Before connecting the wires, inspect the cover. It must be intact, since if cracks appear, the performance of this unit is not guaranteed.
The mark on the distributor cover is located next to the wire socket of the first cylinder. The firing order of the cylinders is slightly out of order (1-3-4-2) due to the ignition slider. It moves around the circle (distributor) counterclockwise. It is precisely by this principle of movement of the slider that it is easy to remember the order of the wires. They need to be connected to carburetor and injection VAZ-2109 according to the same principle. On the distributor cover, connect the wires according to the principle of movement of the slider, this is the only way you can set the ignition correctly:
- the socket of the first cylinder is located at the mark;
- the third one is connected at the very bottom;
- on the same line with the socket of the first, there is a place for the wire to the 4th cylinder;
- at the top point the second cylinder is connected.
On the engine itself, the cylinder numbering goes from the location of the timing belt to the starter, that is, from left to right. The fourth cylinder is closest to the starter, and the first is closest to the timing belt. When connecting, it is important to look at which socket of the distributor cover the wire comes from, if you confuse their location, the car will not start.
If you have connected the wires correctly, but the car still does not start, then the problem may be in them. Check high-voltage conductors for integrity. If you haven't changed them in a while, it's worth buying a new set. The peculiarity of these wires is that over time microcracks can form on their surface. They lead to a lack of spark when the ignition distribution system is working. Moisture and dust get into these cracks, which damages the wire from the inside, although it appears intact from the outside.
The procedure for adjusting valves VAZ 2101-2107
First we prepare the car:
- wait until the engine cools down if it was running;
- park the car on level ground;
Valve adjustment procedure:
- Remove the air filter cover and the filter itself.
- Remove the air damper control cable (choke).
- Remove the throttle linkage.
- Unscrew the nuts securing the valve cover and remove it.
- Before adjusting the valves, immediately check how the chain is tensioned. If the tension is not normal, you will have to do the work again.
- Remove the distributor cover.
- We install the piston in the 4th cylinder at top dead center (TDC). TDCs are set using marks on the internal combustion engine crankshaft pulley and the camshaft drive cover, and marks are also applied to the camshaft gears and camshaft cover. The mark is set with a special key for the internal combustion engine crankshaft pulley bolt. If you don’t have a key, you can set the 4th piston to TDC by rotating one of the rear wheels. Raise one side with a jack and place the gear shift lever in 4th gear to make it easier to turn and turn the wheel slowly. When setting marks without a key, you will need an assistant to look at the marks.
- When the marks on the camshaft and the camshaft cover are aligned, check that the marks on the crankshaft are also aligned. You can also check whether the marks on the distributor slider match. The contact terminal should be directed to the high voltage wire terminal of the fourth cylinder. We have already discussed how to determine whether ignition is early or late in another article.
- After the marks match, we proceed to adjusting the valve clearances.
The correct procedure for adjusting the valve mechanism of the VAZ “Classic” 2101-2107. Crank angle Adjustable valves 8 and 6 180 4 and 7 360 1 and 3 540 5 and 2
Disconnect the filter mounting tubes and remove the mount.
From the table we see that if the 4th piston is set to top dead center, then we measure and adjust the 6th and 8th valves.
Instructions for setting the ignition of the VAZ 2106
Let's look at 3 known methods of adjusting the ignition angle on VAZ engines.
Using a strobe light (by marks)
This method allows you to very accurately set the ignition to the marks, and does not require removing the distributor and valve cover. The entire adjustment process takes 5 minutes. A strobe light can be found at any auto store. The procedure is as follows:
- With the car turned off, loosen the nut securing the distributor, having first made a mark of the initial position on its body;
- We connect the negative wire of the strobe to the engine ground, the positive wire to the ignition coil, and a special clamp to the high-voltage wire of the first cylinder;
- We start the engine and turn on the strobe. The light from its lamp directed at the pulley will show the true position of the ignition timing;
- Slowly turning the distributor body, we achieve alignment of the mark on the crankshaft pulley and the bosses on the front cover;
- We check the engine speed using the tachometer and, if necessary, adjust the idle speed on the carburetor;
- Tighten the distributor fixing nut.
On the front engine cover we find two short and one long marks, clean them of dirt and oil;
The “4” mark on the pulley must be aligned with the mark you need on the cover. Label “1” corresponds to an angle of 10 0, “2” - 5 0, “3” - 0 0
The marks have values of 0 0, 5 0 and 10 0 relative to top dead center (TDC). For proper operation on 92 gasoline, select an advance of 0 degrees.
Installation by light bulb
If you don’t have a strobe handy and you need to set the ignition accurately, it is recommended to use a simple 12-volt car lamp. Two wires with stripped contacts are soldered to it. The settings are made in the following sequence:
- Unscrew the spark plug from the first cylinder;
- Using a ratchet or a suitable wrench, rotate the crankshaft until the compression stroke begins in the first cylinder;
- We combine the marks on the crankshaft pulley with the tides on the cover body, for 92 gasoline we select the middle or last short one;
- Remove the distributor cover, noting the position of the slider on the rotor opposite the first cylinder;
After removing the distributor cover, it is necessary to note the position of the slider on the rotor opposite the first cylinder
Advice! Instead of a signal lamp, use a voltmeter, which is connected in the same way. By rotating the distributor body, we look for a position in which there is no voltage.
We set the ignition by ear
It is possible to quickly adjust the approximate position of the distributor without any instruments. It will take a little patience and good hearing. This method is applicable only if the carburetor and timing belt are in good working order. We proceed this way:
This adjustment by ear requires testing on the road or with a strobe light, but for initial tuning it is the best option.