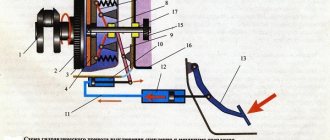
How to bleed the clutch on a VAZ-2107 yourself
Why is it necessary to bleed the clutch? The fact is that it will work well only if there is no air in the system itself. Otherwise, the gears will be difficult to shift. Newbies in the world of motor transport ask the question: how to properly bleed the clutch on a VAZ-2107? There are still millions of owners of this car, and therefore the issue is still considered relevant. Fortunately, such work can be done with your own hands - it is by no means necessary to take the car to a workshop, where you will have to spend a lot of money. After work, such as replacing the working fluid or any manipulations with the hydraulic drive, air can enter the system. To get rid of it, the clutch is pumped. A brief step-by-step instruction will help you understand the pumping process.
Checking the quality of clutch bleeding
Regarding the pumping itself, it should be noted that the process itself should not be long: on a VAZ-2106 - 4-5 pumps followed by draining and 5-7 sharp presses on the pedal with a leisurely release - on a VAZ-2107.
If the process takes more steps, you need to look for where air got into the system, fix the problem, and then pump it again.
You can check the operation of the drive after bleeding while driving.
Start the car, move slowly and change gears. If there are no signs of hydraulic drive malfunction, we can assume that the pumping was done correctly.
Stages of work
Before you start working, it is better to enlist the help of another person. Then it is important to carefully check the integrity of all connections and the hose on the car - there should be no leaks, cracks, etc. Under your hood there will be either an injector or a carburetor - it all depends on the modification of the VAZ-2107 model. Work should be carried out carefully following all the following steps:
- Pour brake fluid into a transparent container.
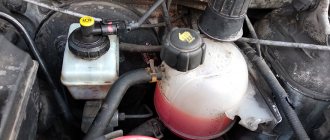
- On the body of the working cylinder you can see the clutch bleeder fitting - this procedure will be carried out with the help of it. Remove the protective cap from it and smoothly tighten the rubber tube.
- The lower end of this same tube should be lowered into a container with brake fluid and it is important to ensure that the end of the tube always remains immersed in it.
- Pour brake fluid into the reservoir (expansion tank).
- After this, the fitting must be loosened slightly. To do this, you just need to unscrew it about half a turn.
- During this, the assistant must press the clutch pedal every three seconds and keep it pressed all the way.
- If all of the above was done correctly, then liquid will flow through the tube, and you will also notice air bubbles in it.
- Continue in this manner until the air is completely released. As soon as the bubbles stop coming out, the mission can be considered successfully completed.
- At the end, the assistant must press the pedal, and at this time you must tighten the fitting thoroughly and put on the protective cap, which you removed at the very beginning of this operation.
It is possible to do a similar procedure without a hole, but for this you will need an overpass. By following these instructions, people who have virtually no experience working with cars will be able to do the bleeding procedure correctly.
When do you need to adjust the clutch on Lada 2107?
It is recommended to check the settings regularly at every car maintenance. But there are still signs when the procedure should be started immediately, so it wouldn’t hurt any owner to know how to bleed the clutch on a VAZ 2107 on their own. Malfunctions in the operation of the coupling during operation are expressed by the following symptoms:
- Slipping – the clutch disc slips when the pedal is fully released, and is unable to transfer all the power from the internal combustion engine to the transmission.
- Drives - the disc does not move away from the flywheel when the pedal is fully depressed, which makes it difficult to change gears.
What should I check?
The clutch may engage too early or late due to the pedal not moving properly, resulting in jerking while driving. The free play of the pedal should be within 0.4-2.0 mm; if these indicators are violated, then adjustments are necessary.
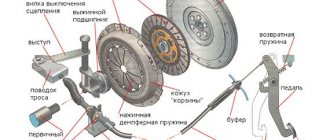
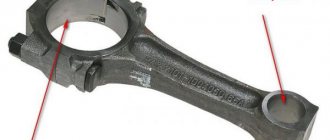
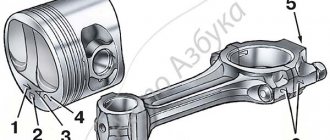
If you look under the car, you can check the free play between the pusher (indicated by the red arrow) and the release fork (blue arrow). Before adjusting the clutch on a VAZ 2107, you need to pump the fork by hand; if there is no free play or exceeds 5 mm, then adjustment of the unit is necessary, because the release bearing will be subject to constant loads.
If all adjustment parameters are normal, the pedal stroke before the clutch starts engaging should be 25-35 mm. This is determined using a ruler; if the indicator does not correspond to the norm, then you will have to adjust some components of the clutch drive system.
It's simple: how to properly adjust the clutch on a VAZ 2107 without the help of specialists?
The procedure for fully setting up the friction clutch control system consists of two parts, one is performed in the cabin, and the other is performed under the car from the inspection pit. To work you will need a set of tools:
- Set of keys.
- Set of screwdrivers and pliers.
- Ruler or square.
Adjusting the initial travel of the clutch pedal
A bracket with a pusher is installed under the steering column in the cabin. By rotating the nuts, you can achieve the desired clearance between the pusher and the clutch master cylinder piston. It is this parameter that is responsible for the initial free play of the pedal; the adjustment technology is quite simple:
- Use a wrench (no. 1 in the photo) to hold the travel stop, and use a second wrench to unscrew the lock nut two turns.
- Rotate the limiting pin with the first key (screw in or unscrew), set the desired initial free play of the pedal - 0.4-2.0 mm.
- Check the free play using a straight edge and, if necessary, repeat the adjustment operation.
- Tighten the locknut with a wrench.
How to adjust the free play of the release fork?
Before you bleed the clutch on a classic VAZ 2107, you need to perform the second adjustment stage, which is done on an overpass or inspection hole. The technology for checking and adjusting the free play of the clutch release fork is as follows:
- Using pliers, remove the spring from the fork and then from the working cylinder. The check can be done without dismantling the spring, but when checking the free play, you will have to apply force to overcome its resistance.
- Check the stroke of the fork with a ruler, pressing it all the way. The readings should be within 4-5 mm; if there are deviations, then the following points should be followed.
- Clean the cylinder of dirt and spray the nuts with WD-40.
Why and how to bleed the clutch on a VAZ 2107 in your garage?
Bleeding is necessary if the clutch does not disengage completely. For example, the pedal is depressed, the first gear is turned on, but before you even have time to release the pedal, the car is already moving. A slight pedal stroke also indicates the need to remove air from the system. The procedure must be performed with an assistant who will press the pedal. To work you will need:
- Brake fluid.
- Rubber hose 50-100 cm long.
- "8" wrench.
- Container for liquid.
- Brake fluid.
Car owners who are interested in how to properly adjust the clutch on a VAZ 2107 should know that bleeding is carried out through a fitting located on the working cylinder under its bottom. The operation is no more complicated than adjusting wheel alignment ; even a novice car enthusiast can perform it.
Pumping technique
It is advisable to carry out the work on an overpass or inspection hole; in extreme cases, the machine should be raised on supports. Further actions are carried out according to transitions:
- Pour new fluid into the clutch reservoir.
- Place one end of the hose onto the working cylinder fitting and lower the other end into a container.
- Ask an assistant to press the clutch pedal 5-6 times and hold it pressed.
- Loosen the fitting on the cylinder with a “8” wrench and release the liquid with air into the container, then tighten the fitting and ask to release the pedal.
- If necessary, add liquid to the tank and repeat the operation until there are no air bubbles in the liquid.
During pumping, do not allow the liquid level in the tank to drop below 15 mm, and top it up in a timely manner. Finally, you need to check the functionality of the coupling:
- Start the car and put the car in reverse gear; the appearance of jamming or extraneous noise is unacceptable.
- Check the gear shift while driving; if acceleration and shifting occur without jerking or extraneous noise, then the clutch control system is configured normally.
Instructions for bleeding the VAZ-2106 clutch
- To begin with, put a hose on the fitting hole (they must have the same diameter), having previously cleaned it of dust and dirt.
- Next, the opposite side of the hose must be installed in a tank into which the already used brake fluid will be poured.
Note: the rubber hose must be put on the pipe with a reserve so that it does not fly off.
- At the next stage, the owner of a VAZ-2106 car will need the help of a partner, since it is necessary to depress the clutch pedal several times, with some time interval.
- Once the pedal movement begins to become difficult, you need to stop and hold it in this position.
- The car owner, in turn, must at this time loosen the pipe until the brake fluid begins to flow down the hose (if bubbles are noticed in it, this indicates that there is air in the system).
- When moisture begins to come out, you may notice that the clutch
begins to fail. After it is deepened all the way, you can screw the fitting back. - the clutch
again . - The steps must be repeated until all bubbles have disappeared from the exiting brake fluid.
- While pumping, you may notice that the fluid level decreases. There is nothing wrong with this, it just needs to be topped up as needed.
Note: you need to ensure that the TJ does not drop below 10 millimeters from the bottom. Otherwise, air will appear in the system again, which means that all the work will have to be repeated again.
- Next, you will need to check the brake fluid level and, if necessary, top it up to the filler neck.
- Then tighten the cap of the VAZ-2106 tank, unfasten the hose and screw in the fitting.
At this stage, bleeding the clutch can be considered complete, but you should not immediately drive onto a busy highway. You should drive a little on the road without other cars.
During such a check, you need to pay attention: so that while the reverse gear is engaged and the pedal is pressed all the way, there is no grinding of the Renault gear or other unnecessary noise. A situation where such sounds, noises or creaks occur indicates that the work was not carried out entirely correctly, and there is air left in the system. Accordingly, the entire procedure will have to be repeated.
In conclusion, it must be said that bleeding the clutch, like all other necessary checks and repairs, must be carried out efficiently and on time. All this affects the proper functioning of the car, and the safety of not only the driver, but also those around him depends on it.
How to bleed the clutch on a VAZ-2107 yourself
The clutch is bled when air enters the system.
Often this happens due to depressurization of hoses or weak tightening of threaded elements. This damage is considered one of the most unpleasant, moreover, it can take absolutely any VAZ-2107 car owner by surprise. The main problem is that the car will not be able to move further. To repair a vehicle, you will need to call a tow truck or rely on a fellow driver who will help tow the car to a garage or service station. If the first case involves additional financial costs, then the second will make you realize once again that understanding drivers who are ready to put aside their affairs and problems are not so often found on the road. Let's talk about how you can pump the clutch, what subtleties appear during this lesson and what you will need.
The clutch of a domestic VAZ-2107 car is pumped after repairs carried out with a hydraulic drive, or after the working fluid has been replaced. In these situations, air can end up in the system. If the latter is present in the hydraulic drive, the clutch is not completely disengaged; as a result, gears are shifted very slowly.
Like any type of activity, bleeding the clutch requires preliminary organization. In addition to the instruments (listed below), it is necessary to check the level of hydraulic fluid in the tank, which must be no less than normal. Next, you need to clean the clutch assembly from contamination. All these points will, for the most part, facilitate the implementation of the upcoming stages.
To carry out the work, the machine must be installed on an inspection hole or overpass. What you need to prepare in advance:
- the brake fluid itself;
- a small transparent container for draining fuel fluid;
- hose (size must fit the drain fitting);
- standard set of tools for cars (it must include an 8 mm wrench);
- a stop for fixing the clutch pedal (in case you didn’t take care of an assistant and you need to do all the manipulations yourself).
Before proceeding to the actual bleeding stage in a system with a mechanical and hydraulic clutch, it is necessary to configure it. The need for adjustment is due to the fact that in the absence of free movement for the master cylinder piston pusher, it is impossible to carry out bleeding operations. Both the pusher and the piston are, at their core, a shut-off valve.
Algorithm for carrying out the clutch bleeding operation on a VAZ 2106
The first thing you need to do is put a rubber hose of the appropriate diameter onto the fitting inlet. Before performing this operation, it is recommended to clean the inlet from dust and dirt deposits. The second end of the hose is directed into the tank to receive brake fluid (used). It should be remembered that the connecting hose must be placed on the fitting with some tension.
Unfortunately, it is impossible to do without outside help when bleeding the hydraulic clutch. Why is it this way? The answer lies on the surface! Help will be required during subsequent operations directly inside the vehicle. Your partner will have to depress the clutch pedal about five times. In this case, the interval between pumping should not be less than 3...5 seconds. If the pedal does not return to its original position, it should be returned to this position independently.
After the clutch pedal is recessed once again, the one who works with the hydraulic drive must unscrew the drain fitting using an open-end wrench. However, remember that the fitting should not be completely unscrewed. This operation is necessary to ensure that the air leaves the system (when unscrewing the fitting, the user will hear the movement of air masses coming out of the hose). Immediately after the leak stops and the air leaves the hydraulic system, the assistant will need to give the command to release the pedal so that it returns to its original position. At that time, the person working with the hydraulic system must tighten the fitting. Professionals working in service centers note that the clutch pedal should acquire elasticity with each operation of unscrewing and tightening the fitting. As soon as the force becomes required, you can stop performing the operation.
As a rule, the brake fluid level, when performing the above steps, does not decrease too much in the standard clutch reservoir. However, despite this, careful monitoring of the brake fluid level should be carried out. A reduction of up to 10 mm from the bottom edge of the drive capacity should not be allowed.
The next step will be to increase the tightening torque of the fitting device to the maximum and dismantle the auxiliary rubber hose. Many car enthusiasts who bleed the VAZ 2106 clutch for the first time do not take into account the fact that liquid remains inside the auxiliary hose after its removal. That is why it is best to drain this liquid back into the tank.
Several ways to bleed the clutch. Video:
So, after completing all the previous operations, you will need to top up the brake fluid into the standard tank by tightening the cap with a little force. Then we use the rags we prepared earlier and remove all the smudges. Many experienced people advise performing a visual inspection of the entire system before turning on the engine. If no problems are found, then you can start checking the system directly with the engine running (with mandatory gear shifting).
The last step will be to check the quality of the work. The test will consist of measuring the stroke of the piston pusher when pressing the clutch. When bleeding the clutch correctly, the stroke should be about 26...28 mm. What to do if the actual parameters do not meet the requirements? You should not make unreasonable decisions. It is enough just to carry out an additional adjustment operation.
Remember that clutch bleeding must be timely and of high quality, since the safety of absolutely all road users will depend on this!
If you do not carry out preventive maintenance on your car in a timely manner, this can lead to sudden breakdown of components and even accidents. You need to pump the clutch on a VAZ at least once a year, but if you notice clear signs of bubbles in the brake fluid, then you need to do it now. In this article you will learn how to determine that there are bubbles in your brake fluid, and most importantly, you will find instructions for bleeding the clutch on a VAZ. This article is ideal for models 2106, 2101, 2107, and is also applicable to 2104. Even if you are the owner of another VAZ model, read this article, look at the principles of clutch bleeding and try to apply them to your car.
Clutch adjustment VAZ-2107
In order to set up the clutches, you need 2 keys, and with the right approach you won’t spend much time.
The pedal travel itself on the 2107 model must be 120-130 mm. The stroke is adjusted by turning the adjusting nut. The distance between the pusher rod and the end of the release fork should be 5 mm. First you need to remove the spring from the fork and bracket. In order to increase the stroke, the fastening components should be tightened; to decrease the stroke, they should be unscrewed. The second wrench is needed to tighten the control bolt. When the required parameters are achieved, you will need to press the pedal 3 times and then measure the distance. If necessary, the procedure can be repeated.
In addition, before pumping, it is advisable to replace the working fluid. To do this, you need to remove the cap and put it on the fitting (pre-prepared hose), the opposite end should be lowered into a container for draining. Using a size 8 wrench, turn the fitting approximately ¾ of a turn. The liquid is then removed. So, pressing the pedal, you need to repeat this process until everything flows out, then tighten the fitting. In the case when the clutch pedal does not rise on its own, you should pull it up by hand. Using the clutch reservoir, you need to fill the brake fluid into the system.
The mechanism of Soviet VAZ cars is mostly similar, including the clutch. By the way, the technique described below is suitable not only for the 2107 model, but also for the VAZ-2106 and 2109. You need to pump the clutch in stages. It doesn't require super skills, education or vast experience. You need to be consistent and understand the design of your machine. We remind you that work will be more productive if you have an assistant.
Bleeding the hydraulic clutch of a VAZ 2106
If the question arises of how to bleed the clutch of a VAZ 2106, you should prepare the necessary plumbing tools and auxiliary material in the form of a container with brake fluid, an auxiliary hose and a reservoir for filling the drained waste.
If the hydraulic clutch of a VAZ 2106 is pumped after replacing the brake fluid, then it is first necessary to clean the drain fitting of the main clutch cylinder (clutch master cylinder) from dirt and dust deposits. This work is carried out using a special brush with a working surface made of steel wire.
To gain solid knowledge of how to bleed the clutch, you need to follow the following algorithms:
- We put the pre-stored rubber hose onto the fitting outlet, which has been treated and cleaned of dirt and dust deposits. This connecting element must be pulled onto the fitting with some force. We direct the other outlet of the hose to the tank to receive used brake fluid.
- To carry out the operation of bleeding the clutch, the help of another person is required, who will help carry out subsequent actions while inside the vehicle.
- The assistant must depress the pedal of the device 5-6 times, and the time interval between pumping should be 3-4 seconds. If, after pressing the pedal device, the product does not restore its original position, then it should be returned to the starting position.
- After recessing, the clutch pedal is held in the recessed position by an assistant in the cabin. At the same time, a car enthusiast working on a hydraulic drive must slightly unscrew the fitting to drain the working fluid using a wrench. At this time, the “brake fluid” with air bubbles begins to come out.
- After the leak from the rubber hose has stopped, tighten the drain fitting and give the command to your partner in the cabin to release the pedal so that it assumes a free position.
- We repeat the previous technological cycle with unscrewing and tightening the fitting element. A logical continuation of these actions should be a gradual “hardening” of the clutch pedal, i.e. it should acquire elasticity.
- The frequency of these successive operations must be repeated 3 to 5 times or until the end of the release of air bubbles from the rubber hose directed into the reservoir for draining the used brake fluid. In this case, it is important to control the volume of brake fluid in the standard clutch reservoir. The brake fluid level must not be allowed to decrease less than 10 mm from the lower edge of the hydraulic drive reservoir!
- After creating a vacuum in the clutch hydraulic drive, it is necessary to tighten the fitting device completely and remove the hose from the rubber base. The other end of the hose must be kept in a tank with a “brake seal”, because it contains used liquid, after which it is necessary to drain this liquid.
- Add working fluid to the standard tank to the specified amount and tighten the tank cap with a little force.
- We wipe off excess leaked fluid with a dry rag and test the clutch hydraulic drive unit for possible leaks. Next, we try the operation of the hydraulic drive with the engine turned on and then switching on the speeds. During normal operation the vehicle can be driven.
An important addition: while the hydraulic clutch of the VAZ 2106 is being pumped, one should not forget about adding brake fluid to the standard reservoir in order to prevent air masses from entering the hydraulics.
Step by step instructions
- Pour brake fluid into the prepared container.
- The process is performed using a bleeder fitting located on the cylinder body. The protective cap must be removed and the rubber tube must be put on.
- Place the lower tip of the tube into a container with TJ. Make sure that it does not exceed the liquid level in the container.
- Pour hydraulic fluid into the expansion tank.
- Loosen the fitting and unscrew it half a turn.
- On command, the assistant needs to press the clutch pedal (interval - 2-3 seconds), holding it in the pressed position.
- Liquid and air will begin to flow out of the tube through the hose.
- Repeat until no more air comes out.
- The assistant presses the clutch pedal, in the meantime you need to tighten the fitting by putting the cap on it.
During the process, it is important to look at the level of brake fluid in the reservoir, and if there is a deficiency, add a little. The liquid indicator at the end of pumping is located at the bottom mark of the filler neck.
Thus, having familiarized yourself with the information presented, it will not be difficult for you to carry out this procedure yourself.
Bleeding the clutch on a VAZ 2101-VAZ 2107
Welcome! Clutch - sometimes it happens that some units in the system have to be changed, but this mainly concerns the clutch drive cylinders, after replacing or simply removing them, the clutch hydraulic drive must be pumped, and if this is not done, then when you press the pedal the clutch itself simply does not work will turn off completely, and the pedal travel will be very light. The clutch drive must also be pumped if the brake fluid level in the clutch reservoir has reached its minimum and gone even lower than the mark, because in this case air gets into the hydraulic drive and the clutch pedal, which is pressed all the way, may not fully disengage the clutch, Read more about when you need to bleed the clutch hydraulic drive just below!
Note! To bleed the clutch you will need to stock up on: Firstly, new brake fluid that has not been used before, as well as a small rubber hose of about “0.5 or 1” meter in order to carry out the bleeding itself, as well as a wrench “ 8" and a container into which you will drain the used brake fluid with bubbles from the clutch reservoir!
Summary:
What part is used for pumping and where is this part installed? Bleeding is carried out only through a fitting that is specifically needed for bleeding the clutch on a car, and this fitting is located on the clutch slave cylinder, which in turn can be very easily seen by looking under the bottom of the car, or by looking from above into the engine compartment. (For a more detailed location of the clutch slave cylinder, see the article entitled: “Replacing the slave cylinder”)
When should you bleed your clutch? Pumping is carried out only in cases where:
When you press the clutch pedal all the way, the clutch is not completely disengaged, for example, you pressed the pedal, engaged first gear and before you even had time to take your foot off the pedal, the car is already moving, this is what is called not completely disengaging the clutch, as people say that the clutch is moving.
Note! Why do you bleed the clutch? In order to remove air from the cylinders, or more correctly, to remove air from the brake fluid, otherwise if there is air in the brake fluid that is in the cylinders, then the clutch will not work as it should, as was noted earlier, it will not completely turn off, and also the pedal travel can be very light, therefore, after detecting these malfunctions, it is recommended to bleed the system as soon as possible, because it is dangerous to drive with a clutch that is not fully functional, since during emergency braking, the car itself will also roll into the before, as the clutch will not disengage completely!
How to bleed the clutch on a VAZ - how to understand that there is air in the hydraulic drive
The surest way is to watch the behavior of your car. If, when you press the clutch pedal, it does not fully engage, and the pedal itself moves too easily, then this is a clear sign of depressurization. The car may also start moving earlier than it should. You can easily notice the symptoms of such a “disease”; if your vehicle simply does not respond to the pedals as it should, you feel uncomfortable.
You can contact a car service, but before that it is better to try to bleed the clutch yourself, because this is not a particularly difficult task and will get you better acquainted with your car.