Replacing brake fluid on a Renault Duster is a routine maintenance work; the safety of the vehicle depends on the timeliness of the procedure. The solution poured into the circuit absorbs moisture from the air, which leads to a decrease in characteristics (for example, boiling point). The owner can perform the work independently or in a service center.
About the Renault Duster brake system
Cars use a hydraulic brake pad drive with a vacuum booster installed in the engine compartment. The fluid is supplied to the wheels along 2 diagonal circuits; the ABS electronic unit is included as standard equipment.
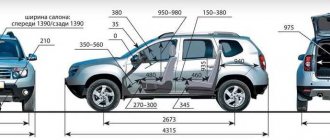
The Renault Duster brake system includes drum mechanisms on the rear wheels and ventilated discs (the diameter of the working elements depends on the size and type of engine). The system has a compensation tank with a sensor; when the liquid level drops in the instrument cluster, a warning light turns on.
Renault Duster four-wheel drive clutch replacement
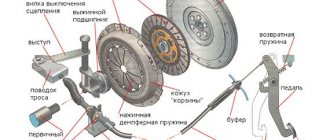
On a car with a manual transmission, a single-disc, dry, central diaphragm spring clutch is installed
The drive disk (basket) is connected to the engine flywheel with six bolts.
There are three pins pressed into the flywheel that center the clutch housing.
A diaphragm spring is installed in the drive disc casing, which is stamped from sheet spring steel.
When free, the spring has the shape of a truncated cone with radial slots extending from the inner edge of the spring.
The spring slots form eighteen petals, which are elastic release levers.
Due to the elasticity of the levers, the diaphragm spring creates more uniform pressure on the clutch pressure plate, which facilitates smooth engagement and disengagement of the clutch.
At three points, the clutch housing is connected by elastic steel plates to the pressure (drive) disk.
The casing with the diaphragm spring and the pressure plate form a non-separable unit (also called the clutch “basket”), which is balanced on a stand.
If the clutch basket fails, the entire clutch basket is replaced.
Replacing the “basket” is necessary if there is severe ring wear on the diaphragm spring petals and if the ends of the petals are not located at the same level.
We also replace the “basket” if the force on the pedal decreases when the clutch is disengaged (and, accordingly, the working stroke increases), which indicates large wear on the surface of the pressure plate or “settlement” of the diaphragm spring.
The driven disk with a spring-loaded torsional vibration damper is located on the splines of the gearbox input shaft between the engine flywheel and the pressure plate.
The torsional vibration damper dampens vibrations arising from dynamic loads in the transmission and uneven engine operation.
Two friction linings of the disc are riveted on both sides to the spring plate, which in turn is riveted to one of the two damper plates.
The spring plate has a wavy shape.
When the clutch is engaged, the friction linings compress the spring plate, which facilitates smooth engagement of the clutch.
A disc hub is installed between the damper plates. Damper springs are installed in the grooves of the hub and damper plates.
The damper plates are connected by support posts.
In the disk hub, opposite the support posts, there are cutouts that allow the hub to rotate within certain limits relative to the damper plates, while compressing the damper springs.
Choosing brake fluid for Duster
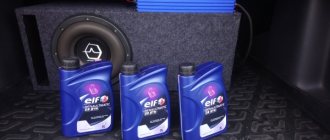
The Renault Duster brake system must be filled with DOT-4 standard fluid:
- Elf Frelub 650, which is used for initial charging of the circuit at the factory. Built on a synthetic base, it is characterized by reduced hygroscopicity. When saturated with moisture, the boiling point drops slightly. The advantage is chemical inertness; during operation it does not form deposits in the brake circuits.
- Shell Brake Fluid DOT-4 ESL, designed for vehicles with electronic stabilization systems. When moistened, the solution boils at a temperature of 165°C. Supplied in 500 ml plastic canisters.
- TRW DOT-4 ESP, which has a boiling point of 267°C, drops to 172°C as the solution becomes saturated with water vapor. There is a modified version of DOT-4 Racing, characterized by an increased boiling point to 312°C.
- Mobil Brake Fluid DOT-4, which boils when heated to 278°C, decreases to 183°C as it is moistened.
- Sintec SUPER DOT-4, which has a boiling point of 240°C. The liquid is chemically inert to brake system parts made of non-ferrous metals and synthetic materials.
Bleeding the hydraulic clutch
The adapter onto which the rubber hose is placed is loosely fixed in the clutch housing. For ease of work, it is secured with a regular washer. They make a kind of locking device and install it in the groove of the fitting.
- Check the amount of substance in the car tank.
- A rubber hose is pulled onto the adapter and the other end is lowered into the container.
- It is necessary for someone to provide assistance and press the clutch pedal. After 5 presses, the pedal is held in the depressed position.
- Some of the liquid will flow into the container. You need to wait until it stops flowing. Repeat pressing the pedal several more times.
- Disconnect the hose and put the cap on the clutch housing fitting.
In practice, many motorists use a simpler method of replacing brake fluid. It completely eliminates the need for a second assistant to press the brake pedal. But for this you will need to prepare a little more brake fluid, approximately about one liter.
- The car is driven onto an overpass.
- Using a rubber bulb, pump out the contents of the tank.
- Tubes are put on all four wheel fittings and their ends are lowered into transparent bottles.
- Loosen all the fittings and observe the fluid flowing out. At the same time, it is necessary to monitor its level in the tank and, as it decreases, new liquid is poured into the container to the normal level.
- Simultaneously with the leakage of brake fluid from the reservoir, the filling level of the bottles is also monitored. Especially, you need to monitor the containers that are installed on the front wheelset. When filling approximately 0.2 liters in the bottle, the fitting is screwed on. The process of pumping the cylinders of Renault Duster wheels ends when the bottles are filled with 0.2 - 0.25 liters.
- Tighten all fittings and make sure they are tight.
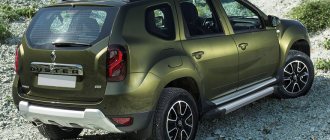
Renault Daster is a great car for our roads. It has a very effective braking system. But you need to keep an eye on it and changing the brake fluid in the system yourself is not difficult if you approach this process responsibly. If you don’t want to do something yourself, there are a large number of car services where the replacement will be carried out by professional specialists.
Renault Duster cars have a hydraulic braking system. The pads are pressed against the disc by a force that is transmitted hydraulically from the pedal. The brake fluid in Renault Duster should be changed every 90,000 kilometers, but at least once every 3 years. Replacement is necessary because over time the liquid can separate into fractions and lose properties due to low temperatures.
Self-replacement
In a dealership setting, the replacement is carried out by connecting a computer, which opens the valves in the ABS block. The liquid is pumped under pressure into the circuits and pumped out by a vacuum pump, which prevents air from entering the working substance.
When replacing yourself, the spent solution is removed through valves located on the wheel brake mechanisms. Fresh solution is poured into the compensation tank.
The easiest way
Algorithm for servicing the brake system on a Renault Duster:
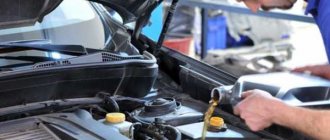
- Drive the car into a garage with an inspection hole or place it on a lift. The vehicle is held in place by a mechanical parking brake and additional chocks under the rear or front wheels. If the work is carried out in an open area, then it is necessary to jack up the body one by one and remove the wheels.
- Unscrew the cap of the reservoir installed on the brake cylinder, and then remove the liquid from the reservoir using a vacuum method (for example, with a rubber medical bulb).
- Pour fresh brake fluid into the container (to the bottom of the neck).
- Go down into the hole or lift the car on a lift, and then remove dirt from the rubber caps and fittings.
- Remove the protective elements from the drain valves.
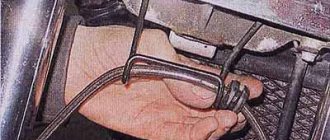
- Place the pre-prepared elastic tube onto the fitting mounted on the brake mechanism on the rear right wheel. The opposite end of the hose is led into a clean container with transparent walls.
- Ask an assistant to take a seat behind the wheel and sharply press the brake pedal all the way several times, pausing between impacts for 1-2 seconds. After the last press, the pedal is held in this state.
- Unscrew the valve on the brake mechanism by 0.5-0.75 turns, which will allow you to begin pumping out the solution from the circuit. As the pressure drops, the pedal will sink under the influence of your foot until it stops. After the flow of the substance stops, it is necessary to tighten the fitting. The level in the compensation tank must not fall below the minimum level, otherwise air will enter the circuit.
- Using a similar method, remove the solution from the front left wheel caliper.
- Service the second circuit of the system according to the scheme described above, starting work from the rear left mechanism.
- To ensure that old material is drained from the circuits, the operation is repeated 6-9 times for each wheel. The procedure is considered complete when a clean substance begins to flow from the hoses without gas bubbles.
- Replace the rubber caps; do not use damaged parts.
- Check the functionality of the brake system by pressing the pedal sharply. If different forces are observed, then it is necessary to remove remaining air from the circuits.
- Bring the solution level in the tank to the average value between the minimum and maximum level notches, and then close the lid.
On Duster vehicles with manual transmission, along with replacing the brake fluid, the old substance is drained from the clutch circuit. The driver needs to remove the rubber cap and put the hose on the fitting. The assistant presses the clutch control pedal 12-15 times with an interval of 3 seconds between impacts, and then releases it. After removing the tip from the socket in the cylinder, the pedal is pressed, which causes the liquid to drain through the hose into the container.
Alternative replacement
The owner can replace the fluid using an alternative method:
- Place the machine over an inspection hole or on an overpass and raise the parking brake lever.
- Unscrew the tank cap and remove the liquid using improvised means (for example, a 5-10 ml syringe with a spout extended with a tube).
- Unscrew the fittings on the wheel mechanisms and install flexible lines that need to be routed into separate containers or a common tank. As the liquid drains, fresh material should be added to the compensation tank.
It is prohibited to re-add the drained fluid to the brake circuits, since the solution is saturated with air bubbles and moisture. When topping up, take a new substance of the same brand that is used in the system. It should be remembered that brake fluids of the DOT-4 standard are hygroscopic; during storage, the material absorbs water from the atmospheric air. The solution pumped out from the circuits must be disposed of; pouring the liquid into the sewer or onto the ground is strictly prohibited.
The procedure for replacing fluid in the Duster brake system with bleeding
To ensure convenience and safety, work on the vehicle is carried out without starting the engine on an overpass or inspection pit, with an assistant. First, you need to pump out the old “brake fluid” (hereinafter referred to as fluid) with a rubber bulb from the brake and clutch refill reservoir. Then, fill the tank with fresh DOT-4 fluid. All you have to do is bleed the brake mechanisms of each wheel, that is, replace the fluid in them with fresh one. The work is carried out in the following order: 1. right rear; 2. left front; 3. left back; 4. right front.
After cleaning the bleeding fittings from dirt, remove the rubber caps.
Using an 8 mm wrench, unscrew the fitting half a turn. We attach the hose and its other end should be in a bottle half filled with old liquid, so that it is hidden in it. The assistant is required to sharply press the foot to lower the brake pedal all the way, only then will the fitting be unscrewed.
With each press and release of the pedal, the old “brake fluid” will flow into the bottle; before pressing the pedal, remember to tighten the fitting, after which the pedal can be released to return it to its original state. This work is done until the air comes out and fresh brake fluid (light) appears, on average 4–5 times. When finished, remove the hose, wipe the fitting with a dry cloth and place the rubber cap on it. After these actions, liquid with air bubbles will flow from the hose, and the pedal will sink even more.
We perform these operations on the remaining brake mechanisms. During pumping, liquid will leak from the refill tank, so do not allow the level to drop below a critical level, and replenish the tank with liquid in a timely manner. Finally, bring the level within normal limits.
Choice
What kind of brake fluid is in Renault Duster?
Brake fluids with DOT4 specification are suitable for this model. Renault initially fills with ELF FRELUB 650 DOT4. Other options with the same specification can be used, but this is the recommended one. This fluid not only meets, but exceeds the latest FMVSS 116 (DOT 4) and SAE J 1704 standards.
FRELUB 650 can be mixed with all synthetic brake substances of specification DOT 3, DOT4, or DOT5.1. However, ELF cannot be mixed with special liquids such as LHM or silicone with the DOT5 specification. FRELUB 650 is adapted to a braking system that operates in the most difficult conditions.
Among the advantages of the fluid recommended for Renault Duster are:
- incompressibility;
- high durability;
- circulation and good fluidity at low temperatures;
- does not promote corrosion.
Of course, FRELUB 650 is not the only brake substance that can be used in Renault Duster. TRW DOT4 or any other will do. It is only important to keep in mind that the sensations should be the same. If you experience different impressions when braking, even if the difference is minimal, it is better to change only the filled fluid to another.