If a car has a faulty battery, it is not recommended to drive it. Professional drivers are well aware of the problems a dead battery can cause. To avoid emergency situations while driving, it is necessary to maintain the battery in a timely manner. To do this, you need to know how to measure the density of the electrolyte in the battery. Higher and lower values significantly reduce battery efficiency.
What is density?
Lead-acid batteries contain several elements, one of which is an electrolyte. It is presented in the form of sulfuric acid, which contains distilled water. Water is added to the electrolyte because concentrated acid tends to dissolve metals. Dilute it to such a state that the composition cannot destroy lead. The density of acid and water is different - 1.84 g\\Ml and 1 g/ml, respectively.
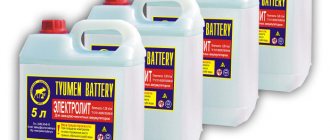
Electrolysis is stronger if the density is high, and the destruction of lead occurs even faster. For batteries used in different conditions, there must be a specific density in the range of 1.25 g/ml and higher. You can also buy electrolyte and bring it to the required values.
During the operation of the battery and with constant underdischarge, a deposit of acid with lead forms on the plates. In other words, sulfation occurs, which negatively affects the performance of the battery. The electrolysis intensity becomes low. When you try to recharge the battery, the substance boils.
Correction of electrolyte density
Operating a car involves a cyclic load on the battery, during which the catalyst for the electrochemical process changes its structure. Since the electrolyte consists of acid (35%) and distilled water (65%), this ratio can change depending on the degree of charge of the energy source. While the vehicle is moving, the generator constantly supplies electrical current to the battery.
When the capacity is restored, the electrolysis process begins, during which the electrolyte boils and evaporates. A similar process occurs during long-term charging with a special device. The amount of water in the solution decreases, which causes the density to increase and the volume of the liquid to decrease. To restore the nominal value, you need to add distilled water to each battery jar.
Reasons for reducing electrolyte density
To maintain battery performance, car owners add distilled water to the battery, forgetting to check the density indicators. A high concentration of water leads to strong electrolysis, during which sulfuric acid begins to evaporate along with water, which reduces the density of the electrolyte. Over time, the acid content in the solution becomes critical and the solution ceases to act as a catalyst for chemical processes, which negatively affects the functionality of the battery.
What should it be?
It is impossible to say with certainty what the battery density should be, since this value depends on the climate. If operation takes place in a temperate climate, then the density of the electrolyte should be 1.25-1.27. When working in cold regions, this value should be higher by 0.01, and in hot areas - lower by 0.01. The battery density should be highest in regions with extremely low temperatures (down to – 50°C). Every car owner should know that the lower the density in a charged battery, the longer it will work.
As has already been found out, the density of the electrolyte affects the condition of the battery and its service life. If a car owner has a serviceable battery, he can measure the value using a special device. But you shouldn’t raise the parameters yourself, otherwise there is a risk of damaging the plates.
For example, many car enthusiasts add acid, not knowing that its molecules are both in solution and on the plates. After the charging procedure, the molecules detach and replenish the lack of acid in the substance. If you top up, there will be too much acid, which will lead to destruction of the plates.
What should be the density of the electrolyte in the battery?
Domestic car owners are in a desperate debate about the rules for using batteries. The number of cars is growing rapidly, and every driver is trying to formulate his position on this issue. Even among specialized experts, opinions vary significantly. Therefore, we will build on the recommendations of manufacturers, because only battery developers are able to formulate the nuances of operating their own products. Any new battery has an accompanying instruction manual that specifically outlines maintenance activities.
The battery reacts negatively to both increased and decreased electrolyte density. A high density indicator activates chemical processes, making the electrolyte “aggressive”, which leads to a significant reduction in the working life of the product. Low density will reduce the battery capacity, which contributes to problems starting the power unit, especially in winter. It is for this reason that it is necessary to adhere to the values recommended by the manufacturer. The density of a fully charged new battery should be 1.27 g/cm3 at a temperature of +25 °C. In hot climates, a decrease in density by 0.01 g/cm3 is allowed, and in frosty climates - by 0.01 - 0.02 g/cm3 more.
Preparatory work
Before you measure the density of the electrolyte in the battery yourself, you need to prepare.
The driver needs to know the following nuances of work:
For work it is necessary to use protective equipment.
Before measuring, make sure that the solution is present. If it is not enough, then add water.
The density level is measured only after inspecting the device from all sides.
The terminals should be cleaned of dirt deposits using sandpaper or a brush.
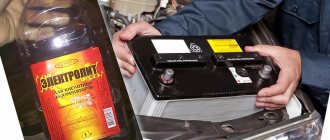
Sometimes it is necessary to dismantle the battery, disconnect the terminals and fixing plates. Before turning off the battery, you must also deactivate electrical appliances and the ignition system. To prevent dirt from getting into the cans, clean the battery with a rag.
Is it possible to increase the minimum density?
If the density level of the solution that conducts current in the car battery has fallen much below 1.18 g/cm3, there is no point in raising it. In this case, it is necessary to drain the entire solution, replacing it with fresh one.
First, as much electrolyte as possible is pumped out from the jars using a syringe. Next, the battery is placed in a large container, carefully turned on its side, and a small hole is drilled in the bottom of each can. By turning the device over, all excess remaining liquid is drained from it.
Next, distilled water is poured through the lids of the jars to rinse them. After this, the holes made are sealed with plastic that is resistant to electrolytic fluid.
Having done this, fresh solution is poured into the battery, after which the device will be ready for use. The disadvantage of this method is that the end result is a reduced service life of the device, but it will still work for some time before purchasing a new one.
Safety precautions during inspection
When checking the density, you work with acid. If safety precautions are not followed, the driver may receive skin burns. To carry out the procedure correctly, you must follow the recommendations:
Work in special clothes that you don’t mind throwing away.
Measurements are taken only with rubber gloves.
Safety glasses may be required when preparing electrolyte.
It is desirable that the room be ventilated.
When taking measurements, the driver should not smoke, since the acid is explosive due to its hydrogen content.
When and what to top up the battery with?
The need to add working fluid to the battery occurs infrequently, but it is sometimes necessary. What, how much and in what cases should I add? There are two such cases: low electrolyte level and abnormal acidity of the working fluid.
We recommend: In what order to connect the battery to the car
Low level in sections
This situation occurs often because during battery operation the water evaporates or, as they say, boils away. In this case, the level of solution in the sections decreases, and the edges of the plates turn out to be dry. This can be determined visually by simply unscrewing the plugs from the sections and looking into the filler necks. The normal liquid level in the section should be approximately 1 cm above the cut-off level of the plates. Some batteries even have a special mark stamped on the case. If the level is low, then the situation, although serious, can be easily eliminated. For this operation you will need:
- a medical syringe without a needle or a car hydrometer;
- distilled water;
- protective equipment (glasses and rubber gloves).
Distilled water is drawn into a syringe and poured into the appropriate sections to the required level. After adding liquid to the battery, it is placed on charge. In this regard, an autohydrometer is much preferable, since by adding water, you can immediately control the density of the solution.
Be careful not to work with acid unless your eyes are protected.
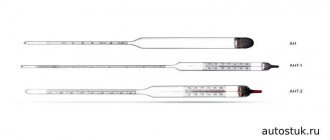
Is this a hydrometer?
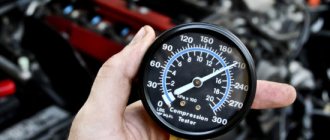
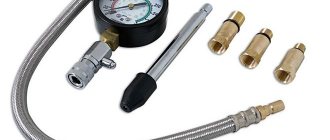
A hydrometer is a device whose operation is based on Archimedes' law. In other words, this device helps to study the density of the electrolyte after immersing it in liquid. As for density, it represents the specific gravity of acid and water in relation to the total volume.
The hydrometer varies in type; the driver will need a car version. Its design includes a tube, a rubber bulb, a pipette and the device itself. The pipette is attached to the tube so that it reaches the plates. Inside the tube is a hydrometer, which also consists of a tube with a weight at the end. The other end of the tube turns into a narrow stick with a measuring scale on the surface. A rubber bulb is attached to the other end of the body.
How to measure battery density
First, you need to install the battery on a flat horizontal plane and clean the cover from dust and dirt. It is better to use a cloth moistened with a weak solution of soda, as the most accessible alkali: it neutralizes possible sweating of the electrolyte around the plugs.
Now we check the electrolyte level. It is easier to do this on batteries with translucent walls - there are marks on the walls, with the help of which you can immediately understand whether the level is within the acceptable range. Not only the height of the level itself is important, but also the uniformity across the jars: where the electrolyte level is noticeably lower, a malfunction is possible (leakage of the walls or bottom, rapid “boil-off” of the electrolyte due to its excessive initial density, and so on). If the walls of the battery are opaque, use a transparent tube, lowering it into the holes of the plugs until it stops in the set of plates and then plugging the upper end with your finger: when you pull out the tube, you will see how much the electrolyte is above the plates. The norm is a level height of 10-15 mm above the plates.
If the electrolyte level in any jar is below normal, bring it to the required level by carefully adding distilled water. As we already wrote above, most often the level decreases due to water loss due to electrolysis, so it is impossible to replenish the level with ready-made electrolyte.
Read also: How to charge lithium-ion batteries
Before checking the density, ensure that the battery is 100% charged - connect the charger until it “boils” or until it turns off if you are using an automatic model. This is also necessary so that the density in the jar is equalized after adding distilled water, otherwise the measurement will give an erroneous result.
A common device for monitoring density is a hydrometer, which is a transparent flask with a bulb for collecting liquid. Inside this flask there is a weight with divisions - it will plunge into the collected electrolyte to a height depending on the density of the battery and the risk at which it is immersed, and will indicate the measurement result.
However, there is a more convenient and versatile device - we are talking about an optical refractometer, which is also capable of measuring the freezing temperature of coolant and washer fluid. To measure, just drop a drop from a pipette onto the desired location and press the drop with a transparent glass lid. By looking at the light through a refractometer, you will see the density of the electrolyte by the mark. This is faster and more accurate than the usual method with a hydrometer.
How to use a hydrometer to check?
Drivers who are interested in how to measure the density of the electrolyte in a battery should know some conditions to create the correct measurements. Before the procedure, you need to make sure that the battery is fully charged, but after recharging it is prohibited to measure the density. The device values will have to be adjusted based on the t of the electrolytic liquid. The most correct parameters will be those that were performed at a solution temperature of +27°C.
Instructions for measuring density with the device:
First you need to assemble the hydrometer, that is, connect the body to the pipette, place the dencimer there and close the back end with a bulb.
Density is measured in each jar. The pipette is placed inside and acid is drawn into the hydrometer. You don't need a lot of liquid to get the information.
You can read the readings by looking at the instrument scale and the place where it intersects with the surface of the liquid.
The main thing is to understand which dimensions are marked on the scale. There are devices with g/cm3 and kg/cm3 readings.
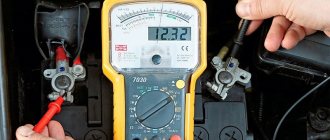
Is it possible to do without the device?
If a hydrometer is not available, then the density is checked with a multimeter. First you need to assemble the tool by connecting wires with alligator clips to the body. The tester is switched to voltmeter mode by moving the switch to 20V. After this, the device will begin to show values below this.
After this, the cable is connected to the battery outputs, that is, the black one is connected to the negative terminal, and the red one to the positive terminal. Next, you need to monitor the voltage values and compare the information with the “norm”. A charged battery will show 12.7 volts. If the values are lower, this indicates that the density is not standardized. In this situation, further diagnosis of the battery or its replacement is necessary.
Measuring with a homemade device
If the driver does not have a hydrometer or a multimeter, he should build the device himself. The main part of the device in both cases is the float. Instead of a container, a test tube is often used. It is filled with cereal or a loose mixture, and a lead piece of metal is taken as a load.
The container is placed in water and about the place where the level appears. The number means that the liquid has a density of 1. For further “marking”, you will need to take measurements with a liquid of a higher density.
As a result, to check the density of the electrolyte in the battery, you will need to carry out the same actions as with special devices.
How to independently check the density of the electrolyte and the degree of discharge of the battery?
Before measuring the electrolyte density, you need to check and prepare the battery, then take the measurement using:
- Hydrometer (densimeter). To do this, all the jars are unscrewed with the battery disconnected, the device is immersed in liquid, and a small amount of electrolyte is collected. The density level is determined in accordance with the readings on the tester scale.
- Tester (multimeter). The device is switched to voltmeter mode, the voltage parameter is monitored and the obtained data are compared with the normalized ones.
- A homemade device. The method is similar to testing with a hydrometer, but in this case a glass test tube is used as a reservoir, into which some kind of weight (millet, a piece of lead) is placed. Then you will need to calibrate the hydrometer yourself.
It is important to know
If the battery is maintenance-free and does not have an indicator to check the level and density, then to measure with a hydrometer you will need to drill holes in the cans, which must be soldered after completing the task.
Video: checking the electrolyte density in a car battery
The videostar channel in its video spoke in detail about how much electrolyte should be in battery banks and how to check its density.
Table: correction to hydrometer readings
| Temperature of the working solution when measuring density, °C | Correction to hydrometer readings obtained during testing, g/cm3 |
| from -55 to -41 | -0,05 |
| from -40 to -26 | -0,04 |
| from -25 to -11 | -0,03 |
| -10 to +4 | -0,02 |
| from +5 to +19 | -0,01 |
| from +20 to +30 | 0,00 |
| from +31 to +45 | +0,01 |
| from +46 to +60 | +0,02 |
Table for determining battery charge by electrolyte density
| Air temperature | Battery charge level | ||
| 100% charged | 70% charged | Completely discharged | |
| +25 degrees and above | 1,21 — 1,23 | 1,17 — 1,19 | 1,05 — 1,07 |
| less than +25 degrees | 1,27 — 1,29 | 1,23 — 1,25 | 1,11 — 1,13 |
Table: electrolyte density and battery charge level when checked with a multimeter
| Battery charge level | Density of working electrolyte solution, g/cm3 | Battery voltage, V |
| 100% | 1,28 | 12,7 |
| 80% | 1,245 | 12,5 |
| 60% | 1,21 | 12,3 |
| 40% | 1,175 | 12,1 |
| 20% | 1,14 | 11,9 |
| 0% | 1,1 | 11,7 |
How to adjust the density of the electrolyte in the battery?
Good to know
Electrolyte density is stabilized by adding a working fluid solution and charging. However, to increase this parameter, it is not enough to simply add distilled water to the jars and thereby increase or decrease the density.
Table: electrolyte density adjustment
| Electrolyte density in the battery, g/cm3 | Density level according to the standard, g/cm3 | ||||||||
| 1,24 | 1,25 | 1,26 | |||||||
| Suction of working fluid | Adding a solution of 1.40 g/cm3 | Adding distillate | Suction of working fluid | Adding a solution of 1.40 g/cm3 | Adding distillate | Suction of working fluid | Adding a solution of 1.40 g/cm3 | Adding distillate | |
| 1,24 | — | — | — | 60 | 62 | — | 120 | 125 | — |
| 1,25 | 44 | — | 45 | — | — | — | 65 | 70 | — |
| 1,26 | 85 | — | 88 | 39 | — | 40 | — | — | — |
| 1,27 | 122 | — | 126 | 78 | — | 80 | 40 | — | 43 |
| 1,28 | 156 | — | 162 | 117 | — | 120 | 80 | — | 86 |
| 1,29 | 190 | — | 200 | 158 | — | 162 | 123 | — | 127 |
| 1,30 | — | — | — | — | — | — | — | — | — |
| Electrolyte density in the battery, g/cm3 | Density level according to the standard, g/cm3 | ||||||||
| Suction of working fluid | Adding a solution of 1.40 g/cm3 | Adding distillate | Suction of working fluid | Adding a solution of 1.40 g/cm3 | Adding distillate | Suction of working fluid | Adding a solution of 1.40 g/cm3 | Adding distillate | |
| 1,24 | 173 | 175 | — | 252 | 256 | — | — | — | — |
| 1,25 | 118 | 120 | — | 215 | 220 | — | — | — | — |
| 1,26 | 65 | 66 | — | 177 | 180 | — | 290 | 294 | — |
| 1,27 | — | — | — | 122 | 126 | — | 246 | 250 | — |
| 1,28 | 40 | — | 43 | 63 | 65 | — | 198 | 202 | — |
| 1,29 | 75 | — | 78 | — | — | — | 143 | 146 | — |
| 1,30 | 109 | — | 113 | 36 | — | 38 | 79 | 81 | — |
Checking the density in a maintenance-free battery
A maintenance-free battery is a battery that does not have plugs for filling solutions. It turns out that the car owner is not able to gain access to banks. However, there is one way to check the density of the electrolyte in the battery without opening the cans.
First, the driver needs to unscrew the fluid indicator eye located on the lid. Measurement is carried out through the hole. But the results obtained will correspond to only one jar. Due to the design of the battery, it is not possible to increase the density by any means. Measurements in a maintenance-free battery are carried out with the same instruments.
Most often, the density is increased through a charger (charger). The essence of the procedure is to restore the density of the electrolytic liquid by applying a minimum current. The battery is placed on charge and waited for up to 3 days. During this time, excess moisture will evaporate, increasing density.
How to increase the electrolyte density with a charger
There is another way that should be shared. It requires less labor and more time. The essence of the process is simple - you need to charge the battery, setting the minimum current (no more than 1A). Having reached a full charge, the battery will begin to “boil”. In this case, distilled water will actively evaporate. The fluid level in the housing will gradually decrease. Instead of evaporated water, add electrolyte of nominal density. The process is very long, however, in a few days you can achieve the desired result.
Typical faults
Before checking the density values and increasing (lowering) it, it is necessary to study typical battery malfunctions.
These include:
Shedding. Sometimes the plates fall off. This is evidenced by the presence of flakes or pieces of lead at the bottom. The device cannot be restored. Needs replacement.
Low liquid density. If low readings are detected, it is necessary to increase them by all available means, and then assess the condition of the battery.
Short circuit. If the plate inside the battery touches the bottom, the battery will not work. This is usually due to a large amount of sediment. The battery requires replacement, since it cannot produce more than 10 volts without load.
All these problems can be avoided if you use the battery correctly.
Design and principle of operation of the battery
In order to properly service the battery and ensure its proper operation, it is necessary to at least approximately understand what is inside it and how it all works. Therefore, before moving on to questions about the electrolyte, it is necessary to understand how a car battery works and on what principle it works.
Battery design
Almost all lead-acid batteries have the same design. They consist of separate sections (cans), each of which has a set of positive and negative plates. The first are called cathode and are made of metal lead. The second, anode, are made of lead dioxide. The plates are collected in a bag and placed in an acid-resistant container, into which the working fluid is subsequently poured - an aqueous solution of sulfuric acid or the so-called electrolyte.
Lead-acid battery section design:
- 1 – jar lid;
- 2 – can body;
- 3 – ribbed settling tank;
- 4 – plates collected in a package;
- 5 – negative (anode) terminal;
- 6 – negative (anode) plates;
- 7 – dielectric gasket – separator;
- 8 – positive (cathode) terminal;
- 9 – positive (cathode) plates.
The finished sections connected in series are the battery. There are three such sections in six-volt batteries, and six in 12-volt batteries.
How it works
So, the design of the battery is quite simple, but how does voltage appear at its terminals? Indeed, if you take a battery straight from the store and connect a voltmeter to it, the device will show “0”. The lack of current is due to the fact that the electrolyte is not poured into the battery immediately after manufacture, and the plates in the battery standing on the store shelf are dry. The working fluid is poured into the battery after purchase.
It's time to find out what the electrolyte is for . Since the positive and negative plates have different chemical compositions, a potential difference arises between them when immersed in an acid solution (about 2 V per section, which determines the number of sections in the battery). When a load is connected to the battery terminals, current begins to flow between the plates due to the high electrical conductivity of the electrolyte. At the same time, the chemical process of converting lead dioxide into lead sulfate begins with the participation of sulfuric acid. As soon as the amount of dioxide and sulfuric acid drops to a certain level, the process will stop and the battery will stop producing current - it will be discharged.
During the discharge process, sulfuric acid and lead dioxide are consumed to form lead sulfate
We recommend: How to properly add distilled water to the battery
But batteries, unlike galvanic cells (batteries), can restore their chemical properties. If you connect the battery to a DC source, then under its influence the sulfate will begin to decompose into lead dioxide and sulfuric acid. The battery will begin to charge, converting electrical energy into chemical energy. As soon as the amount of dioxide and acid reaches the initial values, the battery can be considered charged.
Chemical processes that occur in a battery when it is discharged and charged
Sulfuric acid, which is part of the electrolyte, plays one of the main roles in the operation of the battery. The quality and long-term operation of the battery as a whole will depend on its properties.
Which hydrometer should I buy in Russia?
Car hydrometers are also divided into several types according to their intended purpose. For example, they are used to measure antifreeze performance. Let's consider which hydrometers are designed to determine the density of an electrolyte.
Jonnesway AR030001 is a Taiwanese invention with a three-color scale. The device is resistant to aggressive environments, sealed and lightweight. It is characterized by high cost.
Heyner PREMIUM 925 010 is a high-quality device with a plastic body that determines density with a minimum amount of electrolyte.
AUTOPROFI Battery BAT/TST-118 is a Russian development with light weight and simple control. There is a color scale on the body. Even a beginner can figure out how to use it. A durable device according to most users.
JTC 1041 is a Taiwanese budget device that determines the degree of charge and electrolyte density.
Vympel AR-02 5002 is a budget Russian invention. Its main advantage is the presence of a glass bulb. Able to work for dozens of years thanks to glass that does not become cloudy.
Experts advise buying hydrometers with a glass bulb that will be resistant to organic compounds. Plastic can also withstand harsh environments, but it will fade over time. For novice drivers, you will need a device with a color scale, for professionals - a digital one.
Conditions for taking measurements
An indicator of the “health” of lead-acid batteries is the density of the electrolyte, measured in grams per cubic centimeter (g/cm 3 ). The latter is a solution of demineralized (distilled) water with concentrated sulfuric acid. When the power source supplies energy to the vehicle’s on-board network, this parameter decreases; during charging and recovery, it increases.
Read also: Review of coffee makers for home
Thanks to the described property of the electrolytic liquid, the technical condition of the battery being serviced can be monitored. When in one of the sections (in common parlance - jars) the density of the solution remains low, despite long-term recharging, the question arises about the performance of the battery and the need to replace it. Exceeding the norm indicates the evaporation of water from the electrolyte due to constant boiling - the liquid becomes denser.
Reference. During the boiling of the electrolyte, only water evaporates; sulfuric acid remains in solution, but its concentration increases. Water vapor escapes through a special valve.
Density measurements are carried out under certain conditions:
- the temperature of the electrolytic fluid is in the range of 20–22 °C;
- The power supply must be fully charged;
- ambient temperature – 20–25 °C.
If the above conditions are met, the normal value for all cans of a working battery will be 1.27–1.29 g/cm 3 , the minimum acceptable value is 1.25 g/cm 3 . If you do not meet these requirements and measure the density of the electrolyte at a lower temperature or on a discharged battery, then the results will not reflect the real picture. The resulting values will be noticeably lower than normal.
Battery operating principle
When talking about the density of battery electrolyte, we need to start with the very principle of operation of car batteries. During charge-discharge, about 60 reactions occur in the battery, according to research dating back to Soviet times, but the main one is only one: during the discharge process, lead oxide on the cathode (negative electrode) and lead on the anode (positive electrode) “take away” sulfate -ions from a solution of sulfuric acid, turning into lead sulfate, and water is additionally formed at the cathode, and when charged, lead sulfate, on the contrary, “gives” sulfate ions to the electrolyte.
Thus, during a discharge, the density of the electrolyte drops; with a complete discharge, distilled water actually remains between the plates, and during charging it increases. Then why does the density of the solution in the battery decrease over time if these processes are mirror-image?
The reason is that the lead sulfate formed when the battery is discharged is not always completely consumed during charging. This is especially noticeable in the cold and after the battery has been in a discharged state for a long time: the plates are first covered with white stains of coarse-crystalline lead sulfate, and then these crystals gradually fall down and practically do not participate in the further reaction that takes place during charging.
Therefore, sulfation of battery plates is clearly a harmful phenomenon. The capacity of the battery and the strength of the plates decrease, and due to a drop in the density of the electrolyte, the battery is less able to charge: the lower the density of the solution, the worse the conductivity. A completely discharged battery practically does not accept a charge - the electrolyte resistance between its plates is too high.
However, the density may increase over time. Since the electrolyte is not pure sulfuric acid, but its aqueous solution, when charging the battery, another reaction occurs: banal electrolysis of water, unnoticeable at the beginning of the cycle, but increasing towards the end. Therefore, old recommendations for charging serviced batteries advised waiting for the battery to “boil” - a sharp increase in the release of oxygen and hydrogen in the banks. Losing water, over time the electrolyte will lower its level, and its density will inevitably increase - even taking into account the gradual binding of sulfuric acid on the plates and in the scree, water is lost faster during “boiling”.
Read also: Construction hydraulic level how to use video