Washing machines, like any other household appliances, break down from time to time, regardless of the price category the device belongs to. And whether it’s a Bosch, Candy, LG or any other machine, breakdowns can occur in a model from any manufacturer. To have an idea of what is broken and whether you can fix the device yourself, you should understand the structure of washing machines.
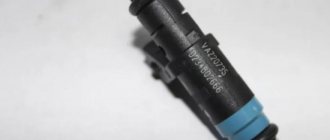
One of the important parts in a washing machine of the Indesit, Samsung, Ariston, Zanussi or any other brand is the inlet valve. It is responsible for filling the machine with water, which is why it is also called the fill valve.
Principle of operation
The intake valve has two functional states - closed (this happens more often) and open. The valve has a coil to which current is applied to form an electromagnetic field, as a result of which the valve opens, letting water into the machine. This switching principle gives rise to another name for the part – solenoid valve.
As soon as water fills the tank to the required level, the control module sends a command to stop supplying electricity to the valve. The result will be that the valve closes and the water supply stops.
To see what a single electromagnetic fill (inlet) valve for washing machines looks like, see the following video review.
Inlet valves of different models and manufacturers differ in the number of coils. Some valve models have only one coil, while others have two coils. Valves with three coils are also common. The number of coils corresponds to the number of sections in the valve through which water flows into the dispenser.
Models with a single coil are found in old washing machines, in which the operation is controlled by a command device (a stream of water is directed mechanically into the dispenser). Modern machines have valves with two and three coils.
To direct water to a specific compartment of the detergent dispenser, the desired coil is turned on and the water flows in the desired direction. In valves with two coils, two coils must turn on at once to direct water to the third section of the dispenser.
Where is?
Most often, the inlet valve is located at the top of the machine, closer to the back wall, so to check and remove it you need to disconnect the back cover of the machine. Usually the cover is held in place by two self-tapping screws, after unscrewing which it is pushed from the front side and easily removed.
In models in which laundry is loaded vertically, the fill valve is also located at the rear of the machine, but at the bottom. To gain access to the valve, part of the side wall of the machine is disconnected.
How to check if it's working properly?
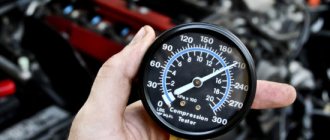
To check the serviceability of the filling valve, the part must be removed, then a hose must be connected to the valve, and voltage must be applied to each of its sections. If the valve is working, it will open to let water in. After stopping the 220 V supply, the valve should close and not let water through. This check should be carried out very carefully, since the part will be energized and if water gets in, a short circuit may occur.
Checking the operation of the intake valve will also include the following steps:
- Inspect the valve mesh to identify blockages. If the mesh is dirty, it should be removed and cleaned, and then returned to its place.
- Additional check using a tester. It will be needed if the valve does not open when power is applied. The multimeter will measure the resistance and show whether the coil is burnt out. In the working coil, the resistance will be from 2 to 4 kOhm.
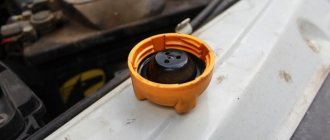
- Check for the presence of plastic inserts in the fittings. Such rates are designed to prevent water from entering the machine with excessively high pressure. If the inserts fall out, the valve must be replaced.
Valve check
The carburetor valve should be checked in the following modes:
- Idling. After starting, increase the speed to 2100 and listen to the carburetor. A sharp characteristic sound should be heard indicating the shutter is closing. Next, smoothly reduce the speed to 1900; an opening click should be heard.
- Engine braking. You need to let off the gas without changing gear. In this case, a working valve will not work, even if the speed has dropped to 1900. If a click is heard, the device is faulty.
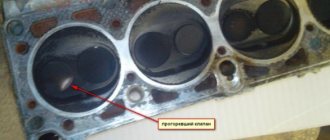
- After stopping the engine. If, when the ignition is turned off, spontaneous outbreaks of the detonating working mixture continue in the cylinders, the engine jerks and vibrates - this means that the valve does not shut off the fuel supply to the chambers and further to the cylinders.
- If you pull the solenoid valve power wire out of the connector while the engine is running, the engine should stall. If it continues to work, it means the valve is faulty.
In addition to ways to check the solenoid valve “on the go,” you can unscrew the valve from the carburetor body and try to apply voltage to it from the battery. One wire from the battery is connected to the contact block, the other to the body of the device. When voltage is applied, the valve should click and pull the needle inward. After the circuit opens, another click is heard and the return spring retracts the needle. At the same time, you can check whether the parts of the device are contaminated with resinous deposits. They need to be soaked in gasoline and removed with a soft cloth.
It is also necessary to check whether control voltage is supplied to the contacts. Its normal value is 10.5-14.4 volts. If there is voltage on the control unit, but not on the contact, it means the wire is faulty. It needs to be repaired or replaced.
If there is no voltage at the control unit connector, then most likely the unit itself is faulty. It is checked by connecting the valve to the battery with another temporary wire. A voltmeter or test light is connected to the terminal of the control unit that controls the valve. Next, you should start the engine. When the speed reaches 900 rpm, the light should flash, and at 2100 rpm it should go out. If you reduce the defense to 1900 rpm, it will flare up again. This behavior of the light bulb means the control unit is working properly. If the light does not light up or go out at all, and also turns on and off at different speeds, the control unit is subject to in-depth testing and, possibly, replacement.
Source
Can it be repaired?
By their structure, filler valves are classified as non-separable parts, so their repair is often impossible. You can try replacing a burnt-out coil by removing a working coil from a similar valve. However, in most cases such actions do not bring results. The best solution would be to buy a new valve and replace it completely.
Repair
Most often, the idea that it is the inlet valve that is not working appears in a situation when water does not fill into the washing machine at all. To repair such a part, you can call a specialist or try to replace the valve yourself.
To select a solenoid valve suitable for your washing machine, it is best to remove the faulty part from the device and purchase exactly the same new valve from the store. At the same time, pay attention to the number of coils so that the new valve fits your equipment.
How to remove the XX solenoid valve
- Open the hood and remove the negative terminal of the battery (it is recommended to do this every time you work on the car’s electrical system)
- We clean the bolts of the air filter housing and, using a wrench or a 10mm socket, unscrew the 3 bolts securing the cover.
- Inspect the air filter. If it is very dirty, then this may be the reason. Since it does not allow a sufficient amount of air mass to pass through. It is recommended to change it every 8000-10000. This is usually done with changing the engine oil.
- Unscrew the 4 nuts securing the pressure plate to the body.
- We remove the air filter housing and see our valve.
- Remove the terminal and use a 13 mm wrench to unscrew the valve itself.
- Let's examine it. Particular attention should be paid to threads and rubber O-rings.
- We take out the idle jet and clean it with a toothpick.
There is no need to work with metal objects, as the hole can be enlarged. Now that you have the valve in your hands, it’s worth checking its operation. It may be working, or it may need to be replaced. After all, the most you can do is clean it with carb cleaner.
Replacement
- After turning off the power to the equipment, turning off the water supply to the machine and removing the required wall of the device, you need to disconnect the hoses and terminals from the valve.
- Be sure to remember how they were located, and even better, take a photo.
- Next, you need to unscrew the bolts holding the part or remove the latches (in some models they secure the valve).
- By turning the valve, it is removed, after which a new inlet valve is inserted in its place.
- The new part should be secured in the reverse order.
- When the inlet valve is in place, you need to turn on the machine and check whether it has started to take in water.
You can see the process of replacing the water inlet valve on an LG washing machine in the following video.
INDESIT WITL 86 "vertical" age about 7 years. The washing machine suddenly began to fill with water uncontrollably. And with washed things and empty! And since we supply water according to time(, we need to find out who is to blame: the valve or the electronics. While there is no water, turn off the tap on the supply pipe. They gave water, opened the tap - thin streams ran from the holes for flushing the powder (the washing machine was unplugged from the outlet ). Result: “the valve does not hold.” Internet monitoring did not please: “INDESIT WITL 86 WATER SUPPLY VALVE 33390017” price from 800 to 2400 rubles! Plus delivery time. ((((Knowing the quality of our water) I hope there may be dirt (although filter - the coarse cleaning flask is worth everything) or the frog might get stuck).Just in case, I reached into the pumping pump - I earned 1 iron ruble))
Disassembling the machine. It's enough to shoot the left side and that's it, but then it's a bit cramped, you need to have the hands of a surgeon)).
Disconnect and remove the panel with switches (so as not to interfere) Lift the top part up. I didn’t remove it completely - there was too much extra, factory installation, etc...
Disconnect, otherwise you cannot pull out the valve:
1. thick corrugated hose in the center. 2. plugs (2 pcs.) on the valves. 3. spring clamps (2 pcs) on the hoses (all motorists love them)) but it will not be easy to compress them. I used duckbill pliers. 4. remove 2 rubber water supply tubes.
Removing the double valve.
1 - press (with a thick screwdriver one at a time) 2 - turn until the latches disengage. Pull out the water supply valve
Checking valves. Measure the resistance of the electromagnet coils. I got a coil resistance of 3.72-3.77 kOhm. The windings are intact. (from 3 to 5 kOhm) If you blow into the holes, you can hear the characteristic gurgling sounds of passing air. Result: the valve does not hold. Replacement. Nope.
Disassembling valves 1. pry off the coil with a screwdriver.
2. pull out the valve. Unscrew the middle part. Unscrew by pushing with a screwdriver or “platypus”.
Wipe everything away from plaque. Clean the 3 pressure equalization holes.
3. I greased everything lightly with silicone. I don't think it will get any worse.
Checking and repairing the EPH system of carburetor 2108, 21081, 21083 Solex
The forced idle economizer system of the carburetor 2108, 21081, 21083 Solex and its modifications is designed to forcibly shut off the fuel supply to the engine cylinders through the carburetor idle system during engine braking (coasting with the gear engaged and the gas pedal fully released).
It also prevents fuel from entering the engine after it is stopped, thereby preventing it from operating with the ignition off (glow ignition).
Signs of malfunction of the EPH system of carburetors 2108, 21081, 21083 Solex
— No or unstable idle. The engine stalls or runs rough
— The engine stalls in engine braking mode (when coasting with the gear engaged and the gas pedal fully released).
— The engine stalls when the gas is suddenly released at speeds above average (2000 and above).
— After stopping and turning off the ignition, several flashes occur in the cylinders (dieseling).
Causes of malfunction of the EPH system
— The solenoid valve is faulty. — The solenoid valve control unit is faulty. — The contact of the fuel mixture “amount” screw is oxidized, dirty or damaged. — The connecting wires are damaged or their tips are oxidized. — The connectors of the connecting blocks have come off.
Tools for repair
— Open-end wrench 13 mm. — A piece of wire 0.5 meters. — Tachometer. — Voltmeter. — Ohmmeter.
Or one multimeter or autotester that can work in all these modes.
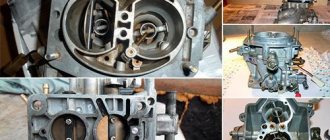
Checking and repairing the Solex carburetor solenoid valve
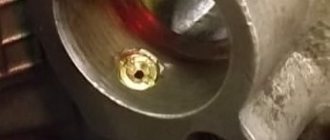
Carburetor solenoid valve 2108, 21081, 21083 Solex
1. Remove the wire tip from the solenoid valve.
2. Turn on the ignition.
3. Put the wire end back on.
4. You should hear a click when the valve operates.
If there is no click, then use a piece of wire to connect the positive terminal of the battery and the terminal of the solenoid valve. There is a click - the valve is working, but the control unit or connecting wires are faulty. There is no click - the valve itself is faulty and must be replaced.
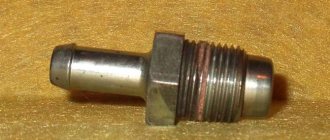
This is the solenoid valve of the 21083 Solex carburetor. There is a marking on the jet 41.
EMK 21083
And this is the solenoid valve of the carburetor 2108, 21081 Solex. It has a slightly different shape and is already marked on the fuel nozzle 42.
EMK 2108
Both valves are interchangeable.
In addition, you can check the serviceability of the solenoid valve and the correct installation by removing the wire tip from the valve outlet with the engine idling. The engine should stall. If it does not stall, then the needle may be stuck in the valve or it may not be fully tightened.
We unscrew the valve, remove the fuel nozzle from it, and check the mobility of its needle. We wrap the valve back by hand, do not put the wire on it yet, start the engine and then continue to wrap it with an open-end wrench. Turn it in slowly until the engine starts to stall. Next, we put a wire on the output of the solenoid valve - the engine should start normally, and stall after disconnecting the wire. For more details, see “Features of installing the Solex solenoid valve.”
It may be necessary to slightly rotate the valve with a key back and forth (with the wire end on) in order to achieve more stable engine operation.
There is no need to repair the valve if it malfunctions. We replace the faulty valve with a new one.
Checking and repairing the control unit of the EPH system of the Solex carburetor
1. Take a voltmeter and connect one of its terminals to the terminal of the solenoid valve, and the other terminal to the “ground” of the car (the “ground” can be a body part, a metal part of the engine, or the “minus” of the battery).
2. Connect the tachometer.
3. Start the engine and look at the voltmeter.
4. At idle, the voltage must be at least 10 V (equal to the on-board voltage).
5. We increase the engine speed to 4000 rpm and sharply reset.
You can press the gas pedal or rotate the throttle control lever with your hand.
6. When the speed is reduced to 1900 rpm, the voltage should drop to 0.5 V, and when it decreases below 1900 rpm, it should rise again to at least 10 V. If this does not happen, the EPHH control unit is faulty
Checking the operation of the EPH system of the Solex carburetor using a voltmeter (multimeter) - instrument readings when idling with the gas pedal not pressed and the throttle valves closed
Repair of the control unit consists of replacing it with a new one.
Do not lose sight of the fact that there are several types of control units used on different cars with a Solex carburetor. Their response thresholds are different.
For example, some block modifications:
5003.3761 - used on VAZ 2108, 2109, 21099 cars, “Tavria” turns off the valve at speeds above 2100, turns it on at 1900 rpm.
502.3761 - used on Moskvich 2141 cars with a Solex carburetor, turns off the valve at 1500, turns it on at 1250.
5013.3761 - VAZ 2104, 2105, 2107, 2121 cars with a Solex carburetor, turns off above 1900, turns on below 1700 rpm.
Checking and repairing the “quantity” screw of the fuel mixture of the Solex carburetor
If you suspect a malfunction of the “quantity” screw (the contact is oxidized or damaged, the screw wire is broken), it is necessary to check it. — We connect a voltmeter to the carburetor EMC, the same way as when checking the block. — Let's start the engine. — Set the speed within 2200-2300 rpm.
— We disconnect the tip of the green wire leading to the “quantity” screw, close it to “ground” and then open it on the contrary.
When a short-circuit to ground occurs, a voltage drop should be observed (the EMC is de-energized); when it opens, it increases to the voltage of the on-board network (the EMC is energized).
Screw for adjusting the “amount” of fuel mixture in carburetor 2108, 21081, 21083 Solex
Repairing a screw consists of removing corrosion and dirt from its contact or replacing the screw itself or its wire with a new one.
For more information about the “quantity” screw, its principle of operation and testing, see “Sensor-screw EPHH Solex, check, repair.”
Checking and repairing connecting wires of the EPHH system
— Visually inspect the wires for breaks or breaks. — Remove the block from the control unit and measure the voltage at pin 4. Must be at least 10 V. — Clean the wire tips from oxidation. — Check that the connecting blocks are securely seated. — For a more thorough check, using the diagram, test the connecting wires with a multimeter, one by one disconnecting them from the blocks.
Repairing wires involves replacing damaged ones with new ones.
Twokarburators VK - More information on the topic in our VKontakte group, on Facebook Twokarburators FS and on Odnoklassniki - Twokarburators OK
More articles on Solex carburetors
— Control unit EPHH Solex 2108, 21081, 21083
— Scheme of carburetors 2108, 21081, 21083 Solks
— Economizer of forced idling of the Solex carburetor 2108, 21081, 21083, device, principle of operation
— Unstable idling of a car engine with a carburetor 2108, 21081, 21083 Solex
— Adjusting the idle speed of a car engine with a carburetor 2108, 21081, 21083 Solex
— Engine “troits”, reasons
Purpose of the inlet valve
All washing machines such as Indesit, Samsung, Ariston, Zanuzzi and other models are necessarily equipped with a solenoid valve.
This device has two operating states: open and closed. As soon as the washing program is selected, the mechanism of the electromagnetic device will work and open, after which water will begin to flow. The volume of water is controlled by an electronic module, which in turn controls the operation of the pressure switch and the inlet solenoid valve. The filling device is activated by supplying power from the control unit to the coil of this device.
The water supply valve for a washing machine acts as a shut-off valve, essentially a tap that opens and shuts off the flow of water into the washing tank through a container with detergents at the right time, according to the washing mode.
Solenoid valve design
The valve is very simple. It contains the following details.
The external thread of the inlet and outlet pipes is 1/4" or more depending on the fluid flow. The least amount of water passes through the solenoid valve for drip irrigation. Small-sized devices are built into a water pipeline and operate on a timer that sets different irrigation modes.
Recently, models combined with a switch have appeared. Available for purchase through the online store: the solenoid valve for irrigation C 1060 plus GARDENA, which has become popular. It automatically switches the water supply to irrigate the garden.
Water supply valve device
The inlet solenoid valve of a household washing unit is a small device consisting of:
- housings;
- electromagnetic coil with core;
- springs;
- a disk mounted on a core that blocks the flow of water coming from the water supply.
The body material in most cases is various types of heat-resistant polymer materials, less often brass or stainless steel. For the manufacture of membranes, gaskets and seals, heat-resistant rubber, caoutchouc, fluoroplastic or silicone are used. Electric magnets with rigidly fixed parts (solenoids) are installed in the retractor coil. Depending on the number of solenoids, they can be one, two, or three-coil. The number of coils corresponds to the number of sections of the device through which tap water flows into the dispenser. Electromagnetic valves of washing machines from different companies may differ in materials of manufacture, appearance or number of coils, but the operating principle of all such elements is the same.
Working principle of water supply valve
The inlet valve of the washing machine is controlled by the control module. In a stationary position, when no voltage is applied to the coil, the valve is closed, and its membrane, due to the spring, is in hermetically sealed contact with the seat of the device, reliably shutting off the pressurized water in the water supply. When the processor sends an electrical signal to the coil, the rod, under the influence of an electric field, is drawn into it, dragging the piston along with it. The device moves from the static “closed” position to the “open” position. When the electric current supply is interrupted, the rod returns to its previous position and the water supply is interrupted. All coils of household washing units are designed for a normal voltage of 220 V and a clock frequency of 50 Hz.
Purpose of the solenoid valve
An electromagnetic valve for irrigation is always needed, even if there is no irrigation system. It is used in conjunction with a timer that turns it on at the right time. It is especially needed to fill the storage tank. When water is supplied according to the schedule, the timer opens the valve and the tank is filled. It is advisable to water the area at the same time. All this is done in the absence of the owner. All he has to do is water hard-to-reach places.
The main purpose of the valve is to supply water to the irrigation system at a given time. A 1-inch device is suitable for this, flowing 50-100 l/min at a pressure of up to 10 atm. It can also be used for short irrigation areas, since the built-in regulator allows you to adjust the required local flow. It is suitable for spray and drip irrigation when the pressure in the system is low.
One or more valves are installed on a drainage pad made of crushed stone and closed with a box. This can be done in any convenient place.
Types of intake valves
Water supply valves for LG, Samsung or Indesit washing machines may have various technical differences. Almost all manufacturers install normally closed valves on their units. Normally closed valves are valves that open when voltage is applied to the electromagnetic coil.
The inlet valves of washing machines can be divided into:
By the number of electromagnetic coils
- single-reel (outdated washing units);
- two-reel (most budget models);
- four and five reel (some models);
2. Based on the materials used to manufacture the case
3. According to the sizes of water supply fittings
There is also a universal fill valve for washing machines on sale, marked 1/90, which means there is one outlet located at an angle of 90 degrees relative to the inlet fitting. The metal mounting plate of such a valve is removable and can be adjusted at different angles. The diameter of the solenoid valve nipple is 10.5 mm, and the inlet fitting is ¾ inch. This universal solenoid valve is suitable for washing units from most manufacturers that have a single-coil version of the device installed.
Malfunctions of inlet valves and their replacement
If the washing unit has been idle for a long time and tap water has accumulated in the washing drum, the inlet valve most likely needs to be replaced. If the washing unit, for some reason, was left in a room with sub-zero temperatures, then due to the freezing of the water accumulated in it, the body of the device may crack. In this case, it is also changed entirely.
If the water supply is poor, sometimes it is enough to clean the filtration mesh to restore operation. To do this, you need to turn off the water and remove the water supply hose and remove the contamination by pulling out the mesh with pliers and then putting it in place.
The main malfunction of solenoid valves is a malfunction of the electromagnetic coil. If the coil is burnt out and does not retract the rod, water does not flow into the washing tank at all. Most modern units are equipped with electric valves that have a non-separable design, so they cannot be repaired. It is better to carry out replacement with the assistance of a specialist. You can carry out the repair yourself by purchasing a new filling electric valve, similar to the one that failed. To do this you need:
- turn off the power to the washing unit;
- turn off the water supply and disconnect the water supply hose;
- remove the lid or side wall (for top-loading machines) of the washing machine;
- disconnect the electrical wiring and hose (or hoses) associated with the dispenser section;
- unscrew the fixing plate bolts;
- remove the device;
- check performance using a multimmmeter. The winding of a single-coil valve should “ring” at 3.8 kOhm (on older Samsung models 4.5 kOhm), for double and triple coils this figure ranges from 2 to 4 kOhm;
- Replace the solenoid valve with a new one, reassembling it in the reverse order.
Electrical repair of ODE solenoid valve
The valve is closed and opened using an electromagnetic coil (solenoid) directly attached to its body. Accordingly, if the coil fails, the valve will stop working. Therefore, if during operation of one or another equipment the working medium does not overlap/open, it is necessary to check the operation of the electromagnetic coil:
- Use a tester to make sure that voltage is supplied to the coil. If necessary, clean the connectors.
- Using an ohmmeter (tester, multimeter), you need to measure its resistance. It should be in the range of 2-4 kOhm. If not, the coil must be replaced.