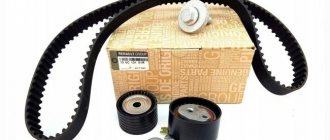
Timing marks (gas distribution mechanism) of engine 21083 (2108, 21081)
The engines of VAZ 2108, 2109, 21099 cars and their modifications in the timing drive have three pairs of installation marks.
When they are combined, the camshaft and crankshaft are in a position in which the pistons of the first and fourth cylinders of the engine are at top dead center.
It is necessary to set the timing drive marks when replacing the timing belt, when setting the ignition timing, when checking and adjusting thermal valve clearances, repairing the engine and replacing its parts, etc.
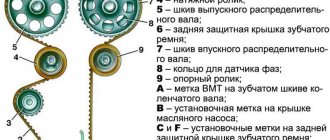
Timing drive timing marks for engines 21083, 21081, 2108 of VAZ 2108, 2109, 21099 cars
Mark on the camshaft pulley and mark-protrusion on the rear timing cover
Mark on the crankshaft pulley (“sprocket”) and the ebb of the engine oil pump housing cover
A number of engines of VAZ 2108, 2109, 21099 cars have an oil pump without an installation mark on the body. In this case, when setting the timing drive marks, we focus on the marks in the clutch hatch and the camshaft pulley.
Mark on the flywheel and mark-triangular cutout of the ignition timing scale
The mark on the flywheel is a long, shallow cross mark. If there is dirt on the flywheel, it may not be visible. To detect it, you need to gradually turn the flywheel and wipe its surface with a rag soaked in solvent.
Diagram: timing marks for VAZ 2108, 2109, 21099 vehicles with engines 21083, 21081, 2108
Notes and additions
— To access the timing marks on the camshaft pulley and the rear timing cover, it is necessary to remove the outer cover of the car engine timing drive. We align the marks by rotating the crankshaft by the ratchet bolt with a “19” wrench or a large slotted screwdriver by the flywheel teeth in the clutch housing hatch clockwise. It is not recommended to turn the camshaft pulley mounting bolt with a wrench.
— To access the installation marks on the crankshaft pulley and the oil pump housing, it is necessary to jack up the car and remove the wheel from the timing drive side. Then loosen the generator, move it towards the engine (or loosen the tensioner nut, if equipped) and remove the drive belt. Next, use a key set to “19” to unscrew the crankshaft ratchet bolt (in this case, the flywheel is fixed in the clutch housing hatch by the teeth with a slotted screwdriver). We remove the generator drive pulley and screw the ratchet bolt back (you can use it to rotate the entire timing drive).
— To access the installation marks on the flywheel and the ignition timing scale on VAZ 2108, 2109, 21099 vehicles, there is a hatch in the clutch housing closed with a rubber cover. It is located under the thermostat. The flywheel in the hatch can be rotated using a large slotted screwdriver using the teeth of the flywheel crown.
Source
https://youtu.be/https://youtu.be/Z_pJOrI3-Hk
_
How to replace the timing belt on a VAZ 2108-VAZ 21099?
Removal: 1) First unscrew both side cover bolts.
2) Next, unscrew the last remaining central bolt that secures the cover.
3) Now, holding the cover with your hand, remove it from its seat.
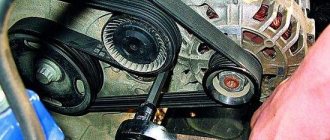
4) Next, remove the generator belt from all the rollers. (For information on how to remove the alternator belt, see “this article”) 5) Then remove the front right wheel from the car. (see Removing the wheel)
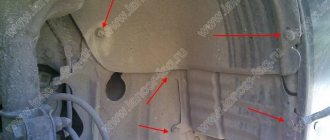
Note! If your car also has fender liners installed, then they will also have to be removed!
6) Then, using the central bolt that secures the pulley, turn the crankshaft strictly clockwise.
Note! After turning the crankshaft, pay attention to both marks that are indicated in the photo, they should coincide with each other, the first mark indicated by a screwdriver is the camshaft mark, and here is the second mark, this cover mark!
7) Now pull the plug with your hand to remove it from the clutch housing.
 Next, look at the mark that is present on the flywheel; it should coincide with the slot on the clutch housing cover.
Note! In the photo, for easier viewing, the cooling hose has been removed!
How to set timing marks on a VAZ 2109
This article shows how to set timing marks on a VAZ 2109. Replacing the timing belt is one of the most important vehicle maintenance procedures. Because a broken belt leads to engine failure. Ultimately, this type of work does not require large material costs and the skills of a qualified specialist. It is very important to understand the processes occurring in a running engine in order to correctly orient the order of work to replace the timing belt.
How to set VAZ timing marks
The piston must be at top dead center at the moment of fuel compression. Accordingly, there is a mark on the crankshaft toothed pulley. When combined with the mark on the front engine cover, this position is fixed. When the piston is at top dead center. The valves of this cylinder in the block head must be completely closed.
This also corresponds to a certain position of the camshaft. Which is marked with a label. Markers must be placed on the first cylinder of the engine. That is, the piston of the first cylinder is at TDC. The valves are completely closed. It is also necessary to understand that the next position of the piston at which the fuel is compressed and the marks are located correctly.
Correspond to one revolution of the camshaft and two revolutions of the crankshaft. As a result, the crankshaft mark is twice aligned with the mark on the front engine cover. And its correct position corresponds to when the piston is at TDC at the moment of fuel compression. And the valves of the first cylinder are completely closed. If you understand all this, then the process of installing the belt itself will not cause any difficulties. Take any existing internal combustion engine. All these processes will remain unchanged. The only difference is in the design of the timing drive. Either it is a belt or chain or gears. All we have to do is understand the nuances characteristic of each type of engine.
Disassembling the timing belt
I would like to talk about the timing mechanism of the engine installed on the VAZ 2109 car. With a cylinder head having 8 valves. That is, each cylinder has one exhaust and one intake valve. Accordingly, the operation of these valves is ensured by one camshaft.
Replacing the roller
First of all, you need to replace the tension roller with a new one. Therefore, we install a spacer washer. The roller itself and tighten the roller with a fastening nut.
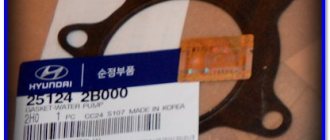
It is advisable to change the pump at the same time; it doesn’t cost much money. And it can cause a lot of harm if it fails.
Install the crankshaft according to the mark
Now you need to install the crankshaft correctly. To do this, scroll until the marks on the toothed pulley and the front engine cover align.
The piston is at top dead center. This position also corresponds to a mark on the flywheel. Which is combined with the central slot of the ignition setting scale. It is clearly visible through the inspection window in the flywheel housing housing.
Where are the timing marks on a VAZ?
The 8-valve VAZ engine has one camshaft, and it is much easier to set marks on it than on a twin-shaft engine. Let's look at all the possible ways to find the extreme position of the camshaft and crankshaft.
On the camshaft, as a rule, there is a mark on the pulley, such a small mark, and on the cylinder head there is an ebb with which this mark should coincide, or rather not even an ebb, but a protrusion on the shield, on the left side, when looking at the engine and camshaft from the front. Sometimes these marks are not observed; what to do in this case is described below.
The crankshaft is aligned according to the mark on the flywheel, on the gearbox, near the engine on top there is a hatch covered with a rubber plug. If you remove the plug, you will see marks on the flywheel and a protruding rod from the engine, which should coincide. But there may be a problem: the fact is that if the engine was disassembled and the flywheel was removed, then the flywheel can be placed on either side, that is, the mark will be God knows where, but not at TDC. There is no guide or eccentric on the flywheel; whichever side you put it on, that’s what it will become, even if you turn it 180 degrees.
We independently change the timing belt on a VAZ 2109 - 21099
The gas distribution mechanism (GRM) of an internal combustion engine coordinates the operation of valves and pistons and is driven by a special belt or chain. Replacing the VAZ 2109 and VAZ 21099 timing belt is done every 30-40 thousand km, which will minimize the likelihood of it breaking during operation. Many owners turn to specialized service stations, but due to the maintainability and simplicity of the design of these models, the replacement can be done independently.
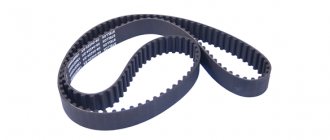
Timing belts for VAZ-2108
The timing belt is a special part that makes it possible to combine the action of two shafts - the crankshaft and the camshaft. By using the part, the technical characteristics of the engine are improved, and, therefore, the quality of the car itself increases.
The standard timing belt on a VAZ-2108 with an 8-valve engine has article number K015521.
Moreover, it is equipped with a roller, through which it is possible to tension the belt and secure it in the desired position. The price for such a design ranges from 500 to 2000 rubles. The cost depends on the manufacturer and region of residence of the car owner.
The table below shows analogues of timing belts with article numbers and approximate prices. Before purchasing, you should know how many teeth there are on the belt.
| Analogue | vendor code | price, rub. |
| CONTITECH | 111Z | 300 |
| BOSCH | 1987949139 | 400 |
| GATES | K015521xs | 500 |
It is worth noting that prices are for the belt only. However, the price does not include other spare parts used to secure the part. Thus, when replacing a timing belt, you will need to increase costs and calculate possible costs in advance.
Preparatory work
Replacing the timing belt requires some prep work to get to it. To do this, lift the hood and remove the air filter pipe by unscrewing the fastenings of the retaining clamp with a wrench. Next, the belt protective cover is removed, for which you need to unscrew the three bolts that hold it in place. This is done with a regular open-end wrench. In the opened space, the timing belt will be visible, which needs to be replaced.
The front right wheel and the protection under it are first removed to get to the crankshaft pulley, which drives the gas distribution mechanism via a belt. In the cab, put the lever in the fourth gear position and ask the assistant to press the brake pedal. We install the head 19 on a long wrench so that it is convenient to get to the crankshaft pulley, which we unscrew, which will require some effort. After the bolt is broken, you can put the gear in neutral and not hold the brake pedal.
Important feature! To replace the timing belt on a VAZ 2109 8-valve injection engine or a similar VAZ 21099 model, when removing the crankshaft pulley, you need to hold the flywheel, which is best done with a screwdriver. Otherwise, it will rotate along with the pulley. In carburetor engines this problem does not exist; the pulley is held independently.
From the top of the open hood, the nut that holds the tension of the generator belt is loosened; this is best done using a special cardan on which to place the head of the key. The generator pulley is moved so that the belt can be removed without interference. After this, remove the crankshaft pulley so that the gear is visible.
Replacing the timing belt on a VAZ 2109
Gasoline car engines provide for the supply of a fuel mixture to the cylinder while the piston is at top dead center. Synchronization of the rotation of the crankshaft (controlling the piston group) and distribution shaft (controlling the timely flow of the combustible mixture into the combustion chamber, exhaust gas removal) shafts of VAZ cars is carried out using a special transmission element. Mechanical wear of an important structural part causes unstable operation of the motor, loss of power, breakdown, expensive repairs, and possible replacement of the unit. The article answers the question: how to independently replace the timing belt (gas distribution mechanism) on VAZ 2109 cars.
When is it necessary to replace the timing belt on a VAZ 2109
Initially, power units used a chain drive, which was distinguished by reliability, durability, and ease of maintenance. The transition to the use of a belt drive made it possible to reduce operating noise, cost, and weight of the product. The belt is a three-layer structure.
The inner working side contains nylon teeth and is in contact with the gear. The main, middle layer consists of fiberglass cords, characterized by high strength, resistance to mechanical and temperature loads, and exposure to aggressive environments. The outer, rubber, protective five-millimeter shell gives the item elasticity and flexibility.
The service life of the product is determined by the manufacturer, operating conditions of the vehicle, quality, and regularity of maintenance.
The reasons for the breakdown may be:
Under normal vehicle care conditions, replacing the timing belt on a VAZ 2109 is carried out after fifty thousand kilometers. The lubrication of the tension roller bearing is designed for the same motorcycle mileage. There is an opinion among car owners: it is advisable to change the timing belt and tensioner simultaneously with changing the engine oil. The event will cost several orders of magnitude less than a major overhaul of the power unit in the event of an emergency.
Signs indicating the need to remove the front cover of the protective casing and inspect the transfer unit.
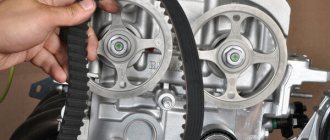
Aligning marks
In order for the engine to work after replacement, it is necessary to set the timing marks. If the belt tensioner roller is noisy, it is better to replace it. Although it is better to do this in any case, so that no problems arise during the life of the belt. But if this is not possible, use a 17 wrench to loosen the nut holding it in order to loosen the tension for subsequent removal of the belt. We find a mark on the main camshaft sprocket and align it with the mark on the cover. To align the marks, unscrew the bolt holding the camshaft sprocket, align the timing belt marks, and then tighten it again.
After this, we align the marks on the crankshaft. To do this, we find a groove on the housing in the area of the oil pump and a point on the crankshaft gear. We put the pulley on the gear and turn it by hand until the marks match. This is easy to do; just hand strength is enough to turn the pulley.
Sometimes the marks on the crankshaft are not visible, then after aligning the marks on the camshaft, you need to make sure that the mark on the flywheel and the notch on the casing match. To do this, you first need to remove a special plug, after which these marks will be visible. If they do not match, after replacing the timing belt the engine will not start, and if it starts, it will run unstably and intermittently. Therefore, this stage is important for successful repair and subsequent operation of the car.
Belt installation
If the marks on the camshaft and crankshaft coincide, you need to install a new timing belt. If there are markings or inscriptions on the belt, they must be oriented clockwise, and the arrows must also be oriented if they are on the belt. Before this, the old belt is removed; if it is intact, by examining it, you can make sure that it is cracked and its operation is dangerous.
First, the belt is installed on the crankshaft gear, and then, with light force, on the camshaft sprocket. When installed, it should go around the drive sprocket and tension roller, making a zigzag.
Checking the timing belt tension is done by adjusting the tension roller, which is best replaced when installing a new belt. This is done with a special key; if you don’t have one, bolts or pins 40-50 mm long that fit the diameter are inserted into the holes. A screwdriver is inserted between them and, turning the roller, the belt is tightened. It should be quite tight, but with the average effort of the hand to turn 90°, if it is overtightened, it will quickly wear out. After this, the tension roller nut is securely tightened.
Reassembly
Then everything is assembled in reverse order. First, install the crankshaft pulley. To tighten the bolt, set the fourth speed again and depress the brake pedal, after which the bolt is tightened with a head with great force using a collar. The generator belt is installed in place, the pulleys are moved apart using a pipe, a collar or a small pry bar. This is necessary for good tension of the generator belt, after which the nut is tightened using a wrench with a universal joint. The pulling procedure is repeated several times. This belt should be stretched very tightly and practically not bend under the force of your hand.
Video: Replacing the timing belt VAZ 21099, 2109
After this, the timing belt protection is put in place, for which you will need to install it in the seat and tighten the three bolts again. The air intake is put in place and secured with a clamp. The metal and plastic protection is installed in place and the removed wheel is secured, the car is removed from the jack. After this, you can start the engine. It will start without problems, its operation should be stable, without fluctuations or extraneous sounds. This will only be possible when all the marks match and the belt is tensioned with sufficient force.
Replacing the timing belt on a VAZ 2109 carburetor
The gas distribution mechanism drive is located on the right in the direction of travel of the car, opposite the passenger seat. Access is required from above under the hood, below behind the right wheel.
Step-by-step instruction
Rotate the crankshaft again and check the marks. Mismatch - repeating the seven previous points again.
Replacing the timing belt on a VAZ 2109 injector
There are no fundamental differences from the procedure described above for the carburetor version. An exception is the dismantling, installation, and clearance adjustment of the crankshaft position sensor (CPS). Before starting work, disconnect the battery terminal.
Preparatory operations
Changing the pump and roller is a prerequisite so that after a thousand kilometers you don’t have to disassemble everything again. But it’s up to you to decide for the pulley, the price is 150 rubles per pair. There were cars where a slightly bent pulley caused the belt to slip and gradually wear out, reducing its service life. On this car the belt was worn down in half.
Replacement interval
We recommend that you periodically check the condition of the belt to avoid annoying consequences and not have to look for someone to take it to a repair shop. Replace every 40,000 kilometers.
And here is the patient himself.
Everything we need.
We unscrew the three ten bolts securing the protective timing cover and remove it.
Next, loosen the nut thirteen that secure the generator and unscrew the tension bolt ten.
We take the generator to the engine and remove the belt.
Set the top dead center
Remove the engine protection and drain the antifreeze. We set the camshaft mark by turning the crankshaft clockwise. The ebb on the pulley should be opposite the bend of the protective cover fastening.
Unscrew the crankshaft pulley mounting bolt. We put the assistant in the cabin and force him to engage fifth gear and press the brake. And at this time we easily and naturally unscrew the bolt using a 19 meter head and a pipe of one and a half meters. It must be screwed properly, and some craftsmen lubricate it with sealants and then wait for kind words addressed to them.
On the left side we see the crankshaft position sensor. We will need it to subsequently check the correct installation of the timing belt. We remove the crankshaft pulley and see that the marks match.
Replacing the pump
Unscrew the nut on the tension roller 17 and remove it along with the belt. Then unscrew the camshaft pulley bolt and remove the last one.
We unscrew everything that secures the protective metal shield, namely one ten-point nut and a bolt securing the cover, three bolts securing the pump.
Remove the protective cover and pump. Antifreeze remaining in the block may leak out if you have not drained it. Carefully, it's sweet.
We clean all the parts from oil and belt residues, as well as the pump seat from the old gasket and sealant.
Lubricate the gasket of the new pump with sealant and put it in place. We install the metal protection and tighten all the bolts and nuts securing it.
We tighten the pump bolts evenly in a circle, then check whether the pump is spinning.
Recently a client brought in an original pump, which turned out to have slightly larger petals and after installation it began to bite. I had to modify it with a grinder and take measurements several times. These are the spare parts we have.
We check if the key is lost on the camshaft and install the pulley. We tighten its bolt to seventeen.
Installing a new timing belt
We check that all marks match.
We first place the belt on the crankshaft and pump. Then we tighten the right descending branch of the belt and put it on the camshaft pulley and tension roller. We check all the marks again and tighten the belt with a roller. The tension is considered sufficient if, with the force of two fingers, you can twist the longest branch of the belt by a maximum of 90 degrees. It’s easier to take the right branch of the belt with two fingers and twist it, if more than 90 is not very bad, but less is very bad. An overtightened belt will wear out quickly and will also reduce the life of the pump.
We place the bottom protective plastic cover. And on the crankshaft pulley we mark the twentieth tooth after skipping two teeth. We count counterclockwise.
This mark corresponds to the top dead center of the first cylinder. We put the pulley in place and the mark should be against the crankshaft position sensor. More precisely, against the small iron core of the sensor. Sometimes it gets into the gap between the teeth, this is considered acceptable. We tighten the pulley in the same way as we unscrewed it, with the help of a partner.
We turn the crankshaft two turns and check the marks; this is where our mark on the pulley comes in handy.
If everything is in trouble, we collect everything that we took apart. As they say in smart books, install the parts in the reverse order of removal. Don't forget to add antifreeze.
We start the car, accept congratulations from family and friends and head off to adventure.
Now comes the fun part - installing a new belt.
We check that all marks match. We first place the belt on the crankshaft and pump. Then we tighten the right descending branch of the belt and put it on the camshaft pulley and tension roller. We check all the marks again and tighten the belt with a roller. The tension is considered sufficient if, with the force of two fingers, you can twist the longest branch of the belt by a maximum of 90 degrees. It’s easier to take the right branch of the belt with two fingers and twist it, if more than 90 is not very bad, but less is very bad. An overtightened belt will wear out quickly and will also reduce the life of the pump.
It will be useful: Why the belt whistles when you turn on the air conditioner: reasons, photos and videos
We place the bottom protective plastic cover. And on the crankshaft pulley we mark the twentieth tooth after skipping two teeth. We count counterclockwise.
This mark corresponds to the top dead center of the first cylinder. We put the pulley in place and the mark should be against the crankshaft position sensor. More precisely, against the small iron core of the sensor. Sometimes it gets into the gap between the teeth, this is considered acceptable. We tighten the pulley in the same way as we unscrewed it, with the help of a partner.
We turn the crankshaft two turns and check the marks; this is where our mark on the pulley comes in handy.
If everything is in trouble, we collect everything that we took apart. As they say in smart books, install the parts in the reverse order of removal. Don't forget to add antifreeze.
We start the car, accept congratulations from family and friends and head off to adventure.