How to remove a VAZ 2114 engine: we analyze the process in detail
Many car enthusiasts, taking into account the price of a VAZ car and the possible cost of repairs in a car repair shop, are thinking about how to remove the VAZ 2114 engine with their own hands.
This article is intended specifically for thrifty and independent car owners, in which we will figure out how to remove the engine, install it back, what options for this procedure exist and how to check the compression after the repair. In addition, we will look at how to do this yourself without involving other people.
How to choose engine mounts?
When choosing engine mounts, you should pay attention to the quality of the product. If you have the opportunity to get acquainted with it by opening the box in the store, do so. Evaluate the products based on the quality of metal insulation and whether there is an anti-corrosion coating. Check the rubber element for elasticity.
Generally, the front support is more expensive than the rest. The price of the engine mount will be about 1000 rubles . The left and rear airbags cost an average of 700 rubles each.
When purchasing, check the article number indicated on the box so as not to get a fake in packaging similar to the original:
- Front – 2108-1001015-10
- Rear – 2108-1001031-10
- Left – 2108-1001040-10
In addition to the original engine mounts and their analogues, you can find reinforced ones on the market. They are considered stronger and allow the engine to be secured more firmly. But they also have their disadvantages, one of the most noticeable is strong vibration on the body. This is due to the fact that the damping element is made of dense rubber. The installation of such supports is not required on a civilian vehicle, and their cost is twice as high as that of a stock one.
Replacing an engine mount on a VAZ 2114 with your own hands is not a labor-intensive process. When you have chosen the right parts and done the job correctly, unnecessary vibration, sounds and knocks from the engine compartment should disappear. If the malfunction is still observed, check whether the cushions are level in their places.
To extend the life of new supports, you need to periodically check the tightness of the bolts and clean the rubber damper from dirt. This should be done regularly, especially if the car is driven in rural areas or on poorly paved roads.
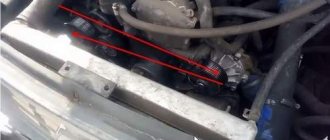
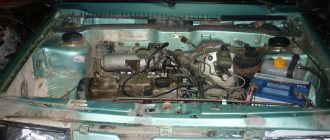
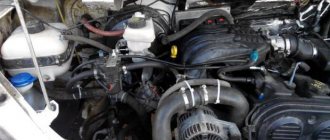
Removal and installation of the VAZ 2114 engine
There are several typical circumstances after which removing the VAZ 2114 engine becomes an absolute necessity. The most common of them are body repairs and the need for major repairs of the engine itself (its replacement).
Before carrying out repair work, it is necessary to prepare in advance:
The standard engine removal algorithm is as follows:
IMPORTANT! When you disconnect the fuel pump, do it with two 17mm wrenches, otherwise you will simply break the tube.
At this point, engine dismantling is considered complete; after repair work, it is installed in the reverse order. The only exception is that the power mount fasteners are tightened in the same order in which they were twisted, starting from the rear.
Instructions for replacing lubricant and filter
We change the oil in the VAZ 2114 engine according to the following algorithm:
- Warm up the car by driving it for 10-15 km. Drive the car onto the overpass.
- Open the filler cap located on the valve box.
- Take a socket wrench size 17, a container with a volume of at least 5 liters and climb under the car.
- Unscrew the drain plug. It is located on the oil pan. Oil will leak. Be careful - it is very hot.
- The spent composition will drain for about 10 minutes.
- Remove the old filter. Most often, no problems arise - the part can be easily unscrewed by hand. If it is jammed, take a special puller. You can simply pierce the filter with a screwdriver closer to the edge of the housing and use it as a lever. But this method is artisanal, and a professional would not approve of it.
- Pour about 200 ml of oil into the new filter, lubricate the gasket and tighten it three-quarters of a turn.
- Close the drain hole.
- Pour the new compound into the engine through the neck located under the hood. At first, 2.7 liters will be enough.
- Let the engine idle for 2-3 minutes. After this, check the lubricant level using a dipstick. If there is not enough fluid, add and repeat the test.
If you are not confident in your abilities and do not have experience in such a matter as changing the oil, it would be a good idea to contact a specialist at a workshop.
Without removing the gearbox
If there is no pit, overpass and friends, you will most likely have to figure out how to remove a VAZ 2114 engine without a box. You can perform this procedure yourself, and you will not need any special physical activity. Part of this procedure will not differ in any way from the general algorithm, so we will focus only on the differences.
To prepare a working base you will need bricks and a jack. It is necessary to smoothly lift the car and place brick by brick under the front wheels, having first secured the rear wheels so that the car does not roll.
The key differences between the methods begin when you completely free the motor head from the wires connected to it:
BE CAREFUL! Sometimes the engine does not want to fall off the box on its own, in order to fix this you will have to gently push it with a crowbar.
When you put it back together, don't forget to secure not only the engine, but also the box itself with rope. To carry out reassembly without removing the box, you will need an assistant.
How to check engine mounts on a VAZ 2114?
To diagnose the mechanism we need:
- A pair of jacks;
- Bar or board;
- Mount.
The check occurs in order:
- We drive the car onto a straight platform or into a garage with a flat floor.
- Raise one of the front wheels using a jack. Then we place a second jack under the engine pan and press it against it, through a board or block, to relieve the tension on the cushions.
- We lie down under the car and inspect the engine mounts. There should be no cracks or tears on the rubber elements. Also, they should not be hardened or peeled off from the metal part.
When a visual inspection does not help to detect the problematic element, it is worth checking for the presence of play between the support and the body. To ensure a complete inspection, use a pry bar to tilt the mechanism to the side.
If problems are identified in the elements, then it is better to immediately begin replacing the engine mount, since the motor is not securely mounted and because of this, other pillows receive a load higher than that for which they are designed. Subsequently, they may also fail, which will further weaken the reliability of the structure.
Extraction from the top
If you have a good winch or 3-4 reliable assistants, then there is no better solution on how to remove the engine from the VAZ 2114 through the top. This method differs from removal through the bottom in that it eliminates the possibility of damaging the engine itself or the car. The most important factor in the success of this operation will be your accuracy.
The procedure for removing the engine from the top must be carried out as carefully as possible. It is important to take into account everything that can affect the engine falling off its mounts. Moreover, if you do everything correctly, this method will be the least labor-intensive. At its core, this procedure is no different except for removal from removing an engine without a gearbox.
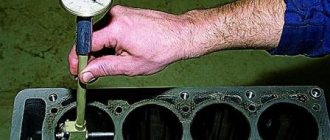
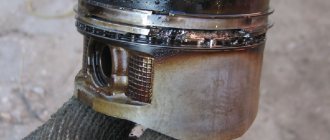
Compression test, troubleshooting
One of the main reasons for engine repair is decompression. Actually, the troubleshooting itself must be done every 30 thousand km, combining it with valve adjustment.
Signs of the need for early technical inspection of the engine are:
If you experience similar symptoms, you need to do the following:
IMPORTANT! The normal pressure in the VAZ 2114 engine is 1.0 MPa in the standard configuration and 1.4 MPa on an eight-valve engine.
After the procedure is repeated for all cylinders, it is necessary to analyze the records. So, in a working engine, compression should not fall below 1 MPa and should not have a spread between the cylinders of more than 0.2 MPa. Otherwise, you will have to repair the engine.
Priora engine for VAZ 2110
Replacing a VAZ 21124 engine with a VAZ 21126
Let's rearrange the Lada Priora engine into a VAZ 2114. So, first of all, you need to dismantle the attachments, receiver, exhaust manifold, etc. Next, we install the motor on its standard mounts and attach it to the gearbox. In order not to have problems with laying a new fuel line and changing the fuel pump, we buy a standard ramp.
In addition to the ramp, you will have to purchase long nozzles. At this stage we do not attach the ramp to the engine. Before this, you need to install the receiver, this is a labor-intensive process; you will need to tighten all the cushions and lift the VAZ 2114 using a jack. We push the receiver through, insert the ramp with the injectors, insert them into the wells and screw the ramp. Only after this we begin to place the receiver in its place and secure it. Be careful not to damage the rubber seals of the receiver. Next, we put the attachments in place. Now let's move on to the electrical wiring. First, let's deal with the ignition. Since the car does not have four ignition coils, we leave the standard coil of the VAZ 2114 in its place, providing it with high-voltage wires from the Priora. The length of the injector control wiring may not be enough, so if necessary, we increase them by about 40 cm. The same applies to the phase sensor. As for the exhaust, the standard exhaust manifold with catalyst must be dismantled and replaced with a 4-2-1 “spider” system, which has a hole for the DC. We also insert the corrugation there, completely change the exhaust pipe and modify the standard can. Let's move on to the cooling system. It is worth noting that this system on the VAZ 2114 and Lada Priora is very different, so if possible it is recommended to install a radiator from the Lada Priora.
Replacing the Lada 2114 engine (VAZ 2114)
- Comparison of technical characteristics of VAZ-21124 and VAZ-21126 engines
- Comparison of power indicators of engines 21124 and 21126
- Table of changes in units, parts and components of the VAZ 21126 engine compared to the 21124 engine
- The difference is in the connecting rod and piston group, piston pins and lock rings, cylinder block gasket, timing drive, timing belt, support rollers and timing belt tensioning mechanisms, crankshaft pulleys, water pump, catalytic converter and its gasket.
Replacing a VAZ 21124 engine with a VAZ 21126
- All engine mount mounts are identical.
- The differences are in the plugs of the coolant temperature sensor and the oil pressure sensor, so we replace them with standard ones (if you have Priora wiring, then you do not need to change them).
- It is necessary to reflash the January 7.2 ECU specifically for the Priorovsky engine. You can order the firmware on the Ikin website.
- It is not necessary to install the Priora catalytic collector; the main thing is to programmatically disable the second oxygen sensor, since the ICE 21126 has Euro-3 standards.
- Consumption of 21126 in the city with heavy traffic jams and warm-ups in the morning (10 minutes) ranges from 6 to 9 l/100 km.
- Consumption on the highway (average speed according to BC 76 km/h, speed from 20 km/h to 180 km/h) consumption 6.2/100 l.
xn—2111-43da1a8c.xn—p1ai
- Installation of the whole unit;
- Replacing the cylinder head.
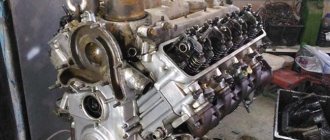
- First, the old motor is dismantled, here everything happens according to the usual scheme;
- We are preparing the new engine for installation. To do this, you need to replace all consumables. Usually they change seals, gaskets, belts;
- The power unit is put in place and attached to the pillows;
- They installed a tank from 2112. It fits perfectly. The difference is in the design of the fuel pump and the presence of sensors. If you don’t have such a tank at hand, you can leave your original one. But you will have to install an external fuel pump from the Volga;
- The next step is to install the fuel line. It is best to use copper tubing. It's more flexible. If you decide to install steel, then heat it on fire before fitting. This will allow you to bend it as needed without any problems;
- Wiring is being installed. On cars younger than 2002, no modifications will have to be made. There is already a hole for the wires coming from the injector, as well as other elements necessary for fastening. If the car is older, you will have to cut the hole yourself. Studs are placed under the bottom for attaching the absorber and gasoline filter;
- The wiring will have to be redone. Some sensors have short wires. In this case, we lengthen them;
- To install the generator you will have to buy new mountings, otherwise you will not be able to install it;
- The box won't fit a little. You need to try it on and grind off the extra corners with a grinder. It's a matter of a couple of minutes;
- The starter installed on 2109 has 11 teeth, it will not converge with the flywheel. Therefore, replace the bendix, take one with 9 teeth;
- The exhaust system will also have to be overhauled and adjusted.
- First, the engine is removed from the car and disassembled. To do this, remove the cylinder head, pan, dismantle the pistons;
- New pistons from 2112 are installed. They have more reinforced connecting rods, and they also have recesses for the valves;
- Replace the fuel pump;
- Shorten the cylinder head mounting bolts. 12 holes are drilled in the new cylinder head;
- A hole of 8 is drilled in the block and a thread is cut for the knock sensor;
- They install a pump from 2112, at the same time install a thermostat from “Samara”;
- Change the breather;
- All that remains is to assemble the entire body kit for the engine, install the wiring and configure the unit.
AutoFlit.ru
Let's rearrange the Lada Priora engine into a VAZ 2114. So, first of all, you need to dismantle the attachments, receiver, exhaust manifold, etc. Next, we install the motor on its standard mounts and attach it to the gearbox. In order not to have problems with laying a new fuel line and changing the fuel pump, we buy a standard ramp.
In addition to the ramp, you will have to purchase long nozzles. At this stage we do not attach the ramp to the engine. Before this, you need to install the receiver, this is a labor-intensive process; you will need to tighten all the cushions and lift the VAZ 2114 using a jack. We push the receiver through, insert the ramp with the injectors, insert them into the wells and screw the ramp. Only after this we begin to place the receiver in its place and secure it. Be careful not to damage the rubber seals of the receiver. Next, we put the attachments in place. Now let's move on to the electrical wiring. First, let's deal with the ignition. Since the car does not have four ignition coils, we leave the standard coil of the VAZ 2114 in its place, providing it with high-voltage wires from the Priora. The length of the injector control wiring may not be enough, so if necessary, we increase them by about 40 cm. The same applies to the phase sensor. As for the exhaust, the standard exhaust manifold with catalyst must be dismantled and replaced with a 4-2-1 “spider” system, which has a hole for the DC. We also insert the corrugation there, completely change the exhaust pipe and modify the standard can. Let's move on to the cooling system. It is worth noting that this system on the VAZ 2114 and Lada Priora is very different, so if possible it is recommended to install a radiator from the Lada Priora.
You can leave the thermostat as standard, you just need to reconfigure it correctly. If the cooling fan is in contact with the receiver, then install a Niva fan with two impellers on the outside instead. The hoses on the radiator will also have to be replaced. We place the generator on standard mounts from the VAZ 2114, it has its own bracket, and there is no need to change the belt either. Firmware and calibration of the injectors will be required, only after this the engine will start working normally. The decorative engine cover can be left in place by first making the necessary cuts on the front side. It is recommended to purchase and install a brace with a fourth mount for the power unit; this will significantly strengthen the structure and is also inexpensive. After all this work, we fill the oil, install new filters and begin running in the engine. At first, we try not to accelerate the engine to maximum power, because at this stage the elements are grinding in and such a load can cause deformation of parts, and this indicates that the engine has failed. It is recommended to replace the engine on a lift, this will make it more convenient to pull out the original one and insert a new motor. With proper assembly and installation of the new engine, the VAZ 2114 will become much more playful and powerful.
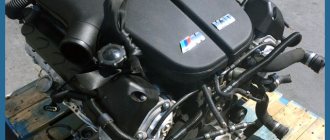
Since today the fuel is not of the highest quality, many owners need to replace or clean their injectors. Injectors fail due to dirt in the fuel and various impurities. You can understand that they are working poorly by the behavior of the engine (loss of power, increased fuel consumption, car troubles, etc.).
Removing and replacing injectors
Before dismantling the injectors on the VAZ-2114, you will need to relieve the pressure in the fuel rail. The process is performed by disconnecting the wire connectors from the fuel pump and then starting the engine. The machine should run in this position until it stalls. The procedure must be repeated until the car can start.
Removal:
- It is necessary to dismantle the pipe from the air filter;
- Disconnect the wires from the injectors;
- Disconnect the wires from the idle speed and throttle position sensors;
- Remove the vacuum hose from the fuel pressure regulator.
- Now you need to unscrew the gas supply pipes.
- It is recommended to remove the throttle cable as well, this will make it easier to carry out the work further.
- Next, you need to unscrew the plate that holds the fuel hoses;
- Now you need to dismantle the fuel rail and carefully remove it from the car. The nozzles should be directed upward;
- Now you need to remove the injectors themselves by disconnecting the brackets that hold the electrical connectors and the injector itself.
- This way the injectors will be removed and they can be replaced.
Important! If the nozzle will be washed, it is not recommended to place it in a dirty place. - It is better to cover the ramp and the holes in it with something to prevent dirt and other objects from getting in there.
Replacing the injector is quite simple. When the old spare part is removed, install a new one and secure it with a spring washer. After this, you can put the ramp in its place.
Video about removing and installing injectors
It is important to remember that you should be extremely careful when dismantling and installing injectors.
Service workers always advise adherence to the following points when replacing:
- Do not damage the injector when replacing.
- It is prohibited to disassemble injectors for repairs.
- You need to make sure that no oil gets inside.
- It is strictly forbidden to immerse parts in any cleaning products. They have electrical connections in the middle.
- There is no need to rush to part with money for new parts; perhaps the problem can be solved by simply flushing the channels.
- To do this, it is recommended to watch a video on proper washing.
Video about proper injector cleaning
In fact, there are quite a lot of reasons why injectors may not work well. And below are the most common symptoms:
- Difficulty starting the engine in any weather;
- The engine is running erratically;
- The engine stalls at idle;
- High crankshaft rotation speed at idle speed;
- Loss of power, poor response to the accelerator pedal;
- When you press the gas, shocks or dips may appear;
- High gas consumption;
If the nozzle is dirty or damaged, it should be replaced or cleaned. There is no point in repairing it. It should also be noted that today injectors cannot last even 100 thousand km.
Checking old injectors
Before replacing injectors, it is recommended to check them. This will allow you to determine whether it is working or not.
The test is carried out on a removed fuel rail, on a special stand.
Such a check can be done in almost any service.
You can also check not all injectors at once, but each one separately. To do this, you will need to apply current to the part and install a container with fuel on it. When current is applied, the valve will operate and gasoline will spray out through the nozzle. But such a check is inaccurate and will still need to be checked at a stand.
Nozzle selection
For more information about choosing injectors, see the material: “Choosing which is best to install injectors on a VAZ-2114.”
The VAZ-2114 model can be equipped with different injectors from different manufacturers. Depending on this, durability and their cost also differ.
It is recommended to buy not domestic parts, but from other companies, for example, GM, BOSCH, SIEMENS.
Also, the choice of injectors also depends on the working volume and the number of valves. For 16-valve engines, the performance of such parts will be different than for the 8-valve version. If the parts are selected incorrectly, then most likely, gas mileage will be higher or the car will lose power.
If we talk about choice, then preference should be given to the BOSCH brand number 0280158502. This is the serial number that is suitable for an 8-valve engine with a volume of 1.5 liters.
Injectors fail not only because of their quality; their performance is largely affected by fuel that contains a lot of dirt or large fractions.
Cleaning injectors at service stations will not be cheap. Therefore, if you do not check and clean it yourself, then you should think about whether it might be easier to buy new parts and replace them.
No comments yet
Removing and replacing injectors
Before dismantling the injectors on the VAZ-2114, you will need to relieve the pressure in the fuel rail. The process is performed by disconnecting the connectors with wires from the fuel pump and then starting the engine. The machine should run in this position until it stalls. The procedure must be repeated until the car can start.
Removal:
Important! If the nozzle will be washed, it is not recommended to place it in a dirty place.
Replacing the injector is quite simple. When the old spare part is removed, install a new one and secure it with a spring washer . After this, you can put the ramp in its place.
Video about removing and installing injectors
Replacement Tips
It is important to remember that you should be extremely careful when dismantling and installing injectors.
Service workers always advise adherence to the following points when replacing:
Video about proper injector cleaning
Signs of wear
Since the function of the engine mount is to dampen vibrations, if they are noticeable even at idle, this indicates a problem. Among other signs of wear on the airbags on the VAZ 2114:
- Vibration of the gearshift lever. This indicates that all motor vibrations are transmitted to the box.
- If you open the hood, strong vibrations of the engine are visible.
- Uneven car operation. The fact is that when the silent blocks are heavily worn, the crankcase begins to move slightly relative to the clutch. Because of this, the crankshaft position sensor (CPS) constantly produces different signals. The ECU is forced to mistakenly “catch” the revolutions to eliminate the imbalance.
Symptoms for replacement
In fact, there are quite a lot of reasons why injectors may not work well. And below are the most common symptoms:
Checking old injectors
Before replacing injectors, it is recommended to check them. This will allow you to determine whether it is working or not.
The test is carried out on a removed fuel rail, on a special stand.
Such a check can be done in almost any service.
You can also check not all injectors at once, but each one separately. To do this, you will need to apply current to the part and install a container with fuel on it. When current is applied, the valve will operate and gasoline will spray out through the nozzle. But such a check is inaccurate and will still need to be checked at a stand.
Nozzle selection
For more information about choosing injectors, see the material: “Choosing which is best to install injectors on a VAZ-2114.”
The VAZ-2114 model can be equipped with different injectors from different manufacturers. Depending on this, durability and their cost also differ.
It is recommended to buy not domestic parts, but from other companies, for example, GM, BOSCH, SIEMENS.
Also, the choice of injectors also depends on the working volume and the number of valves . For 16-valve engines, the performance of such parts will be different than for the 8-valve version. If the parts are selected incorrectly, then most likely, gas mileage will be higher or the car will lose power.
Injectors fail not only because of their quality; their performance is largely affected by fuel that contains a lot of dirt or large fractions.
Cleaning injectors at service stations will not be cheap. Therefore, if you do not check and clean it yourself, then you should think about whether it might be easier to buy new parts and replace them.
Source
VAZ 2114 engine replacement
Many car enthusiasts, taking into account the price of a VAZ car and the possible cost of repairs in a car repair shop, are thinking about how to remove the VAZ 2114 engine with their own hands.
This article is intended specifically for thrifty and independent car owners, in which we will figure out how to remove the engine, install it back, what options for this procedure exist and how to check the compression after the repair. In addition, we will look at how to do this yourself without involving other people.
Removal and installation of the VAZ 2114 engine
There are several typical circumstances after which removing the VAZ 2114 engine becomes an absolute necessity. The most common of them are body repairs and the need for major repairs of the engine itself (its replacement).
Before carrying out repair work, it is necessary to prepare in advance:
The standard engine removal algorithm is as follows:
IMPORTANT! When you disconnect the fuel pump, do it with two 17mm wrenches, otherwise you will simply break the tube.
At this point, engine dismantling is considered complete; after repair work, it is installed in the reverse order. The only exception is that the power mount fasteners are tightened in the same order in which they were twisted, starting from the rear.
Engine malfunctions, assembly and disassembly of the Lada 2113 engine, gas exhaust system, power unit of the Lada 2114, Lada 2115. Stages of assembly and disassembly of the VAZ 2113, VAZ 2115, VAZ 2114 engine. Operation of the engine systems of the Lada 2115. Troubleshooting the Lada 2114 systems: exhaust, cooling, power, lubrication. Repair recommendations: cylinder heads Lada 2113, piston group, cylinder block.
The power unit of cars is the gearbox and engine of the VAZ 2115. The engine is usually lifted and removed using a hydraulic lift or blocks. Before removing the engine, the wheel shaft ends are disconnected and left on the vehicle.
The installation and removal stages are carried out step by step. Place the vehicle on a lift and apply the parking brake. Supports are installed under the rear wheels and the hood opens.
To equalize the pressure in the gasoline supply system, disconnect the gasoline pump from the ignition system, then start the engine and wait until the engine stalls. After stopping the Lada Samara 2 engine, turn on the starter from the ignition switch for about 3-5 seconds.
Then disconnect the battery by removing the terminals.
Disconnect the gasoline supply system from the engine.
The gas pedal cable is disconnected from the pipe and bracket.
Removing components and parts of the air supply system: 1 – air filter; 2 – mass air flow sensor; 3 – throttle pipe; 4 – sealing gasket; 5 – receiver; 6 – exhaust pipe of the engine cooling system; 7 – hose clamps; 8 – supply pipe of the coolant pump; 9 – throttle pipe heating hoses; 10 – inlet pipe hose
The clamps 7 loosen and remove the hose 10.
Unscrew the nut and remove the air supply hose
Then the air filter 1 is removed along with the air flow sensor 2, and the rubber supports that attach the filter to the body are cut off using a knife.
Disconnect the vacuum hoses from the receiver to the fuel pressure regulator and to the brake booster.
Disconnect the canister purge hose from the throttle pipe
Wires from the throttle pipe, ignition, generator and starter, injectors, from the frog located on the gearbox of the Lada Samara 2, VAZ 2115, VAZ 2114, VAZ 2113.
The engine splash guard should be removed on a lift.
After unscrewing the bolts at the lower points of the radiator and cylinder block, drain the antifreeze, while keeping the expansion tank and radiator plugs open.
In order to drain the oil from the engine, you need to unscrew the plug, which is located at the lowest point of the VAZ 2114, VAZ 2115, VAZ 2113, Lada Samara 2 engine. Then the hoses from the thermostat and the cylinder head must be disconnected.
The cable that leads from the clutch pedal to the gearbox must be disconnected.
Mounting the power unit.
When removing the engine using blocks, the engine clings to the frames provided by the design on the gearbox and VAZ 2113 engine.
Bottom view of the gearbox: 1 – gear lever drive rod; 2 – clamp; 3 – gear selector rod hinge; 4 – front wheel drive shafts; 5 – gearbox.
Rod 1 is disconnected from hinge 3 of the gear shift rod by unscrewing the clamp bolt 2.
The sealing ring must be removed in order to disconnect the muffler pipe from the converter.
Front suspension assembly: 1 – upper support of the telescopic strut; 2 – upper support cup; 3 – compression stroke buffer with protective casing; 4 – compression buffer support; 5 – suspension spring; 6 – lower spring support cup; 7 – steering rod ball joint; 8 – steering knuckle; 9 – telescopic stand; 10 – eccentric washer; 11 – adjusting bolt; 12 – rack bracket; 13 – steering knuckle; 14 – front brake protective cover; 15 – brake disc; 16 – retaining ring; 17 – wheel hub nut; 18 – splined shank of the wheel drive hinge housing; 19 – guide pin; 20 – wheel hub bearing; 21 – ball joint; 22 – suspension arm; 23 – adjusting washers; 24 – stabilizer strut; 25 – stabilizer bar; 26 – stabilizer bar cushion; 27 – stabilizer bar mounting bracket; 28 – body bracket for mounting the suspension arm; 29 – suspension arm extension; 30 – bracket for fastening the extension; 31 – protective cover of the ball pin; 32 – ball pin bearing; 33 – ball pin; 34 – ball pin body; 35 – suspension strut rod; 36 – outer body of the upper support; 37 – inner body of the upper support; 38 – upper support bearing; 39 – rubber element of the upper support; 40 – travel limiter of the upper support; 41 – protective cap of the upper support; B - zone for monitoring the suspension joint
Unscrew the bolts securing the brackets 30 of the braces 29 of the front suspension arms to the body, loosen the nuts securing the braces to the arms 22 of the suspension
In order to remove the power unit, it is necessary to unscrew the bolts of the brackets 30, 22, unscrew the hinges 21
Bottom view of the gearbox: 1 – gear lever drive rod; 2 – clamp; 3 – gear selector rod hinge; 4 – front wheel drive shafts; 5 – gearbox
Next, you need to remove the inner tips of the internal joints of the shafts 4 and move them to the side. In order to remove the tips, it is necessary to sharply remove them along the hinge body with a sledgehammer. After the shafts are disconnected, the holes must be closed with a plug.
Power unit suspension: 1 – rear suspension bracket; 2 – rear suspension support; 3 – left suspension support; 4 – left suspension bracket; 5 – bracket with front suspension support
Unscrew the suspension mounting bolts.
Installation is in the reverse order.
When installing a VAZ 2114 engine and gearbox, it is necessary to install new retaining rings for the tips of the internal joints.
How to Remove a VAZ 2114 Engine
Without removing the gearbox
If there's no pit, no plane, and no friends, you'll probably have to figure out how to remove the engine
VAZ 2114
without box You can do this procedure yourself and you won't need much exercise.
Many motorists, taking into account the cost of the car and the possible cost of repairs in the workshop, are thinking about how to remove the engine of a VAZ 2114. Part of this procedure will not differ from the general algorithm, so we will focus only on the differences.
as a take-off engine VAZ 2108-2115 Do it yourself!
Repair of caps 2108-2115.
Part 1. Repair of VAZ 2114
Engine repair after 180,000 km.
To prepare a working staging area, you will need a brick and a jack. Types of injectors for different VAZ 2114/2115 engines. How to remove and wash injectors. Replacement procedure. It is necessary to smoothly lift the car and place bricks on bricks under the front wheels, after securing the rear wheels so that the car does not roll.
The main differences between the methods begin when you completely free the motor head from the wires connected to it:
VESKO-TRANS.RU
AutoNews / Reviews / Tests
How to Remove a VAZ 2114 Engine
In the first months after purchase, the VAZ 2114 engine runs smoothly, showing a zero index in the car index, but some time after purchase the car begins to suffer from the properties of the road surface, unstable weather conditions and traffic jams. Next, ideally, go to a service center. Therefore, you can be completely sure which part has been malfunctioning over the years of use, and remove the problematic item correctly, especially when it comes to the engine. If you are sure that this is the cause of the malfunction, unscrew the VAZ 2114 engine mount and undergo a thorough check.
To fully perform the function of changing a VAZ engine mount, you will need parts such as a trestle, as it is called a regular inspection pit. On the contrary, you do not have access to any of these tools that allow you to repair at a more comfortable level; The engine mounts can be replaced even if they are missing, but the work will be much more difficult.
To competently change the engine mount on a VAZ, you need to buy a stand or, as it is also called, a pillow, a set of keys and a wrench, a tool designed to remove rust, and a rattle with a board. If our client still has the necessary materials, he needs to call the top of the pit on the car and carefully insure the car using quality stops. This must be done so that the machine does not move during operation.
After some time, in order to safely change the VAZ engine mount, it is necessary to remove the battery terminals. Then a wooden jack is placed on the engine stand under the pallet and the engine protection parts begin to be removed.
To support the engine, the VAZ 2114 was simply removed from the seat provided by the manufacturer, please note that for the front support, when using a jack, it is necessary to handle the internal combustion engine from the pallet. And if you decide to change the rear and side struts of your VAZ engine, you must work with the gearbox while using a jack. Remember, when replacing a front strut, our customer is almost always left with cracked cushions and needs to be replaced.
How to remove the engine on a VAZ
When, whenever possible, provided that the properties of city roads were full of shocks, the engine did not have to deal with parts. Here it is more practical to change what our client still needs to do. Then you get confidence in such a context that our client remains that the VAZ engine support will be 100% effective. When doing the work yourself, you need to be prepared for the fact that the VAZ engine mount is very screwed on.
For this reason, it is also possible to unscrew the bolts together with the stud. When it was resting on the starter, it should also be removed. When performing this operation, keep in mind that it is secured with 3 bolts, and before proceeding with unscrewing, it is necessary to remove from it what is left for our client to make unnecessary parts.
Before you begin, you will need to immediately go over all fasteners with a rust remover. Thanks to this procedure, the VAZ engine mount will be even easier to remove. When lifting the engine, please note that other parts of the car, including wires, are not damaged.
Extraction from the top
If you have a good winch or 3-4 reliable assistants, then there is no better solution on how to remove the engine from the VAZ 2114 through the top. This method differs from removal through the bottom in that it eliminates the possibility of damaging the engine itself or the car. The most important factor in the success of this operation will be your accuracy.
The procedure for removing the engine from the top must be carried out as carefully as possible. It is important to take into account everything that can affect the engine falling off its mounts. Moreover, if you do everything correctly, this method will be the least labor-intensive. At its core, this procedure is no different except for removal from removing an engine without a gearbox.
Compression test, troubleshooting
One of the main reasons for engine repair is decompression. Actually, the troubleshooting itself must be done every 30 thousand km, combining it with valve adjustment.
Signs of the need for early technical inspection of the engine are:
If you experience similar symptoms, you need to do the following:
IMPORTANT! The normal pressure in the VAZ 2114 engine is 1.0 MPa in the standard configuration and 1.4 MPa on an eight-valve engine.
After the procedure is repeated for all cylinders, it is necessary to analyze the records. So, in a working engine, compression should not fall below 1 MPa and should not have a spread between the cylinders of more than 0.2 MPa. Otherwise, you will have to repair the engine.
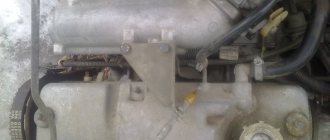
Self-replacement of VAZ 2114 engine mount
How to replace a VAZ 2114 engine mount will be discussed in our article. The power unit of any vehicle begins to vibrate strongly from the moment it is started, and if its vibrations (which increase with power gain) are not suppressed, one can expect dire consequences for the car frame.
Despite the fact that on older models of the domestic automobile industry, special cushions made of dense and durable rubber acted as dampers for engine vibrations, but the engine still continues to lie on the frame.
The designers have significantly modernized the engine compartment of the latest generation front-wheel drive models (for example, on the VAZ-2114), adding specially designed cushions, which are now also supports for the power unit.
However, under our operating conditions for automotive vehicles, these elements are subject to high loads and wear out faster. In this publication, we will discuss in what cases it is necessary to replace the engine mounts of a VAZ-2114, and how to carry it out yourself.
Design and technological features
Since in the “fourteenth” model the entire load from the engine falls on the front suspension, accordingly, the chassis is made of materials with an increased margin of safety, and its design must strictly comply with established standards. Durable rubber mounts of the VAZ-2114 engine are used as a damper for vibrations of the power unit under various loads.
Since high demands are placed on this part, it is extremely important to purchase only original and certified supports, since only they are suitable for use in our conditions.
In the design of the front part of the car frame and its suspension, the engine mount is one of the important elements, while its independent replacement is quite within the capabilities of a car owner who has even the most minimal concepts in plumbing.
The main thing in the repair process is to complete the entire technological sequence of actions, then the installed part will serve for a long period of time.
When do you need to change engine mounts on a VAZ-2114?
Since rubber elements are included in the design of the supports, during operation they are subject to increased loads, wear out and lose their properties.
This can be judged by the noticeable vibration that is clearly felt inside the car. The service life of the element is influenced by the following factors: It is very important to replace the cushion in a timely manner; if this is not done, the part will simply become unsuitable for further use, and only then will cause more complex and expensive repairs to the suspension of the power unit.
If you hear extraneous noises in the area of the engine compartment when driving, and suddenly noticeable vibration appears in the interior of the VAZ-2114, it is necessary to perform a visual inspection of the engine mounts, and if damage is found, replace them immediately.
Advice! You need to purchase only original products, the quality of which is confirmed by the manufacturer’s guarantee. Otherwise, the pillow will not cope with its functions and will quickly collapse.
Replacing the engine mount
To perform this activity, you should purchase a set of power unit supports, since it is not practical to change them one by one.
To replace these elements yourself, you will need the following tools: Advice! It is worth inviting an assistant in advance, since during certain stages of the repair it will be necessary to lift quite a lot of weight. We recommend using an engine disassembly stand for these purposes.
The process for replacing pillows varies. Sequence of actions when replacing the front engine mount:
Sequence of actions when replacing the rear and side supports:
The side cushions of the VAZ-2114 engine change in the same way. The only thing is that if the starter is large, it will need to be dismantled, since it will not be possible to get to the support mounts properly because of it.
This is the entire process of replacing worn out engine mounts. As you can see, it will not cause any particular difficulties, and its timely and competent implementation will help to avoid serious problems in the future and save on expensive repairs.
Replacing the front and rear engine mounts of a VAZ 2114. Engine mount
The engine mount on any domestic car is a rubber-metal silent block on a bracket. It connects the cylinder block body to the stationary parts of the car.
On the VAZ 2114, the factory provides three such supports:
- the front one, also known as the bottom one, connects the crankcase to the beam;
- the right one, also known as the side one – between the engine and the spar;
- rear - attached to the gearbox housing and body.
Also, sometimes an additional mount is installed on the VAZ 2114, which is attached to the cross member on one side and to the clutch housing on the other.
It is widely believed that the main task of airbags is to provide ride comfort. This is only partly true. In fact, their main task is to minimize the transmission of engine vibrations to transmission parts. With a rigid connection, the gearbox would become a consumable item; in 30-40 thousand kilometers its “internals” would wear out completely. Therefore, in particular, rubber in silent blocks cannot be replaced with polyurethane.
Prices for car service services
Below are the prices for VAZ car repairs. The cost of repairing foreign cars is negotiable (depending on the model and technical condition of the car). More detailed information by phone (4932) 23-48-93
| Service | VAZ 2101-07 | VAZ 2108/2112 |
| Chassis diagnostics | 300 rub. | 300 rub. |
| Changing the engine oil | 300/350 rub. | 300/350 rub. |
| Changing the gearbox oil | 300 rub. | 300 rub. |
| Changing the oil in axles | 300 rub. | 300 rub. |
| Replacing brake fluid | 400 rub. | 400 rub. |
| Bleeding the brakes | 300 rub. | 300 rub. |
| Generator repair | 500 rub. | 500/600 rub. |
| Door repair | 500 rub. | 500 rub. |
| Carburetor repair | 800 rub. | 800 rub. |
| Transmission repair (excluding removal/installation) | 2500 rub. | |
| Steering rack repair (includes removal/installation) | 1800 rub. | |
| Starter repair | 500 rub. | 500 rub. |
| Distributor repair | 400 rub. | 400 rub. |
| Engine disassembly and assembly | 12000 rub. | 12000/14000 rub. |
| Timing drive adjustment | 200 rub. | 200/250 rub. |
| Adjusting the generator drive | 150 rub. | 150 rub. |
| Adjustment of valves | 600 rub. | 700 rub. |
| Ignition adjustment | 200 rub. | 200 rub. |
| Adjusting the wheel bearing | 150 rub. | |
| Steering rack adjustment | 150 rub. | 150 rub. |
| Adjusting the hand brake | 150 rub. | 150 rub. |
| Wheel alignment | 700 rub. | 700 rub. |
| Wheel alignment 2121 | 1000 rub. | |
| Carburetor adjustment | 150 rub. | 150 rub. |
| Removing/installing the gas tank | 800 rub. | 850/1000 rub. |
| Removing/installing the headlight unit | 450 rub. | 450/600 rub. |
| Removing/installing side glass | 600 rub. | 600 rub. |
| Removing/installing a vacuum brake booster | 600 rub. | 600/1000 rub. |
| Removing/installing the water pump | 700 rub. | 1000/1300 rub. |
| Removing/installing stabilizer bushings (2 pcs) | 600 rub. | 600 rub. |
| Removing/installing the generator | 500 rub. | 500/600 rub. |
| Removing/installing the master brake cylinder | 550 rub. | 550 rub. |
| Removing/installing a muffler | 400 rub. | 350 rub. |
| Removing/installing the cylinder head | 3000 rub. | 3000/5000 rub. |
| Removing/installing the radiator sensor | 200 rub. | 200 rub. |
| Removing/installing the door | 1000 rub. | 1000 rub. |
| Removing/installing the engine | 5000 rub. | 5000/6000 rub. |
| Removing/installing rear beams/bridge (bare) | 3000 rub. | 3000 rub. |
| Removing/installing rear beams/bridges in Sat. | 1700 rub. | 1700 rub. |
| Removing/installing rear shock absorber | 500 rub. | 500 rub. |
| Removing/installing the rear light | 300 rub. | 300 rub. |
| Removing/installing the ignition switch | 500 rub. | 600 rub. |
| Removing/installing pallet protection | 200 rub. | 200 rub. |
| Removing/installing rear view mirror (side) | 200 rub. | 200 rub. |
| Removing/installing carburetor | 500 rub. | 500 rub. |
| Removing/installing the cardan | 400 rub. | |
| Removing/installing rear pads | 500 rub. | 500 rub. |
| Removing/installing crankshaft | 4000 rub. | 3500 rub. |
| Removing/installing a wheel | 100 rub. | 100 rub. |
| Removing/installing front pads | 450 rub. | 400 rub. |
| Removing/installing the intake manifold | 1700 rub. | 2000/1500 rub. |
| Removing/installing a graphite ring | 300 rub. | |
| Removing/installing gearbox | 2200 rub. | 2200 rub. |
| Removing/installing heater valve | 2101, 2106 — 600 rub. 2104 - 2107 - 800 rub. | 800 rub. |
| Removing/installing the cross | 200 rub. | |
| Removing/installing the intake pipe valve | 200 rub. | 200 rub. |
| Removing/installing door cylinders | 700 rub. | 700 rub. |
| Removing/installing windshield | 800 rub. | 800 rub. |
| Removing/installing the oil pump | 1500 rub. | 1500/2000 rub. |
| Removing/installing the pendulum | 600 rub. | |
| Removing/installing the stove motor | 800 rub. | 700/1100 rub. |
| Removing/installing the tie rod end | 350 rub. | 350 rub. |
| Removing/installing the front shock absorber | 400 rub. | 800 rub. |
| Removing/installing front shock absorber with hub | 900 rub. | |
| Removing/installing the front beam | 3000 rub. | 1200 rub. |
| Removing/installing a repeater | 200 rub. | 200 rub. |
| Removing/installing the pallet | 900 rub. | 700 rub. |
| Removing/installing rear wheel bearing | 550 rub. | 500 rub. |
| Removing/installing the front wheel bearing | 600 rub. | 900 rub. |
| Removing/installing axle shaft/drive | 450 rub. | 600 rub. |
| Removal/installation of a mechanical valve drive (GRM) | 1500 rub. | 750/1100 rub. |
| Removing/installing the exhaust pipe | 500 rub. | 500 rub. |
| Removing/installing rear springs (2 pieces) | 900 rub. | 1000 rub. |
| Removing/installing front springs (2 pieces) | 1500 rub. | 1800 rub. |
| Removing/installing a radiator | 600 rub. | 650/850 rub. |
| Removing/installing the heater radiator | 2101-2106 — 1000 rub. 2104-2107 — 1500 rub. | 2108, 2109, 2110 — 1500 rub. Europanel - 2000 rub. Kalina - 4500 rub. |
| Removing/installing transfer case VAZ 2121 | 700 rub. | |
| Removing/installing camshaft | 1500 rub. | 1500/3000 rub. |
| Removal/installation of reaction rods (kit) | 1500 rub. | |
| Removing/installing rear brake adjuster | 800 rub. | 700 rub. |
| Removing/installing rear axle gearbox | 1700 rub. | |
| Removing/installing the resonator | 500 rub. | 400 rub. |
| Removing/installing the alternator belt | 300 rub. | 300 rub. |
| Removing/installing the steering wheel (standard) | 200 rub. | 200 rub. |
| Removing/installing steering wheel (sports) | 300 rub. | 300 rub. |
| Removing/installing steering gear/rack with lubricant filling | 1500 rub. | 1500 rub. |
| Removing/installing silent blocks (1 lever) | 600 rub. | 600 rub. |
| Removing/installing rear beam silent blocks | 1000 rub. | |
| Removing/installing the rear crankshaft oil seal | 200 rub. | 200 rub. |
| Removing/installing the front crankshaft oil seal (with removing the front cover) | 600 rub. | 1000/1200 rub. |
| Removing/installing valve seals with valve adjustment | 2000 rub. | 2000/3500 rub. |
| Removing/installing axle shaft seal | 50 rub. | |
| Removing/installing stabilizer | 700 rub. | 700 rub. |
| Removing/installing starter | 500 rub. | 500 rub. |
| Removing/installing headlight block glass | 400 rub. | 400/600 rub. |
| Removing/installing the caliper | 400 rub. | 400 rub. |
| Removing/installing the thermostat | 600 rub. | 600 rub. |
| Removing/installing a fuel sensor | 300 rub. | 300/600 rub. |
| Removing/installing the fuel pump | 300 rub. | 300/600 rub. |
| Removing/installing a brake drum | 200 rub. | 200 rub. |
| Removing/installing a brake disc | 500 rub. | 500 rub. |
| Removing/installing a brake hose | 300 rub. | 300 rub. |
| Removing/installing distributor | 400 rub. | 450 rub. |
| Removing/installing the hand brake cable | 600 rub. | 600 rub. |
| Removing/installing clutch cable | 300/500 rub. | |
| Removing/installing a brake line pipe | 500 rub. | 600 rub. |
| Removing/installing a brake pipe | 200 rub. | 200 rub. |
| Removing/installing fuel + air filter | 250 rub. | 250 rub. |
| Removing/installing a muffler clamp | 200 rub. | 200 rub. |
| Removing/installing clutch master cylinder | 400 rub. | |
| Removing/installing the clutch slave cylinder | 500 rub. | |
| Removing/installing rear brake cylinder | 350 rub. | 350 rub. |
| Removing/installing the front brake cylinder | 300 rub. | 300 rub. |
| Removing/installing a ball joint | 400 rub. | 350 rub. |
| Removing/installing CV joint | 500/700 rub. | |
| Removing/installing an elastic coupling | 600 rub. | |
| Removal/installation and repair of the block head | 4500 rub. | 4500/5200 rub. |
| Removal/installation and repair of the steering rack | 2000 rub. | |
| TO-1 | 3700 rub. | 3700 rub. |
| TO-2 | 3000 rub. | 3000 rub. |
| Installation of electronic ignition | 700 rub. |
Electrical work: 1 standard/hour - 350 rub. For cars older than 10 years and VAZ 2121, the work complexity coefficient is 1.4. More detailed information by phone
Source