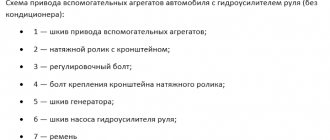
How to install a timing belt on a 406 engine
Loosen bolt 1 by two to three turns.
Unscrewing adjusting bolt 2, loosen the belt tension and remove it.
If there are cracks, rubber delamination, tears, dirt deposits between the ribs, etc., replace the belt.
If there is dirt or damage, clean or replace the pulleys.
If it is necessary to remove the tensioning device, unscrew the three bolts 3, and to make it easier to unscrew the bolt under the roller, move the roller up.
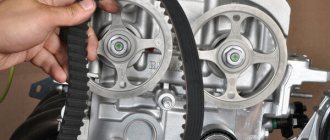
1. Place the belt on the crankshaft pulley.
2. Place the belt on the water pump and generator pulleys.
3. After this, put the belt on the tension roller.
After installing the belt, adjust its tension.
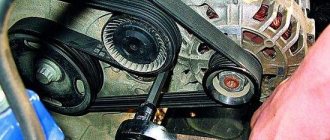
With correctly adjusted tension, the belt should bend by 15 mm when a force of 8 kgf is applied in the middle between the generator and water pump pulleys.
Belt tension is adjusted by moving the tension roller.
1. Loosen bolt 1.
By tightening or unscrewing bolt 2, adjust the belt tension. Tighten bolt 1.
2. Check the belt deflection.
Details in pictures:
VESKO-TRANS.RU
The Gazelle Business car belt is responsible for transmitting engine speed to auxiliary components. Some devices are capable of controlling multiple devices simultaneously.
The drive belt can affect the pump, power steering pump, various compressors, and sometimes the alternator. In order for our client to remain with the above-mentioned mechanisms that work smoothly and smoothly, it is necessary to change the detailing over time and, if necessary, adjust its tension. In this article we will look at: where the Gazelle business generator belt is located, signs of wear, size, location and step-by-step installation instructions. And let's begin.
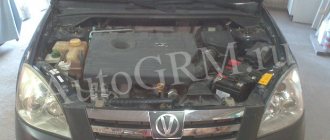
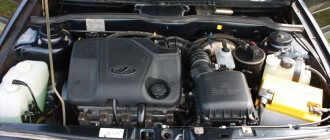
The alternator belt for Gazelle Business is located under the hood in front of the car! As shown in the screenshot
It is easy to find because in this matter I will not focus on my own skill and your attention.
If you intend to find out how worn the alternator belt is in the Gazelle business, a visual inspection is sufficient. If you saw:
- Tears
- Superficial peeling
- Mechanical damage, etc.
Then do not put off changing the drive belt for a long time, but immediately change this consumable.
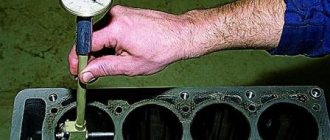
Replacing and adjusting the tension of the accessory drive belt
Use a 12mm wrench to loosen the bolt securing the tension roller (for clarity, the engine radiator has been removed).
We loosen the belt tension by turning the tension roller bolt counterclockwise with a key “10”
Remove the belt from the pulleys
Installing a new belt.
By rotating the tension roller bolt, we achieve a belt deflection of 15 mm under a load of 8 kgf applied in the middle of the horizontal drive branch (between the generator and pump pulleys).
Tighten the tension roller mounting bolt.
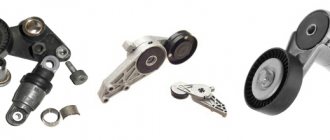
Replacing the tension pulley and accessory drive belt tensioning mechanism
We loosen the tension of the drive belt.
Completely unscrew the tension pulley bolt.
Remove the pulley from the tensioner axle.
If necessary, use a socket wrench or a 12mm socket to unscrew the three bolts securing the tensioner
Remove the tensioner mount from the engine
We install the tensioner and pulley on the engine in the reverse order, and then tighten the belt.
Source
Procedure for replacing the timing chain ZMZ-406 Volga GAZ-31105 (+ video)
The dream of our fathers and grandfathers is the Volga. Recently, an old friend of mine visited us in his favorite GAZ 31105. The appearance of extraneous noise from the timing drive, as well as increased consumption and poor throttle response, condemns the timing chains. So, GAZ 31105, engine 406 - timing chain replacement.
Let's say right away what we need: engine oil with a filter and a sump gasket, it would be better if it was cork, high-temperature sealant, gray 999 from ABRO, kerosene and a metal brush for washing parts. I have only seen a clean engine in the new Volga. It’s not for nothing that they say: “If the Volga doesn’t leak oil, it means it doesn’t exist.” Another set of keys and sockets with a reinforced 36mm, a 6mm hexagon, a lot of rags, instant coffee and several sausage sandwiches. As well as patience and a great desire to carry out this procedure yourself, since the temptation to entrust this to someone else is very great. After reading the article to the end, you will understand why.
Most importantly, this is a complete kit for repairing the gas distribution drive of ZMZ-405,406,409 engines - this is its official name. It must include the following ingredients:
Replacing the timing chain of a gazelle 405 engine
As already mentioned, timing marks are set after the timing chain is replaced. Typically, engines are equipped with a chain with a lifespan of up to 150 thousand kilometers. However, during operation this resource may decrease.
For example, when operating a motor under extreme conditions, the chain stretches faster, as it almost wears out. In addition, belts from different manufacturers may vary in the number of kilometers they can travel before the chain breaks or stretches.
Attention! The chain must be monitored. Every forty thousand kilometers, the car owner must check the tension of the device and inspect for chips and damage. If any are found, it is advisable to replace them.
Why does the timing chain fail?
The timing belt can quickly fail because it was purchased on a regular market where you were sold a fake. Original devices are sold only in specialized car markets. Such a chain costs from six thousand rubles.
Most often, the chain fails due to improper engine care. The device may also reach the end of its lifespan. By this time it has stretched and become useless.
The timing chain number for the ZMZ 405 engine is 040900100011800. The device is double-row. There are several ways in which you can distinguish a fake from the original. I'll tell you about them:
If you have not found the problems described above, then you can safely buy a chain.
Replacing a 405 gazelle chain: how to determine the need
The chain needs to be replaced when you find chips or cracks on it. When the device is stretched, it is also advisable to change it as soon as possible on the ZMZ 405 engine.
Knocks and noises while idling will also tell the owner that it is time to change the timing chain. This is also evidenced by the unstable operation of the power unit.
The main thing is not to forget about setting the timing marks. Since they play a major role in the operation of the engine. Without them, the phase distribution cannot be normal. This means the motor may not work correctly.
How to replace the timing belt Gazelle 405
To replace the timing chain, the car owner will need the following materials and tools:
After all the tools are prepared, proceed to removing the power unit casing, draining the antifreeze and lubricant. Procedure steps:
Unpack the new belt and throw away the old one. They begin assembling the gas distribution mechanism and installing timing marks.
We finished the examination, let's start strength exercises
First, remove the engine protection and mudguard. Drain the antifreeze and oil from the engine. Remove the upper radiator pipe.
Disconnect all interfering pipes.
We remove the wiring harness to the side. We remember or sketch the location of the connectors on the ignition coils.
Using a 12mm socket, unscrew the eight bolts in a circle holding the valve cover and remove the last one.
While the service belt is tense, loosen the three bolts on the 10th pump pulley.
We loosen the bolt by 13, the tension roller and unscrewing the bolt by 10, we loosen the tension of the auxiliary belt.
Remove the service belt, roller and coolant pump pulley.
We unscrew the four screws of the upper timing case cover and remove the last one.
We remove the generator along with the triangular plate.
Unscrew bolt 10 of the crankshaft position sensor.
We move the sensor to the side so that it does not interfere.
Using a 36mm socket, use the pulley bolt to turn the crankshaft clockwise until the marks on the camshafts point to top dead center.
The mark on the intake camshaft should be level with the top edge of the cylinder head.
Likewise for the exhaust camshaft.
We unscrew the crankshaft pulley bolt, having previously locked the crankshaft. To do this, the assistant in the cabin engages fifth gear and presses on the brake with all his might, while we, with a slight movement of the hand, using a meter-long pipe and a 36mm socket, unscrew the bolt. We remove the crankshaft pulley, you will have to suffer because it sits tightly on the shaft.
Loosen the clamps of the pump pipes.
Use a 6mm hex to unscrew the four screws on the front side of the pump and a 12mm wrench to one on the back side and remove the coolant pump.
Unscrew the two bolts of the upper hydraulic tensioner cover. Since the tensioner in a discharged state will put pressure on the cover, we hold it so that it does not jump out.
Remove the cover and the hydraulic tensioner itself.
Likewise for the bottom one.
We unscrew the six bolts on the 14 amplifier and remove it. The oil pan mounting nuts were hidden under it.
Use a hexagon to unscrew the remaining screws of the front timing cover (5 pieces), as well as everything that holds the oil pan (11 screws and 4 nuts).
The pallet goes down about two centimeters, the beam does not go any further. But this is enough to pull out the old gasket and, remembering the kind words of the engineers from Gorkov, clean the adjacent surfaces before installing a new gasket.
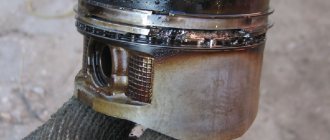
This is the terrible picture that appears before our eyes.
Now remove the lower timing cover.
Using a hexagon, unscrew the screws of the upper damper and remove it.
Same with the second one. It will come off along with the chain.
The camshafts have a special 30 mm square so that the shafts can be held when unscrewing the sprocket bolt. We hold the shafts with a 30 wrench and unscrew the camshaft sprockets with a 17 wrench.
We remove the camshaft sprockets and the chain with the damper.
Use a hexagon to unscrew the chain tensioner fastening and remove it. Same with the bottom one.
We bend the edges of the locking plate and use a 12mm wrench to unscrew the bolts securing the intermediate shaft sprocket. We remove it together with the chain. Then use a hexagon to unscrew the two bolts of the lower damper and remove it.
Remove the retaining ring and the crankshaft sprocket. In the photo the ring is slightly shifted for clarity.
A two-legged puller is best suited for this.
And here is the secret why we change as a set. If you look at the sprockets, you can immediately see the difference, so the old chain will not fit the new sprockets and vice versa.
Now that everything that bothered us has been dismantled, we can wash all the removed parts and the cylinder block, at least from the front.
How to replace the timing belt on a Peugeot 406 2.2 2004
Peugeot 406 2.2 2004 belt replacement and replacement instructions. Complete Guide!
Special tool
- Crankshaft drive pin - Peugeot No. (-). 0189-B.
- Exhaust camshaft pin - Peugeot No. (-). 0189-AZ.
- Intake camshaft pin - Peugeot No. (-). 0189-L.
- Timing belt clamp - Peugeot No. (-). 0189-K.
- Tensioning tool - Peugeot No.(-). 0189-J.
- Crankshaft locking tools - Peugeot no. (-). 0606-A1 and (-). 0606-A2.
Special Precautions
- Disconnect the battery ground wire.
- DO NOT turn the crankshaft or camshaft with the timing belt removed.
- Remove the spark plugs to make turning the engine easier.
- Turn the engine in the normal direction of rotation (unless otherwise specified).
- DO NOT start the engine through the camshaft or other sprockets.
- Observe all tightening torques.
Repair time -
| Camshaft Belt/Chain - R&I | 2,20 |
Gas distribution procedures
How to replace the timing belt on a Peugeot 406 2.2 2004
Removal
- Raise and support the front of the vehicle.
- Delete:
- Engine top cover (if installed).
- RH front wheel.
- RH mudguard.
- Auxiliary drive belt.
- Engine torque response.
- Support motor (406). NOTE. To avoid exhaust gas damage, ensure that the engine remains in its original position.
- Remove the right engine mount (406).
- Delete:
- Upper timing belt cover [1].
- Crankshaft pulley bolts [2].
- Crankshaft pulley [3].
- Lower timing belt cover [4].
- Turn the crankshaft clockwise to the installation position.
- Insert the toothed pin into the crankshaft pulley hub [5].Tool No. (-). 0189-B.
- Insert the toothed pin into the exhaust camshaft sprocket [6]. Tool No. (-). 0189-AZ.
- Insert the toothed pin into the intake camshaft sprocket [7]. Tool No. (-). 0189-L.
- DO NOT loosen the intake camshaft sprocket bolts [8].
- Loosen the tensioner pulley bolt [9].
- Detach the tensioner pulley bracket from the cylinder block rib [10].
- Move the tension roller away from the belt.
- Remove the timing belt. NOTE. The timing belt should always be replaced after it has been removed.
Installation
NOTE. Belt adjustment should be performed with a cold engine.
- Make sure the sync pins are correctly positioned [5], [6] and [7].
- Install the timing belt onto the crankshaft sprocket. NOTE. Make sure the arrow on the belt faces in the direction of rotation.
- Secure the belt to the crankshaft sprocket using a retaining clip. Tool No. (-). 0189-K [11].
- Install the timing belt onto the remaining sprockets and pulleys in the following order:
- Guide roller.
Intake camshaft sprocket.
- Exhaust camshaft sprocket.
- Water pump sprocket.
- Tension roller.
- Install the tensioner pulley bracket onto the rib of the cylinder block [10].
- Tighten the tensioner pulley bolt by hand [9].
- Remove the timing belt clamp [11].
- Turn the tensioner counterclockwise until the belt tension reaches maximum. Use a hex wrench [12]. Make sure the pointer is positioned as shown [13].
- Make sure the pointer is offset from the notch by at least 10° [14]. If not, replace the tension roller.
- Insert the tensioner positioning tool [15]. Tool No. (-). 0189-J.
- Turn the tensioner clockwise until the pointer and positioning tool touch [15] and [16]. Use the hex key [12]. NOTE. The index and notch are also aligned.
- Tighten the tensioner pulley bolt [9]. Tightening torque: 20 Nm.
- Remove the tensioner positioning tool [15].
- Remove the sync pins [5], [6] and [7].
- Turn the crankshaft ten turns clockwise to the installation position. NOTE: DO NOT allow the crankshaft to rotate counterclockwise.
- Make sure the pointer and notch are aligned [16].
- If not: repeat the tensioning procedure.
- Insert the toothed pin into the intake camshaft sprocket [7].
- Insert the toothed pin into the crankshaft pulley hub [5].
- If the timing pin [5] cannot be inserted, reposition the crankshaft pulley hub as follows:
- Fix the crankshaft pulley hub. Use tool No. (-). 0606-A1/A2 [17].
- Loosen the crankshaft pulley hub bolt [18].
- Rotate the crankshaft pulley hub until the timing pin [5] is inserted. Use tool no. (-). 0606-A1/A2 [17].
- Tighten the crankshaft pulley hub bolt [18]. Torque:
- (A) 406 - 130 ± 13 Nm.
- (B) 607 - 40 ± 4 Nm + 53 ± 4 °.
- Remove timing pins [5] and [7].
- Install the components in the reverse order of removal.
- Tighten the crankshaft pulley bolts [2].Tightening torque: 20 Nm.
- 406: Tighten the engine mount on the right side:
- Three bolts securing the intermediate bracket to the engine bracket - 61 Nm.
- Nut securing the engine to the intermediate bracket - 45 Nm.
- Tighten the engine torque link bolts. Tightening torque: 45 Nm.
NOTE. Make sure the belt is tight between the sprockets.
I hope the information is useful!
,
Replacing and installing the timing chain of the ZMZ 406 engine with your own hands
ZMZ406 engines are used on various GAZ vehicles, and the timing block of these engines has a double-row chain. Similar internal combustion engines can be found on Volga or GAZ 31105 cars. Often the cause of noise in ZMZ406 engines is a faulty timing chain. There were cracks and chips on it. Therefore, it is important to prevent the moment of chain failure in time and install a new chain.
Design Features
The ZMZ406 engine is a motor with four cylinders and 16 valves. The open joint stock company Zavolzhsky Motor Plant produces motors. Designed for installation in passenger vehicles and minibuses. It began to be mass produced only in 1997, although the first prototypes appeared back in 1992.
The cylinder block in the engine is made of cast iron for better rigidity and reliability. The masses of the piston and piston pin are reduced and, together with the crankshaft, are made of high-quality material. Valve mechanism hydraulic pushers are used, so there is no need to adjust the gaps.
Technical characteristics are given in the table:
| Parameter | Meaning |
| Year of manufacture of ZMZ | 97 – 08 |
| Supply system | Injector\carburetor |
| Motor type | Row |
| Volume in liters | 2,2 |
| Rated torque | 177 |
| Environmental class | Euro 3 |
| Fuel consumption per 100 km | 11.5 l |
| Oil consumption per 1000 km | 100 gr |
| Change of oil | After 7000 km |
| Life resource | 300 000 |
Attention! The technical characteristics of ZMZ are nominal. For each modification, you must look at the instruction manual.
The ZMZ timing belt is replaced once every 100 thousand kilometers. Every 30 thousand kilometers it is necessary to monitor the condition of the timing belt. A broken chain can bend the valves. Then the repair will cost several times more than just changing the ZMZ timing belt.
Where is the chain located
Getting to the timing chain is not so easy. A complete disassembly of the engine will be required. And this is a serious process. If the car owner does not understand the design of the timing belt, it is recommended to contact a service center. Let's take a look at the timing belt layout.
The belt itself is installed on the crankshaft and camshaft. When the pulley rotates, the rotation is then transmitted to the camshafts. And the tension is adjusted thanks to a damper inside the unit.
If the operation of the damper is disrupted, the device is faulty, then the belt can jump from one to three or four teeth. The operation of the engine will be unstable, and wear on the unit will increase with every kilometer.
Signs of breakdown of the gas distribution mechanism
Symptoms of a ZMZ timing belt failure include noise during idle speed. Fuel consumption increases. The timing system is not stable. Popping noises appear in the intake and exhaust manifolds. Beginners will ask the question: “Why is this happening? What can I do to optimize fuel consumption and get rid of noise?
If the thermal clearances of the ZMZ do not correspond to the norm in a certain phase, then the valves will not open and close when necessary. In this case, the hydraulic compensators break. Overheating negatively affects chains and gear teeth. Metal cracks, bursts and breaks.
If there are cracks and chips on the timing chain body, then only replacing the timing chain will help.
Procedure for replacing timing chain ZMZ 406
To change the ZMZ timing chain with your own hands, you will need tools and materials purchased in a specialized store. And position the vehicle to allow you to approach the hood from both the front and the side.
You'll have to disassemble the engine. Therefore, the car owner wears a robe and gloves.
Tools for replacing timing chain
What tools will you need to change the timing chain at ZMZ:
All timing joints covered with corrosion or dust or dirt should be treated with WD 40 and left for about five minutes so that the solution penetrates into the metal. Then it will be easier for the car owner to unscrew the bolts.
The car owner will need to buy the following materials:
The purchase of these timing components is mandatory, since the old ones will be removed by the car owner when disassembling the engine.
Draining antifreeze from the system
Now you need to drain the coolant. To drain, you need to take the following steps:
About 10 liters will spill out. After the hole becomes dry, you can proceed to the initial stage of disassembling the ZMZ 406.
Attention! If you unscrew the plug, a large pressure of liquid will flow out. Therefore, the container must be deep so as not to lose part of the ZMZ 406 antifreeze in the splashes. And, if the car owner wants things to go faster, he can unscrew the cap in the expansion tank.
Initial disassembly stage
Now the car owner can proceed to the initial stage. These actions are performed before setting the mark on the ZMZ motor.
Now you need to proceed to the next procedure for final disassembly of the timing chain.
Final removal of the drive chain
To completely remove the ZMZ timing chain, the car owner will need to take the following steps:
Gear number 2 can only be removed using a puller.
Carrying out the assembly
When the timing belt is removed, you need to wash it. After removing carbon deposits and dirt, it is necessary to inspect the timing device ZMZ 406. Measure the belt. Must be no longer than its size. If its size is 2 cm larger, then the mechanism should be replaced with a new one.
The timing belt should not have any cracks, chips, or dents. After inspecting the chain, the car owner must inspect the following components:
Attention! When overhauling the ZMZ engine, it is necessary to install marks. Such procedures increase engine life and power.
After changing the chain, before starting assembly, you must do the following:
When tightening, the car owner must use a torque wrench. When tightening without its help, problems may arise when operating the ZMZ engine. The force applied to the tightening should be 22\2.5 Nm.
Now you need to bend the locking plate. Press the tensioner lever to check whether the marks match or not. Now you will need to screw in the damper mounting bolts and lubricate the upper part of the mechanism with lubricant.
Timing marks and tightening
To continue tightening the timing chain, you will need to do the following:
Now you can try to start the ZMZ 406 engine. The noise and unstable operation of the engine should disappear.
Replacing the Alternator Belt Gazelle 406
replacing alternator belt gazelle 406
People help the delegate tighten the alternator belt on the Gazelle 4.
GAS COMMON BELT (6. PK1. 21. 0) LUZAR 3.
Alternator belt LUZAR 3. Application: GAZ 3. ZMZ- 4. 06, 4. 05, 4. Timing belts LUZAR mechanisms are designed to drive camshafts of road vehicles.
Timing belts for driving camshafts of a machine engine. Make sure the engine valve is working correctly, synchronize the rotation of 1 or 2 camshafts with the engine crankshaft. It is recommended to replace the timing belt at a service station with mandatory requirements for camshaft timing. LUZAR recommends immediately replacing the rollers and seals with replacing the timing belt. gas distribution mechanism. Advantages: Maximum heat dissipation due to increased working surface and uniform distribution of tension on the belt part. LUZAR's high-strength polyester cord enhances the belt's ability to withstand heavy loads, maintains consistent belt tension and provides excellent belt length stability. The upper layers of fabric provide elasticity and flexibility.
Ghost Belt Ghost
wizards who throw puzzles or emergency solutions have not yet been translated.
READ Replacement Head Gasket Golf 2
Replacing the belt tensioner pulley and its bracket. Tension roller ZMZ 406.
Subscribe to drive2: VKontakte: Facebook:.
Chloroprene rubber, reinforced with first class fibers, gives the belt oil, thermal and wear resistance and prevents the accumulation of deposits. The aligned side surfaces of the belt guarantee optimal torque transmission and reliable grip on the pulley surface. Guarantee period. 2 years or 1.
Replace the alternator belt and tension pulley yourself. Replacing the UAZ Hunter belt, engine 406. All cars are equipped with a mandatory generator, which generates electricity and supplies it through the battery charging circuit and the vehicle’s on-board network. All generators are driven by a belt. The car service replaces belts and rollers in the Gazelle sector by replacing timing chains ZMZ 405, replacing belts 4216, replacing 4216, 670.
Replaces with a new generator. Sooner or later I'll set it up. But there is one big question. In all 406 engine manuals, the belt removal procedure begins with the tension pulley to which it is attached. replacing the tension roller, alternator belt and its bracket. Tensioner roller ZMZ 406 for GAZ Volga and Gazelle cars. Welcome to my site. Add to box Report an error Order in random order Discuss on the forum. Engine. Cooling system.
READ Replacement Rear Stabilizer Bushings Kia Sportage 3
Belt pulley for tensioner Gazelle ZMZ 406. Fast delivery of belt GAZ-3110.3302 Generator ZMZ-406 with power steering RUBENA Code: 6PK1370 Order code: 024574 540 rub. Catalog of spare parts for GAZ ZMZ 406 Gazelle In stock! The loose bolt allows you to select the optimal belt tension. belt drive of auxiliary units. generator , water pump, power steering.