Rework object
VAZ 2108, 2109 or 21099 with a carburetor engine modification 21083. The main goal is to convert the carburetor engine into a 16-valve injection engine by installing it on the cylinder head of a VAZ-2112. Testing a VAZ-2109 converted to a 16-valve head (even before high-quality program settings) demonstrates a huge difference in the behavior of the car compared to the standard power system. Some deterioration in performance at low speeds (up to 2000 rpm) is compensated by a significant improvement in traction after revving the engine to high speeds. According to subjective feelings, acceleration in fourth gear “on 16 valves” is the same as in third gear with a carburetor engine. On a straight, flat road the engine easily reaches 5000 rpm. This makes an unforgettable impression on most drivers.
What to cook
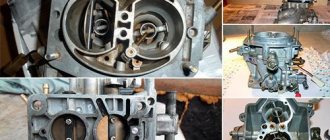
Cylinder head cylinder head 16V, equipped with a receiver and manifolds, knock sensor, MZ, throttle pipe with throttle position sensor, mass air flow sensor, idle air regulator, exhaust pipe with DC, both rollers, thermostat complete with sensor, camshaft pulleys, timing cover, phase sensor, controller, complete wiring kit, fully equipped gas tank and fuel line, oil level sensor and indicator, ramp complete with injectors, HF position sensor, generator with tensioner and brackets, pistons with pins and rings, connecting rods, pulley crankshaft, generator drive, exhaust system kit, oil pump housing. Having an ebb for the HF position sensor.
Work order:
All operations can be performed without removing the block, but it is much more convenient to work with the engine removed.
1. Remove the cylinder head, standard gas tank, all fuel pipes, completely dismantle the ignition system, remove the generator, thermostat, as well as all pulleys and belts.
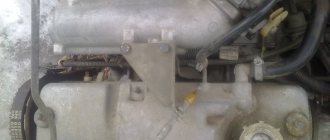
We install a gas tank with a gas pump (from a model with an injector) instead of the standard one. Photo of the standard gas tank:
Gas tank with built-in fuel pump:
We remove the standard cylinder head, dismantle the carburetor, all wiring and the ignition system, which must be replaced.
2. Disconnect the cooling system pipes. Some of them can be used, but a new kit for the 2112 engine is inexpensive, so don't be greedy.
3. When working on a car, remove the pan. Instead of the old pistons and connecting rods, we install pistons from model 12 (for floating pins) and “tenth” connecting rods. Replacement is necessary, since the old ones are designed for a lower compression ratio and do not have special recesses for the valves of the new head.
4. We replace the oil pump with a unit that has an ebb on the cover for the DPKV. It is possible to replace only the cover, but to remove it you will need a powerful hexagon.
5. We replace all pipes of the cooling system. We recommend replacing the entire set; it is inexpensive and much more rational. Although, some can be left old. Naturally, there is no need for a sensor that turns on the fan.
Image of standard pipe:
This is what the new pipe looks like:
6. We carry out preparatory work for the installation of a sixteen-valve head. The location of the fasteners is the same, but the bolts from the old head will have to be shortened. And in the new head the hole is drilled with an x12 drill.
7. All fuel lines are taken from a model with an injection engine (08, 99). Mounted in standard places.
8. We connect the fuel tank to the lines, having previously installed it in place. We carry out the wiring from the control unit to the fuel pump. The fuel level sensor wires remain old.
9. In order not to lengthen the new wiring, when installing it, it makes sense to cut a hole in the wall of the engine compartment, as this was done in the VAZ-2110.
10. Drill a hole in the block for installing a knock sensor, followed by cutting an x8 thread.
11. We replace the pump with a corresponding unit from the 12th model.
12. We replace the breather for crankcase ventilation with a new one, from model 2112. It is purchased together with the oil dipstick.
View
of the new breather:
13. We mount the head, replacing the old gasket with a new one that matches the new head. It is advisable to prepare the head and collectors before this by removing all protrusions at the interfaces and walking through the channels with a roller cutter to reduce the resistance inside them.
14.The thermostat is installed from Samara with an injection engine (21082).
15.Connect the coolant pipes.
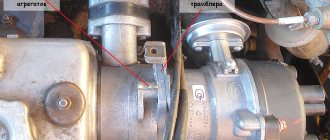
16. We mount the rear cover of the gas distribution mechanism and rollers, pulleys from model 2112. We install the belt according to the marks. We install a generator with a drive. The lower bracket, generator bolt and upper tensioner are used from the “eight” with an injector, purchasing all this as a set.
New assembled generator:
Generator mounting method:
The upper mounting hole remains unused, since the block does not have a hole for it. It is quite enough to secure the unit with old bolts using the two lower ones. The upper tensioner is attached with two bolts (old and new are identical) to the holes in the block.
17. Reinstall all sensors. The temperature sensor in the block remains old; you need to purchase a new one for the thermostat, for the injection engine. The remaining sensors will also have to be purchased new; the locations and features of their installation are described in specialized literature.
18. Mount the valve cover on the sealant. We put in place the ignition module, spark plug wires, receiver, corrugation and throttle. After this, we install the wiring to all the sensors, now it will not interfere. We put in place the air filter, as well as the throttle cable from model 21103.
19. We install the exhaust system. You can keep the muffler from the old power plant, but the resonator, “pants” and manifold must be purchased new.
20. Connect the wiring to the dashboard and the lock. We fill the system with antifreeze, add oil, and refuel the car with gasoline.
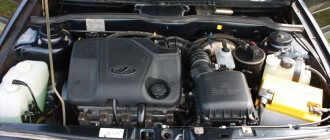
The updated engine will also delight you with a pleasant appearance, in which you will not be ashamed to open the hood.
The most important question really remains - is it worth it? Surely there are already ready-made 16-valve VAZ 2112 engines on sale. If in Russia there may still be problems with legalizing this alteration, then in Ukraine the engine is nothing more than just a spare part...
Most owners of the “Nine” know that you can install a 16-valve engine on a VAZ 2109, thereby improving the driving characteristics of your car at high crankshaft speeds. Is it worth doing this, and how to bring the idea to life?
Why install a new power unit?
Installing a new engine can be useful for those motorists who want to improve their outdated car. Many domestic car enthusiasts know that the “nine” has pretty good driving characteristics, requires little gasoline and is generally not as demanding to maintain as foreign cars, which is why it is often tuned. Replacing an engine from an 8 cl to a more advanced model has its advantages:
- Increased power.
- Improved driving characteristics at high speeds.
- Efficient use of fuel due to the injection system.
- More stable operation of the power unit.
- No constant valve adjustment required.
But there are also disadvantages:
- You need a lot of parts and tools to replace them in your garage.
- At low speeds the 16 cl engine is slightly worse than its 8 valve counterpart.
There are two replacement options here:
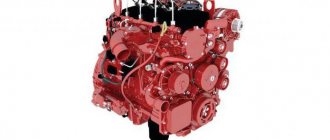
- Installation of the entire engine from the 2112 model. In this case, not many parts will need to be replaced, but the cost of the entire engine may discourage this idea.
- Modification of the cylinder head for new components. This is a more economical, but very labor-intensive process.
Engine Installation
Let's start with the simplest option - installing a whole motor in the "nine". To do this, in addition to the unit itself, you will need a steel or copper fuel pipe and a gas tank. It is advisable to take the engine with a body kit. So it will cost much less. The installation work is carried out in the following way:
- First, the old motor is dismantled, here everything happens according to the usual scheme;
- We are preparing the new engine for installation. To do this, you need to replace all consumables. Usually they change seals, gaskets, belts;
- The power unit is put in place and attached to the pillows;
- They installed a tank from 2112. It fits perfectly. The difference is in the design of the fuel pump and the presence of sensors. If you don’t have such a tank at hand, you can leave your original one. But you will have to install an external fuel pump from the Volga
; - The next step is to install the fuel line. It is best to use copper tubing. It's more flexible. If you decide to install steel, then heat it on fire before fitting. This will allow you to bend it as needed without any problems;
- Wiring is being installed. On cars younger than 2002, no modifications will have to be made. There is already a hole for the wires coming from the injector, as well as other elements necessary for fastening. If the car is older, you will have to cut the hole yourself. Studs are placed under the bottom for attaching the absorber and gasoline filter;
- The wiring will have to be redone. Some sensors have short wires. In this case, we lengthen them;
- To install the generator you will have to buy new mountings, otherwise you will not be able to install it;
- The box won't fit a little. You need to try it on and grind off the extra corners with a grinder. It's a matter of a couple of minutes;
- The starter installed on 2109 has 11 teeth, it will not converge with the flywheel. Therefore, replace the bendix, take one with 9 teeth;
- The exhaust system will also have to be overhauled and adjusted.
In general, the work of installing such an engine is not too difficult. In practice, it is not too different from replacing a conventional power unit.
We install the finished engine
We put the 2112 engine on the “nine”, since the power units of the models are similar to each other. You will also need a fuel pipe of a suitable diameter (you can take a steel one, but copper is better) and a gas tank from the same 12th model. The following work is carried out:
- We dismantle the old power unit, disconnect all pipes and electronics. In order to remove and install the engine, a crane is needed for convenience, since the entire assembly is heavy. This is a major problem in the garage.
- When the engine is removed, you can install a new one in the seat. It is worth immediately checking the condition of the seals and gaskets if the unit is used. Also check the belt tension.
- Next you need to replace the entire fuel system: tank, fuel pump, fuel lines.
- An excellent replacement for the “nine” tank is the analogue from 2112. The parts are the same in size, but their design is different, which is not an obstacle to installation.
- For fuel lines you need to take copper tubes, which bend better.
- Now you can start wiring the injector. If the “nine” was produced in 2002 and younger, then there will be no special problems with connecting the wires, but for older models you will have to make new holes manually.
- You need to install an absorber and a gasoline filter. They are usually placed under the bottom and secured with studs.
- We install the sensors, change the wiring to one that is suitable in length.
- Installing the generator will have to work hard, since the original mounts do not fit. Find suitable ones, replace them and you can install them. If the gearbox is not changed, then it will have to be sharpened with a grinder.
- The starter will have to change the bendix from 12 to 9 teeth.
- The last modification is the exhaust system. The pipes will not fit, so they will need to be welded. Fitting helps put all the parts in place.
Installation of a 16 valve engine on a VAZ 2109. More power my lord
Quite a lot of drivers are interested in how difficult it is to install a 16-valve engine on a VAZ 2109. After all, such engines are more efficient than the standard ones installed on the VAZ.
This power unit makes you feel much more comfortable on the road. After all, engines with 16 valves are more modern. Such a rework is the most justified and logically sound. At the same time, it practically does not require complex equipment; there is no need to bore the block and do other things. At the same time, all work is carried out quite quickly and without any interference.
Installation of a 16 valve engine on a VAZ 2109
can be done in 2 ways. Each has its own pros and cons. Therefore, you can choose one of these methods:
- Installation of the whole unit;
- Replacing the cylinder head.
The final choice depends on your goals and capabilities. If you have a complete and serviceable engine, you can install it. Otherwise, when buying parts from scratch, it is better to install a new head.
To remake your "nine" it is best to use a motor from a VAZ 2112
. They are almost identical. The differences are only in small details. But these nuances are precisely what make this engine more modern. What is important for you is that this engine fits perfectly into the mounts. In this case, you can even use the original box and clutch basket. Next, we will analyze these methods in more detail.
Let's start with the simplest option - installing a whole motor in the "nine". To do this, in addition to the unit itself, you will need a steel or copper fuel pipe and a gas tank. It is advisable to take the engine with a body kit. So it will cost much less. The installation work is carried out in the following way:
- First, the old motor is dismantled, here everything happens according to the usual scheme;
- We are preparing the new engine for installation. To do this, you need to replace all consumables. Usually they change seals, gaskets, belts;
- The power unit is put in place and attached to the pillows;
- They installed a tank from 2112. It fits perfectly. The difference is in the design of the fuel pump and the presence of sensors. If you don’t have such a tank at hand, you can leave your original one. But you will have to install an external fuel pump from the Volga
; - The next step is to install the fuel line. It is best to use copper tubing. It's more flexible. If you decide to install steel, then heat it on fire before fitting. This will allow you to bend it as needed without any problems;
- Wiring is being installed. On cars younger than 2002, no modifications will have to be made. There is already a hole for the wires coming from the injector, as well as other elements necessary for fastening. If the car is older, you will have to cut the hole yourself. Studs are placed under the bottom for attaching the absorber and gasoline filter;
- The wiring will have to be redone. Some sensors have short wires. In this case, we lengthen them;
- To install the generator you will have to buy new mountings, otherwise you will not be able to install it;
- The box won't fit a little. You need to try it on and grind off the extra corners with a grinder. It's a matter of a couple of minutes;
- The starter installed on 2109 has 11 teeth, it will not converge with the flywheel. Therefore, replace the bendix, take one with 9 teeth;
- The exhaust system will also have to be overhauled and adjusted.
In general, the work of installing such an engine is not too difficult. In practice, it is not too different from replacing a conventional power unit.
Compared to replacing an engine, this work is more complex. However, both options have common actions. This applies to installing the tank and connecting the wiring. But there are also enough differences; the work is done as follows:
- First, the engine is removed from the car and disassembled. To do this, remove the cylinder head, pan, dismantle the pistons;
- New pistons from 2112 are installed. They have more reinforced connecting rods, and they also have recesses for the valves;
- Replace the fuel pump;
- Shorten the cylinder head mounting bolts. 12 holes are drilled in the new cylinder head;
- A hole of 8 is drilled in the block, and a thread is cut for the knock sensor;
- They install a pump from 2112, at the same time install a thermostat from “Samara”;
- Change the breather;
- All that remains is to assemble the entire body kit for the engine, install the wiring and configure the unit.
In general, there is nothing extremely difficult in this work. Of course, you will have to tinker a little, but in the end you will have an almost rebuilt engine with new characteristics and in perfect condition.
Conclusion
. Many people like the first front-wheel drive VAZs for their good reliability. But their engines are far from perfect. This is why many people install a 16-valve engine on the VAZ 2109. This makes the car more economical and responsive. Also, the unit from 2112 allows you to feel more confident on the road.
- How to remove and connect the ignition switch on a VAZ 2106? Without this you can't go anywhere
- Installation of a 16 valve engine on a classic (2107). When you want tuning
- Which engine is suitable for the VAZ 2107? When you want change
- Replacing valve guides on a VAZ 2109. Becoming a mechanic
Cylinder head modification
Installing a 16-valve engine on a VAZ 2109 will be much more difficult if you replace individual parts.
You will need:
- A 16-valve cylinder head with a corresponding receiver (the kit must include a manifold with a knock sensor, a throttle valve and a pressure switch);
- another fuel supply system: gas tank, fuel line, ramp with suitable injectors;
- electronics kit - wiring, controller;
- new sensors for thermostat, oil level, crankshaft position, phases;
- mechanics: thermostat, pulleys for the camshaft, pistons with finished rings and pins, connecting rods, pulley for the crankshaft;
- complete replacement of the exhaust system;
- power supply: generator with suitable tensioners, generator drive;
- other parts: throttle pipes, idle speed regulator, housing for the oil pump with a cast-in mounting location for the crankshaft sensor.
All parts must be suitable in power to work with a 16-valve engine and injection system. The kit is impressive, and there is even more work to complete the VAZ 2109 with 16 valves. Engine conversion begins:
The motor is ready for use.
It’s easier to install a power unit from a VAZ 2112. Of course, you will need a crane to pull out the engine itself, but this is nothing compared to the work that will have to be done to modify the “nine” unit.
Quite a lot of drivers are interested in how difficult it is to install a 16-valve engine on a VAZ 2109. After all, such engines are more efficient than the standard ones installed on the VAZ. This power unit makes you feel much more comfortable on the road. After all, engines with 16 valves are more modern. Such a rework is the most justified and logically sound.
At the same time, it practically does not require complex equipment; there is no need to bore the block and do other things. At the same time, all work is carried out quite quickly and without any interference.
Engine
Installation of a 16 valve engine on a VAZ 2109
can be done in 2 ways. Each has its own pros and cons. Therefore, you can choose one of these methods:
- Installation of the whole unit;
- Replacing the cylinder head.
The final choice depends on your goals and capabilities.
If you have a complete and serviceable engine, you can install it. Otherwise, when buying parts from scratch, it is better to install a new head. To remake your "nine" it is best to use a motor from a VAZ 2112
. They are almost identical. The differences are only in small details. But these nuances are precisely what make this engine more modern. What is important for you is that this engine fits perfectly into the mounts. In this case, you can even use the original box and clutch basket. Next, we will analyze these methods in more detail.
Engine Installation
Let's start with the simplest option - installing a whole motor in the "nine". To do this, in addition to the unit itself, you will need a steel or copper fuel pipe and a gas tank. It is advisable to take the engine with a body kit. So it will cost much less. The installation work is carried out in the following way:
- First, the old motor is dismantled, here everything happens according to the usual scheme;
- We are preparing the new engine for installation. To do this, you need to replace all consumables. Usually they change seals, gaskets, belts;
- The power unit is put in place and attached to the pillows;
- They installed a tank from 2112. It fits perfectly. The difference is in the design of the fuel pump and the presence of sensors. If you don’t have such a tank at hand, you can leave your original one. But you will have to install an external fuel pump from the Volga
; - The next step is to install the fuel line. It is best to use copper tubing. It's more flexible. If you decide to install steel, then heat it on fire before fitting. This will allow you to bend it as needed without any problems;
- Wiring is being installed. On cars younger than 2002, no modifications will have to be made. There is already a hole for the wires coming from the injector, as well as other elements necessary for fastening. If the car is older, you will have to cut the hole yourself. Studs are placed under the bottom for attaching the absorber and gasoline filter;
- The wiring will have to be redone. Some sensors have short wires. In this case, we lengthen them;
- To install the generator you will have to buy new mountings, otherwise you will not be able to install it;
- The box won't fit a little. You need to try it on and grind off the extra corners with a grinder. It's a matter of a couple of minutes;
- The starter installed on 2109 has 11 teeth, it will not converge with the flywheel. Therefore, replace the bendix, take one with 9 teeth;
- The exhaust system will also have to be overhauled and adjusted.
In general, the work of installing such an engine is not too difficult.
In practice, it is not too different from replacing a conventional power unit. Replacing the cylinder head
Compared to replacing an engine, this work is more complex. However, both options have common actions. This applies to installing the tank and connecting the wiring. But there are also enough differences; the work is done as follows:
- First, the engine is removed from the car and disassembled. To do this, remove the cylinder head, pan, dismantle the pistons;
- New pistons from 2112 are installed. They have more reinforced connecting rods, and they also have recesses for the valves;
- Replace the fuel pump;
- Shorten the cylinder head mounting bolts. 12 holes are drilled in the new cylinder head;
- A hole of 8 is drilled in the block and a thread is cut
Tuning is not just about changing the appearance of a car, as many people think. In fact, revisions often concern the technical component. Someone makes changes to the exhaust system, changes elements of the factory engine.
But there is a more drastic, expensive and interesting option - change the engine. With the new engine you get different technical characteristics, increased power, increased maximum speed, better acceleration.
Replacing a motor is a fairly serious step that requires thinking through every stage, from choosing a new motor to the consequences that such work may result in.
Rework object
VAZ 2108, 2109 or 21099 with a carburetor engine modification 21083. The main goal is to convert the carburetor engine into a 16-valve injection engine by installing it on the cylinder head of a VAZ-2112. Testing a VAZ-2109 converted to a 16-valve head (even before high-quality program settings) demonstrates a huge difference in the behavior of the car compared to the standard power system. Some deterioration in performance at low speeds (up to 2000 rpm) is compensated by a significant improvement in traction after revving the engine to high speeds. According to subjective feelings, acceleration in fourth gear “on 16 valves” is the same as in third gear with a carburetor engine. On a straight, flat road the engine easily reaches 5000 rpm. This makes an unforgettable impression on most drivers.
What to cook
Cylinder head cylinder head 16V, equipped with a receiver and manifolds, knock sensor, MZ, throttle pipe with throttle position sensor, mass air flow sensor, idle air regulator, exhaust pipe with DC, both rollers, thermostat complete with sensor, camshaft pulleys , timing cover, phase sensor, controller, complete wiring set, fully equipped gas tank and fuel line, oil level sensor and indicator, ramp complete with injectors, HF position sensor, generator with tensioner and brackets, pistons with pins and rings, connecting rods, crankshaft pulley, generator drive, exhaust system kit, oil pump housing. Having an ebb for the HF position sensor.
Work order:
All operations can be performed without removing the block, but it is much more convenient to work with the engine removed.
1. Remove the cylinder head, standard gas tank, all fuel pipes, completely dismantle the ignition system, remove the generator, thermostat, as well as all pulleys and belts.
We install a gas tank with a gas pump (from a model with an injector) instead of the standard one. Photo of the standard gas tank:
Gas tank with built-in fuel pump:
We remove the standard cylinder head, dismantle the carburetor, all wiring and the ignition system, which must be replaced.
2. Disconnect the cooling system pipes. Some of them can be used, but a new kit for the 2112 engine is inexpensive, so don't be greedy.
3. When working on a car, remove the pan. Instead of the old pistons and connecting rods, we install pistons from model 12 (for floating pins) and “tenth” connecting rods. Replacement is necessary, since the old ones are designed for a lower compression ratio and do not have special recesses for the valves of the new head.
4. We replace the oil pump with a unit that has an ebb on the cover for the DPKV. It is possible to replace only the cover, but to remove it you will need a powerful hexagon.
5. We replace all pipes of the cooling system. We recommend replacing the entire set; it is inexpensive and much more rational. Although, some can be left old. Naturally, there is no need for a sensor that turns on the fan.
Image of standard pipe:
This is what the new pipe looks like:
https://datag.ru/
6. We carry out preparatory work for the installation of a sixteen-valve head. The location of the fasteners is the same, but the bolts from the old head will have to be shortened. And in the new head the hole is drilled with an x12 drill.
7. All fuel lines are taken from a model with an injection engine (08, 99). Mounted in standard places.
8. We connect the fuel tank to the lines, having previously installed it in place. We carry out the wiring from the control unit to the fuel pump. The fuel level sensor wires remain old.
9. In order not to lengthen the new wiring, when installing it, it makes sense to cut a hole in the wall of the engine compartment, as this was done in the VAZ-2110.
10. Drill a hole in the block for installing a knock sensor, followed by cutting an x8 thread.
11. We replace the pump with a corresponding unit from the 12th model.
12. We replace the breather for crankcase ventilation with a new one, from model 2112. It is purchased together with the oil dipstick.
Type of new breather:
13.We mount the head, replacing the old gasket with a new one that matches the new head. It is advisable to prepare the head and collectors before this by removing all protrusions at the interfaces and walking through the channels with a roller cutter to reduce the resistance inside them.
14.The thermostat is installed from Samara with an injection engine (21082).
15.Connect the coolant pipes.
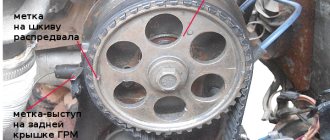
16. We mount the rear cover of the gas distribution mechanism and rollers, pulleys from model 2112. We install the belt according to the marks. We install a generator with a drive. The lower bracket, generator bolt and upper tensioner are used from the “eight” with an injector, purchasing all this as a set.
New assembled generator:
Generator mounting method:
The upper mounting hole remains unused, since the block does not have a hole for it. It is quite enough to secure the unit with old bolts using the two lower ones. The upper tensioner is attached with two bolts (old and new are identical) to the holes in the block.
17. Reinstall all sensors. The temperature sensor in the block remains old; you need to purchase a new one for the thermostat, for the injection engine. The remaining sensors will also have to be purchased new; the locations and features of their installation are described in specialized literature.
18. Mount the valve cover on the sealant. We put in place the ignition module, spark plug wires, receiver, corrugation and throttle. After this, we install the wiring to all the sensors, now it will not interfere. We put in place the air filter, as well as the throttle cable from model 21103.
19. We install the exhaust system. You can keep the muffler from the old power plant, but the resonator, “pants” and manifold must be purchased new.
20. Connect the wiring to the dashboard and the lock. We fill the system with antifreeze, add oil, and refuel the car with gasoline.
The updated engine will also delight you with a pleasant appearance, in which you will not be ashamed to open the hood.
The most important question really remains - is it worth it? Surely there are already ready-made 16-valve VAZ 2112 engines on sale. If in Russia there may still be problems with legalizing this alteration, then in Ukraine the engine is nothing more than just a spare part...
What to put?
Indeed, the most important issue among VAZ 2109 owners is the range of engines that may be under the hood of their car.
Let's look at several popular solutions that are most often found among those who decide to change the engine on their VAZ 2109.
| Option | Peculiarities |
| 16-valve cylinder head | Gas is a cheaper alternative to gasoline, which will allow you to save big in the future at gas stations. This replacement is called the easiest. But you should take into account the fact that such a replacement will pay off only if the car is used frequently, and you will have a gas cylinder in the trunk. Such work can only be done by specialists with appropriate qualifications and permits. |
| VAZ injector 1.5 liters | A good alternative that will allow you to extract more power from your improved car. The injector is more powerful, it requires less fuel, and provides better dynamics. But in practice, changing engines from VAZ to VAZ is not the best solution, since there are many options among more reliable, powerful imported cars |
| Engines from Priora and VAZ 2112 | Not bad domestic options that will easily fit into the space for the engine of your nine. Good output, excellent opportunity to transfer not only the engine, but also the gearbox itself |
| 1.5 liter engine from Honda Civic | Here we are talking about 1.5-liter engines with a capacity of 92 horsepower of the 1991-1995 model. Injection engines of that generation perfectly fit the dimensions of the engine compartment of the VAZ 2109 and have good technical characteristics. A kind of improved variation of the previous version |
| Engines from Opel | Vectra engines of 1.4, 1.6 and 1.8 liters have proven themselves well. The engines, although old, are playful, quite powerful, and relatively economical. Their main advantage is their affordable price with good build quality. If you find a decent German engine of any of the presented volumes, your VAZ 2109 will perform significantly better compared to the factory engine |
| Motors from Mitsubishi Lancer | 1.5-liter injection engines with a power of up to 100 horsepower are to the taste of many. Good dynamics, good assembly, pleasant economy. Finding such a motor is not very easy, but there shouldn’t be any big problems either. |
| An attractive replacement option that allows you to get a high-spirited, interesting, reliable Korean engine. The only important nuance is that the box from the nine does not match the features of the engine from the Korean, so you will have to change everything together | |
| VW Passat or Golf | Excellent reliability, amazing engine life, despite their age. You won’t be able to install engines from the latest versions of these German cars, because then you’ll have to redo literally everything. But engines from the 90s will take your VAZ 2109 on board very well |
| Another example of the excellent German quality of the engine that can be installed on the nine. In many ways it is similar to engines from Volkswagen and Opel in terms of characteristics, dynamics, and efficiency. It’s not difficult to find, but try to choose a motor with minimal mileage. This way you will ensure a long and carefree life for your car. | |
| Engines from FIAT | You should choose engines up to 2.0 liters. The best option is a 1.6-liter engine with 16 valves and a power of 90 horsepower. You will find such engines on the Doblo model. There are quite a lot of them at car wrecking yards, so there shouldn’t be any problems finding them. |
| Torquey, quite powerful, dynamic engine with a good margin of safety. A good solution for our roads. Japanese quality is not much inferior to the presented analogues from Germany. At one time, engines for the 626 model received many positive reviews, which is why their installation on the VAZ 2109 is recommended by many experts |
Replacing a motor is a complex operation that requires the participation of an experienced specialist. It is strongly not recommended to change the engine yourself in a garage environment.
Let's figure out how to convert an 8 valve engine to a 16 valve engine in a VAZ 2114
The engine power of a car like the VAZ 2114 may seem insufficient for many car enthusiasts. However, this can be fixed. Let's figure out how to convert an 8-valve engine to a 16-valve in a VAZ 2114
If you install a cylinder head with 16 valves, the car's power can exceed all expectations. The reason for this is that the engine cylinders with a similar block head can be filled with a special air-fuel mixture.
As a result, the power of the power unit increases significantly. It is important to note that this is an absolutely safe way to increase the “strength” of your car. So how to convert an 8 valve engine to a 16 valve VAZ 2114?
The question also arises about the difference in power of cars. For example, the power of a car whose engine has a volume of 1.5 liters and 77 horsepower can be significantly improved. If you replace the 8-valve head with a 16-valve one, it will increase to 90 “horses”!
This is quite a big difference, so you should figure out what needs to be done (and in what order) to improve your own car.