Replacing the Renault Logan headlight bulb of the first generation
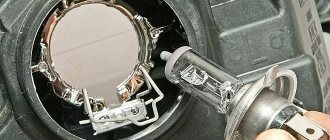
Remove the plastic cover (for clarity, the headlight mounting bolts are unscrewed and it is pushed forward). Disconnect the wire block from the headlight lamp. Remove the rubber sealing cover (shown on the removed headlight for clarity). By pressing the spring clamp of the lamp, we disengage it from the reflector hook... and remove the headlight lamp from the headlamp housing.
Attention! The headlight lamp is halogen. You should not touch its glass bulb with your fingers, as traces from them will lead to darkening of the lamp when heated
You can remove dirt from the flask with a clean rag soaked in alcohol. Install the new H4 headlight bulb in the reverse order.
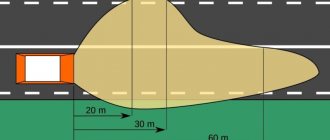
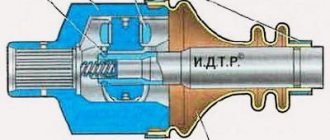
Scheme of work
Diagram of operation using the example of the front right headlight.
The first thing you need to do is remove the front bumper. You can learn more about the process of dismantling the bumper by following the article below.
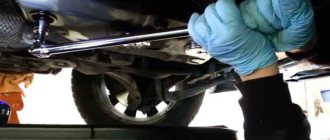
After removing the front bumper, our hands will be able to reach all the headlight mounting points. The optics body has three mounting points. One is located at the bottom, the master begins dismantling from the bottom point. For convenience, a ratchet wrench is used. The next bolt is located to the right of the headlight, and the 3rd fastener is located on top.
The fastenings are given away and before removing the headlight, you need to disconnect the corrector cable. The protective rubber cap is removed first, then we lift the corrector cable up and it comes out of its housing niche.
Then we take out the headlight towards ourselves and now there is excellent access to all connectors. We give away the chips for the turn signal, marker (you can remove it together with the base), as well as the low beam connector.
For clarity, the technicians once again showed the procedure for removing the corrector on a removed headlight. The entire process of work is clearly and clearly shown by the masters in the video:
Let's repeat:
- Remove the rubber cap and slide it down.
- To remove the cable, pull it towards you so that the shirt comes out of the lock.
- We lift the cable up, disengage the edge and remove it.
- When installing the cable in place, insert the edge into the groove, pull the shirt towards you a little and snap it into the lock.
- We put the protective cap in place.
A question was asked on this topic: does the removal process itself depend on the year of manufacture of the Renault Logan? According to the master, the removal procedure is the same on all models and even the attachment points are similar.
How were all the operations performed with the optics removed? For example, we changed the glass, then we installed the lamp power supply chips in the reverse order. When installing the headlight, it is necessary to correctly direct the guides on its body. The guides should fall into place.
If the body has not been subject to impacts and the front panels have not been deformed, then no adjustments to the headlight will be required. It will “sit” on its standard socket, after which, pressing on the headlight housing, we put it in place and tighten all 3 bolts of its fastening.
We install the corrector cable, protection, and this completes replacing the front headlight with your own hands.
For clarity, the craftsmen take pictures with a camera by lifting the car on a lift. And you can also work from a viewing hole or even on a flat, dry area.
Replacing the side light bulb for Renault Logan first generation
Before replacing the side light bulb, it is more convenient to first disconnect the wire block from the turn signal lamp socket (see above).
Turn the side light lamp socket clockwise (for the right headlight - counterclockwise)... ...and remove the lamp socket from the headlamp housing.
We remove the baseless W5W side light lamp from the socket and replace it with a new one. [How to save up to 6,500 rubles on Renault Logan/Sandero maintenance] [Renault Logan/Sandero maintenance for 15 thousand km] [Renault Logan/Sandero maintenance for 60 thousand km] [Renault Logan/Sandero maintenance for 90 thousand km of mileage] [Tools required for maintenance of Renault Logan/Sandero] [Lamps used in Renault Logan/Sandero]
Replacing lamps in a Renault Logan headlightReplacing lamps in a Renault Logan headlightReplacing lamps in a Renault Logan headlightReplacing lamps in a Renault Logan headlight
Error in the text? Select it with your mouse! And press: Ctrl + Enter Anton Dolgov
Advantages: Disadvantages:
Inexpensive, reliable, mass-produced, practical car. Inexpensive to maintain. Wear resistance of the interior. Noise and vibration insulation (by modern standards)
Are the headlights different on different generations of Logan and how to replace the lamps in them?
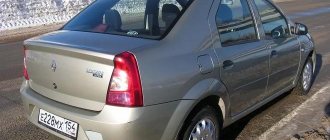
Today, the Renault Logan car has two generations. The first began its life in 2005 in (Moscow) and ended in 2021.
The second generation was born in Togliatti (AvtoVAZ) in 2021, and its production continues to this day.
As can be seen from the above photos, headlights differ somewhat between generations, and these differences are not only external, but also structural. Nevertheless, the algorithm for replacing side light bulbs for Renault Logan I and Renault Logan II is almost the same. The only difference is the protective cover (Logan II), which covers the lamp base of the dimensions.
As for the rear lights, their design has not changed at all, which means that the algorithm for replacing the bulbs in them remains the same.
Fog lights
The factory equipment for PTF includes lights of class H11 12V 55W. The maximum service life of the optical element is 15,000 runs. Replacing a Logan fog light bulb is more difficult than changing the standard head optics or changing the dimensions.
The sequence for replacing the Renault Logan fog light bulb is:
- The protective cover (shield) on the bumper is removed.
- The connection wires are disconnected.
- The fog lamp is removed.
- A new consumable is installed.
For PTF, optics exceeding the technical specifications are not recommended: 12V 55W. This threatens to melt the plastic diffuser.
Fog lights are often replaced with LED lights. Such optics provide a stronger luminous flux in the yellow spectrum and have a longer service life, but their price is significantly higher compared to standard lights.
Of the entire Renault lineup, the best car for the budget segment is still Logan. Inexpensive special maintenance, simple repairs and quick replacement of mnemonics have made it the most popular in the domestic market.
Changing and adjusting optics in Renault Logan: from theory to practice
From time to time, every owner of such a car may need to replace the Renault Logan low beam lamp. Although these and other lights fail relatively rarely, it is best to know how to change them yourself. By avoiding contacting a car service for such a minor issue, you will save yourself time and money. How to make repairs yourself will be discussed in the article.
Lamp type (H4)
And they are designed for both low and high beams, since they have two filaments. This type of lamp is convenient because for a complete inspection of the headlights in a car, it is enough to change only 2 lamps. But the most significant drawback lies in the price: such a lamp is more expensive than the “separate” H1 and H7.
Choosing a lamp manufacturer
The most popular and reliable lamps today are considered to be H4 lamps from Philips, Osram and Narva, but they are also the most expensive! Our portal has accumulated a considerable number of positive reviews about these manufacturers, so each car enthusiast must independently determine for himself and give preference to one or another manufacturer based on his financial capabilities and technical needs.
However, it is only worth noting that despite the absolutely identical power of 55/60 W on the lamps, some manufacturers indicate + 30\50% in the packaging. This means that this product is equipped with an increased luminous flux, which will require the most precise adjustment of the headlight itself so as not to blind drivers in oncoming traffic.
Replacing fuses
If, after the above procedure, the low beam in the Renault Sandero still does not light, you should check the fuses. They are located in the cabin, on the left side of the instrument panel.
Fuses F9 (left headlight) and F10 (right headlight) are responsible for low beam lighting. It should be noted that it is not always possible to visually notice damage to the fuse. Therefore, to check, a new protective element should be installed.
If the problem is not related to the fuses, you need to contact a service center for help.
Replacing the low beam lamp
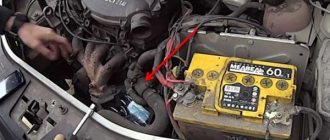
So, we have figured out what lamps you need, then the process of replacing it directly follows. We will change the light bulb using the example of the left headlight, since replacement involves removing the battery. The light bulb on the right headlight changes in the same way.
First of all, we will need to remove the battery, for this we will need two keys 10 and 8 to remove the terminals from the “+” and ground, as well as a socket head 13 to remove the mount of the battery itself (if there is one). Particular attention should be paid to the fact that first the wires are removed from the “-” ground, and then only from the “+”.
After the battery has been removed from its place, we see the headlight unit itself, in the center of which a plastic cover is installed, with a lock on top. To remove the cover and get directly to the light bulb, you need to press the thumb of one hand on a kind of tab (latch), and at the same time pull the cover towards you from below
Since plastic is quite pliable, no difficulties should arise in this process.
When we removed the plastic cover, we see a rubber seal and a block with wires that is connected to the light bulb. First, you should carefully remove the block, holding it only by the body, and then by the sealing cover itself.
The final touch remains. Before us is a spring clamp that fixes the halogen lamp, holding it securely in its tenacious paws. However, don't be afraid of this! You can remove the latch as easily as putting it in place; you just need to remove it from the “hook” with the reflector hook by pressing your finger on its upper part.
Next, we remove the lamp itself from the headlight unit, holding it by the metal legs and replace it with a new lamp, installing it in the reverse sequence similar to removal.
Replacing dimensions or turn signal
If you have a need to replace the front turn signal or replace the side light bulb, then it is worth saying that replacing them is much easier. The lamp socket that needs to be replaced simply needs to be turned counterclockwise and the burnt out light source removed.
Replacing headlight bulbs for Renault Logan 2021 (replacing headlight bulbs for Renault Logan 2)
To remove the lamp, pull on two wires, the black one and the next yellow one. Brake light New brake light If the Renault Logan headlight brake light bulb burns out, you must first disconnect the battery. After this, you can begin the process of replacing the part.
Install in reverse order. In the video below you will find instructions on how to replace a burnt-out brake light part. The author of the video is the Renault Repair channel. Possible malfunctions of the light switch and their elimination In Renault Logan, the light switch becomes unusable from time to time.
This usually occurs due to wiring problems. They may stop turning on all the lights at the same time, and, for example, only the side lights.
To fix this problem, you need to disconnect the negative from the battery, and then remove the cover from the steering wheel and unscrew the switch. Disconnect the terminal by pressing the clamp on both sides.
Inspect the part to determine which wire has broken.
Replacing the low/high beam, turn signal, clearance lamp Renault Logan (2008-2010)
Let's start with the low/high beam lamp.
1. Press the tongue and remove the plug.
2. Disconnect the connector by simply pulling it towards you.
3. Remove the rubber boot. It fits tightly because it fits over the light bulb.
4. Press the spring clamp on both sides and move it to the center. The place to click is marked below.
5. Remove the lamp.
6. Install a new lamp. It is installed in only one position due to three guide antennae.
7. Snap the spring clamp of the lamp.
8. We put on a rubber boot. Make sure it fits well around the edges and on the lamp.
9. We put on the power connector.
I recommend checking the condition of the connector before putting it on. Sometimes the contacts inside burn out and the connector falls apart in your hands. In this case, it must be replaced.
10. We put on and snap on the cap. Make sure that the wires from the lamp power connector fall into the groove at the bottom of the plug.
Turn lamp
1. The power connector from the lamp does not need to be disconnected.
2. Turn the base counterclockwise and pull it out.
3. Press the lamp, turn it counterclockwise and pull it out.
4. Insert the new lamp and turn it clockwise.
5. Insert the base and turn it clockwise.
Dimension lamp
1. Turn the base counterclockwise 90 degrees and remove it.
2. Remove the light bulb from the base and insert a new one. The light bulb simply pulls up.
Also, make sure there is a rubber seal on the base; in our case there is none.
3. Insert the base with the lamp into the headlight and turn it clockwise.
Replacement methods - simple and not very
In both generations of cars, the manufacturer offers a rather labor-intensive algorithm for replacing light bulbs in headlights:
- Disconnect the battery.
- We dismantle the protective cover of the headlight range control, and in most modifications, the bumper.
- We remove the headlight itself, for which we unscrew the screws that secure it and disconnect the power supply + the corrector cable.
- Remove the protective cover from the back of the headlamp.
- We take out the power supply for the low beam lamp (high/low for Sandero I).
- Remove the rubber boot (first generation).
- Depress the spring clip and remove the lamp.
- We install a new light bulb and assemble the car, performing all the steps in reverse order.
There’s not much to change here, you’ll get tired of reading. But replacing the low beam bulb in Renault Sandero, including Stepway, can be much easier, and you don’t need any tools for this. The only thing is that if you are installing a halogen light source, you need to stock up on clean cotton gloves or a piece of cotton fabric.
Let's start with the first generation Renault Sandero. There are no problems with the right headlight at all. We open the engine compartment, get to the back of the headlight unit and remove the protective cover from the high/low beam hatch, after pressing its lock.
In front of us is a rubber boot and a lamp power supply (socket). We first remove the block by simply pulling it out, and then the boot.
Now you can clearly see the light bulb, pressed by the spring clamp. We press the latch and fold it back.
Now the high/low beam lamp can simply be pulled out.
We take it out, install a new one in its place, secure it with a spring retainer, and replace the boot, power supply and protective cover.
If you are installing a halogen lamp, then first put on clean gloves - you cannot handle the halogen bulb with your bare hands!
We do the same with the left headlight. But, in order to get to the left headlight unit, you will have to remove the battery.
Now let's move on to the second generation Renault Sandero (including Stepway II). We will not follow the recommendations of the French engineers and tear the car to pieces, but will simply repeat almost the same manipulations as on the Renault Sandero I. The differences will be as follows:
- There is a separate hatch for the low beam bulb. If you look at the direction of the car, then on the right headlight it is on the left (closer to the central axis of the Renault), and on the left it is on the right.
- There is no dust cover under the protective cover, which has a tab instead of a latch that you just need to pull.
- The light bulb is used with an H7 base, not an H4 (see paragraph “Which low beam lamp is needed”).
- The light bulb is held in place not by a spring clip, but by three clips.
So, remove the protective cover, pull off the power supply, slide the light bulb down until it clicks and take it out. We install the new one by simply pressing it until it clicks, connect the block, and put on the cover.
Replacing a light bulb in Renault Sandero II
High beam
Conveniently, all the light on the Renault Logan - both high and low - is provided by one element of the headlight. The electronic control unit, having received a signal from the switch button, changes the lighting options.
In addition to the head light, side lights are installed here. Replacing dimensions step by step:
- The headlight housing is removed.
- The pad lock is released.
- The wire block is disconnected from the light bulb socket.
- The marker rotates clockwise for the left headlight and counterclockwise for the right headlight.
- The lamp in the socket is removed from the headlight unit and freed from the socket.
- The element is being changed to a new class PY21W.
- The cartridge is installed in the reverse order.
A rubber gasket is used as a seal for the cartridge. It is recommended to update it after each removal.
Repair
If a specialist is involved in the matter, replacing low beam lamps on a Renault Logan takes only 10 minutes.
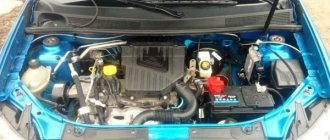
- Stop the engine and open the hood
- We remove the battery so that we can easily get to the light bulb on the left side. To do this, unscrew the wiring and unscrew the battery fasteners. If the master has refined hands, then the battery does not need to be removed
- We remove the plug. Press the top clamp (marked in the photo) and pull the plug towards you
- Pull out the block with the wires, and then pull out the seal
- Please note that the seal has straps on the sides. If you pull on any of the straps, the seal can be removed very easily and quickly. Such nuances can save valuable time when replacing low beam lamps on a Renault Logan
- Using your finger, press the spring bracket that secures the light bulb. That is, the staples need to be brought together and pulled out toward you. There is very little room for maneuvering, so it is better to entrust this work to someone with thin fingers
- We take out the light bulb
- Change the light source and reassemble in reverse order
We recommend: Add antifreeze to Renault Duster
In fact, the work is not difficult. It is quite possible to save money on a trip to a car service center and service your Renault Logan yourself; you already know which low beam lamp is used. Such light sources are available in any auto parts store.
Side light circuit
It's very easy to replace the side light bulb yourself.
In order to save fuel and reduce the load on the generator, daytime running lights are now often included in this circuit, which makes it quite complicated.
You might be interested to know whether it is possible to use LED lamps in a car? Read more in this article
The standard wiring option is quite simple and consists of the following elements:
- circuit breakers;
- front and rear position lamps;
- central or key switch;
- Let's take a closer look at the first two elements.
Circuit breakers
Sometimes blown fuses are the reason why the side lights do not light up on one side or another.
There are usually two fuses in the circuit, for the left and right sides separately. Since the light bulbs consume little power (4-5 W each), the fuse rating is small, only 5-7.5 A.
Where are the side light fuses located?
In the same place as the others, in a single block. On most modern cars, this block is located under the instrument panel next to the steering column, or, more often, on the lower left, under a plastic trim.
In the latter case, it is enough to remove the cover protecting the unit, mounted on latches. On the back of the cover, as a rule, there is a sticker with information about which circuit this or that fuse protects, indicating its rating.
The biggest inconvenience in this case may be insufficient knowledge of the English language - it is in this language that inscriptions are usually made, even on Korean and Japanese cars.
Lamps
Externally, the headlight bulb is marked W5W, but today LED sidelight bulbs are increasingly used.
Their advantage over incandescent lamps is their greater durability, and the price of both largely depends on the manufacturer. The most famous products are Philips, Osram, Tesla.
What are the new generation 4Drive LED lamps? Find out now!
Watch the video about LED bulbs for side lights:
Moreover, as the “Behind the Wheel” test showed, expensive products do not always justify their price.
Also, quite often, the front dimensions are equipped with light bulbs with a metal base, but this, one might say, is a thing of the past.
For rear position lights, the most common lamp is with two spirals - 21 and 5 (or 4) W.
The 21 W coil lights up when you press the brake, i.e. In this case, the light bulb serves as a brake light, while the lower power spiral works as a side light.
Just as with any other lamps, purchasing a more expensive product does not guarantee any exceptional durability.
The reliability and safety of Renault Logan is beyond doubt, as is the operation of all its systems. Decent lighting equipment is available for maintenance, and after carefully reading the recommendations, you can easily replace head lighting equipment yourself, including side lamps.
The process of replacing marker lamps in detail
Some owners remove the block lamp completely, but this is a lot of unnecessary steps. My hand can easily fit into the gap, even where the battery is!
- Use the head to remove the headlight unit.
- Then you need to disconnect the negative wire from the headlight.
- Remove the entire front bumper.
- Disconnect the headlight range control cable.
- To move the headlight to the side you need to unscrew three screws.
To replace a side lighting element, no additional equipment is required; the process will not take more than 5 minutes.
- In order to replace the lamp, you need to open the hood and feel on the headlight unit for the side lamp socket, which is located just below the headlight lamp.
- Finding the lamp body by touch is not difficult.
We took out the socket and tried to remove the burnt out lamp. - Next, turn the cartridge to the left and remove it from the headlight housing.
The lamp has been removed and we are preparing to install a new parking light lamp. - To replace the lamp, just pull it.
It is only necessary to remove the light bulb from the housing while wearing cotton gloves.
How to replace the left headlight bulb of a Renault Logan car with your own hands
1. To dismantle the battery, you will need two keys 8 and 10 to remove the terminals from the battery, and a socket head 13 to remove the battery mounting bar. Battery Keys for terminals Socket head2.
First, unscrew the ground terminal fastening with your own hands! And then remove the “+” terminal.
Ground terminal Unscrewing the fastening Terminal “+”3. Unscrew the battery mounting screw
Carefully remove the bar with the screw so that it does not fall into the hood. Remove the battery from the hood
Unscrewing the fastening Fastening bar The battery is removed4. A little life hack. Take a mirror - this will greatly speed up your work; by controlling your actions through the mirror, you can immediately do everything correctly.
5. After the last lamp change at the service center 2 years ago, I discovered that the protective cover was not latched and the wire of the hood closing sensor was broken, and the sensor itself had gone sour in the lower position. 6.
Remove the cover. We see a rubber seal and a lamp socket. We remove the socket.
The protective cover is not latched. The socket is removed. Rubber seal7. The most important moment is to remember how you remove the lamp. Take a close look in the mirror at this hook, which you won’t be able to immediately throw a spring on blindly. The mounting spring is removed by pressing on it from above and simultaneously moving it to the right, as seen in the photo.
Fastening the lamp with a spring Fastening the lamp with a spring The spring has been removed8. The pressure spring releases the lamp. We take out the lamp. We put on a glove. We take a new lamp and insert it into the socket. The base key will not allow you to make a mistake. We take the spring, press the base and move it slightly to the right, and then to the left until it engages with the hook. Monitor your actions in the mirror.
Burnt out lamp Take a new lamp Insert a new lamp Lifehack The lamp is fixed The seal is on9. We put on the rubber seal. We insert the socket. Close the socket with a lid.
The battery is connected. Place and secure the “+” terminal 10. Reinstall the battery. Screw on the “+” terminal. We screw the mass. We check the operation of the headlights. When screwing the terminals, check their condition just in case. We screw the battery mount with our own hands. We restore car clock readings and car radio settings.
The time spent on replacing a headlight is minimal compared to the need to travel to a service center, and money is saved.
Renault Logan gray 1.4 › Logbook › LOGAN - replacing the low beam bulb
I’ve been meaning to write for a long time about replacing light bulbs in my logash. In general, there is nothing complicated. Something like this: Let's raise the hood. We remove the “-” terminal from the battery (if you wish, you can also unhook the “+”). Remove the plastic cover and rubber gasket from the desired headlight from the engine compartment side. If we are changing a light bulb on the left, driver's side, it is better to remove the battery completely, because the hand will not fit into the required space. If we change it on the right side, then nothing interferes there. After opening access to the headlight, pull out the wiring block from the headlight connector, bend the metal latches and carefully pull out the burnt out light bulb. Next, carefully insert the new lamp without touching its glass part. And we collect everything in reverse order. Watch the video, don’t criticize the quality, you have to shoot it on a simple smartphone and even upside down, because... lamp under the hood :)
How to replace
Removing the optics on Logan 2 varies depending on whether it is a left or right headlight. If you need to change the part on the left, you need to remove the battery. In some cases, car service technicians replace the lights on the left headlight without removing the battery.
Replacing the halogen on the right is carried out without removing the battery.
The replacement procedure can be described in stages:
- AB dismantling. The tools you will need are: a 13mm socket wrench and a 10mm and 8mm open-end wrench.
- Using keys, the wires are removed, first from the ground (the “-” sign), then from the positive. The socket head presses out the battery fasteners.
- There is a plastic cover in the center of the headlight unit, the lock is located on top. Press the latch with your finger, press the lid and pull it towards you.
- The power supply block with wires and the sealing cover are removed.
- By squeezing the hooks of the latch, the light bulb is removed from its regular place in the headlight.
- Installation of a new lamp is carried out in the reverse order.
The specified length of the bulb in this model is 82 mm. The headlight housing has standard recesses into which metal tabs located on the base should fit. This will ensure the optimal position of the part relative to the reflector and diffuser.
Optics repair on Logan
In Renault Logan, like in many classic VAZs, one lamp is responsible for the high and low beam in the headlight, and that is what we will be changing.
If you change the lamp on the left headlight (in the direction of travel), then first remove the battery, otherwise getting to the lamp will be problematic.
To get to the lamp, first of all, remove the back cover of the headlight, carefully prying it off with something sharp.
Under the cover there is a plug with wires that must be carefully removed without damaging the wiring.
After this, having removed the O-ring with your hands, we proceed directly to dismantling the lamp, which is attached in the classical way, that is, with a metal bracket that must be pushed up so that it can be easily removed.
By throwing the bracket to the side, you can grab the base and remove the lamp.
Important! Never touch the lamp with your bare hands, only use clean gloves or a clean rag. Greasy fingerprints are “deadly” to the flask.
We recommend: How to remove and replace spark plugs on a Renault Duster
Taking a new lamp, install it in the reverse order. Once in the special grooves and fixing the lamp with your finger, we put on the mounting bracket and fix it. One of the lamp contacts must be positioned vertically.
Then we put on the O-ring and connect the contact to the wires.
We put on the cap, and the work of replacing the low and high beam lamps is completed. On the right headlight we do the same thing, except that we don’t need to remove the battery.
Something else useful for you:
- Replacing the thermostat on Renault Logan
- How to replace coolant on a Renault Logan
- How to independently measure compression in a Renault Logan or Sandero engine
We told you how to change the high and low beam lamp on a Renault Logan headlight without removing it from its place. But there are simpler options: replacing a removed headlight, this is both more convenient and simpler. Most often this is done when replacing a lamp with a more powerful one on a newly purchased headlight, or if the headlight was removed for replacement.
In any case, it is preferable to change light bulbs on a removed headlight, although this requirement is not mandatory, we will tell you about this. We hope that with our help, novice drivers will save time and money. After all, although the headlights on Renault Logan of different years of production are the same, each has its own nuances.
Which lamps to choose
The choice of low beam lamp directly depends on the financial capabilities and personal preferences of the driver. Philips and Osram lighting devices are considered more popular among drivers. Narva also has good reviews. These lamps are durable and reliable. However, they also have the highest price.
If you wish, you can choose cheaper analogues, but it is worth remembering that the working life of inexpensive copies is much less. Also, due to the design features, after installing such lamps, you will need to spend more time fine-tuning the light flow.
Before purchasing a light bulb, you should decide what type of lighting fixture will be used.
Incandescent lamps
The simplest and most unpretentious type of lighting elements. They consist of a sealed flask filled with an inert gas, a tungsten filament and electrodes. The lighting quality is quite poor. Almost the entire resource is wasted on heating the headlight. However, the cost of lamps is in the lowest category.
Halogen
A more advanced type of lamp. The main difference from the previous type is the halogens added to the inert gas. It is due to them that the efficiency of the device significantly increases. Such lamps illuminate the road much better while driving.
Xenon or gas discharge
They work without the use of a tungsten filament due to an electrical discharge between the electrodes. They have excellent light quality and serve the owner for a long time. They are very expensive and are prohibited by law (except for factory equipment). There is a fine for the driver for installing xenon lamps on his own.
LED
They combine the best qualities. The high level of illumination and long service life of the devices have brought them to a well-deserved first place among automotive lamps. The picture is spoiled by too high a price.
When choosing a low beam bulb, you should also pay attention to the manufacturer
Bosch
According to car owners, light bulbs produced by Bosch have all the necessary qualities and pleasantly please the driver. In terms of lighting quality, these lamps are 90% brighter than standard ones. Drivers note that this immediately catches the eye after installation.
High performance provides a powerful flow of light even with not very new and clean reflectors. The direction of the light beam allows you to clearly see even distant objects.
In addition, original Bosch light bulbs have a much longer service life than most standard fixtures. The luminous flux has a pure white light, which does not tire the eyes even when driving for a long time. Due to the quality of light, many drivers refuse to install xenon.
The main disadvantage, according to car owners, is the high cost.
Osram
Osram lamps have increased light output. They provide decent lighting quality even with not very good reflectors. Additional configuration is required during installation. Otherwise, the headlights will blind oncoming drivers, which negatively affects traffic safety.
The cost of the lamp is slightly higher than that of a standard one, but this is fully compensated by the quality of work. The main disadvantage is the short service life.
Philips
Lamps from this manufacturer are invariably bestsellers. Bright, clean light provides a greater viewing range while protecting the driver's eyes from fatigue on long trips. The lamp service life is several times longer than the average operating period of lamps from other manufacturers. High quality and great demand ensured the considerable cost of the devices.
NARVA
Excellent quality low beam. At the same time, the cost of the lamp is not too high. Not bad for drivers who drive within the city at night. High beam is significantly worse than that of more expensive analogues. This is one of the most significant disadvantages of lamps from this manufacturer.
Koito
Despite the lack of more or less clear information on the packaging (all labels are in Japanese), these lamps demonstrate good qualities during operation. They perfectly illuminate the road with low and high beams, do not dazzle oncoming drivers, and demonstrate a considerable service life.
Amplified lamps usually have higher quality illumination, but their lifespan is much lower than average.
Tips for choosing
p, blockquote 32,0,0,0,0 —>
When choosing low beam bulbs when purchasing, you should be guided by the following considerations:
p, blockquote 33,0,0,0,0 —>
p, blockquote 34,0,0,0,0 —>
You should purchase only the type of lamp that is installed in the car. If you change the type of lamp, there is a high probability that the car will not pass inspection. For cars with xenon and LED bulbs, it is mandatory to have a functioning headlight dimmer. Therefore, if you change the type of lamps, it is necessary to install a headlight luminous flux corrector.
p, blockquote 35,0,0,0,0 —>
p, blockquote 36,0,0,0,0 —>
Many car enthusiasts believe that the more power, the better the road conditions will be visible. Maybe it is so. But blinding an oncoming driver can lead to an accident, and with your participation. In addition, problems are possible when passing the technical inspection.
p, blockquote 37,0,0,0,0 —>
3. Standard size, pinout.
p, blockquote 38,0,0,0,0 —>
It is necessary to select lamps of the appropriate size and pinout. It’s even better to come to the store with a sample, then the error will definitely be excluded.
p, blockquote 39,0,0,0,0 —>
Video - replacing a Toyota Avensis low beam bulb:
p, blockquote 40,0,0,0,0 —>
p, blockquote 41,0,0,0,0 —>
4. Quantity.
p, blockquote 42,0,0,1,0 —>
It is known that lamps are best installed in pairs. The identity of the lamps will have the best effect on the uniformity of the glow. It’s even better to buy a third one “just in case.” It is possible that one of the lamps will be damaged during repair or installation. And a spare copy in the glove compartment will not be superfluous.
p, blockquote 43,0,0,0,0 —>
5. Manufacturer.
p, blockquote 44,0,0,0,0 —>
There are no exact tips here. Even a well-known brand of lamp will most likely be made in the East. We can definitely say that a little-known brand should be left in the store.
p, blockquote 45,0,0,0,0 —>
Choosing a manufacturer
Phillips lighting fixtures are factory installed in Renault. Elements in a standard installation show a long service life - up to 40,000 km. After replacement, a similar part will last up to 10,000 km.
Among the companies specializing in the production of H4 type car lights are:
- Philips;
- Narva;
- Osram;
- Bosch;
- Koito;
- LynxAuto;
- Tesla;
- Lighthouse;
- Dialuch.
Halogen optics from these manufacturers are characterized by high quality and good lighting properties. For Renault Logan lamps, a power of 55/60 W is provided. A separate package may include a technical mark +30/50%. This marking indicates an increase in luminous flux by a certain percentage.