The factory headlight, used as a head lighting fixture in the Renault Logan model, contains in its design several lamps responsible for:
- activation of the turn signal;
- turning on low or high beam (type “H-4”);
- side lighting.
As a rule, the indicated lamps on Renault Logan can last no more than 2 years, after which the low beam lamp needs to be replaced. The operation is not particularly complicated, but its implementation, in order to avoid possible unplanned incidents, requires strict adherence to specific instructions.
In order to replace the low beam lamp on the French car Renault Logan, two options are applicable.
Method No. 1, which is “official”
Successfully replacing the low beam lamp responsible for the low beam requires arming yourself with the following set of tools:
- socket heads (“10th” and “13th” standard sizes);
- simple keys to “8” and “10”;
- a regular extension cord.
We carry out simple steps to dismantle the headlight unit.
- For this purpose, we disconnect the negative voltage from the battery.
- We carry out the procedure for removing the Renault Logan bumper and the protective cover that serves to cover the headlight range control mechanism.
- We disconnect the corrector cable, and then unscrew the bolts that secure the headlight itself.
- Supporting the light fixture, carefully move it to the side.
- By bending the latch and removing the cover, we disconnect the electrical connectors from the corresponding sockets on the back side of the headlamp housing.
- We take out the device and place it on a suitable surface, taking measures to protect the front plastic flask from mechanical damage.
- We dismantle the cover, then press and remove the latch.
- Having ruled out the possibility of touching the bulb, remove the lamp.
- We install a new element and put all previously dismantled components back in place.
Replacing the low beam lamp
So, we have figured out what lamps you need, then the process of replacing it directly follows. We will change the light bulb using the example of the left headlight, since replacement involves removing the battery. The light bulb on the right headlight changes in the same way.
- First of all, we will need to remove the battery, for this we will need two keys 10 and 8 to remove the terminals from the “+” and ground, as well as a socket head 13 to remove the mount of the battery itself (if there is one). Particular attention should be paid to the fact that first the wires are removed from the “-” ground, and then only from the “+”.
The battery will get in the way, but if you have “precise hands and fingers”, you can try without removing
- After the battery has been removed from its place, we see the headlight unit itself, in the center of which a plastic cover is installed, with a lock on top. To remove this cover and get directly to the light bulb, you need to press the thumb of one hand on a kind of tab (latch), and at the same time pull the cover towards you from below. Since plastic is quite pliable, no difficulties should arise in this process.
Removing the plastic plug
- When we removed the plastic cover, we see a rubber seal and a block with wires that is connected to the light bulb. First, you should carefully remove the block, holding it only by the body, and then by the sealing cover itself.
It is necessary to remove the lamp power supply
- The final touch remains. Before us is a spring clamp that fixes the halogen lamp, holding it securely in its tenacious paws. However, don't be afraid of this! You can remove the latch as easily as putting it in place; you just need to remove it from the “hook” with the reflector hook by pressing your finger on its upper part.
- Next, we remove the lamp itself from the headlight unit, holding it by the metal legs and replace it with a new lamp, installing it in the reverse sequence similar to removal.
Replacing dimensions or turn signal
If you have a need to replace the front turn signal or replace the side light bulb, then it is worth saying that replacing them is much easier. The lamp socket that needs to be replaced simply needs to be turned counterclockwise and the burnt out light source removed.
We recommend: Replacing rear brake pads on Renault Duster
Method number 2. "Simplified"
- We remove the battery (when replacing the lamp on the left side).
- Press the latch and remove the cover.
- Disconnect the electrical connector of the supply wires.
- Remove the rubber sealing collar.
- We open the hook together with the latch and, pressing the latter, remove it, after which we remove the used lamp.
- We install a new element and carry out assembly using the reverse dismantling algorithm.
The procedures for replacing both left and right lamps are identical.
Useful tips
As a rule, on different cars (including Renault Logan), replacing a low beam lamp is accompanied by replacing the dimensions, turn signal lamps, etc. So, on Logan, replacing the front turn signal or side lights is easier than replacing low beam lamps.
In fact, it is enough to turn the lamp socket that is being replaced counterclockwise, then remove the lamp and replace the element. Let us also add that low beam and high beam lamps must not be touched by the bulb during installation. The reason is that grease from the fingers impairs heat dissipation and contaminates the flask. As a result, the lamp may shine worse, overheat and fail much faster.
This is due to the fact that halogen lamps themselves are very hot during operation. So, in the place where the flasks touched with your fingers, a characteristic soot quickly appears. Over time, this soot becomes darker, and the heating of the flask due to its occurrence is greatly increased.
We also recommend reading the article on how to configure and adjust car headlights. From this article you will learn how to adjust the headlights on your car, as well as what you need to consider when adjusting the headlights yourself.
Subsequently, the bulb simply collapses and the lamp fails. To prevent this from happening, the installation of all lamps should be done with gloves or, at a minimum, not touching the bulb with your hands.
Taking into account all the requirements and recommendations, by replacing a couple of lamps yourself, the car owner will not have any problems in the future, and replacing the headlight lamps itself will require a couple of tens of minutes even in difficult cases.
Finally, we note that it is important to always remove the terminals from the battery in order to avoid short circuits, breakdowns of electrical equipment, etc. Even such a simple operation as replacing a lamp in the headlights still requires compliance with all rules, including safety regulations.
How to choose a “consumable”?
Before replacing the low beam lamp, you need to select the appropriate option. Original lamps from Renault can last quite a long time (equivalent to up to 40 thousand km), but the replaced analogues function for a relatively short period (comparable to a mileage of up to 10 thousand km). This applies to either Osram. And such “devices” as: “Mega”, “Super” or “Ultra” with “Xtreme” will “say goodbye” to the owner even earlier. After all, the brighter the beam of light, the shorter the lamp will last.
If you decide to purchase lamps that produce cold light for Renault Logan, then in rain or fog they will not be able to provide normal visibility.
The modern market is overflowing with products for Renault Logan, the work of which is implemented using various technologies and principles. Let's look at some in order to determine consumer qualities and disadvantages. The main thing is that the low beam bulb is replaced with a high-quality, durable product.
Ground clearance Renault Logan
Renault Logan tank volume
Fuel consumption per 100 km Logan
Repair
If a specialist is involved in the matter, replacing low beam lamps on a Renault Logan takes only 10 minutes.
- Stop the engine and open the hood
- We remove the battery so that we can easily get to the light bulb on the left side. To do this, unscrew the wiring and unscrew the battery fasteners. If the master has refined hands, then the battery does not need to be removed
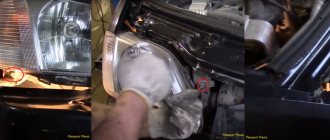
- We remove the plug. Press the top clamp (marked in the photo) and pull the plug towards you
- Pull out the block with the wires, and then pull out the seal
- Please note that the seal has straps on the sides. If you pull on any of the straps, the seal can be removed very easily and quickly. Such nuances can save valuable time when replacing low beam lamps on a Renault Logan
- Using your finger, press the spring bracket that secures the light bulb. That is, the staples need to be brought together and pulled out toward you. There is very little room for maneuvering, so it is better to entrust this work to someone with thin fingers
- We take out the light bulb
- Change the light source and reassemble in reverse order
We recommend: Do-it-yourself repair of the heated rear window of Renault Logan
In fact, the work is not difficult. It is quite possible to save money on a trip to a car service center and service your Renault Logan yourself; you already know which low beam lamp is used. Such light sources are available in any auto parts store.
Lamp type
In a Renault Logan car, the front optics are equipped with lamps of a certain type.
When replacing, lamps with an H4 base should be installed. This type assumes the presence of two filaments - for low and high lighting. This means that during scheduled maintenance, only one light bulb will need to be changed. The design features of the lamp also conceal its main drawback. Such devices have a much higher cost than simple H1 and H7. There is also a possibility that if the lamp fails, it will not have either low or high beam.
DIY height stabilization
This process has several features that are worth paying attention to:
- After washing, the next mandatory requirement is to normalize the tire pressure and adjust the suspension of the 2nd generation Renault Logan.
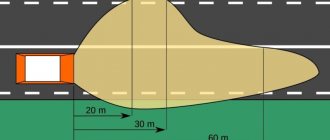
- It is also mandatory to install the vehicle on a flat horizontal surface that is perpendicular to a flat wall. Renault Logan should be installed at a distance of 3 meters from the wall.
- If the procedure is performed without the help of strangers, then a load weighing 80 kilograms should be placed on the driver’s seat. You need to draw a screen on the wall itself. Its parameters are shown in the image.
- Switch the light control to a value that corresponds to the load of the vehicle with the driver.
- Turn on the low beam.
- Open the hood and stabilize each element individually. You need to make sure that the position of the fire is in the center of the screen, vertically.
After the low beam has stabilized, the high beam should also be adjusted (if necessary).
If a high-quality double-filament lamp, then after the first stage of low beam adjustment no additional procedures are required. As for low-quality lamps, the indicators may differ, so car owners are recommended to purchase high-quality headlights. Many car enthusiasts prefer to purchase xenon lights. Their stabilization is similar to that of a double-filament lamp.
The procedure for adjusting the light of the lights horizontally is considered a common manipulation that every owner of a second generation Renault Logan can perform. However, if the driver is not confident in his abilities, it is worth contacting a technical service. Qualified specialists will make adjustments quickly and at a reasonable price.
Installation of fog lights Renault Logan
Road safety depends on many factors. In poor visibility conditions, visibility is impaired, which affects the car owner’s assessment of the current road situation. In conditions of limited visibility on the road, fog lights (fog lights) play an important role. According to the existing GOST, the color of elements, operation and installation features are regulated. In the event of a malfunction, the fog light bulb must be replaced in a timely manner.
The Renault Logan car, presented on the global and domestic vehicle markets since 2004 (in our country since 2005–2006), has several modifications. Depending on the generation (the first is 2004–2009, restyling 2009–2015, the second edition is 2014–2017), the model of fog lights offered for cars also varies.