Purpose of piston rings
These parts serve as a seal between the piston and cylinder. They are responsible for performing 2 functions:
- Excess motor lubricant is prevented from descending into the internal combustion compartment, leaving a small layer of lubricant on the walls of the part. This is what the oil scraper ring does.
- The combustion chamber is sealed and hot gases are removed from the piston. This is the challenge for compression rings.
The first compression ring is made from a reliable and durable material that can withstand high temperatures, but does not expand much when heated. A special coating on the part reduces friction and protects against corrosion. The shape of the ring is arched with an end gap. This is necessary so that after installation the spare part presses the piston tightly.
The second compression also fits tightly to the piston and helps remove excess lubricant. It does not come into contact with high temperatures, so it is made from less durable materials. The different structure of products is explained by different effects.
The oil scraper ring is located below all. It removes excess oil and leaves a thin film of lubricant, which reduces the friction force of compression and extends their service life. Replacing piston parts will help restore the engine to its original quality.
Compression rings, oil scraper rings, installation
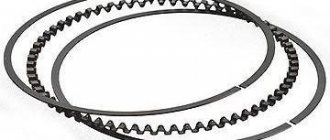
Piston rings form a seal between the cylinder wall and the piston. Must provide good sealing across the entire plane of the cylinder over a wide temperature range. In four-stroke engines, three rings are most often used, of which two are compression rings and a lower oil scraper ring.
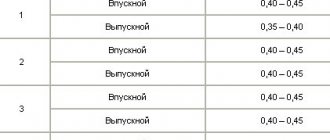
The first compression ring is intended solely to prevent the breakthrough of expanding gases in the combustion chamber. During the power stroke cycle, increasing pressure in the combustion chamber forces the first compression ring to the bottom of the piston groove and presses it harder against the cylinder walls, thereby providing sufficient insulation of the combustion chamber. The pressure in the ring groove remains on subsequent strokes without having time to decrease. The gap between the ring and the groove is 0.04-0.08 mm
Protects the second ring from high combustion temperatures and reduces the load. It has the greatest heat transfer from the piston to the cylinder; approximately 50-60% of the heat removed from the piston to the cylinder occurs on the compression rings. Some of the gases break through, the second ring begins to perform its functions, more on that later.
The first compression ring is made of high-grade cast iron, capable of withstanding high temperatures and loads while having a low coefficient of thermal expansion. During engine operation, the temperature of the ring reaches 180-210°C; at top dead center, where there is practically no lubrication due to friction, an even higher temperature is reached. The outer working surface of the ring often has a special coating to reduce friction. This can be plasma surfacing of molybdenum, cermets, and ceramics. The most common type is chrome coating, which has a matte gray color (applied by electroplating) and a peculiar porous structure that allows it to retain oil to further reduce friction. The remaining surfaces are black as a result of phosphating. The coating provides anti-friction and anti-corrosion properties.
Compression rings are not made entirely round, but have a complex arc shape in the free state and a fairly large end gap. Once the ring is in place in the piston and inserted into the cylinder, it will provide uniform clamping force at any point on the circumference.
Second compression ring
It works in more favorable conditions and performs the function of an additional seal. Also, due to its special shape, it helps the oil scraper remove excess oil, leaving only an oil film on the surface of the cylinder. The average ring temperature is 150 - 170 °C in operating mode. The gap between the ring and the piston groove is slightly lower than the first one, 0.03-0.06 mm. The variety of ring shapes determines the performance of certain functions. Such as distributing the load in the groove, reducing friction of the piston skirt by aquaplaning with oil, removing excess oil.
The chamfer on the inside of the ring determines which direction the ring will bend. If the chamfer is on the bottom, then the ring, after heating, will turn its outer surface down, as shown in the picture. And accordingly, if the chamfer is on top, then the working surface of the ring will turn upward.
Tools and accessories for work
To replace parts yourself you will need:
- Piston ring expander, in order to separate spare parts and not damage them.
- A wrench with a built-in dynamometer and a set of attachments for it.
- Crimping device.
- Hammer for tapping parts.
- A vice to secure the piston.
- Motor oil for fresh processing.
- Use a rag to remove old grease from parts.
You may need some more equipment. But this is a matter of personal preference. Since the above equipment copes well with the task.
How to install piston seals?
It is not recommended to install piston rings manually, without any tools. The rings are openwork details and can bend, but a deformed ring, as you know, cannot be installed. In general, for this reason, it is not recommended to test rings for elasticity when bending, especially if you do not have the appropriate skills.
If you decide to try bending rings, then remember the following:
Correct installation of piston rings is carried out using pliers. The oil scraper kit is installed first:
As for the compression rings, their installation is carried out according to the principle: second row - first row with orientation according to the “UP”, “TOP” mark or color indicators. The top of the ring should be oriented towards the combustion chamber, opposite to the crankcase. Before installing the piston into the cylinder, it is necessary to orient the locks of the first and second compression and oil scraper rings at 120 degrees, with the condition that none of the locks should be opposite the piston pin.
Source
Instructions for correct installation of piston rings on the piston
If you wish and have free time, you can repair your car yourself. The vehicle owner must follow the diagrams, order and sequence of instructions.
Preparation
Before the upcoming installation of the rings, the following preparatory measures are carried out:
- remove the battery terminals so that the engine is de-energized;
- drain oil and antifreeze;
- remove the cylinder cover and look at the condition of the liners;
- study the instruction manual that comes with the new spare parts.
Installation on piston
The preparation is complete, you can begin installing the rings on the piston; to do this, it is secured in a clamp. The part will be firmly fixed and no outside help will be needed. Next, remove the remaining carbon deposits of the old lubricating fluid from the piston. Otherwise the rings will not fit straight. The order in which the kit is installed must be observed. The oil scraper comes first:
- install the spring;
- The ring itself is attached on top.
Then the second and first compression ones. When installing, the main thing is not to overdo it and not to stretch the products so that they do not crack. To do this, it is better to use a piston circle expander. Using this tool, the parts are moved apart to the desired size and placed on the piston.
An important point is to ensure the orientation of the products relative to the piston. If you neglect this rule, fuel consumption may significantly increase. According to the instructions, the location of the piston ring locks from each other should be 120°. Each ring has its own inscription with notes. The upper ones are marked “torus”, and this side of the ring should be directed towards the piston bottom.
Installing pistons into the cylinder
A special clamping device is used to allow the piston to easily enter the cylinder. Such a device can be made from an iron can or bought in a store. For better cross-country ability, it is lubricated from the inside with machine oil. It is necessary to tighten the nut of the device, observing the measure, so that it moves around the piston under moderate load.
Next, lightly tap the device with a hammer so that it fits well on the piston. Afterwards it is removed from the support and the yoke is removed. The connecting rod, pre-lubricated with fresh oil, is placed on the piston. The piston must be installed evenly. The neighboring ones will become a reference point, if they were not removed or installed earlier.
Using a hammer, they try to achieve equal girth of the sleeve with the crimping device. When the desired tightness has been achieved, you need to hammer the part into the cylinder with gentle blows.
Next, the connecting rod is attached. There are also some nuances here. First, tighten the tie screws by hand. Next, you can use a torque wrench and tighten the bolts to the end. But the main thing is not to overdo it, as this can affect the operation of the engine.
Finally, the engine is assembled and the oil pan is returned to its place.
Piston rings: what are they and how many are there?
Together, two types of piston rings meet the requirements: compression and oil scraper. Each of them has its own tasks, which is why the designs are fundamentally different from each other. But there is one feature that unites internal combustion engines of all families - the design and number of rings used.
The “standard” scheme consists of three seals: compression ring No. 1, combined compression-scraper ring No. 2 and oil scraper ring. The countdown starts from the bottom of the piston (its highest point).
Necessary actions after installing the rings
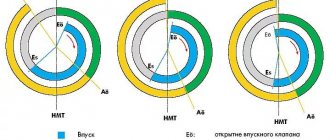
When each ring has taken its place in the groove, you need to install the slots approximately 120 degrees from each other. This reduces the likelihood of gases breaking through from the fuel chamber into the crankcase cavity.
Incorrect installation of piston rings
There is evidence that the first ring holds about 75% of the total compression, and the second - about 20%.
If the thermal gaps are separated, then when a certain amount of gas breaks through the first ring, it will not have time to get further, in contrast to the closer position of the second gap.
When to perform break-in after replacing piston rings
Installing new components into an engine always requires a break-in period. This applies not only to piston rings. It is well known that break-in is required after a major overhaul of the engine, or if the engine is completely new.
The break-in procedure itself implies that the components “grind in” to each other. When replacing piston rings, running-in is required so that they get used to the piston or cylinder. Despite the fact that the dimensions of the parts are standard, they wear out during operation due to a number of technological features. Accordingly, by installing new rings into an engine where old parts remain, complete size matching cannot be achieved. That is, it takes some time to break in the engine so that the parts fit together perfectly.
Beginning of work
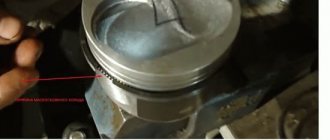
First of all, you will need a thin, flat-type probe. The new part is inserted inside the cylinder to check the clearances and correct position. The part should sink all the way to the middle. The correct position is tightly adjacent to the walls. If you notice a gap between the wall and the part itself, then it can be considered defective. It cannot be installed.
Important: the rule does not apply to oil scraper rings. Since they are supported by a separator, small clearances are required when installing them!
To speed up the process, sort the items by purpose. For convenience, you should arrange them in the following order:
In that sequence, the elements are put on the piston. You won't need any additional tools other than your hands. The separator occupies the lowest position in the groove, so immediately replace it. Before installing the following components, you need to remember important nuances.
Orientation of oil rings on the piston
The oil scraper rings are the thinnest and most flexible of the entire set. If you apply a little force by pressing on the part with your fingers from opposite sides, it will bend. The bending side is provided for a reason, being a special design feature. Do not press too hard to avoid deforming the material.
Remember the bend of both rings. If there are no marks on the convex surface, make notes for yourself with a marker, or check the side of the bend immediately before installing it on the piston.