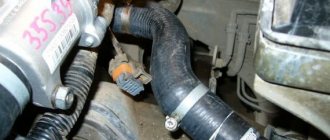
The Lada Vesta engine has a thermostat, which is designed to maintain a constant temperature and prevent overheating. The factory thermostat of the Lada Vesta car is set to an operating temperature of 95 degrees. This part, together with others, is called the engine cooling system (CO). When the heating temperature rises to its maximum value. The thermostat activates and opens, the temperature drops to 80 degrees. If movement in a large circle does not begin, then the thermostat needs to be replaced. In this way, the engine temperature and the heating system of the car interior are regulated, that is, on a hot engine, the stove warms up well, despite the frosty weather. In summer, on the contrary, the cooling turns on at full power.
The cooling system of a Lada Vesta car manufactured by AvtoVAZ is fundamentally the same type. Cooling is carried out by circulating coolant - in a large and small circle. If the temperature is less than 95 degrees, antifreeze circulates in a small circle, as soon as the temperature exceeds 95 degrees, the thermostat opens and the fan turns on. Antifreeze begins to move in a large circle in order to reduce the temperature of the engine. Read the article and find out all the details about the thermostat and the cooling system in general!
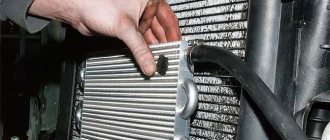
How does the Lada Vesta engine cooling system work, what are the components?
- The pump is a CO pump;
- Engine radiator;
- Air conditioner heater radiator;
- Electric fan;
- Expansion tank;
- Thermostat;
- Connecting tubes.
Antifreeze is used to cool the engine. You need to use the same brand. And mixing liquids from different manufacturers is unacceptable. If the liquid runs out suddenly, you can add distilled water, but this should not be done in winter - it is better to constantly monitor the antifreeze level. As a rule, in winter, with the arrival of frost, the pipes begin to leak.
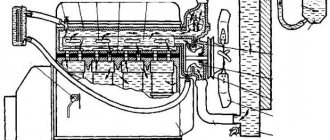
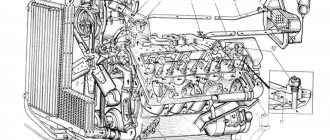
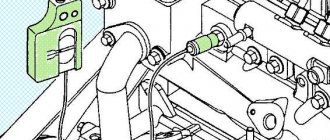
Engine cooling system diagram
_x000D_
_x000D_
Description: 1 – engine; 2 – water pump; 3 – thermostat; 4 – fitting for air removal; 5 – heater radiator; 6 – radiator of the engine cooling system; 7 – expansion tank.
_x000D_
Lada Vesta engine cooling device
The engine CO has two circulation circles, which are regulated by a thermostat.
- Small circle, does not pass through the engine radiator. Antifreeze only flushes the cylinder block, cylinder head and radiator of the heating system.
- A large circle passes through the engine radiator, and there it is cooled by oncoming air flows.
What is a water pump and how does it work?
A pump is a pump that circulates liquid in CO.
The pump is fixed in the cylinder block; it circulates the anti-freeze agent into the CO. On VAZ engines, the pump is driven by a timing belt.
The operating principle of the Lada Vesta 21129 engine thermostat. It is characterized by switching from a small to a large coolant circulation circuit.
Electric fan, turning it on
The cooling fan turns on and reduces the temperature of the circulating fluid when oncoming air flows are ineffective. It is located behind the radiator and is triggered by a signal from the electronic engine control panel. The fan start temperature is usually 95 degrees. The fan signal is activated even when the vehicle's ignition switch is keyless.
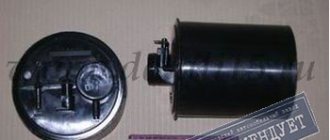
Expansion tank Lada Vesta
An expansion tank is provided to compensate for the expansion temperature in CO. There is a lid on the neck of the barrel that has safety valves.
DSC_9622 (Copy)
Let's start the engine. With the engine running, vigorously compress all the hoses of the cooling system several times in turn - this will help the fluid fill the system and displace air from it. As the coolant level in the expansion tank drops, bring the level to normal and screw on the tank cap. When the engine warms up, the outlet (lower) radiator hose should be cold for some time, and then quickly heat up, which will indicate the beginning of fluid circulation in a large circle. After waiting for the cooling system fan to turn on, stop the engine. After the engine has cooled, check the coolant level again and, if necessary, replenish the system.
Basic faults
The expansion tank on Vesta can fail for two reasons:
- the cap (cork) is broken;
- The plastic container burst.
The plug breaks due to the fact that the exhaust manifold of the coolant system becomes faulty. Operating a vehicle with increased coolant pressure in the system will result in the RB bursting. The hoses connected to it may be subject to destruction.
It is not recommended to add even more coolant - it already works “hard”. If you do this, you can bring your car to repair the cylinder head.
When the tightness of the system is broken - for example, the plug (lid) wears out, or a plastic container bursts, air enters the system, which creates blockages in the lines and increases the pressure in the system.
With such a problem on Vesta there is no point in continuing to drive; you need to start replacing the failed spare part.
Signs of engine overheating
The whole insidiousness of this problem lies in the somewhat delayed reaction of the control systems. This is not any design flaw of a particular car or model. Inertia is a feature of the system that is characteristic of any machine, regardless of the brand, class and manufacturer. Therefore, the actual engine temperature will always differ by several degrees from what the driver can see on the instrument panel.
Sensor readings
The second disadvantage of the internal combustion engine is the rather narrow range of optimal heating temperatures. An insufficiently warmed up engine cannot produce all the power inherent in its design. If the temperature does not exceed 60–70°C, it will work at half capacity until it warms up to the optimal 85–95°C. This is the operating range for a car engine, in which it can show the maximum of what it is capable of. When overloaded, the motor can heat up to 105°C, which is not yet so dangerous, but is already a red line and it is not permissible to continue driving in the same mode. A temperature of about 110°C is already a critical boiling point with all the negative consequences for the engine.
Owners of economy class cars are in a more difficult situation. They do not have a coolant heating indicator with a temperature scale. It is replaced by two indicator sensors: blue and red. If a blue icon representing a thermometer lights up on the dashboard, it means the engine temperature is below the permissible level - less than 60 ° C. When it warms up to operating parameters, the blue indicator goes out. When the engine is in danger of overheating, a red light comes on, which should warn of the threat of boiling of the coolant. In fact, due to the slightly delayed reaction of the control devices, the red pictogram literally confronts the driver with the fact of boiling, and the driver has little time to respond.
Indirect signs
Due to the inertia of the sensors, as well as due to the existing probability of failure of the control electronics, it is important to be able to recognize indirect signs of overheating of a car engine. These include:
- Heating of the wall separating the interior from the hood. This heating can be felt with your feet: the temperature in the front part of the cabin clearly rises;
- Sudden decrease in vehicle traction. When crossing the “red line”, the engine sharply loses power;
- Continuous operation of the radiator fan. The sensor that regulates their operation does not have time to cool down, and the fan does not stop working. The driver can easily hear the sound of its operation;
- Steam coming from under the hood. This is an extreme sign when the liquid in the cooling line has already boiled and began to turn into steam. In this case, excess pressure is released through the valve of the expansion tank, and the pipes will be inflated;
- Engine knock. Often, among the first symptoms of excessive heating, a uniform knocking sound appears in the engine, which only intensifies as the temperature rises.
Removing and installing the expansion tank
To replace the expansion tank on a Lada Vesta, start with the actions that the manufacturer recommends before each repair: remove the negative terminal from the battery, stop the car. Next follow the instructions:
- Open the hood. Wait until the car has cooled down to avoid getting burned. To protect your hands during repairs, wear medium-thick gloves.
- Remove the steam hose from the “hero of the occasion” with your hands.
- Behind the part from below, unscrew the two bolts and one self-tapping screw that secure it in place.
- In place of the old part, put a new one, connect the hose, establish a strong connection, tightening it with a new clamp.
Replacement frequency, what antifreeze to fill
Lada Vesta cars are filled with coolant from the factory, designed to operate for 90 thousand kilometers. But if the mileage during use is not long, then replacement should be done once every 3 years.
Sintec Antifreeze Lux G12 is used as the first fill antifreeze. It can also be found in branded cans called LADA G12. Coolstream Standard is also popular among motorists. It has AvtoVAZ approval and is fully compatible with this model.
Alternatively, you can choose other manufacturers. The main thing to understand is that the coolant must meet the tolerances of a given car model. But there is no need to make a choice by color, since the color is just a dye.
How much antifreeze is in the cooling system, volume table
| Model | Engine capacity | How many liters of antifreeze are in the system | Original liquid / analogues |
| Lada Vesta | gasoline 1.6 | 6.4 | Sintec Antifreeze Lux G12 |
| gasoline 1.8 | LADA G12 | ||
| Coolstream Standard |
How to understand that there is a malfunction in the system
Frequent addition of antifreeze indicates that the connecting hose system is not tight. And this contributes to the penetration of liquid beyond the CO. You should carefully inspect the connecting hoses and their integrity. Be sure to inspect the pump and drain holes. If there are traces of leaks, you need to solve the problem yourself or contact a service station.
To identify problems with the cooling system, you need to warm up the car to a maximum of 85-92 degrees. Then you need to check the lower pipe, when it is cool, this means that only a small circulation circle is working - the thermostat does not open. In this case, the machine cannot be used. To verify that the part is faulty, you need to open the expander cover. Make observations when antifreeze does not flow, you need to clean the pump or replace the thermostat.
Simple check without removing the part
The easiest way to check the functionality of the thermostat is to diagnose it directly on the car. This requires that the car engine be initially cold. The procedure itself is carried out according to the following algorithm:
- start the engine;
- let it run for 1.5-3 minutes;
- touch the rubber pipe going to the top of the radiator with your hand.
Normally, it should be cold, since at this stage antifreeze circulates only through the stove and engine. A hot pipe indicates a thermostat malfunction.
Thus, when checking, you can focus on the upper and lower hoses. If they both heat up, then this is also a bad sign.
There are situations when, after heating the coolant, the lower pipe remains cold. This also indicates that antifreeze cannot pass through the radiator. In both cases, we can talk about breakdowns of the thermostat, the need to dismantle it and replace it with a new device.
There are situations when the valve gets stuck in an intermediate position. Under such circumstances, it is neither closed nor open, so the engine warms up very slowly. Here the thermostat needs to be removed from the car.
Replacing the thermostat Lada Vesta
To replace, you must adhere to the safety rules and the following algorithm. At the very beginning, you need to buy a new assembled Fenox TS034E7 TS034E7, or another similar spare part.
- You need to tilt the car slightly, that is, reduce reinforcement on one side. The procedure requires a jack. This is done so as not to spill antifreeze.
- Next, you need to partially pour out the antifreeze. The Lada Vesta is different in that the drain plug on the block is closed by the starter, and without removing it it is impossible to pour out the antifreeze; there is no plug on the radiator either. This means you need to pour it through the expansion tank. The amount of liquid drained should be about four liters. Then the jet of anti-freeze becomes smaller, and air begins to lie in its composition;
- Remove the air filter;
- Disconnect all connections to the temperature sensor panel;
- Then loosen the hose clamp. To do this, use a Phillips screwdriver;
- Disconnect the hoses from the nozzles. A hose that acts as a pump supply pipe for anti-freeze;
- It is necessary to unscrew all the nuts from the body (use wrench number 13);
- Remove the spare part from the studs along with the sealing lining.
To install a new spare part, you need to follow the instructions described above, but in reverse order.
- Place the thermostat gasket 21100130301700 LADA. Install the part body on the studs;
- Screw in the nuts using the same wrench;
- Connect the hoses to the pipes;
- Secure the hoses;
- Connect all connections to the control sensor unit;
- Fill with coolant;
- Make sure antifreeze does not leak. Test the cooling system.
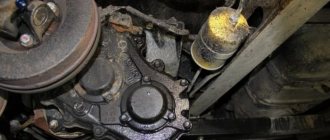
No. 3 Modification of the thermostat on the Lada Grant - heating the throttle valve
The throttle valve on the Lada Granta is not heated. In winter, in severe frosts, metal structures slightly grab, which is noticeable while driving a car.
There is only one way to protect the unit from freezing - to run the circuit from the cooling system.
Sequencing
- We place the car on the inspection hole and remove the metal protection of the oil pan.
- Drain the antifreeze.
- We release the clamps - ties, remove the rubber supply and return pipes.
- We dismantle the flow regulator, fix it in a vice, and disassemble it into its component elements.
- In the back of the case we drill an additional hole at “10”.
- Using argon welding, we weld the fitting to the hole for partial intake of antifreeze from the thermostat (Luzar).
- We assemble the structure.
- We put the rubber pipe on the fitting.
- We fill the system with antifreeze.
- We start the engine and test the proper operation of the stove heater.
Analogues of parts for Lada Vesta and their advantages
- Luzar, produced in Ukraine. The advantages of luzer are that the heating system begins to heat up better and faster. And replacing the thermoelement becomes much easier, you only need to unscrew two bolts and the element on your hands, you don’t need to remove a lot of pipes.
- Pekar article 21900100000000000, manufacturer Russia. It does not have a thorough design, so it does not retain the heat of the engine well.
- The automagnet is designed with new valves that release antifreeze in doses. Almost never overheating.
- Pramo article number 2108210000000000000, although often used, has many negative reviews. Sudden opening of valves and others. Produced in Russia, China.
In order for the thermoelement to last a long time, it is necessary to use antifreeze recommended by the manufacturer. Replace breakdowns only with high-quality auto parts, only from the manufacturer of original parts. Don't buy fakes. Replace broken parts in a timely manner. When operating an engine with a broken spare part, the operating temperature of the engine differs sharply. That is, there are jumps from 79 to 95 degrees, and this can negatively affect the operation of the motor in the future and shorten its service life.
Fuel level sensor
Price: 400 rubles.
FLS is exactly what allows you to always see the amount of fuel in Vesta’s tank. It is an integral part of the fuel system, and AvtoVAZ engineers strongly recommend replacing the entire fuel system. The owners of Vest, who have already gone through the replacement of the FLS, say that there are no problems with careful work.
Malfunctions
The FLS fails rarely, but you can notice this if the needle on the fuel level scale reaches 100 without decreasing.
Replacement
To begin, prepare a 10 mm socket, a hammer and a screwdriver. You'll have to "sweat." Sequence of work:
- Remove the rear sofa cushion and the soundproofing sheet underneath.
- You will see a black fuel pump cap. Use a flathead screwdriver to pry it up.
- Disconnect the fuel pump plug from the network.
- Start the engine and let it idle until the fuel that the fuel pump managed to pump to the injector runs out - the car will stall on its own. Turn off the ignition, remove the negative from the battery.
- Compress the springs at the tip of the fuel pump tube and disconnect it.
- Turn the ring counterclockwise (if you can't do it by hand, use pliers) and remove it.
- Tilt the fuel module and disconnect it from the fuel pump.
- Remove the tip from the pressure regulator outlet.
- Unlock the latches of the plug with the wires and disconnect it from the cover.
- Use a screwdriver to disconnect the block mount.
- Disconnect the fuel pump and plug.
- Press out the fasteners and remove the FLS. Install a new FLS. Reassemble everything in reverse order.
Source
Vesta is cold in winter.
I will share some observations regarding the operation of Vesta during the cold season, which in our region stretches for 7-8 months a year. I am a relatively heat-loving person, so take the observations below with some skepticism, since the perception of cold is different for all people. Go.
First observation.
VAZ cars have always been famous for their fairly warm interiors. In principle, Vesta’s climate control system cannot be called completely cold, but there are some features. I’m used to the fact that even in the absence of climate control, in cold weather I don’t need to turn the temperature knob to the maximum level. In Vesta, even in late autumn, it turned out that the middle of the climate scale (not climate control), even at temperatures around zero, does not provide adequate comfort. If we take temperatures of -15 and below, then only the maximum values of the climate scale and 3-4 fan strips are needed. And if you just lower it by one notch, it becomes cooler. There is a subjective feeling that it is at the third fan level that the stove turns on at normal power.
Second observation.
When driving long distances, I like to drive (including in cold weather) in a light jacket or T-shirt that does not restrict movement. I bought the car at the end of February, and in March I needed to go to neighboring Cheboksary (about 400 km one way). Traditionally, he took off his jacket and hat, throwing them in the back seat and remained in a light jacket. It was warm in the cabin, but when driving on the highway I felt a good draft from the driver's door. I turned up the heat, but it only became warmer in the face area. I experimented with the air flow settings, but did not notice a significant change. Apparently the door seals were to blame. At one time I heard the news that AvtoVAZ changed the design of the seals, but either I didn’t change it or I’m just that cold. I saw that they were installing additional seals, but I didn’t get around to it yet.
Observation three.
Vesta warms up for quite a long time in frosts below -15. Here again everything is very subjective. For me, the measure is the distance to work, which is about 4 km from home. Of course, in the morning, everything largely depends on the traffic situation: traffic jams, luck in driving through a green wave of traffic lights, etc., but in my previous car I arrived with a warm interior, now this is not always the case, although the previous car had the same 1.6 engine. This problem was solved by installing autorun. 5-10 minutes before departure and you sit down in a slightly warm salon.
Source