Soldiers of the Great Patriotic War 12. Lieutenant of the Red Army Air Force in summer uniform, 1941.
Soldiers of the Great Patriotic War 12. Lieutenant of the Red Army Air Force in summer uniform, 1941.
Soldiers of the Great Patriotic War 12. Lieutenant of the Red Army Air Force in summer uniform, 1941. Tin figurine.
According to the combat regulations adopted in 1940, the main task of fighter aviation was the destruction of enemy aircraft at their airfields and in air battles, both in independent air force operations and in close operational-tactical connection with combined arms formations. Although by the beginning of the Great Patriotic War fighter aviation had become the largest branch of the Soviet Air Force, its reorganization could not be completed in full: the new type of fighters - the Yak-1 and MiG-3 - accounted for no more than a quarter of the total number of combat vehicles.
Since the Soviet Air Force was not an independent branch of the Armed Forces, but was part of the Red Army as a branch of the Red Army, the cut of their uniform was the same as that of the Ground Forces, differing only in the dark blue color and blue buttonholes and piping.
Since August 1924, uniforms of a general army cut, dark blue, with buttonholes on blue collars with red edging, were installed for servicemen of the Red Army Air Force. The very next year, a new uniform of clothing was adopted for the middle, senior and senior command and control personnel of the Air Force - a cloth jacket of the English pattern in khaki color, and the uniform introduced in 1924 was cancelled. Also introduced were buttonholes of blue cloth cloth with black edging, onto which distinctive insignia of specialties were attached.
PILOT OFFICER of the Red Army Air Force
Soldiers of the Second World War No. 12. Lieutenant of the Red Army Air Force in summer uniform, 1941.
In December 1935, new uniforms and insignia were introduced for all Red Army personnel. For military personnel of all branches of the military, with the exception of the Air Force, a cloth cap with a colored band according to the branch of service was introduced and, for field uniforms, a khaki cloth cap. Instead of a cap, Air Force personnel always wore a blue cloth cap with blue piping. In everyday combat uniform, command and control personnel of all branches of the military were entitled to a tunic, trousers and boots, and in non-combat uniform - an open jacket, untucked trousers and chrome boots.
Unlike other branches of the military, which were assigned a protective color for their uniforms, the uniforms of aviation commanders were made of cloth or worsted fabric in dark blue.
At the same time, new insignia were introduced for all military personnel of the Red Army, while the Soviet Air Force received blue buttonholes with black edging for political workers, soldiers and junior commanders and gold for officers. On the buttonholes were placed the aviation emblem - a propeller with wings and insignia of the ranks of middle and senior command and command personnel: kubari and sleepers.
Preface
On June 22, 1941, Nazi Germany and its allies began a war against the Soviet Union. This war caused enormous damage to the Soviet people, and ended with the Great Victory on May 9, 1941. While we pay our debt to our grandfathers, let us nevertheless think: could the USSR have defeated Germany and its allies before 1945? Could he have won with fewer casualties? Probably yes. What prevented this from being achieved? Probably the insufficient combat capability of the Red Army at the time of June 22, 1941. Let's consider one of the components of the combat effectiveness of the Red Army: the combat effectiveness of the Red Army Air Force. Let us take into account that for the most part, the Soviet soldier was not particularly pleased with the actions of Stalin’s falcons, especially in 1941.
Black, maroon, blue
In different countries, the same color of a disc-like headdress indicates belonging to different branches of the military. Below are the colors that are relevant for domestic military personnel.
- Black. The black color indicates that they belong to the Marine Corps. This is the most compact of the existing berets. You can easily hide it in your pocket or put it over headphones if necessary. The Marine Corps is the elite of the Russian army. And a black beret is evidence of belonging to this elite.
- Speckled. A military maroon beret is a kind of award for a serviceman, confirming his professionalism. You can get such a headdress only after successfully passing a series of tests. Moreover, first they conduct a training exam, and only after it the military man runs a cross-country race, demonstrates his mastery of acrobatic tricks and engages in hand-to-hand combat with an opponent.
- Blue. Blue berets can most often be seen on soldiers and officers of the Airborne Forces. Especially when this branch of the military celebrates a professional holiday. Until 1968, paratroopers wore crimson headdresses. But then they were replaced by blue “discs”, the wearing of which is still relevant today.
Berets are divided into seamed and seamless. The latter are popularly called “droplets”.
The influence of the quality of the aircraft fleet on the combat effectiveness of the Air Force
Let's evaluate the optimal quality of aircraft: The influence of the quality of the aircraft fleet on the combat effectiveness of the Air Force is quite obvious at first glance - each Soviet aircraft in its class should be a product of higher quality than a similar one in the German Air Force (a fighter is better than a fighter, a bomber is better than a bomber, and so on). The higher the quality of the aircraft increases, the better. However, as the speed, rate of climb, armament, and reliability of aircraft increase, their cost will also increase. That is, for the same money it will no longer be possible to produce the same number of aircraft. What is the optimal quality of an aircraft - not too low and not too high? I will express my personal assumption - the optimal quality for USSR aircraft will be 20..30% higher than the quality of a similar enemy aircraft. Exceeding the quality by 2 times over the enemy’s analog would, in all likelihood, require a 4-fold increase in cost, and would be beyond the bounds of feasibility.
The impact of fleet size on the combat effectiveness of the Air Force
Let's estimate the optimal quantitative composition: As a first approximation, to the question “how many and what aircraft would be optimal to have in service?” the answer would be “the more, the better.” However, if we offer the option “is a billion aircraft better than a million?”, it will become clear that no, it is not better, if only because there is no way to find a billion pilots in the USSR. So the “more = better” option is not suitable. It is clear that the number of aircraft, at least, should not exceed the strength of the Red Army. Further, most likely a significant part of the military personnel must fight on land and at sea, and not in the air. For my part, I will give my personal assessment - the optimal total aircraft fleet of the USSR Air Force will be the number of aircraft that is 2 times greater than the number of German Air Force aircraft in the Western theater of operations on June 22, 1941. Why not more? The combat effectiveness of the Air Force is determined, among other things, by the training of its personnel. By increasing the number of aircraft (and, accordingly, the number of pilots), we (with a limited amount of aviation fuel) inevitably reduce the flight time of each pilot. In addition, by increasing the size of the Air Force, we are reducing both the requirements for admission to flight schools and the requirements for final examinations. A decrease in the quality of personnel always occurs with an increase in the number of staff units. But due to the growth of the aircraft fleet, not only the number of pilots is growing - the number of units and formations is growing. The growing number of vacancies for mid- and senior-level commanders must be filled urgently, and we only have a large number of poorly trained pilots, and here is the logical result: the requirements for unit and formation commanders are being reduced. Worse, our unit and formation commanders will be of reduced quality and will command larger formations (in the Air Force of optimal size, he would lead a regiment - but here you have to put him in a division). Finally, as the height of idiocy, a worthy commander is assigned to a division, district, and finally, leads the USSR Air Force, and fails to cope. In a reduced (optimal) Air Force, he would have remained a commander, risen to the rank of regiment commander, and brought a lot of benefit.
Thus, the combat effectiveness of the USSR Air Force will increase up to a certain limit as the number of aircraft increases (for example, when increasing from 1000 aircraft to 2000 aircraft), and after a certain limit it will fall.
Means for fixing the shape
Before beating the beret to make it hard, the fabric must be additionally treated with a fixing compound. This will allow the wool fabric to maintain its shape over a long period of time.
Shaving foam
- Putting a damp beret on your head or a dummy, give it the desired shape.
- Without removing, coat it thoroughly with shaving foam, without missing the slightest area.
- Wait five minutes for the material to soak in the product.
- Wet your hands in cold water and begin to rub the foam into the fabric with little effort.
- Having got rid of the stains, finally adjust the shape and leave the beret until completely dry. This will take about two hours.
During the application of foam, pellets may appear on the surface of the headgear. To get rid of them, treat the fabric with a disposable razor.
Sugar
- Dissolve a couple of tablespoons of sugar in two glasses of water.
- Soak the headdress in the sugar solution until the fabric is completely saturated with it.
- Beat the beret in the way you like.
A hat treated with sugar syrup will lose its shape upon first contact with water. In addition, the fabric may attract insects.
Hair fixation spray
- To keep your military beret in shape, spray hairspray on the inside surface when the item is dry.
- When the product is absorbed into the fabric and hardens, repeat the procedure.
- You may need to use up an entire bottle of hairspray to get your headdress hard and immovable.
Adhesive layer
- Take measurements of the beret and transfer them to a piece of paper or cardboard to draw a template for the part of the headdress that should maintain its shape.
- Using a pattern, cut out a part from adhesive fabric (usually bag interlining is used).
- Fix the adhesive layer with a hot iron.
The adhesive layer is resistant to water. This way, even after repeated washings, the shape will hold.
Paraffin
- Place the wet headdress in the desired position and wait until it dries.
- Melt the paraffin and treat the areas that need stability from the inside out.
- Adjust the shape if necessary and leave the product to dry.
Rigid frame
- To install the beret yourself, cut out the fragments that require fixation from cardboard or plastic.
- Place a solid frame inside the product.
- Secure the backing with double-sided tape.
Laundry soap
- To create a beautiful seam beret, moisten the areas that need to be shaped.
- Rub the material well with laundry soap.
- Press the edge with your fingers to make it sharp and secure with clothespins until completely dry.
Regular laundry soap may have a specific pungent odor. When treating headwear, it is better to choose modern products that are odorless or with fragrances. Watch the video to see how to hit the moeno beret.
https://youtube.com/watch?v=L6WAuBaT9vo
The beret is worn not only by military personnel or workers, but also by fashionistas and fashionistas at any age. This headdress gives the image a special romantic note and a touch of nobility. Even civilians will benefit from military experience on how to properly beat off and put on a beret with a seam. Wear a beret and give the product a beautiful and stable shape, you will always look irresistible.
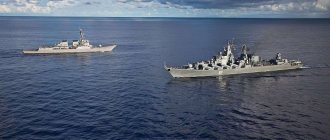
Real aircraft fleet of the German Air Force on June 22, 1941
Let's try to evaluate the German Air Force on the Eastern Front. Oddly enough, determining how many and what kind of aircraft were part of the 1st, 2nd and 4th Air Fleets opposing the USSR on June 22, 1941 turned out to be quite difficult for me. I did not find detailed material in Russian, and I provide a table in English, which shows that in total on all fronts (Russia, Norway and Finland, the Middle East, West and Germany) the German Air Force had about 3428 aircraft of all types, of which there are 2430 of them on the Eastern Front. The site allows you to study how many and which aircraft were in which formations on June 24, 1941 (probably about 200..300 German aircraft by that time had already been shot down by the Red Army Air Force, and thus the composition of the First, Second and Fourth Fleets is determined as approximately 2700 aircraft ) https://sturmvogel.orbat.com/LWJul42.html in collapsed form the situation looks like this:
Various sources estimate the number of aircraft used on the eastern front differently:
Thus, Stepanov A.S., Ph.D., reports “By June 22, 1941, 3509 aircraft of all types were deployed against the USSR.” (https://www.soldat.ru/doc/stepanov.html)
Finally. The British Air Ministry in the book “Combat Operations of the Luftwaffe: The Rise and Fall of Hitler’s Aviation 1939–1945” https://lib.rus.ec/b/258910/read gives the following assessment: At least 2,770 aircraft out of 4,300 took part in the initial stage of the offensive, constituting the first line of the Luftwaffe, including: long-range bombers - 775; dive bombers - 310; single-engine fighters - 830; twin-engine fighters - 90; long-range reconnaissance - 340; tactical reconnaissance - 370; patrol aircraft - 55; only 2770 cars.
Real aircraft fleet of the USSR Air Force on June 22, 1941
According to currently available data, the air fleet of the Red Army Air Force and the Red Army Air Force of the USSR amounted to 21,030 serviceable aircraft, of which 16,052 serviceable combat aircraft: 5,912 bombers 8,611 fighters 57 attack aircraft 1,472 reconnaissance aircraft Data are provided from sources: https://tashv.nm .ru/BiChSostavVS/BiChSostavVS_5.html
and https://www.rkka.ru/ihandbook.htm
Of course, some of the aircraft were stationed in the internal districts, in the Far East, and in the Pacific Fleet. Directly in the Western theater of operations, the Red Army Air Force had 7,628 combat aircraft:
Conclusions about the reasons for the insufficient combat effectiveness of the Red Army Air Force and the Red Red Army Air Force in 1941
1. The low combat effectiveness of the USSR Air Force was caused by the excessive size of the aircraft fleet. Excessive numbers did not allow for the careful selection and proper preparation of Air Force personnel (both crews and commanders of units and formations) for combat operations.
2. A secondary factor was the insufficient quality of the aircraft. Aircraft of new types were not sufficiently studied by the troops, and their number was not sufficient. There were almost no dive bombers or pilots who could dive.
3. The organizational and personnel structure of specialized air divisions made it difficult for fighters, reconnaissance aircraft, attack aircraft and bombers to interact. It would probably be easier to achieve fighter cover for attack aircraft and bombers in the USSR in mixed air brigades, for example, of the following composition: 1 bomber and 1 fighter air regiment.
4. A reduction (relative to real history) in the production of SB bombers in the period 1938-1940 would have made it possible to produce a sufficient number of all-metal combat aircraft of all types using the same resources. Let's assume that the production of a strategic four-engine bomber will require 2 times more resources than the production of an SB bomber (cost 2.0), and the production of an all-metal fighter or tactical reconnaissance aircraft will require 2 times less (cost 0.5). Using reduction factors, the table shows that with the same resources it was possible to produce 8,000 all-metal aircraft for the Optimal USSR Air Force from 1938 to 1940.
5. In the pre-war years, the USSR spent 40% of its military budget on aircraft production. Reducing the production of aircraft would make it possible to increase the resources allocated to the rearmament of the ground forces - the production of more advanced anti-tank artillery, vehicles, artillery. tractors, new tanks, etc.
We beat back step by step at home
The reverse side should be processed, not the front side.
Method 1
The most complex and expensive method. However, if performed correctly and strictly following all the instructions, the result will be a headdress that is ideal in shape and angle.
For the event you will need:
Algorithm of actions:
- tear off the lining of the beret (in some cases you can skip this step) and place the headdress in hot water for 2 minutes;
- take it out, drive off the excess water with your hands ( drive it off, without twisting or squeezing
); - after the water stops dripping, insert the cockade ( for correct placement, follow the liner inside the beret
); - put on the head, tie;
- smooth out the headdress, give it the correct shape;
- cover the beret with shaving foam without removing it from the head;
- wait a few minutes, wet your hands and start rubbing in the foam;
- give final shape;
- leave alone for 1.5 hours (no need to remove);
- after this time, remove the headdress, clean from pellets and residual traces of foam ( small signs of wear - pellets - are removed using a razor drawn along the pile
); - fill the inside with a large amount of varnish (you should not spare the product, as it will give the headdress the necessary hardness);
- cut a small rectangle out of the card, then make 2 holes in the piece for the “antennae” of the cockade, insert the cockade and tighten the “antennae” to your taste.
- smooth the left side of the beret back (while bringing your hand straight to the back of your head);
- smooth the crown to the right;
- We create a half-disc at the right ear.
Method 2
The method is suitable for military and civilians who want to flatten one side of their headgear (bevel it to one side). To do this, you literally have to break off the edge. You will need a hammer and a hard surface strong enough to withstand repeated direct hits from the tool (a barracks stool, for example).
Step-by-step instruction:
The blows should be light, but accurate. If you don’t have the skills to handle the tool or are afraid of ruining the item, use a steel spoon
. However, the process of involving her will take longer.
Method 3
A method that is relevant for the teardrop beret. Take a hat, wet it with water and quickly shake it off (no need to get too wet). Next, put the product on yourself and give it the shape prescribed in the charter. Do this until it is completely dry ( do not forget to smooth and adjust the beret from time to time, otherwise it will not dry correctly
).
When the beret becomes dry, press down the edge with pliers. If the tool is handled correctly, the part will become as sharp as required.
If the idea of wearing a wet headgear is not pleasant in itself or there are reasons to refrain from such a step, and you have a mannequin or at least a ball at hand, the circumference of which coincides with the circumference of your head, then put a beret on them. However, you need to be prepared for a not entirely correct fit - nevertheless, these objects do not correspond to the curves and structural features of your particular head.
Method 4
Soak the headdress in hot water, remove the bulk of the water with your hand, put the product on, and then give the edge a sharp shape using your fingers (punch the edge), paper clips or clothespins.
Method 6
Wash and iron through gauze (double). Before ironing, place a rolled up wet towel inside the headdress (helps create a shape). Then beat off the edges with a hammer.
Method 7
Soak for a couple of minutes in warm water. Take it out and stuff it tightly with newspapers. Ensure that the form adopted corresponds to that required by the charter. Smooth out the folds, and “bevel” the desired side and secure with clothespins. Leave until completely dry ( the item should be kept away from operating heating devices and direct sunlight
).
Method 8
- Mix 180 g of water (cold) with 100 g of starch. Mix thoroughly. Add the resulting mixture to 900 g of heated water.
- Dip the beret and give it the desired look after pulling it out. Once you achieve your goal, put it on the ball or dummy. Let dry.