5.6. Checking and adjusting the valve timing of the ZMZ engine - 409.10.
During operation, as well as due to errors in the manufacture of parts for the gas distribution mechanism drive (GRM) or due to improperly carried out repairs of the timing drive, a significant deviation of the valve timing from the specified values is possible. At the same time, it is known that the correct valve timing is one of the most important factors affecting the power, torque and economic performance of the engine. Therefore, when the traction properties of the engine decrease, the operating fuel consumption increases and the engine becomes unstable, it becomes necessary to check and, if necessary, correctly set the valve timing. For this purpose, a set of equipment developed at the factory is used. The kit includes: a protractor (Figure 85), a template (Figure 86) with a cam profile and an arrow (for the 4062.1 engine and the ZMZ-405.10, ZMZ-409.10 engines and their modifications) and a jig for drilling additional holes for the pin in the camshaft sprockets ( Figure 87).
Technical requirements: 1. Material: stainless steel. t=3 mm 2. Unspecified prev. off according to OST 37.001.246-82 3. Production from textolite t=3 mm is allowed. 4. Apply the designations on the template by impact or other means to a depth of 0.3-0.5 mm
Checking and adjusting the valve timing can be done on an engine installed in a vehicle. To control the valve timing, it is necessary: 1. Disconnect the crankcase ventilation hoses from the fittings on the valve cover by loosening their fastening clamps. 2. Disconnect the wire connectors from the ignition coils. 3. Remove the tips from the spark plugs with seals and high voltage wires. 4. Release the wiring harness from the brackets and remove it from the valve cover. 5. Remove the valve cover with the gasket, spark plug well seals, ignition coils and high-voltage wires assemblies by unscrewing eight bolts (head “12”, extension and wrench). Leave the bolts, washers and wire harness brackets in the holes in the cover. 6. Set the piston of the 1st cylinder to TDC of the compression stroke by turning the crankshaft in the direction of rotation (clockwise) until the mark on the crankshaft damper pulley coincides with the indicator rib (in the form of a boss) on the chain cover. Attention! Rotating the crankshaft counterclockwise is not permitted.
Figure 86 – Cam template
Technical requirements: 1. Material parts. pos. 1: circle 65 GOST 7417-75 45Х GOST 4543-71 2. Unspecified prev. off according to OST 37.001.246-82 3. 42. 48 HRCе 4. Additional holes are located at 2º30′, 5º and 7º30′
Figure 87 – Jig for drilling additional holes for the pin in camshaft sprockets
If deviations in the angular position of the camshaft cams exceed the permissible ±2°, adjustment of the valve timing is required.
Source
Timing drive kits for ZMZ 409 engines of Euro-2 standard
| VENDOR CODE | LS406.3906625-01 | 406.3906625-14 | LS 406.3906625-02 | 406.3906625-04 | 406.3906625-03 |
| MANUFACTURER | "LS Group" | "PROGRESS" | "LS Group" | "PROGRESS" | "PROGRESS" |
| IDEAL PHASE | IDEAL PHASE | ||||
| STANDARD | EURO-2 | ||||
| Lower timing chain | 2-row 70 stars | 2-row 72 stars | 2-row 72 stars (DITTON) | ||
| Upper timing chain | 2-row 90 stars | 2-row 92 stars | 2-row 92 stars (DITTON) | ||
| Left chain cover gasket | 1 | ||||
| Right chain cover gasket | 1 | ||||
| Front cylinder head cover gasket | 1 | ||||
| Soundproofing gasket | 1 | 2 | |||
| Hydraulic tensioner cover gasket | 1 | 2 | |||
| Crankshaft sprocket | 1 | ||||
| Asterisk prom. drive shaft | 1 | ||||
| Asterisk prom. driven shaft | 1 | ||||
| Camshaft sprocket | 2 | 2 (split) | 2 | 2 (split) | 2 |
| Tensioner | 2 (shoes) | 2 (cast with sound) | 2 (stamping lever with ring) | ||
| Hydraulic tensioner | 2 | ||||
| Upper chain guide | 1 | ||||
| Chain stabilizer medium | 1 | ||||
| Lower chain stabilizer | 1 | ||||
| Locking plate | 1 | 1 | |||
| Water pump gasket | 1 | 1 | |||
| Passport (installation instructions) | There is | There is | There is | There is | There is |
LS406.3906625-01
The kit is designed for repairing the ZMZ-409.04 engine.
Main differences from the standard ZMZ kit
:
- Double row bushing timing chains 70/90;
- Low friction plastic shoes instead of levers with sprockets on bearings.
406.3906625-14
The kit is intended for repairing the ZMZ-409.04 engine, as an alternative to the standard ZMZ 406.3906625-01 kit.
The kit contains all the necessary gaskets.
Main differences from the standard ZMZ kit
:
- Split camshaft sprockets for precise timing;
- Double-row bushing-roller timing chains (DVRTs) 70/90 instead of standard double-row bushing chains (DVTs 06-V2) 72/92;
- Low friction plastic shoes instead of sprocket tensioners.
LS 406.3906625-02
The repair kit for the gas distribution mechanism drive STANDARD EURO-2 is designed for repair and modernization of the standard timing drive installed on ZMZ 405, 406, 409 engines and their modifications.
Main differences from the standard ZMZ kit
:
- cast tensioner arms with sprocket.
406.3906625-04
The kit is designed for repairing the ZMZ-409.04 engine; it is completely interchangeable with the standard installed ZMZ 406.3906625-01 kit.
Peculiarities
set:
- Double-row bushing timing chains 72/92 produced by JSC “DZPTs DITTON”;
- Tensioner levers with sprocket. A powerful lever bracket ensures sprocket alignment and eliminates resonance.
Timing chain marks 409 UAZ engine
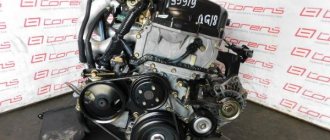
The gas distribution mechanism of the ICE 409 consists of the following parts:
Attention! If you look more closely, an experienced car owner will notice that the ZMZ 409 is structurally similar to the 406 engine in many ways. By the way, the eco-class ZMZ 409 is Euro 3. This makes it close to modern econorms for the emission of harmful gases.
As becomes clear from the list given above, the engine has two single-row chains. This is bad because single-row chains can break without warning, unlike double-row belts. Experienced mechanics get out of this situation by installing a single-row roller-link chain instead of a plate-link chain. The former rarely break before the car owner can detect traces of cracks or strong noise when the engine is running.
Once a year you should attend a preventive examination at the service center. This will save the engine from unexpected chain breaks and valve bending. The latter leads to a major overhaul of the engine.
Let's look at how the timing chain is replaced and the marks are set.
Replacing the timing drive ZMZ 409 Euro-3 UAZ Patriot. NEW 2021
Step by step repair. Installation at 8:45 marks. Replacement of chains, sprockets, hydraulic tensioners, oil seals, pumps and the rest.
- First you need to drain the coolant into a specially prepared container, then, of course, remove the radiator.
- The power steering pump drive belt and the fan pulley are dismantled.
- The drive belt for the generator and water pump is dismantled.
- The supply hose is removed, and the cylinder block cover is also removed.
- From the ZMZ-409 engine of the UAZ Patriot Euro-3 jeep, you need to remove the water pump, and then remove the crankshaft rotation frequency sensor.
- The bolted connections are unscrewed and the upper chain hydraulic tensioner cover is dismantled. After removing the cover, the hydraulic tensioner should be removed. After this fact, the hydraulic tensioner or the upper chain of the ZMZ-409 engine of the UAZ Patriot Euro-3 jeep is removed in the same way.
- Next, unscrew the 7 bolts and remove the cover when finished. With all this you should be careful, because of course you will destroy the crankshaft oil seal.
- To remove the tensioners, unscrew one bolt from the upper and lower chain devices, and then, of course, remove the products together with the sprockets.
- The next step involves dismantling the gears from the camshafts by unscrewing the mounting bolts. To remove the gears you will need to use a special puller.
- Next comes the removal of parts. For this purpose, we will use the following photo with letter designations, on the pages of which the timing mechanism of the UAZ Patriot Euro-3 jeep is depicted.
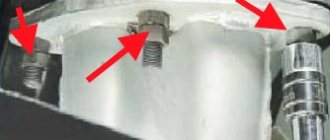
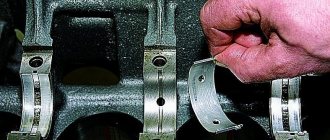
First, two bolt connections numbered 3.5 are unscrewed. After this, you need to bend plate 6, thereby freeing up access for unscrewing bolt 5. Now, of course, remove the gear, and then the chain mechanism itself, pulling it upward. The bottom element is extracted in the same way.
Replacing the timing chain
The scheme for disassembling the engine, installing timing marks and reassembling is in many ways similar to the dismantling and installation of the injection internal combustion engine of the ZMZ 406 modification. The latest engines are installed on the UAZ Patriot and Gazelle.
We very often receive questions from inexperienced car owners or those who are just starting this type of journey: “Why does the timing device and chain break so often.” Let's try to answer it.
Why does the timing chain fail?
Operation under difficult conditions, untimely change of lubricant on the 409 engine, overheating of the engine leads to the fact that the parts of the power unit quickly wear out. Filling with low-quality fuel and replacing it with counterfeit engine oil also affects wear.
It happens that manufacturer’s shortcomings cause a major overhaul of the 409 engine. But this rarely happens.
How to determine the need
The chain needs to be replaced when you notice:
Now let's move on to the replacement process.
Replacement process
In order to correctly replace the timing chain of a UAZ Patriot engine, you need to prepare the necessary tools for this matter:
In addition to the tools described above, you will need a jack and a container for draining the coolant, a protractor for installing timing marks, a star-shaped puller, and a removable nozzle. After the tools are prepared, we proceed to disassembling the engine.
All parts are carefully checked for serviceability; if chips or cracks appear, they are replaced. The rest are washed in kerosene.
After the procedure of removing and testing the functionality of the timing belt elements, its assembly begins. Attention is paid to setting the timing marks, and the crankshaft pin should fit tightly into the socket. Otherwise, it will break the part while the ZMZ 409 engine is running.
How to set timing marks on a 409 UAZ Patriot
The setting of the timing marks itself occurs after the mechanism is assembled. The chain, metal gears and other parts are pre-lubricated with motor lubricant.
First of all, the gear is pressed onto the crankshaft. This is a must. Then turn the crankshaft until the mark on it meets the mark on the cylinder block. The first cylinder should be at top dead center. The crankshaft rotates clockwise. Using the indicator, the correct location of the marks is determined.
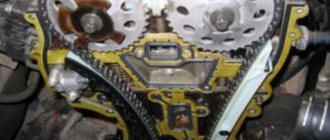
Where is the chain located
One timing chain is located at the top of the timing mechanism, the second is at the bottom. This arrangement of the timing chains on the ZMZ 409 allows for optimal operation of the power unit.
If you do not keep the tensioners and dampers clean, this will lead to the chain slipping through the teeth. In addition, after 80,000 kilometers the device tends to stretch.
How to correctly set camshafts on ZMZ 409
Greetings to all!
The recording will be very useful for those who have decided to switch from a Euro-4 timing drive with a leaf chain to some other Euro one with a wheel-roller chain. During this transition and replacement of the chain, it is MANDATORY to use adjustable camshaft sprockets, since the factory sprockets not from the Euro-4 plate chain are drilled for OTHER timing phases! ALL CHARACTERISTIC INDICATIONS ARE INDICATED IN DEGREES OF CAMSHAFT ROTATION, and not in degrees relative to the cylinder head plane!
The other day I had a chance to carry out a preventive inspection (and the owner of the car was already ready to change everything!) of the timing drive on a ZMZ-409 Euro-4 with a factory leaf chain.
The chain elongation was determined using an “eye meter” and a protractor to set the timing phases for ZMZ-405, 406, 409, etc. Having read a lot of text on the Internet about the correct phases on this engine, I still haven’t found a clear answer! After opening the valve cover, it turned out that the timing drive on this engine is in excellent condition (although the car's mileage = 90 thousand km) and it is possible to accurately determine the factory phase setting for the ZMZ-409 Euro-4. Nook HERE:
Since the chain is still slightly stretched, the readings are delayed by 1 degree!
The exhaust shaft, like other engines of the ZMZ-405,406,409 family, = 19 degrees
(+1 to the protractor readings) - this indicator agrees all over the Internet!
But the installation angle of the intake shaft is different in all sources (someone even specifically conducts experiments with turning the intake shaft further until the minimum idle flow rate according to the BC, liters/hour is obtained), but this engine has a factory chain and factory stars, so the installation is FACTORY, without any experiments! Inlet angle = 16 degrees
(+1 to protractor readings):
Thus, I was convinced in practice that the phases on ZMZ-409 Euro-4 engines differ from the phases on the rest of the family of 16-valve ZMZ gasoline engines! And you - take this important fact into account, dear UAZ drivers (and not only!)
Thank you everyone for your attention and see you again!
And again, a quick review, since during the repair process there is no time to be distracted by photographs, and there is no particular desire to dirty the phone.
Preliminary work on dismantling the attachments and removing the cylinder head valve cover has already been carried out. The front cylinder head cover must also be removed. The split sprockets must be loosened and reinstalled on the camshafts (if it was necessary to remove them from the camshaft). The chain tensioner is cocked and all chain slack has been removed. In general, all the preparatory work is completed and you can move on to the main thing - the setup itself.
Timing phases Euro 4
Timing phases Euro 4
Post by SalUral » Thu May 12, 2021 20:26
Re: Timing phases Euro 4
Post by SalUral » Thu May 12, 2021 20:46
1. December 2013, pepper and noname also from the forum 2. 13/23, consumption xx 1.6, dynamics: up to 2000 sad, after tolerable, normally spun up to 4.5 3. two-row progress 16/19, consumption at xx 1 ,3-1.4 l/h, up to 2500 seems to be normal, but then it’s worse than before.
Then 20/19, consumption xx 1.6-1.7 (without saving the logs, I threw off the cover) and it would seem that this is happiness, it spins up easily, easily pulled out the rise in 3rd gear, where before it immediately died out. But noticing that the temperature needle was creeping up (this had never happened before with the A/C), I stopped and felt the engine loosening. I came back and again (while I still have muscle memory) took off the lid in 5 minutes, all that was left was to try 16/23.
PySy. I run all the options on two ECUs, it’s a pity there’s no stock.
Timing phases Euro 4
Post by Slava61 » Thu May 12, 2021 21:09
Changed to May ones. 2011, July 54,000 km. No firmware.
Phases according to the indicator 20/19, with repeated checks. TDC coincides with the mark on the pulley. The impression is that 50 mares were added. I've never driven like this since new. I can’t say anything about consumption; there is no on-board vehicle. Shafts 252nd. Single row chain reinforced. Now at idle the engine does not shake like an epileptic, you can put a glass of champagne.
Re: Timing phases Euro 4
Post by SalUral » Fri May 20, 2021 13:51
Re: Timing phases Euro 4
Post by Alexander M » Sun May 22, 2016 03:11
Re: Timing phases Euro
Post by Pavel_Kuzminov » Sun May 22, 2016 08:47
Re: Timing phases Euro 4
Post by bugrum » Sun May 22, 2021 08:59
Re: Timing phases Euro 4
Post by Kaisn » Sun May 22, 2021 09:23
Re: Timing phases Euro 4
Posted by yariddik » Sun May 22, 2021 03:34 pm
1. 2013 firmware is native, but sewn by the officials. It is unknown why. Test drive car. 2. Idk, it burst on the highway far from home. It drove well, it did Rav4 2.0 145hp. Then the ride got worse and worse, but the traction of 1000-2000 was fine. 3. 21/18. I didn’t have a chance to drive it, two cylinders were tripping due to detonation. I set the fuel consumption to 16.5/19, as it was on the order, the car drives smoothly, from 1800 to 4000 there is even acceleration. In fourth, I began to accelerate to 140 in one breath. In fifth, I barely accelerated after 120. The ride became much better. Apparently the car was completely killed - the car twitched while accelerating. I'll deal with detonation in 1 and 4 and try 20/19. The problem naturally exists regardless of the phases, it just works at 16/19.
Re-drilling of RV stars and installation of timing belts
December 29, 2013 – KULIBINSK CLUB
Timing phases ZMZ 409, 405, 406 installation, setup, adjustment, recommendations
Kits for installing timing belts are available for sale.
using the template we drill 6 more holes
then set the crankshaft to the mark - to the position of the first cylinder TDC
I had the exhaust camshaft assembled, that is, with a pressed-on star
unscrew the yoke - (the clamping bed) of the camshaft and turn the cams of the first cylinder onto the exhaust manifold, so that the chain from the lower sprocket is tensioned, press the rv - twisting the yoke, put the protractor bar on the first cylinder - we catch 19 degrees with the necessary part of the pointer, I have a new one I set the chain to 18 degrees, the permissible parameter is 2 degrees, in the manual it’s 19... if it’s important, you can repress the sprocket in the second position of the key
The photo shows the position of the outlet up to the RV clamp:
Next we install the intake camshaft (RV)
similarly, turning the cam of the first cylinder onto the intake manifold and catching 20 degrees or relatively one degree more than the resulting exhaust angle
I set it to 19 degrees since the release was 18
We press the installed inlet ditch with a difference of one degree with yokes and, applying the re-drilled star, rotate it so that in the tension of the chain one of the 7 drilled holes is coaxial with the key on the ditch, in extreme cases (for gourmets) there is a second option for a hole on the shaft for the key, that is, you will have 14 options, just don’t drive the key deep into the ditch in advance (so that it wouldn’t be excruciatingly painful...) otherwise you won’t be able to pull it out... then install chain stabilizers and a hydraulic tensioner
It turns out this picture:
hydraulic tensioner: unscrew the hydraulic tensioner cover and a bolt in the center of the cover, insert a new one or a recharged old one, screw the cover while pressing the tensioner and insert a screwdriver and hit the tensioner, opening it inside...
yoke: numbers are written on the yokes
intake: 1-2-3-4, the number is placed on the side of the intake manifold!
exhaust: 5-6-7-8, number on the exhaust manifold side!
do not confuse their places, if you leave the old ones, then put them as they were!
if the RV is new, then be sure to oil the yoke and neck of the RV
if the front cover is new, then the pressure in the oil supply system will be INSUFFICIENT; to correct it, the radius of the beds of the ditch is rubbed in with sandpaper until the front cover is fully pressed!
See you next time on air!
author of the article: alexeyNN
also read the benefits on our website:
blog post about the injector: Setting the timing using a protractor
or topic on the forum: Installation of timing belts (ZMZ 406 - 409 engines)
Similar articles:
TECHNICAL INSTRUCTIONS → flushing IAC (ZMZ 409 engine)
TECHNICAL INSTRUCTIONS → How to install a transfer case on a UAZ gearbox
TECHNICAL INSTRUCTIONS → Octane corrector “IMPULSE”
TECHNICAL INSTRUCTIONS → A.N. Tikhomirov CARBURETTORS K-126, K-135 FOR GAS PAZ CARS
Discuss on the forum Tags: template for stars, phases ZMZ 409 406 405, timing phases, installation, protractor, adjustment, camshafts, tuning, UAZ gas cars Rating: +2 Votes: 2 Comments (0) No comments. Yours will be the first!