Peugeot 308 2012, 120 l. With. — consumables
Cars for sale
Peugeot 308, 2011
Peugeot 308, 2010
Peugeot 308, 2008
Peugeot 308, 2012
Comments 15
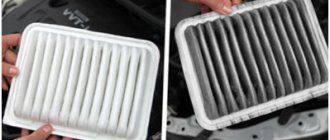
If you know the direction of flow entering the filter, then you can focus on the location of the edges of the accordion. In the photo, the upper part of the filter should be installed in the opposite direction of the air flow, so that it “expands” and dust particles do not penetrate; if you install it the other way around, the result will be an accordion that will shrink and allow dust to pass along the edges of the filter.
By the way, there are arrows on the filter indicating the direction of air flow. They are stuffed in front of the numbers 96.
Well, in general, this is a chevron - the emblem of Citroen)) Peugeot / Citroen are one concert, c4 and 308 are almost identical technically - the filters are the same.
Well, it's a pity that these are not arrows. It would be better if there were arrows instead of emblems. Or maybe it’s two in one, a chevron and a flow direction arrow.
I installed a lot of filters (they all had arrows) and they were all installed exactly as this emblem was drawn.
there is no fundamental difference if there are no marks on the filter.
There should be an arrow drawn on both sides of the filter, place it in the downward direction, as the air flows from above (from the street) down (into the cabin)
there is no arrow, alas =) today I changed the filter, I realized that I was a loser - there used to be an original carbon filter, and so there are two words on it: up, down... and I somehow overlooked them when installing it. In general, he stood on the wrong side for me. But I installed the regular (not carbon) original today and it doesn’t even have these words on it, but I concluded that it needs to be installed in letters not upside down, because a) carbon is correctly placed like this b) the structure of the filter fibers on both sides is everything is still not the same (on the lower edge the threads are more clearly visible, on the upper it is an almost uniform surface) and the threads were on the coal bottom
Like this. Thanks everyone for the advice!
By the way, I watched a video on YouTube about replacing the filter, but on C4 (they seem to be identical) and there the filter was placed upside down!
Try the video on YouTube to see how the filter is changed. Maybe it will be visible there
There should be a cutout in the middle of the filter on one side, like a guide. That's how I put it.
The filter is in front of you in the photo - personally, I don’t see any cutouts... PS: I looked at your report on replacing everything and saw that your car really has grooves at the top and bottom, which I don’t have... I have a restyle and just a rectangular niche without any grooves
And on the other hand?
The filter is in front of you in the photo - personally, I don’t see any cutouts... PS: I looked at your report on replacing everything and saw that your car really has grooves at the top and bottom, which I don’t have... I have a restyle and just a rectangular niche without any grooves
Look at my blog, there is a photo of the filter. It may of course depend on the manufacturer.
I put the inscriptions upside down like this. I don't know why the factory one was like that))
I installed the Boshevsky one, it has top and bottom edges with cutouts that coincide with the opening for the filter, there the text with the filter inserted was like in your photo) it’s logical when the text is readable.
This is not the first time I’ve heard about these edges, but what for are they? The opening for the filter is quite rectangular, the filter is shoved in there this way and that...
Source
Location and replacement frequency
Filter element installation location
Despite differences in filter designs
do not differ too much from each other
in appearance . Although the installation location of the filter element varies in cars of different brands. The most common options are:
- under the main panel, behind the glove compartment, opposite the passenger seat;
- in the space under the hood of the car on the driver's side;
- directly next to the steering column, above the pedals.
Depending on the location of the filter device
(this is influenced by the vehicle model), the procedure for replacing it differs.
Therefore, when it needs to be replaced, it is better to seek the services of a car service center. Otherwise, there are certain risks of deforming the edge or frame of the filter device, not fitting the device tightly enough into the socket, or damaging the seat of the filter element. Filter location
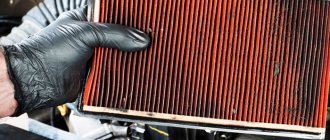
During operation and constant work, debris accumulates in the corrugated element of the filter
, this leads to its incorrect operation and requires replacement of this device. The timing of filter replacement is indicated in the vehicle operational documentation and, as a rule, coincides with the scheduled maintenance period.
Note that sometimes replacing the air filter is required much more often. This is acceptable when the vehicle is used in conditions of excessive gas/dust pollution. Reducing the operating period of the filter element is recommended when:
- continuous movement by car on a dirt road;
- constant trips during the flowering period of plants, which shed a lot of petals and fluff;
- traveling in big cities where traffic congestion is common.
In addition, the quality of the device itself also influences the frequency of replacement. While a high-quality filter element from a trusted manufacturer will last 15-30 thousand km, a counterfeit device may not last even 50% of the period stated in the regulations.
Replacing the filter
The fact that it is time to change the filter device can be determined by some indirect signs:
- The air supplied to the cabin has an unpleasant odor.
- When the fan is turned on, dust appears.
- The strength of the air flow during blowing has decreased, the air conditioner/stove works worse.
- The windows in the car began to fog up heavily due to the high humidity.
Failure to replace the filter device on time leads to the accumulation of dirt, which favors the development of fungus, mold and bacteria, which intensively spread through the system ventilation channels. Under such conditions, the device turns from an air purifying element into a source of spread of various diseases. You also need to understand that vacuuming, washing or washing does not restore the properties of the filter materials.
Cabin filter: a little history
The cabin cleaning system appeared much later than the air filter in its classic form. The number of vehicles increased rapidly, and the first traffic jams formed. Man was forced to come up with a way to protect himself from the negative effects of toxic substances.
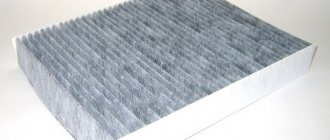
The first paper cleaner was only 5.0 microns thick. The base was powerless against most toxins and gases. In the 90s, the purifiers were modernized. They looked like powerful, functional units and had activated carbon added to absorb air in the cabin.
We’ll look further at how to change the filter and what tools are needed for this.
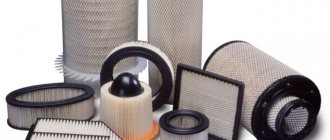
Types of cabin filters
The structure and design of dust filters allow them to clean the surface from impurities, dirt, soot, and allergens. The base is paper or a type of synthetic fiber. The filter traps particles no larger than 1.0 microns. Anything larger penetrates inside.
Five years ago, synthetic-based elements were improved. How has the cabin filter become better? It began to attract dust particles at the molecular level.
Carbon filters are called universal, but they also have difficulty retaining carbon monoxide. If the concentration is high, they are also powerless. The basis is a porous substance – activated carbon. The minimum granule size is 0.5 microns.
There are different types of paper cleaners, but they do not differ significantly from the classic paper and charcoal options.
Replacing the filter installed under the steering column
Replacing and installing a cabin filter on a Nissan Qashqai
Next, we will describe the operations for removing and replacing the cabin filter installed near the steering column. An example would be the Nissan Qashqai.
The only tool you need is a long screwdriver. To access the filter, you will need to remove the side decorative trim on the center tunnel under the front panel on the driver's side. It is held there by clips, and to dismantle it, you just need to pry off the cover with a screwdriver.
The box in which the filter is installed is located behind the accelerator pedal.
To get to the filter, you need to remove the cover from the box, secured with locking latches. To do this, pry up the lower latch with a screwdriver and remove the cover.
Extraction is carried out after preliminary squeezing it with your fingers. To make it easier to install a new filter, it is compressed on the sides, having previously found out which side it should be installed. After placing the filter, you need to straighten it by pressing the end with your fingers.
Next, the lid is placed and secured with latches, and after which the decorative trim is installed in place.
Where is the filter located?
The designs of air ducts, air intake systems, and vehicle cleaning elements vary. In recent years, there has been a tendency to standardize the shapes of units, including ventilation systems. A rectangular frame made of durable polymer material is a universal option.
A typical location is behind the glove box wall on the right side of the console. On some models there is a protective filter in the engine compartment, under the windshield, on the left side of the dashboard, at the rear of the engine.
Here's where the cabin air filter is located on popular models:
Video
This video shows in detail how to replace the cabin filter on the “ten”, “eleventh”, “twelfth” models.
A universal cabin filter that is very cheap.
Machine for the production of cabin and air filters. Like a business idea.
Issues discussed in the material:
- Why do you need a cabin filter in a car?
- Where is the cabin filter located in a car?
- What types of cabin filters are there in a car?
- How often should you change the cabin filter in a car?
- How to understand that the cabin filter in a car needs to be replaced
The air filter, which is located in the cabin, is equipped with many modern cars. Its main purpose is to clean the air entering the cabin through the heating, ventilation and air conditioning system. People with allergies are especially sensitive to air quality, so the ability of a filter to trap dust, pollen and other small particles is important for them. Since this element ensures the comfort of people when traveling, it is necessary to take care of the timely replacement of the car's cabin filter.
How to change the cabin filter?
Cleaning elements can be replaced yourself or in a workshop. To replace it yourself, you need minimal machine maintenance skills. You should not install components yourself on vehicles with a valid manufacturer’s warranty. With unprofessional intervention, there is a high probability of violation of the installation technology - because of this, the car will “fly off” the warranty. To reduce risks, it is better to entrust the work to service station professionals.
If you are determined to act on your own, but do not know how to remove the filter, read the instructions, technical recommendations, and watch video tutorials.
How often should you change the cabin filter?
Buy only original spare parts.
The owner himself should be interested in changing the filter in a timely manner, because we are talking about his health and comfort. If the car is driven in special conditions, when the level of gas and dust exceeds the permissible limits, reduce the replacement interval by a third. The manufacturer allows you to independently adjust the timing of replacement, but without causing harm to the car.
Source
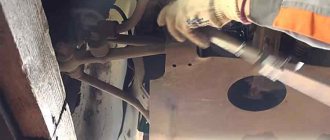
Rules for installing a carbon cabin filter
If I don't see an object, it means it doesn't exist. This rule is widely used by us in ordinary conditions, but when we talk about the microcosm, then rules that contradict common sense come into force. Many people, seeing nothing in the inhaled air except perhaps dust particles (and even then under certain lighting conditions), are confident that it does not contain anything hazardous to health. And they are deeply mistaken. We will not talk about strains of influenza, cholera, African plague and other similar things - today it is truly exotic. But what is missing on the streets of a big city is a whole spectrum of microparticles that are very clearly visible only with multiple magnification. We are talking about ordinary dust, rubber crumbs that get into the air from car tires, tiny particles of asbestos peeled off from brake pads, heavy metals, soot, high-molecular hydrocarbons and carbon monoxide - products of combustion of gasoline or diesel fuel. Their concentration on city roads exceeds all imaginable standards, and it is naive to believe that if you inhale this explosive mixture every day, you will not feel any consequences for the body. It is even more irresponsible to think that while inside the car, you are reliably protected from this cocktail. Everything is exactly the opposite - it is calculated that in the cabin of a vehicle that is not equipped with a filter, the concentration of harmful substances exceeds their amount on a city highway by 25 times!
Installing a carbon cabin filter.
Why is a cabin filter needed in a car?
Many drivers underestimate the importance of the element that filters the air that enters the car interior. According to studies, the cabin filter is capable of retaining up to 99.5% of harmful impurities contained in the incoming air. In the absence of a filter element, the driver and passengers have to breathe fuel combustion products, which contain: soot, oxides of nitrogen, sulfur and carbon, heavy metals, aldehydes and more than 200 other substances harmful to the body.
According to research by environmental monitoring services, in large cities, air pollution on highways exceeds established standards by 20-40 times. Spending several hours a day in a car, the driver runs the risk of developing chronic diseases of the respiratory tract and nervous system. In addition to exposure to toxic substances, microparticles of dust from tires, soot, asphalt and other things cause harm to the driver’s respiratory organs.
In addition to preserving the health of the driver, the cabin filter performs the task of slowing down the aging of the car. By preventing dust and fumes from entering the cabin, the filter element helps prevent clouding of the glass.
Purpose of the cabin filter
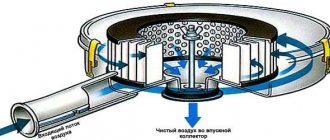
Fortunately, on most cars of the latest generations such protection is present in the form of a cabin filter, which can be installed in different places, but most often - in front of the stove radiator. In this case, the air is heated after cleaning and enters the cabin, distributed through the air ducts. This is the most successful design solution, since if the filter were located after the radiator, the air would have time to cool. In addition, in this case the radiator does not become dirty inside, which significantly increases its service life. In addition to small mechanical impurities such as plant pollen and dust particles, SF also traps volatile substances, as well as high-molecular gases, and models with a layer of activated carbon also resist the penetration of unpleasant odors into the cabin.
Conclusions on replacing the cabin filter of a car
It is worth remembering that different models have filters with different configurations, but with the same filler. Therefore, there is no need to overpay for branded filters. The locations are also different. The filter can be located under the front glass, behind the panel, inside the glove compartment or in a special plastic box under the hood.
For bacteria, a dirty filter creates a favorable environment and the air becomes doubly dangerous. Constantly replacing the filter not only protects the health of passengers, but also saves money on replacing or repairing the air conditioner.
Cabin filter in the engine compartment of a car.
Types of cabin filters
The principle of operation of any filter installation is unchanged: the working element, standing in the path of the flow of untreated air, thanks to its fine-mesh structure, retains particles of a certain size, allowing air to pass freely. Modern automobile filters are capable of retaining particles with a size of about 0.1 microns, which is enough to filter out almost any mechanical impurities. The classification of cabin filters by filtration method involves dividing them into two groups: mechanical and adsorption. The first are ordinary paper/synthetic corrugated products, which have a certain size of cells between adjacent fibers through which air passes but dust does not. Adsorption-type SFs, in addition to the usual filter element, have a layer of activated carbon, the principle of operation of which is based on another chemical phenomenon - the ability to absorb other substances, including volatile compounds and gases. In other words, they also absorb unpleasant odors, which is an important factor in the conditions of a modern metropolis.
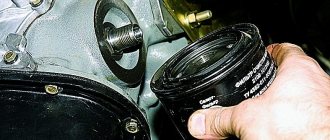
How to install a carbon cabin filter correctly
In most cases, the procedure for replacing the filter element is not difficult, since it is located in the area of the stove radiator. But even if access to the cabin filter is easy (in many car models it is located either directly in the glove box or behind the glove compartment), this does not mean that installing a new one in place of a clogged filter will not be difficult. The fact is that in this case it is necessary to observe the required orientation of the filter element. This is especially important when using a carbon filter, due to the reasons described above. It’s good if the design of the SF does not allow it to be installed outside the rules, but this rarely happens. Rectangular filter cartridges (also called cartridges) usually have symmetry that allows them to be installed incorrectly. As a rule, original products have arrows indicating the correct direction of air flow (the tip of the arrow is always directed towards the deflector, that is, towards the passenger compartment).
But such designations may not exist. In this case, you can use a universal rule that applies only to carbon filters: the dark side (with a carbon layer) of the filter is placed against the air duct that provides air flow from the outside. With conventional dust filters, both sides are the same, but here there is no such strictness regarding the installation of the device, so a mistake will not have such unpleasant consequences.
Source
Replacing the filter installed behind the glove box
An example of removing a cabin filter installed inside the front panel will be the Toyota Corolla, since that is where it is installed.
This is how to replace a filter in a Toyota Corolla
You don't need any tools; all operations are done by hand. To access the box in which the filter is installed, you will need to lower the glove box down. To do this, after opening it, you need to press special latches on the sides, after which the box frame will lower down.
The filter is located in its own box and covered with a lid with latches. You need to unclip these latches and remove the cover. Then you need to press the edges of the filter with your fingers to compress it a little for easy removal and pull it towards you.
If severe contamination is detected, it is replaced. There is a mark on the end of the filter indicating its correct installation. The new filter also needs to be compressed a little and installed in place. Then you should press the end of the filter with your fingers so that it fits and straightens correctly. Next, the filter cover is put in place, after which the glove box is put in place by reinstalling the latches.