How to make your own top
If you have the skin, patience and perseverance, then you can make a top with your own hands; an example of production is shown in the video.
The basis is explained in the video, the types of weaving are named, and specific examples of leather weaving can be easily found on YouTube.
The length of the top is from 50 to 100 cm; in my opinion, it is most optimal to choose the length of an outstretched arm - such a top fits well along the belt and allows you to keep the aggressor out of close combat. The 50 cm model is convenient to wear folded in a semicircle in the inner pocket of a jacket. From a carrying point of view, this is more convenient, but it makes it impossible to quickly take it out and use it.
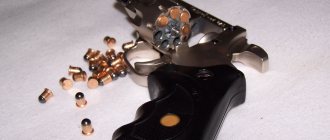
If desired, the ball can be strengthened by putting a piece of lead weighing 20-35 grams into the cue ball. Previously, a bullet was placed there, and the calibers of that time were no match for modern ones. But with a weighted cue ball, the ball turns into a percussion shotgun with all the ensuing consequences of the criminal code.
More about survivalist weapons:
Husband and Father
Over time, Scarlotti tried to change again and settled in Ohio. He married, had a son, and Scarlotti continued to live a difficult life without sufficient means of support. He decided to complete the last task in New York in order to get enough money. When Scarlotti arrived in New York, a killer nicknamed Bullet attacked him in a hotel, as a result of which Scarlotti ended up in the hospital.
After Scarlotti's wife, Trudy, agreed to take Scarlotti's costume and equipment, she was killed by a mercenary nicknamed Shatterhead. Scarlotti discovered Trudy's body in his hotel room, where Bullet mockingly described the torment Reckless had caused Trudy. Scarlotti killed Bullet and later tracked down Reckless and destroyed him. Blacklash will also lose custody of his son.
Scourges in Antiquity
The surviving works of Greek historians bring to us interesting facts about the use of whips. In addition to using whips to punish offending slaves, the Greeks, noticing how the Scythians skillfully wielded arapniks, hired them as keepers of order. Several wild Scythians with whips quickly dispersed the crowd, which was tens of times larger than them. At the same time, the whip was a more humane weapon than the modern batons of riot police.
The battle tactics of the nomadic tribes of that era looked like this:
- At first, the opponents fired at each other with bows;
- Then the spears went into battle;
- Swords and axes were used in close combat (daggers were used as a last resort).
Since the swords of those times were short, where it was impossible to turn with a spear, whips were used. The blows of the whip affected not so much the enemy as the enemy horses. Sharp blows of the whip not only knocked out eyes, but also tore clothes and skin. It was the whips that influenced the development of full Sarmatian armor, since blows from flexible weapons were unpredictable, and it was not always possible to hide from them behind a shield. Famous warriors of that era fought off arrows and darts with arapik. If at long distances the warriors of the steppes used lassos, then at short distances they were successfully replaced by whips. With a deft blow one could snatch an ax or sword from the enemy’s hands. Some warriors became so familiar with whips that they could use them as a sling.
Description [edit | edit code ]
The whip was most often made by tightly weaving leather straps, with a bag at the end. Sometimes a weight was placed in the bag (“slap”). One of the varieties of lashes among the Kalmyks, “tashmg,” was made not by weaving narrow leather straps, but by stitching several relatively wide strips of rawhide with a thin leather cord-thread. Instead of a slap, the whip could have several tips for the same purpose: to “dissipate” the excess energy of the tip of the whip, which alone could tear the horse’s skin if hit too hard. Sometimes a lead weight or a bullet was sewn into the slap out of cheekiness (provocative behavior). In this case, the whip had to be used more carefully, because the force of influence of the weighted tip naturally increased.
There are several types of whips.
Kalmyk whip
The lashes of different tribal Kalmyk clans had design differences. Usually, all Kalmyk whips had a flexible leather part wound around the shaft from the side. Some Kalmyk whips had a smooth, almost unbending leather whip. The Kalmyk whip “malya” was closest in design to the Don whip and often differed only in the way it was attached to the shaft. The Kalmyk whip “tashmg” had a special difference: the leather whip was not woven, but was made by stitching several layers of relatively wide strips of rawhide with a thinner strap. Kalmyks skillfully used whips for horseback hunting of wolves and hare, as well as against thieves.
Kuban whip
The Kuban whip has a relatively short handle braided with leather, which smoothly turns into the weave of the whip itself.
Statutory whip
The Russian Imperial Army used whips made in accordance with special requirements approved by orders.
The volchatka is a shortened version of the whip, but it does not have a pronounced handle. In terms of weaving, it is denser than a whip; in modern production, a metal cable is woven into the whip in the center, which gives it elasticity and strength.
The wolf cub is also known as the wolf-cat, but now this name is rarely used. Initially, wolves were intended specifically for beating a wolf from a horse’s saddle.
In the current edition of the Criminal Code, the volchatka is not a bladed weapon (it does not have a percussion-shot effect) and does not belong to special equipment. So you can carry it with you absolutely legally.
Despite the lack of a crushing effect, a blow with a wolf is very painful. Applying a light slap from a half-swing, without investing strength and body weight, is so painful that it paralyzes the muscles. A blow with full force can cause a painful shock. You probably read it in history books - screw it to death? So, a dozen blows from the lupus at full force can easily send you to the next world, with no fractures.
A blow from a baton is similar to a blow from a rubber baton, only more painful. A stray garage dog the size of a Rottweiler, having received a mid-range blow to the body, forgot its aggressive intentions and walked away with a squeal and on half-bent legs.
The small size of the wool allows you to carry it in a large side pocket of a jacket, you can pass it through belt loops along the belt or tuck it into the belt inside your pants. The most convenient way is to encircle the top along the belt. Belt loops hold the top and, at the same time, do not interfere with its removal. Pulling out the top completely replaces the swing and you can hit right from the waist.
Those who like to look for a cigarette in the evening and at night, having grabbed the thighs with a half-swing, lost their balance and did not really try to find it. So, as a self-defense item, the wolf cub is convenient because it does not require special skills to use; even with a stick, it is more difficult to work with.
DIY shepherd's whip
Rice. 1. Economical cutting of a piece of rawhide
During the Great Patriotic War, I had to weave whips for collective farms, probably to replace oats so that draft animals would perform their duties more diligently. One day a shepherd asked me to weave a whip for him. At the same time, he explained that the braided part of the whip depends on the height of the shepherd, that is, when the whip is thrown over the shoulder of its owner, the braided part of the whip should not drag on the ground. The length of the whip is approximately 40...45 cm. The shepherd also explained that with an elongated whip it is more convenient to send the “whip” forward, as he called the non-braided part of the whip, but to carry out such a send of the “whip” of a whip with a shortened whip requires more skill. However, I cannot confirm that all this information is generally accepted.
The whip is woven from rawhide, that is, from untanned leather soaked in fat. It can consist of one, two or more braided knees and, of course, a “whip”. The number of knees and the length of each of them depend on the size of the pieces of rawhide available. A whip with several knees looks nicer.
Uncover . Work on the whip begins with cutting out the blank for the lower knee, which is advisable to weave from strips 4...6 mm wide, but you can weave a knee from five or more strips. Of course, long straight strips are more convenient for weaving. However, this requires pieces of rawhide of appropriate sizes. But these are difficult to find. Therefore, one has to contrive to obtain long pieces from relatively small pieces of leather, cutting, for example, strips in a spiral. This is not a problem, since the slight curvature of the strips (with a radius of at least 20 mm) does not significantly affect the quality of the weaving. The narrower the strip and the thicker the raw material, the smaller the radius of curvature can be; in addition, when tensioned, the strips are aligned.
Rice. 2. The sequence of operations when connecting strips: a - the ends of the strips to be connected are cut off; b - a cut is made in the center of the folded strips; c - pulling the ends of the strips through the cuts; g - connection point
When starting to cut the blank for weaving a knee, mark a strip on a piece of rawhide with a width equal to the total width of all the strips from which the knee will be formed. Next, mark the required number of equal-width strips on this strip, departing from the end of the strip by 5...10 cm (this indentation will be needed to attach the “whip”). In Fig. Figure 1 shows not the best, but the most economical method for cutting a piece of rawhide of this shape. Of course, as mentioned above, it is better to have a wide and long piece of rawhide. I also note that if the size of the rawhide is insufficient to obtain a workpiece that provides the required length of the strips, the latter can be composed of several segments. When weaving, the junctions of the segments should not be located opposite each other. The stripes are made the same in width and thickness. The method of connecting them is shown in Fig. 2. Weaving the lower knee. For convenience of weaving, first of all, slightly spread in different directions (left and right) by an equal number of strips, after which, alternately, taking the strips from the left and right, move them in the direction of the arrow, as shown in Fig. 3, a...d. In Fig. 3d shows that all the strips have returned to their original position, so all operations will have to be repeated. During the weaving process, make sure that the strips lie relatively evenly and symmetrically, and do not twist. As the knee is formed, it is gradually thickened. To do this, a cone-shaped liner is inserted into the braid, either from the same rawhide or from another suitable material, for example, twine soaked in fat, woven into a cone. They stop increasing the diameter of the knee approximately 5 cm before the ring loop, after which weaving continues without an insert on a section 8 cm long. When finishing work on the knee, thread the section without the liner into the connecting ring, bend it so that the ring dangles freely in the resulting loop, then begin to braid the remaining part of the knee without the liner in the same way, as shown in Fig. 3, e. That's it, the lower knee is almost finished, all that remains is to fasten the protruding ends of the strips by dragging them between the woven strips on the thickening, trim the ends and cut them in the form of a fringe. If desired, you can additionally insert several strips into the attachment point to make the brush fuller. In order to roughly calculate the length of the strips required for the end of the knee, I recommend that in the initial period of weaving, determine their “consumption” for 8 cm of the area without a liner and for 5 cm of the knee area without thickening, adding a little to form the tassel.
Rice. 3. Weaving the lower knee in four stripes: a...d - weaving sequence; e - loop formation
Weaving subsequent knees . When weaving successive knees, it is necessary to take into account that each subsequent knee should be a little thicker (at least not thinner) than the previous one, which is why they are woven not from four, but from six or more strips. It is clear that you can also get thicker elbows by increasing the width of the strips and the diameter of the liner. By the way, a weave of six or more stripes looks much more attractive, especially if the weave is made of eight stripes, as shown in Fig. 4a, but such weaving requires a lot of skill and attention. It is much easier to weave a knee of six or eight strips in a different way (Fig. 4, b and c). If we compare the image in the last figure with the image in Fig. 3, it becomes clear that weaving with six and eight stripes is not much different from weaving with four stripes. (I had never weaved whips and other things, so it was difficult for me to understand the weaving system itself, for example, in the same four stripes. But it turned out to be extremely simple. For myself, I formulated it like this: the left stripe is in front of the right, the right one is in front left. — Editor's note.)
There are several ways to start weaving the second and subsequent knees, but I will give only two that were used at that time. The first is when it is possible to prepare long strips, the second is when there are no particularly long strips available.
Rice. 4. Weaving in eight stripes (a and b) and six stripes (c)
In the first case, they take four long strips and begin to weave them in the above-mentioned way from the middle, forming a section of such length that would be enough to form a loop. A ring woven into the previous knee is put on this section, the woven part is bent into a loop and the weaving now continues with eight stripes (four stripes at one end of the loop, four at the other). If you are going to weave the next leg into six strips, you need to take three long strips, fold them into a bun and add a fourth short one to them, placing it in the middle of the bun. Also, as in the previous case, we begin to weave four strips from the middle, obtaining an area for forming a loop. Of course, the length of the fourth strip should be enough for the entire loop. Subsequently, the woven section is bent into a loop, the short ends of the fourth strip are used as liners, and the remaining six strips are used to weave the knee. In both cases, if it is necessary to increase the diameter of the knee, an insert is used.
Rice. 5. Method of extending the “whip”: a – spliced parts; b - node
In the second case, four strips are folded together, a length is measured from the edge of the bundle, which should be enough to weave a knee, and from the remaining part a section for a ring is woven. If the length of the strips is even shorter, then a 5-centimeter section for a loop is formed at the end of the bundle, and a ring woven into the previous bend is put on it. In both (first) cases, the curved section for the ring is extended with two or four strips.
Rice. 6. This is how the whip blank is polished
When finishing weaving a knee, be sure to ensure that the knee before the final loop is not thinner than the rest of the part, and that the starting loop of the next knee is no thinner than the previous one. At the end of the conversation about weaving knees, I would like to remind you that the liners should be flexible and not have joints.
Whip . A “whip” made of a strip of leather (raw meat) is attached to the last leg of the whip, which tapers towards the end to 5...6 mm as it moves away from the wicker part. A “whip” can be composed of several segments. The preparation of segments for splicing and the method of connecting them are shown in Fig. 5.
The total length of the belt part of the whip, according to that shepherd, should be within 3.5...5 m.
Rice. 7. Loop of the whip (a) and recesses on the whip: 1 – recess for the belt; 2 – recess for the hinge
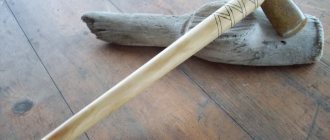
Knutovishche . It doesn’t seem worth writing about the whip, just take a suitable stick, attach the belt part of the whip to it and you’re done. But if the whip is beautifully designed, it will give the whip a more finished appearance. So, it is advisable to turn the above-mentioned “stick” on a lathe, and for those who do not have such an opportunity, I recommend using a plane to level and round as much as possible a wooden blank suitable for this purpose and process it with emery cloth, as shown in Fig. 6. To protect the wood from moisture and to avoid the formation of cracks, the workpiece is soaked in vegetable (sunflower) oil, heated several times over high heat until oil bubbles appear abundantly from the wood, wiped, and dried well.
Next, a strip measuring approximately 200×30 mm is cut out of thick rawhide, both long edges of the strip are bent towards the longitudinal axial, obtaining a “profile” like a flattened letter C (Fig. 7, a). Having pulled the strip into the ring of the last knee, it is bent in half, with one bent end slightly longer than the other (see Fig. 7, a). According to the size of the strip, a recess is made in the whip handle (Fig. 7, b), a belt part is installed in it and it is nailed to the whip handle with nails or screwed with screws.
Rice. 8. Simple winding of the whip
All that remains is to cut a strap 5...6 mm wide for winding the whip at the place where the belt part is attached, make a recess on the whip for the strap, deepening it by 2/3 of the thickness of the strap, fasten the strap with a nail and wrap it around a part of the whip 10...11 cm long. You can simply position turns row to row (Fig. 8), but it is better to make a winding with a ridge, as shown in Fig. 9. In this case, you need to lay the rows of winding as close to each other as possible and ensure that the comb formed when weaving the belt is even. It is also advisable to attach a “handcuff strap” to the end of the whip (Fig. 10).
Rice. 9. Curly winding of the whip (with a comb): a - execution diagram; b - view from the seam side
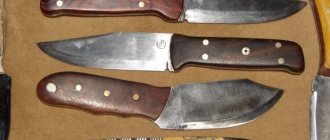
Rice. 10. Finished whip
Use of the whip among nomadic peoples
In the legends and tales of nomadic peoples, whips are constantly mentioned. Arapniks and whips were used by hunters and shepherds. The warriors used the whip. The “naked fight” was very popular among the Kyrgyz, when naked riders with whips tried to knock each other out of the saddle. Everyone is divided into teams and, as in a real battle, they help each other. The use of the whip taught Kyrgyz warriors the ability to fight with any available object. The Chinese in the second century BC experienced the lashes of the Kirghiz.
The steppe warriors developed a system of whip fighting, in which the emphasis was placed on striking pressure points. Moreover, the blows were applied not only with the whip itself, but also with the handle. In folklore, there is often a special blow to the head, from which “the head flew off the shoulders.” It’s difficult to say now whether this is true or not, but an experienced shepherd even today can break a wolf’s back with one blow of his whip.
Whip and its varieties
Subsequently, the combat whip evolved into the whip and arapnik. The most popular variety of arapnik in our time is the whip. The appearance of this name is associated with the word “naga”, which means snake. There were many types of whips, each master added some of his own features. These whips are called differently, depending on the place of manufacture.
- Don whip;
- Kuban whip;
- Ural whip;
- Arapnik;
- Volchatka;
- Tatar whip;
- Belt whip.
The Cossacks, whose martial art is the heritage of the steppe warriors, often used the whip in battle. Just don’t rely on the words of some modern “masters” of Cossack combat, who claim that the whip was a super weapon, and a Cossack with it could easily kill five people. In battle, the whip was used as a last resort, when all the weapons were broken or lost. Basically, shocking blows to the face were applied with a whip in order to break through and gallop away. There were virtuosos who could pull an opponent off a horse with a whip or inflict mortal wounds, but these are isolated cases. And why study whip fighting when the Cossack had a rifle, a saber, a pike and, in extreme cases, a dagger? The whip was used for corporal punishment, and it was a symbol of the power of a married Cossack.
Names and applications
In Rus' (in Russia) the following were used[7]:
- The coachman's whip is a belt one, on a long whip-shape, with a handle, for putting on the hand;
- The executioner's whip - replaced by a cat, a three-tailed lash, also abolished, had a rawhide, variable end;
- A whip is a long whip, for a German harness: the coachman drives the four-handed whip;
- Shepherd's scourge, flapper
,
viten
; - Hunting whip, for whipping, arapnik;
- Povolochnya
- a whip when plowing, which is dragged behind the plow; - The chaser
is a simple, peasant
whip
; - Puga, batog - a whip for urging oxen;
- Whip, kamcha, kanchuk - a short, thick and smooth Cossack whip, sometimes with a slap or a blade;
- A wolf whip is a thick whip, sometimes with a bullet woven into the tip.
Instrument of corporal punishment
Throughout almost its entire history, the whip has also been used as a powerful instrument of punishment, and in this capacity it is used in a number of states and countries even in our time. The punishment was carried out very slowly and required a lot of effort from the performer. According to G.K. Kotoshikhin, “in a combat hour there are 30 or 40 strikes,” and according to the testimony of Count N.S. Mordvinov, dating back to the 19th century, “20 strikes require a whole hour.” The whip was also used as an instrument of torture: the defendant, tied by the hands, was pulled up into the air on the rack on a rope and in this position received blows with the whip. The fatal outcome of punishment by whipping was quite common; All Russian and foreign writers of both the 17th century and the later era unanimously testify to this. According to Prince Shcherbatov [specify link (already 1049 days)], almost all those punished with a whip die either during the punishment itself, or after that, “some of them are in the most severe suffering than beheading, or the gallows, or even quintupleting itself.”
The severity of punishment with a whip depended not so much on the number of blows, but on their strength and method of application. One executioner confessed to Howard that with three blows of the whip he could cause death, penetrating to the lungs. There were examples, says Jacob (1818), that the executioner broke the spine with the first three blows, and the criminal died on the spot; on the contrary, there were examples that 100 and even 300 blows did not cause noticeable harm to the health of the criminal. Thus, Elizabeth Petrovna’s abolition of the death penalty and its replacement with punishment by the whip actually came down to the establishment of a qualified execution instead of a simple one; There are even indications that such a frequent expression “beat the whip mercilessly” was understood by the 18th century performers as an order to mark the criminal to death. In the old days, to heal wounds from a whip, the warm skin of a freshly killed sheep was put on the back of the punished person (17th-century medical book, Olearius).
Punishment with a whip is already mentioned in the Code of Laws of 1497, but it reached particular popularity in the 17th century, in the terminology of which it was also called “cruel punishment” and “trade execution.” According to the Code of 1649, most criminal acts, even the most minor ones, entailed punishment with a whip, either separately or in combination with other punishments. Later decrees of the 17th century expand the use of the whip to extreme limits, assigning it for work on Sundays (1668), for begging (1691), for throwing manure and any droppings into the street or accumulating against yards (in Moscow) (decrees of 1686, 1688 and 1699).
In Moscow, charioteers and footmen for driving fast around the city were flogged by the police with “cats” - belt whips with steel claws[8]
Further expansion of the scope of application of the whip was the result of the abolition of the death penalty under Elizaveta Petrovna. Punishment with a whip was accompanied by cutting out the nostrils, branding and exile; in those cases when, since 1753, it replaced the death penalty, this was also accompanied by hanging or placing the head on the block. The Code of Laws of 1832 and 1842, according to which punishment by the whip was an additional punishment to exile in hard labor, significantly narrowed the scope of the whip, leaving it only for those crimes that before Elizabeth Petrovna entailed the death penalty, in all other cases replacing his whips.
The number of blows with a whip was never determined by law, which in the 17th century distinguished only between simple and “merciless” beatings and only for torture determined the maximum number of blows at 150 (a boyar sentence of 1673, which, however, was not observed in practice); in the 18th and 19th centuries. this number reached 400 or more. In the 17th century, the number of blows was not determined even in the judge’s verdict, but was left to the consideration of the performers; according to Prince Shcherbatov, even in the 18th century, punishment with a whip was administered “without counting.” The Code of Laws prescribed that the court sentence should indicate exactly the number of blows with a whip, in accordance with the guilt, but no limits were placed on judicial arbitrariness.
The issue of abolishing the whip was raised by Emperor Alexander I, who established a special committee in Moscow to discuss it; the latter was declared by the Highest that “punishment with the whip, being an inhuman cruelty, the intensification of which depends on the arbitrariness of the executioner, should be abolished.” The committee also spoke out in this sense, but the matter ended only with a decree of 1817 on the abolition of cutting out the nostrils, while the destruction of the whip was postponed until the publication of a new Criminal Code, since they feared that the announcement of this in the form of a separate decree would arouse among the people the idea “that and all criminal punishment is thereby abolished.” For the same reasons, the secondary discussion of the issue of the whip in 1824 by the State Council, which almost unanimously adopted the opinion, already previously approved by the Highest, on the abolition of the whip, did not lead to practical consequences.
In 1832, the son of the French Marshal Davout, while in Moscow, secretly bought two whips from the executioner; on this occasion, on September 22, 1832, a secret Highest order was issued: “from now on, neither the whips nor the shoulder master should be shown to anyone” (“Russian Antiquity”, 1887, No. 10, p. 216).
Only the Code of Criminal and Correctional Punishments of 1845 abolished punishment with the whip, replacing it with punishment with whips.
Main article: Spanking
How to work with a top
In terms of style of work, the wolf is closer to the checker and flanking.
Here is an example of such work with a top.
Very often, when learning to work with a checker, the student is first given a top and with it he practices flanking techniques. This is due to the fact that if the exercise is performed incorrectly, if the student hits himself, he will only receive painful sensations and this will force him to act carefully; when working even with a training saber, such a blow leaves abrasions and can cut the skin.
Having mastered flanking with a top, you can easily repeat the same exercises with a checker. But you will have to learn how to work with a whip, because the whip is softer and more flexible.
However, for simple self-defense there is no need to memorize complex techniques or develop flanking techniques for years
Here are simple techniques for using the wolf claw against attackers, please note that even neat demonstrative spankings with the wolf claw are very painful
Weapons from improvised means
— How to arm yourself with what you have at hand.
I had heard about wolf cub before, but this was my first time seeing what it was like. Convenient and effective means of self-defense. The new is the well-forgotten old.
Good day! Please tell me, are your products equipped with any permitting documentation, such as a certificate of conformity (about what is not a chemical substance)?
When buying a vacuum cleaner, do you also require such a certificate? What about a hammer?
In fact, lupus does not have signs of a chemical weapon and is not a chemical weapon for its intended purpose. So she needs a certificate just like a hammer.
The whip can be carried completely unnoticed by placing the handle in the inner pocket of the jacket and passing the rest into the sleeve. And so - thanks for the video - everything is explained clearly
Weaving arapnik
Weaving a whip can occur in various ways, but they can all be divided into two large groups:
- Weaving with vitny (core);
- Regular weaving without a core.
The oldest weaving technique is snake weaving. The pattern of the lash woven using this method resembles the scales of a snake. The handles for the whips are carved from fruit trees and have a ball at the end that serves as a grip. The handle is braided with leather straps. The more straps, the better the whip, but it will be more difficult to weave.
To weave arapnik with vitny, you will first need to make this core. In modern conditions, it is best to use a nylon sling for these purposes. Such a core will be much stronger and more elastic than a traditional leather one. Using electrical tape, the sling is attached to the handle, after which it is braided with leather.
Arapnik and other whips can be used for self-defense on the street; they do not fall under the category of bladed weapons and can be freely carried with you. The main thing to remember is that only training will help you effectively use the whip in battle.
Device
The main element of the whip is a long braided leather belt of round section, which is divided into the braided part itself (or the body of the whip
),
foul
and
cracker
.
The body is woven from long strips of leather and gradually becomes thinner towards the end, on which a narrow belt is attached - a foul; A cracker consisting of horsehair or synthetic materials is attached to the foul. When striking with a swing, the end of the whip and especially the foul can reach supersonic speed, causing the cracker to produce a characteristic sound resembling a snap or pop. Whips can also be made from other materials, for example from synthetic ropes or tapes, other materials are less common .
Basically, the whip has a hard handle (for example, made of wood). Whips with a missing handle are sometimes called "snake "
), sometimes a bag of shot is added to the beginning for weighting
.
The history of the appearance of whips
It is difficult to say when the first lashes appeared. It is known for certain that the history of nomadic peoples engaged in cattle breeding is closely connected with the appearance of whips. Each steppe warrior had his own arapnik whip. In Europe, every horseman had a whip; the shepherd also could not imagine his work without a long whip.
The whip was distributed throughout the world; ancient frescoes in Egypt depict people with whips in their hands. After the discovery of America, the shepherd's whip migrated to places where it continues to be used for its intended purpose. Most likely, even in Okinawa they used some kind of whip, although historical documents do not say about this. But in China, many used their long braids as a whip, weaving iron balls into them.
From Knut to Chernokhlyst
Since his defeat at the hands of Iron Man, Scarlotti has improved his combat kit and taken on the nickname "Blacklash". He returned with the goal of establishing himself as a top assassin, with his main target working for Stark International (formerly Stark Industries).
However, Blacklash found himself defeated by Iron Man time and time again and was unable to achieve his goal. After an unsuccessful career as a criminal, his desire to change was also unfulfilled. Due to his notorious criminal activities, Scarlotti was unable to secure any legitimate contracts or honest work. He became the object of ridicule from local residents and was rejected by his parents.
Scarlotti had no choice but to return to a life of crime. That is why, when the Maggia again called Black Whip to serve, he agreed. Blacklash was tasked with killing a scientist at a meeting, but the timely intervention of Spider-Man and Jim Rhodes as Iron Man allowed the target to escape. Blackwhip entered into battle with the two heroes, but was again defeated and imprisoned.
Upon his release, Blackwhip briefly worked with the Sinister Syndicate and unsuccessfully attacked Spider-Man. Later, hired by Justin Hammer, Blackwhip, together with the first Beetle and the second Buran, set out to destroy Force, Hammer's former henchman. The trio were defeated by Tony Stark, Rhodes and the Force.
An industrial saboteur known as the Ghost proved to be a problem for both Hammer and Stark. Hammer ordered Blackwhip, Boomerang, and Blizzard to team up with Iron Man and capture Ghost, but Blackwhip would later attack Iron Man. Hammer tasked Blacklash and Rhino with retrieving Scorpion's armor and tail when he broke his agreement with Hammer.