The device of the VAZ-2114 stove
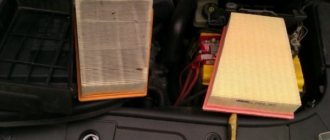
Before we deal with the operation of replacing the VAZ-2114 heater, let’s consider its structure and operating principle. The interior/windshield heater is located in the instrument panel (dashboard) area under the center console. All elements of the device, with the exception of deflectors and heater control handles, are hidden inside the panel. Main components of the stove:
- radiator;
- casing;
- inlet/outlet pipes;
- tap;
- electric motor with impeller;
- main damper;
- driver/front passenger foot air damper;
- heated windshield flap;
- control module (operating mode switch handle, damper control knobs, resistor).
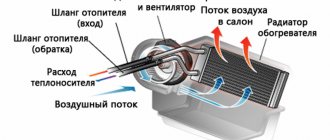
The operating principle of the heater is based on the use of heat exchange processes between the coolant and the atmospheric air entering the car interior. The main element of the heating device is a radiator with a system of tubes through which coolant circulates. When cooling the power unit, the liquid heats up, which allows the tubes to be equipped with special lamellas to release heat, heating the air.
An electric fan is built into the radiator, the main purpose of which is to pump air into the system. The intensity of the air flow entering the car interior can be adjusted using a switch located on the central panel of the VAZ-2114. It changes the resistance of the built-in resistor, thereby allowing you to reduce or increase the fan speed.
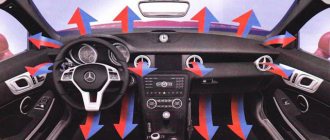
The air flow, passing between the lamellas of the radiator tubes, is heated in the body of the VAZ-2114 stove and enters the cabin through the air ducts. The central damper allows you to regulate the flow of air into the cabin (when the damper is completely closed, the air supply is blocked). Two other flaps allow you to change the direction of air flow when blowing the windshield and feet. Although the stove is an integral part of the car's heating system, it can be completely turned off by turning off a special tap.
Types of heater radiators installed on VAZ 2114/15
The manufacturer installs its own aluminum radiators on the VAZ 2114/15 with a service life of 3–5 years, after which the radiator is replaced. Selecting a new heat exchanger is quite difficult. There is a wide range of radiators from various manufacturers on the market. Of course, there are fakes.
Heating system radiators for the entire Samar family have catalog numbers 2108–8101060 and 2108–08101060–00 and the same dimensions:
- length - 250 mm;
- width - 158 mm;
- height - 42 mm.
The scheme of their attachment to the body is also identical.
Radiators for the VAZ 2114/15 stove are produced under catalog numbers 2108–8101060 and 2108–08101060–00
The VAZ 2114/15 can be equipped with aluminum and copper radiators, which have their own advantages and disadvantages.
Table: comparison of the main characteristics of aluminum and copper heater radiators VAZ 2114/15
| Aluminum | Copper | |
| Service life, years | 3–4 | 5–7 |
| Heat dissipation, W/mg | 209,3 | 389,6 |
| Maintainability in the event of a leak | Conditionally repairable | Repairable |
| Cost, rub. | 800–1000 | 1600–1800 |
The main advantages of copper products are longer service life, increased heat transfer and maintainability. However, they usually cost almost twice as much as aluminum ones. The technical characteristics of radiators are largely determined by their manufacturer.
Radiators DAAZ
The most popular among VAZ 2114/15 owners are radiators manufactured by Luzar, Hola, Craft, Pekar, etc. They are all in the same price category and have similar performance characteristics.
DAAZ radiators are highly efficient and have a long service life
DAAZ aluminum radiators have improved parameters. They have a service life of 4–7 years and a price of about 1000 rubles. The design features of such radiators include a larger number of lamellas (thin plates), and this significantly increases the heat exchange area. DAAZ radiators are the best option for VAZ 2114/15 owners.
https://youtu.be/zZN-1cw1vi8
Reasons for replacement
Experts identify two reasons why the heater radiator needs to be replaced.
- The appearance of a leak. Radiators are made from non-ferrous metals, most often aluminum or copper. Due to the reaction with the coolant, metals oxidize and this leads to the formation of leaks.
- Contamination of the tubes inside the radiator. The coolant, circulating through the system, washes away corrosion products and other fine particles. These particles settle in the engine block and in the pipes inside the heater core. If the heating system is partially contaminated, its efficiency drops, and if it is heavily contaminated, it stops working altogether. It is worth noting that at the initial stage, contamination of the radiator can be eliminated by flushing the cooling system with chemicals.
Before buying a new radiator, you need to make sure that it is the radiator that is leaking. It is not uncommon for damaged pipes to leak, as well as the connections between the pipes and the radiator.
Resistor fault
Despite the fairly simple design of the heater, some of its elements may fail over time. At the same time, the probability of failure of the heating system as a whole is quite small. The most common stove failures include:
- problems with the radiator;
- faucet leak;
- wear of pipes;
- resistor failure;
- switch malfunctions.
Let's look at each fault block in more detail.
As noted above, the resistor is designed to change the level of resistance of the current supplied from the generator to the heating system fan. In the VAZ-2114, using a switch, you can ensure the fan operates in three modes. In the extreme position, the fan is powered by a voltage equal to the nominal voltage of the vehicle's on-board network, providing maximum power output.
In the intermediate position of the switch, the level of the supplied voltage is reduced due to one of the two resistor windings, the resistance of which increases by 0.20 Ohms. In the third mode, the second winding also comes into operation, due to which the total resistance of the resistor increases by 0.80 Ohms, reducing the fan rotation speed to a minimum.
If the windings burn out, regardless of the switch position, the fan operates only at full power. The inability to switch fan operating modes is evidence of a resistor malfunction.
A faulty resistor may be indicated by the fan operating in one mode, when manipulations with the switch do not affect its blowing speed. To replace the resistor, you need to prepare a screwdriver with a Phillips head, fine-grain sandpaper and a multimeter. Algorithm of actions:
- disconnect the negative terminal of the battery;
- unscrew the screws that secure the right console cover;
- Use a screwdriver to unscrew the screws securing the right cover of the center console;
- you will have access to the resistor, from which you need to disconnect all the wiring and evaluate the contacts for burning. If the contact surface is oxidized, use sandpaper to clean it down to metal;
- It may well be that the resistor has lost its functionality precisely due to burning/oxidation of the contacts, so we assemble everything in the reverse order and check whether the fan will work in all normal modes;
- in case of a negative result, again remove the negative terminal, the panel cover and unscrew the screw that secures the resistor to the body;
- We remove the resistor and use a multimeter to measure the resistance at the resistor inputs and at the inputs of both windings. In the latter case, the indicator indicating the working condition of the additional elements is 0.2 Ohm. For the entire resistor, the standard resistance should be 0.8 ohms. If the multimeter readings do not match the specified values, replace the resistor with a new one, and then reassemble in the reverse order.
Replacing the VAZ-2115 heater radiator without removing the panel: photo, description
Good day everyone! Dear friends and read! Although the topic is not new, we are still going through it. I don’t know, maybe it will be useful to someone, maybe not, but I’ll write anyway.
True, there will be few photos before this, and if you do everything, they won’t fit in. Today we will talk about the heater radiator or how I changed it, I wanted to change it for a long time back in the winter, but I kept putting it off, but I know I delayed with this matter until I had the urge to specifically =) Better change it Don’t leave it for later like I did. One fine morning I started the car and heard a murmur in the area of the stove, I accelerated, the murmur stopped, alerted me, then went away or I forgot, but I think it’s nonsense, maybe it’s cold and maybe this happened before - I don’t know, I didn’t pay attention, I thought to myself, I drove like this with this murmur in the morning for about two weeks, then I looked in traffic jams, sometimes the temperature was well understood, then I began to notice “antifreeze” was leaving somewhere, one evening I lifted the right rug and then, in a word, I felt the sea with my hand, and the water was greasy. WITH
I still think the problem has come to my heater radiator or heater tap. On Saturday morning I went to the dacha and, accordingly, I went to the store for spare parts and bought a heater radiator; I already knew which one I would get. I immediately decided to buy a “DAAZ” radiator,
Now some people have a question: what is the best radiator to choose? As they say, the miser pays twice.
(a little later I’ll tell you which one is better, see below) and just in case, 5 liters of antifreeze. you never know will come in handy =) I arrived at the dacha and the weather, of course, was terrible, it was raining, it stopped periodically and started pouring again. The weather was just right for replacing the radiator =) Replacing the heater radiator on a VAZ-2115 is like a Lego set, I remembered everything I could! and how I sometimes swore at the designer. I think they probably heard me =) Probably whoever invented it and made it looked something like this
Okay, let’s not talk about that for now in memory =)
Replacing the heater radiator on a VAZ-2115.
Replacing the heater radiator is accompanied by owners of this VAZ 2113-2115 car with endless swearing and a lot of wasted time. Replacing the heater radiator is not difficult in principle, but it is very difficult to get to it. You need to remove the heater radiator in the following cases:!) the heater radiator is leaking, 2 ) the heater radiator is clogged.
With the onset of the first cold weather, every decent car owner should pay enough attention to the heating system of his car. Especially if we are talking about domestically produced cars. I don’t want to say anything bad about our automobile industry, but it often happens that it is our cars that begin to act up before winter.
The heating system is the weakest point of all VAZs. A constantly breaking and leaking faucet, problems with the fan drive, problems with the heater - this is not the entire list of problems that arise precisely with the onset of cold weather.
In this article we will talk about what constitutes an independent replacement of the radiator of a VAZ-2115 stove. Photos of the replacement process are presented below.
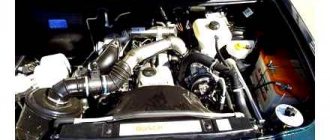
The interior heating system in the fifteenth model, as well as in all representatives of the Samara family, consists of:
- a heater, which includes in its design a plastic housing (casing), a radiator and a fan (electric motor with impeller);
- a valve that blocks access to the coolant (coolant) to the heating radiator, and its mechanical drive (lever on the control panel and cable);
- fan control device (controller on the instrument panel).
In VAZ-2115 cars, the following heating radiator malfunctions most often occur:
- leak (violation of the tightness of the device);
- obstruction (formation of a plug caused by the deposition of scale or dirt).
The tools you will need are a set of wrenches and a Phillips screwdriver. You will also need a container for draining the coolant (at least 5 liters in volume with a wide neck) and a rag.
Replacing the radiator of the VAZ-2115 stove should be carried out using a lift or an inspection pit.
After dismantling the radiator, you shouldn’t relax too much, because putting a new device in place is a more complicated process. Start it by calling an assistant and asking him, as during dismantling, to lift the panel up. Replacing the radiator of a VAZ-2115 stove requires special care - if installed incorrectly, it can be damaged, and then you will have to start all over again.
Next, you need to connect the inlet and outlet hoses to it. To make them easier to put on the pipes, moisten them from the inside with soapy water. If the hoses are damaged (ruptures, cracks), replace them with new ones. The same applies to clamps. Connect the heater control cables to the control panel levers. Check their work. Don't rush to screw on the dashboard just yet.
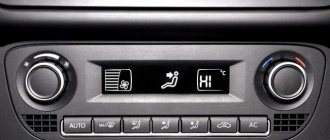
- Turn on switch 1 first, then second and third speeds.
- Using levers 2 and 4, you can adjust the desired direction of the air flow, and the latter also makes it possible to select the desired temperature.
- A faulty fan means the stove does not work at all.
- If the radiator still shows signs of life, then the breakdown may be a failure of the additional resistor or the interior heater does not respond to switch commands.
- But the stove tap can also leak or become stuck, in which case it must be urgently replaced.
- When the fan is running at full power and the temperature is at maximum, and the engine is warm, then perhaps the heater radiator is clogged. To clean or replace it, you will need to disassemble it.
Heater radiator failures
The most common causes of radiator failure are:
- depressurization of the device;
- clogged tubes.
When clogged, the internal radiator tubes become covered with deposits, narrowing their clearance and impairing the circulation of coolant. Clogging most often occurs as a result of using poor-quality coolant. The advanced age of the car also leads to the appearance of this problem, as does the entry of dust, dirt, water, and friction products of the power unit into the heating system.
The appearance of a leak in the radiator is a consequence of mechanical damage, corrosion processes and drying out of the material from which the radiator tubes are made. In this case, a decrease in the volume of antifreeze leads to an increase in its temperature and a deterioration in engine cooling, as evidenced by the readings of the temperature sensor.
The second reason for the inability to change the heater operating mode is a malfunction of the switch itself. True, its failure is a rather rare phenomenon, occurring due to oxidation of the contact surfaces.
If, after repairing or replacing the heater resistor, the fan continues to show signs of life in only one mode, regardless of the position of the switch, it is necessary to check the functionality of the latter. To do this, we again need a screwdriver, as well as scissors (or fairly powerful tweezers). Work order:
- remove the negative terminal from the battery;
- unscrew the 4 screws that secure the right panel cover;
- remove from the slots and pull out the switch by pulling it towards you;
- Using scissors, tweezers or another suitable tool, unscrew the nut that holds the switch;
- on the right side of the console, remove the switch, identifying and disconnecting all connectors from it;
- inspect the contacts for scale, rust or other defects, clean them with fine sandpaper;
- We install the switch in place, connect the terminal and check its operation. If there is no effect, the switch must be replaced with a new one.
If you perform any of these operations for the first time, it may take a lot of time, but you can save on buying extra spare parts and gain invaluable experience in replacing a VAZ-2114 stove. It is worth noting that for VAZ 2112 - 2115 models there are no fundamental differences in the repair or replacement of heating system parts.
Dismantling the stove radiator
Getting to the heater of the “fifteenth” is quite difficult. To do this, you usually have to dismantle the entire instrument panel. Here, VAZ designers have worked hard to ensure that our car enthusiast, faced with one problem, immediately thinks about the next.
Replacing the radiator of a VAZ-2115 stove without removing the panel is, in principle, possible, but requires the participation of an assistant in the process.
We start by unscrewing the central screw securing the dashboard to the body. It is located in the middle at the top and is closed with a plastic plug. Then we unscrew the screws securing the glove compartment and the left plastic trim covering the additional mounting block (on the passenger seat). Then we unscrew the two screws that secure the central part of the instrument panel to the floor.
Replacing the radiator of a VAZ-2115 stove without removing the panel implies its slight displacement deeper into the interior. This is the only way to get to the heater. After first removing the plastic tips of the stove control levers, pull the panel towards you. If all the screws are removed, it should be able to move.
Place a container under the radiator pipes and loosen the clamps securing them. At this time, a small amount of coolant may leak out, so we carry out all work with the utmost care.
Only after draining the antifreeze or antifreeze can the radiator be removed from the heater housing. Here you will need an assistant to lift the panel up.
Stove tap leaking
This malfunction occurs as a result of the heater housing drying out or due to souring of the shut-off device. The last reason is usually a consequence of the car being idle for a long time. In order not to damage the faucet or break the control cable, in such cases it should be opened very carefully, without using excessive force.
When the stove dries out, it is often not possible to diagnose the malfunction in time, since the leak may be minimal. But over time, the coolant leaking from the stove will certainly make itself felt. The first obvious sign of this malfunction is the appearance of a puddle on the floor of the car in the area of the passenger seat closer to the center panel. A driver or passengers with a good sense of smell can sense a characteristic odor before a puddle appears, which will only increase.
Another nuisance when the heater tap leaks is the formation of a thin oil deposit on the windshield, which appears as a result of evaporation of the coolant. At night, or when the sun shines directly into the driver's eyes, this can cause problems with the quality of vision, making it difficult to make the right decisions in a timely manner when the traffic situation changes.
To replace the faulty faucet of the VAZ-2114 stove, we will need 10/13 wrenches (socket ones will work much more conveniently), rags, a Phillips-head screwdriver, and a container for draining the coolant. Dismantling algorithm:
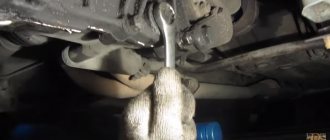
- we drive the car onto an overpass/inspection hole, place a prepared container with a capacity of about 5 liters under the drain hole, unscrew the plug and wait until all the antifreeze is drained;
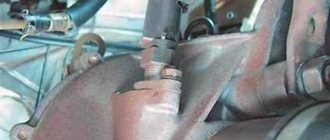
- We look in the engine compartment for the pipes connecting the power unit to the tap, use a screwdriver to loosen the fastenings in the form of clamps, and remove the pipes;
- go to the interior, unscrew the screws that secure the left panel cover;
- on the right side under the panel we find the heater tap, to which the pipes from the engine compartment are connected, put a rag under them and use a screwdriver to remove both pipes;
- go back to the engine compartment, find the studs on which the faucet is attached to the car body, unscrew the bolts with a 10mm wrench;
- now nothing is holding the crane, we go into the interior and pull it out, disconnecting the drive fastening cable;
- We attach the cable to the new tap, install it in its original place and reassemble it in the reverse order.
The process of replacing the stove radiator
After the preparatory work has been completed, you can proceed directly to replacing the stove radiator:
- Remove the steering shaft cover and turn off the hazard warning light button.
- The next step is to click under the steering switches. Remove the connectors from them and put them aside.
- Locate the black and gray wires and disconnect them from the horn slip ring base. It is important to remember which guide was which. Otherwise, the signal will subsequently be triggered by turning the steering wheel. Don't mix up the wires.
- Remove the screws and remove the side panels of the console.
- Open the diagnostic connector cover by unscrewing the mounting screws. Next you need to remove the connector from the instrument panel.
- The next step is to remove the connector from the ashtray and cigarette lighter lamp.
- On the heater control unit, remove the gear selector lever and the damper control knobs.
- Next, remove the radio, unfasten it and pull out the slide. Disconnect the connectors from the buttons and the BSK block. Remove the instrument panel panel.
- Unscrew the screws securing the central bracket using a size 8 wrench and pull it out. First disconnect the engine control unit connector.
- Unfasten the heater unit and lower it down as far as the control cables will allow.
- Take a marker and mark the position where the steering column is located. This is necessary in order to put everything in its place during assembly.
- Using a chisel, unscrew the two shear bolts counterclockwise. During assembly, install new ones, possibly non-cut type. Unscrew the two nuts with a 13mm wrench and lower the column onto the seat.
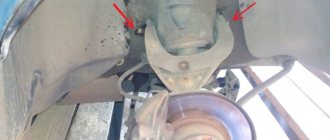
- Remove the front strut covers.
- At this step you need to loosen the clamps and remove the tubes from the heater radiator. Place some material that absorbs liquid well. Residual antifreeze may come out of the radiator. Now unscrew the 5 screws securing the dashboard (two in the area of the front pillars, two immediately below them and one to the right of the instrument backlight control).
- Now you can change the radiator.
To replace the radiator, you need to move the instrument panel slightly to the side. Unscrew the three screws that hold the radiator to the heater housing. Unscrew the damper control cable. At this stage, you can already pull the radiator out of the heater.
Step-by-step instruction
- Remove the two front engine guard mounting bolts to gain access to the coolant drain bolt. Thirteen head bolts.
- Loosen the coolant drain bolt on the BC.
- Place a container to collect coolant and completely unscrew the bolt.
Thirteen head bolt. To drain the liquid faster, you need to open the filler neck of the expansion tank. - Unscrew the fastening screws and remove the plastic covers on the right and left of the center console. Phillips head screws.
- On the right side, unscrew the bolt securing the front panel.
- Unscrew the front panel mounting bolts on the right and left. Ten head bolts.
- Move the front panel to the side and support it from below to secure it in place. The panel must be moved so that you have good access to the radiator pipes.
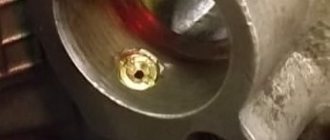
- Using a Phillips screwdriver, unscrew the four screws securing the heater radiator.
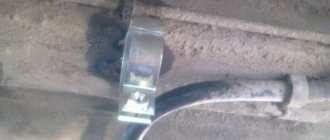
Access to the top two screws is limited and requires a small Phillips screwdriver to unscrew them. - Loosen the two clamps securing the pipes coming to the radiator. The clamps can be loosened with a Phillips screwdriver or a socket eight.
- Place a container to collect coolant and remove the pipes from the radiator.
- Remove the heater radiator from its seat.
- Clean the seat and install the radiator.
- Lubricate the plastic radiator outlet pipes with a sealing compound and replace the pipes.
- Secure the pipes with clamps and secure the radiator with four screws.
REPLACEMENT
Replacing the radiator of a VAZ 2115 (VAZ 2113) heater is no different from replacing it on a 2114 model, so this work is performed in the same way for the listed brands. To carry out the work you will need the following tools:
- Various screwdrivers (phillips, slotted, different lengths and sizes);
- Set of combination keys;
- Skillful hands and maximum patience and accuracy.
You need to prepare a container to drain the coolant. Instead of screwdrivers, it will be convenient to use a screwdriver.
If you need to remove the entire stove, then the instrument panel is completely removed. To remove the heater radiator, the panel is disassembled partially, halfway. Such repairs are not very easy to carry out, but you can still do it yourself without any special plumbing skills. You just need to do everything carefully and slowly. So, what is needed to remove the heater radiator on a VAZ 2114:
Don't forget to drain the coolant first.
- Drain the coolant. First, remove the expansion tank cap and drain the antifreeze from the main radiator, then unscrew the cap in the cylinder block and drain the liquid from the block.
- Remove the car radio in the cabin.
- Remove the plug, then unscrew the screws of the instrument cluster mounting frame (four screws in total - two on top and two on bottom). The instrument panel cannot be removed.
- Remove all sliders and knobs from the stove control unit.
- Remove the steering column cover (fastenings at the top and bottom).
- Remove the cover of the diagnostic connector (located under the cigarette lighter), unscrew the screws securing the connector itself.
- Disconnect the cigarette lighter connector.
- Next, you should disconnect all the plugs that are located on the center console. It is better to mark them so as not to confuse them later during assembly.
- We take out the signaling unit by unscrewing two screws. Now the central frame of the instrument panel is free, you can dismantle it. Now it’s also convenient to get to the cigarette lighter illumination plug; we disconnect it too.
- The glove compartment is held on by 6 screws. We remove the glove compartment.
- There are fasteners on the sides of the instrument panel (one screw on the top and one on the bottom). We turn them away.
- We unscrew the bolts of the bracket securing the engine control unit and from below the bolts securing the iron frame on the left and right sides (to the bottom of the car).
- We unscrew the screws that hold the heater control unit.
- Remove the plastic trim of the front upper body pillars. They are fastened with self-tapping screws.
- There is a screw on the panel between the panel and the steering column, unscrew that too. Now the entire panel is loosened, you need to move it towards the seats and slightly up. It is advisable to use a diamond-shaped jack on the right side to fix the panel in the depressed state and get to the heater radiator.
- We get to the clamps on the heater radiator pipes and loosen them. We pull off the pipes. It is advisable to first place a rag under them so that the remaining draining liquid is not absorbed into the carpet of the floor covering.
- The radiator itself in the stove body is held on by three screws. We unscrew the screws and take it out.
Now all that remains is to install the new part in place and assemble everything in reverse order. To make the interior warmer, we cover its surface with a layer of foam rubber approximately 1.5 mm thick.
A performance check after replacement is carried out before the instrument panel is assembled. The heater radiator is installed, the pipes are attached, antifreeze is poured in and the engine is started. If the antifreeze does not leak and the heating system of the VAZ 2114 is functioning normally (the air in the cabin is heated properly), it means that the replacement of the heater radiator was successful, and all parts can be completely installed in place.
Repair of the stove on a VAZ 2114 (radiator) can only be performed if the material of the radiator housing is not aluminum. Even if you manage to solder an aluminum case, there is no guarantee that the soldering will be reliable.
Wear of pipes
Coolant may leak from the heating system through the inlet/outlet pipes. This result is usually caused by their wear under the influence of aggressive substances that are components of the liquid, combined with high temperature. The appearance of leaks in the pipes can also be caused by excessive efforts when tightening the clamps during their installation (for example, after replacing leaky old pipes).
The heating system of the VAZ-2114 car includes 4 pipes, half of which are located in the engine compartment, ensuring the passage of antifreeze between the power unit and the heater, and the other two are located in the cabin, ensuring coolant circulation between the radiator and the heater tap. Liquid leakage can occur in two different scenarios.
- decreasing coolant level in the expansion tank;
- the appearance of a persistent unpleasant odor in the cabin;
- presence of smudges in the passenger compartment or under the engine protection.
As a rule, when replacing a faucet or heater radiator, all pipes are replaced, especially if they have been in place for a very long time and have not been replaced before. The operation of replacing the pipes of the VAZ-2114 stove will also be required if one of the pipes is damaged. Unfortunately, in the latter case, you will have to complete all steps from 1 to 25 described in the instructions for replacing the heating radiator.
Installing new pipes, as a rule, does not cause much difficulty, but you should not immediately tighten the clamps to working condition. First, we reassemble in the reverse order, fill in fresh antifreeze, start the engine and let it run for 15–20 minutes to check for coolant leaks. After the engine is turned off and cools down a little, you can tighten the clamps until they are fully tightened.
Repair of the VAZ-2114 stove
Many novice car enthusiasts blame the stove when their heating system breaks down. Indeed, replacing it in most cases solves all problems. However, the feasibility of such a decision is highly questionable for a number of reasons. First of all, due to financial reasons: the cost of a new stove for the VAZ-2114 (without pipes and faucet) will cost a tidy sum - about 4,000 - 5,000 rubles.
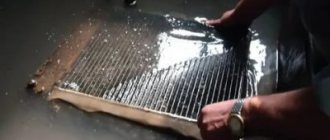
It is quite possible to clean the radiator pipe system from deposits and scale. To do this, you can use the same cleaning products that are usually used in everyday life (“Silit”, “Mole”, Comet). However, any chemically active compositions will do, including Coca-Cola (you’ve probably repeatedly seen materials devoted to this drink regarding its chemical properties).
As practice shows, better results can be achieved by working with the radiator removed, but this is not critical. Completely satisfactory cleaning can be performed without dismantling the radiator. The flushing scheme is very simple: the antifreeze is drained, all pipes are disconnected, after which a cleaning agent is poured into the filler neck. Then the engine starts, which, with the heater on, should idle for about 40 - 120 minutes.
After cleaning, the radiator is thoroughly washed, for which you can use running water from a tap connected through a suitable hose. The final stage is to dry the radiator with compressed air (if a compressor is available) or naturally, which will take at least a day. The presence of a leak is a much more serious problem.
Soldering is also difficult, since the radiator tubes are made of aluminum. For such work you need a very powerful soldering iron, supplemented with special solders and flux. The quality of soldering also depends on the skills of the worker performing such repairs: if they are small, there is a high probability that over time the leak will be restored in the same place. Therefore, it makes sense to replace the radiator with a new one, the cost of which varies within a thousand rubles.