Internal combustion engine and ignition timing
Before focusing on ignition angles, you should understand the operating principle of the entire system. It's no secret that ignition timing plays a huge role in the operation of internal combustion engines. It occurs before the piston reaches its highest point during the compression stroke. The consequence of such a mini-explosion is the expansion of gases, as a result of which the piston continues its movement and the working stroke occurs.
Despite the fact that all these processes occur very quickly, they still take some time. And since the crankshaft also rotates at enormous speed, therefore, the piston has time to travel some distance from the moment the mixture ignites until the gases expand. So, if ignition occurs strictly while the piston is at TDC, then combustion will occur at the beginning of the power stroke and will also end a little later. This will all reduce the gas pressure.
Car crankshaft
But when the ignition of the combustible mixture occurs, on the contrary, very early, the gas pressure will reach its maximum even before the piston is in its uppermost position. This means that there will be some opposition to his movement. This has the most negative impact on the operation and condition of the engine. Therefore, adjusting the ignition timing is very important.
Before we touch on adjusting the ignition timing (IPA), let's figure out what it is and what its effect on the condition of the car is. The optimal situation is when the combustible mixture ignites and burns completely before the piston reaches the TDC position. It is customary to determine this moment by the position of the crankshaft, and the designations are carried out in degrees. In other words, we are talking about the angle between the crankshaft and top dead center. If the shift occurs towards TDC, then such an angle is called late, in the opposite direction, respectively, early.
Ignition timing
It should be noted that the value of the SOP depends on the crankshaft speed. The higher it is, the earlier the ignition timing must be set. If this characteristic is selected incorrectly, then the engine power is reduced, overheating occurs and the unit will fail prematurely, which will entail large material costs. Fuel consumption will also increase and the amount of harmful substances in the exhaust gases will increase. So you will harm not only your car and financial situation, but also the environment.
How the ignition system works and how it works
The VAZ 2110 abandoned such familiar ignition elements as a coil and a distributor. So, a special ignition module is used here, which consists of high-energy control electronics, as well as a pair of coils. It is important to note that such a system does not require frequent maintenance, because There are no moving parts here. The VAZ 2110 ignition system also does not require special adjustments, because For this purpose, a controller is installed here. He carries out all the settings and adjustments.
The ignition system is based on the “idle spark” method. This is a special method of spark distribution. As you know, cylinders in a car engine work in pairs (1st cylinder with 4th, and 2nd with 3rd). So, a spark fires in two cylinders at once: a working spark in the cylinder where the compression stroke of the mixture occurs, and an idle spark in the one where the exhaust stroke occurs. Because the current in the windings of the system coils is constant, it turns out that on the first spark plug the electrons move from the central electrode to the side electrode, and on the second - vice versa (from the side to the central).
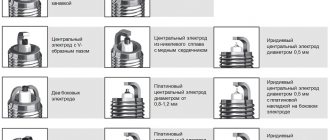
Depending on the type of engine, the VAZ 2110 can use two types of spark plugs. Thus, for 8-valve engines, spark plugs of the A17DVRM type are used, and for 16-valve engines - AU17DVRM (here the wrench size is reduced to 16 mm). At the same time, the distance between the electrodes of the spark plugs is only about 1.0–1.15 mm.
As we noted above, an element such as a controller is responsible for ignition control. To most accurately control the system, the controller analyzes the following information:
- coolant temperature;
- current position and speed of the crankshaft;
- presence of detonation;
The crankshaft position is analyzed using a special sensor that transmits information to the controller. Only after this is the firing sequence of the ignition module coils calculated.
At first glance, the system is quite complex. But in operation everything is very simple. In addition, maintenance and repair of the ignition system of the VAZ 2110 and other models does not take much time.
Correctly adjusted ignition timing is one of the determining factors for the correct operation of a gasoline internal combustion engine. Even minor violations of its adjustment lead to loss of power of the power unit, increased fuel consumption, overheating, and the occurrence of detonation processes.
In this article we will talk about what ignition marks are, why they are needed, and how to use them to set the correct moment of ignition of the combustible mixture using the example of eight- and sixteen-valve VAZ-2110 engines. In addition, we will look at the concept of lead angle and figure out how to adjust it.
Changing the OZ on a gasoline engine
You need to start work by preparing the tool. We will need a wrench and a test light. You can't do without a special wrench that can be used to turn the crankshaft. After all, in fact, its position determines the value of the OZ. You can also purchase a special ignition timing corrector, which can set this characteristic automatically.
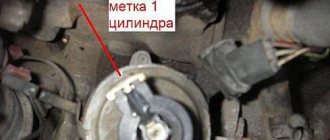
Place the car in neutral and apply the parking brake. Then you need to remove the cover from the breaker. This way you can easily get to the crankshaft, which is turned with a special wrench until the distributor runner is in the sector of the first cylinder of the distributor. Also, be sure to follow the positions of the marks on the ebb of the front cover and the pulley; they must match.
Removing the cover from the breaker
Now, to correctly set the ignition timing, you need to connect the control lamp. One of its terminals is connected to the ignition coil, and the second to the engine ground. Slightly loosen the distributor fastening and turn the key in the ignition. We clamp the slider against the stroke and turn the distributor in the opposite direction of movement of its roller until the control lamp goes out. To be safe, turn the distributor a little more and very carefully return it in the opposite direction. It is necessary to record the moment of ignition of the lighting device. In this position, you need to align and secure the body of the breaker-distributor with bolts. All that remains is to return the lid to its place.
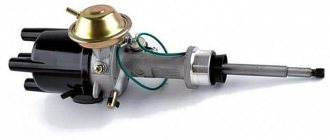
To automate the ignition timing adjustment as much as possible, a vacuum regulator is introduced. Such a device automatically changes the SOP depending on the load. If the engine is idling, then the vacuum regulator turns the chopper disc towards late ignition. As soon as the load increases, a vacuum occurs. Then the vacuum regulator rotates the breaker disk in the opposite direction. So it seems to turn off, because it cannot create a leading angle. At this moment the centrifugal regulator comes into play. Now only he sets the advance angle.
Vacuum regulator UOZ
The fact of vacuum allows you to record the sensitive diaphragm with which the vacuum regulator is equipped. On the one hand, it is affected by our atmosphere, and on the other, by pressure from the carburetor. So it turns out that when the throttle valve is closed, rarefied air from the system does not reach this diaphragm and the vacuum regulator fulfills its mission. As soon as the rarefied atmosphere hits it, it bends and the device stops working, returning everything to its place.
Operation of the contactless ignition system
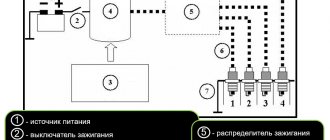
- By turning the ignition key, current from the battery is supplied to the mounting block.
- From it, low voltage current passes to the coils, starter and other electrically dependent devices of the system.
- The starter begins to turn the engine. At the same time, the transistor switch receives a signal from the pulse sensor.
- The commutator interrupts the current on the primary winding of the coil, which allows you to create a high voltage current on the secondary winding.
- The resulting current goes to the central terminal of the coil and enters the distributor.
- Depending on the position of the crankshaft, current is transmitted through high voltage wires to the corresponding spark plug.
- The current produces a spark charge that ignites the fuel-air mixture.
Depending on the crankshaft speed, the centrifugal regulator adjusts the ignition angle.
Is it necessary to adjust the OZ - check on the go
There are often situations when the factory settings are lost or simply do not quite suit specific operating conditions. In all cases, you will have to set the OZ yourself. True, you first need to make sure that this operation is necessary, which means we’ll figure out how to check the value of the ignition timing. To do this, we accelerate on a flat area to 40 km/h, then sharply press the gas and listen to our car. If a noise characteristic of detonation appears, which stops after the car reaches a speed of 60 km/h, then everything is in order and the angle is set perfectly.
If the detonation does not stop, then the ignition is “early”. But when the moment of ignition of the combustible mixture is slightly delayed, the detonation will end before the car accelerates to 60 km/h. To change the ignition timing, open the hood, slightly loosen the mount of the distributor-distributor and change the position of the distributor. In the first case, the adjustment involves a shift of several millimeters clockwise, and for late ignition - in the opposite direction.
Installing the correct OZ on the injector and diesel engine
With an injection engine everything is also extremely simple. In this case, you should turn on the ignition and look at the instrument panel. If a light comes on on it, indicating a malfunction, then we take a laptop with a special program, connect it to the on-board computer and carry out diagnostics.
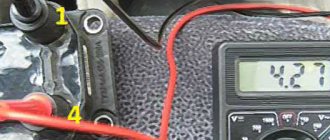
At the next stage, the throttle device is subjected to a thorough visual inspection. It is also recommended to check the voltage of the on-board network and the sensor that regulates the throttle position. They must comply with the standards. Thus, the optimal voltage for the sensor is considered to be in the range of 0.45–0.55 V, and for the network – 12 V. The damper opens only 1%. We sharply press the gas pedal. The throttle opening should exceed 90%, and the sensor voltage will drop to 0.45 V. Otherwise, it is necessary to urgently adjust the ignition timing.
Checking the throttle position sensor voltage
Carry out all work using non-conductive rubber gloves, as most elements are live.
Setting the angle begins with the fact that we disconnect the vacuum hose from the engine. Then we connect the positive clamp of the strobe to the positive terminal of the battery. The ignition is adjusted by switching the ground clamp, connecting it to the negative terminal and pulling the wire out of the cylindrical socket on the distributor cover. We insert the strobe sensor into the vacant space, simultaneously connecting it to the wire of the first cylinder of the power unit. Next, we start the engine and direct the beam from the strobe to a special hatch. A mark will appear on the flywheel; its optimal location is between the divisions. If this is not the case, then set the angle by slowly loosening the nuts securing the flywheel distributor.
Adjusting the ignition timing on a diesel engine is also not difficult. But this operation should not be underestimated, since a diesel engine can only operate when the fuel is completely burned. This will not happen with an incorrectly set ignition angle. The main difference of this system is the absence of candles. Basically, all actions are the same as for gasoline engines. Only in this case it is necessary to remove the decompression mechanism, the engine meter and the body of the neck through which the oil is poured. Be sure to check the fuel supply level. To do this, move the corresponding lever to the extreme position, install the torque scope and slowly turn the crankshaft.
DIY adjustment
Each driver can adjust the settings of the described system independently. To set the ignition timing you will need the following tools:
- Strobe. Moreover, it doesn’t have to be some kind of “sophisticated” one, maybe a simple one that doesn’t have a built-in tachometer and is inexpensive. A more advanced one, which is distinguished by the presence of a built-in tachometer, costs more accordingly.
- Tachometer. In this case, you can use the devices built into the dashboard, as well as connect external devices (for example, a multimeter or autotester in tachometer mode) and focus on sound signals. The latter is recommended to be carried out only if you have considerable experience in this matter.
- Open-end or socket wrench. An alternative option is an L-shaped wrench or a ratchet head. But the optimal size is about 10.
- Slotted screwdriver.
So, answering the question of how to set the ignition timing, first we should note the importance of the preparatory work. So, I advise first:
- Warm up the engine to about 90°, that is, to the optimal operating temperature, and set the idle speed to a minimum level (this is about 800 per minute). To carry out the last action, you need to rotate the screw responsible for the amount of fuel mixture and located on the carburetor.
- You can set this minimum number of revolutions by ear or using a tachometer - whichever is more convenient for you. If they comply with the norm, then this action does not need to be performed.
- Remove the silicone tube from the fitting located on the housing of the vacuum ignition timing regulator on the trembler.
- Check if there is a vacuum in it by placing your finger on its hole. Nothing like this should happen. If this is not the case, then the speed should be gradually reduced until the vacuum disappears. To do this, you need to smoothly rotate the previously mentioned screw.
- Turn off the engine and use a knot or small bolt to remove the hole in the pipe.
- Using a slotted screwdriver, turn the flywheel (before this, carefully unfasten the distributor body by loosening its fastening nuts with a wrench), as a result of which a long transverse alignment mark should become visible.
- Connect the strobe depending on the instructions for it.
To set the ignition timing close to ideal, I recommend following the following instructions:
- Start the engine, and once again check with the tachometer that the speed is minimal.
- Direct the flashing beam from the strobe into the hatch with the scale.
- As a result of this, the highlighted mark, which is placed on the flywheel, should be opposite the required division on the scale.
- Each division on the scale is the corresponding degree of ignition timing.
- To adjust the ignition timing, rotate the distributor housing.
- After the required value has been achieved, disconnect the strobe and securely fasten the distributor.
For a better understanding of the above steps, I recommend also familiarizing yourself with such concepts as ignition timing regulators, as well as its sensor, clutch and ignition timing variator.
We recommend: Modification of the VAZ 2110 thermostat
So, there are two regulators: centrifugal and vacuum. The centrifugal ignition timing regulator is designed to change this indicator at an automatic level, and this depends on the number of revolutions produced by the crankshaft. The vacuum ignition timing regulator is used for the same purpose, but its activity only depends on the speed of the engine.
The ignition timing can be changed by also changing the crankshaft position sensor data. And a device such as an ignition timing variator can help with this. The use of an ignition timing variator is necessary due to the fact that the burning rate of gas is lower than that of gasoline .
The main feature of ignition timing variators is that they are able to be configured with computer programs and change this indicator with an accuracy of 1 degree. Also, this device does not need to be connected to the pedal and allows you to create a car acceleration schedule. Therefore, an ignition timing variator is a necessary mechanism, which, in addition, can be used as a generator.
The ignition timing sensor is also an important mechanism. There are two of them in the car (on top and on the right side), and if they are absent, the engine simply will not be able to start.
And the last mechanism, but not the last necessity, is the ignition advance clutch, the operating principle of which is, as a rule, mechanical. This ignition advance clutch is needed in order to provide better engine dynamics, as well as to advance the ignition of the fuel at higher speeds. As a result, the engine operates more powerfully and efficiently.
How to set the OZ in a car with LPG or entrust this task to a CVT
Lately, gas equipment (GBO) has gained many fans. And all thanks to efficiency, because such fuel is much cheaper than gasoline or diesel fuel. It should be noted that gas consumption is somewhat higher, and the combustion of the fuel-air mixture lasts longer and occurs at the exhaust stage. You can adjust these parameters; you just need to adjust the ignition timing, and we’ll look at how this is done if the car is equipped with LPG.
It is not difficult to set the OZ, and the fuel will burn even before the exhaust valve opens, which means that the car parts will not be subject to negative thermal effects, and the engine efficiency will increase. The characteristics themselves for gasoline engines and LPG are somewhat different. True, there is an opinion that in modern cars equipped with an on-board computer, such adjustments are carried out automatically. However, this is not quite true. Indeed, in injection systems, the OZ is set in accordance with detonation, but for LPG this phenomenon is unusual.
Adjusting the OZ using the on-board computer of a car with LPG
Owners of cars with gas equipment have an assistant - a variator. This part can change the SOP on the fly without your participation. But this is not the basic equipment of the car, and you should buy a CVT. Actually, gas equipment is also installed at the initiative of the owner, and not the plant. Today, there are different ignition timing variators for gas equipment on sale. This device connects to the sensor responsible for the crankshaft position (CPCP) and corrects its readings to the desired value. Moreover, depending on the variator model, the displacement is carried out either by a fixed amount or depends on engine speed. This device is activated when the HBO is turned on.
Let's look at one of the connection diagrams for the variator for adjusting the gas pump. To begin, select the most convenient place where this element will be located. The far left corner of the engine compartment, not far from the gearbox, is perfect for mounting the variator. Now remove the cover from the device and make a direct connection in accordance with the attached instructions.
Connecting the variator for adjusting the UOZ to the gas equipment
One pin is responsible for supplying voltage to the sensor to which we will attach the variator. We attach the second one to the leg of the gas valve in the gas equipment. But the ground should be connected to the screen of the DPKV cable. Then we strip the sensor wires and connect the corresponding variator leads to each of them. Now all that’s left to do is set up the device and enjoy operating the vehicle. Experts claim that the presence of a variator in the LPG system saves fuel by almost 25%. Most likely, the figure is inflated by marketers, but there really is a benefit.
Ignition timing
In order to effectively diagnose and repair malfunctions in your car’s engine, you need to know and understand several basic aspects of its operation.
One of these “whales” on which all auto repair rests is the ignition timing. The distance from the moment of ignition (ignition moment) of the fuel mixture to the moment the piston reaches top dead center (TDC), on the compression stroke, is called the ignition timing angle.
It is measured in degrees. Since the piston moves in the cylinder due to the circular movement of the crank mechanism of the crankshaft (the connecting rod journal with the lower connecting rod head describe a circle). A full circle and the piston stroke up and down (from TDC to TDC) is 360º. If the fuel mixture ignites 10º before the piston reaches TDC, then these 10º will be the ignition timing.
Why is ignition timing necessary?
To obtain the required engine power, the fuel mixture must be ignited before the piston reaches TDC, thereby ensuring its complete and timely combustion, and the subsequent optimal pressure of the gases formed after combustion on the piston moving down during the power stroke.
How and why to adjust the ignition timing?
Depending on the operating mode of the car engine, the ignition timing should change up or down. For example, in idle mode the crankshaft speed is low, the fuel mixture has a certain proportion of air and gasoline, and in power mode (acceleration) it is richer, while the crankshaft speed increases, reducing the efficiency of cylinder ventilation. In such a situation, an earlier ignition timing angle is needed, which will allow the mixture to ignite earlier and it will have time to burn before the piston reaches TDC.
On a carburetor engine, the ignition timing is adjusted by vacuum and centrifugal ignition timing regulators located in the ignition distributor (distributor). They allow you to automatically increase the ignition timing depending on the engine speed. On an injection engine, the ignition timing is set by the control unit (ECU) of the engine control system. It is a certain parameter “hardwired” into its software and is calculated based on sensor readings.
The initial ignition timing on carburetor engines is set by marks and adjusted by rotating the distributor. On an injection engine, the angle setting is controlled by the same ECM control unit.
Malfunctions in the operation of a car engine caused by an incorrect ignition timing
All malfunctions related to the ignition timing are based on only two reasons: either the ignition timing is too early (early ignition) or too late (late ignition). Signs of an incorrect ignition timing: the engine does not start, starts and stalls, “troits”, “shoots” at the carburetor or muffler, smokes, does not pull, detonation occurs, etc. Read more: “Signs of early ignition”, “Signs of late ignition”.
Notes and additions
— To control the moment of sparking and the conversion of low-voltage electric current into high-voltage electric current, carburetor and injection engines are equipped with ignition systems: contact, non-contact, etc. Read more: “Contact ignition system for VAZ 2101, 2102, 2103, 2106”, “Contactless system” ignition of VAZ 2108, 2109, 21099 cars.”
The term “ignition timing” is not heard very often by modern car owners, and even mechanics. And despite this, ignition timing still exists and plays an important role in engine operation. We’ll figure out which one exactly below with the help of Motordata OBD and knowledge about the design of internal combustion engines. Physical meaning
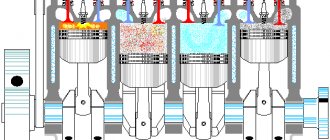
First, let's talk about the engine operation process. During the compression stroke, when the piston approaches top dead center (TDC), the spark plug produces a spark that ignites the air-fuel mixture. The mixture, however, does not burn instantly, but relatively slowly, so if you ignite it directly at TDC, the main gas pressure will be reached when the piston has already gone quite far down. In this case, very little useful work will be obtained from the combustion of the mixture charge.
But if you ignite the mixture a little in advance, you can do this so that at TDC the gases create maximum pressure and direct the piston down with maximum effort. In this case, the useful work will be maximum.
The opposite situation is also possible, when ignition occurs too early. In this case, the gas pressure during combustion of the mixture will develop even before the piston approaches TDC. Then it will also not be possible to get full power from the engine.
The time interval between reaching TDC and ignition is called ignition timing. It is measured, however, not in units of time, but in degrees of the crankshaft rotation angle, which is why the parameter itself is called “ignition timing” (or ignition timing).
Modern technologies have allowed us to “look” inside the combustion chamber while the engine is running, and now anyone can see the ignition timing with their own eyes. If you try to capture this with a picture, it will look something like this:
The position of the piston at the moment of ignition is highlighted in red, and the TDC position is highlighted in blue. You can see this in action in the video below.
On any gasoline engine, the ignition timing must be set correctly. On the very first cars, the ignition timing was set by the driver while driving - for this there was a separate lever on the steering wheel, along with the accelerator lever. In the documentation of those years, this aspect of driving skill was especially emphasized - choosing the right engine operating mode. Some documents (for example, Buick cars from the 1910-1920 period) used the term "horse sense".
Times have shown that the driver already has enough worries, so over time this burden was removed from him. If we move to the Soviet automobile industry of the seventies, we will see that the ignition timing was already regulated by a mechanic by turning the distributor (distributor breaker) to a certain angle. At that time, the ability to choose an OZ was no longer mandatory for the driver, but it was considered good form when the car owner himself knew how to adjust this angle correctly, as well as remove, clean, assemble, install and adjust the carburetor. However, even then, the ignition system included a mechanical and/or vacuum corrector that shifted the OZ depending on the load on the engine (in fact, on the vacuum in the throttle space or on engine speed).
Let's take another leap in time. Nowadays, the control of the OZ is completely given to the electronic control unit (ECU) of the engine. Neither the driver nor the mechanic can influence it - automakers do not provide standard means to control this parameter. This, however, does not make this parameter any less important for engine operation. This means that when diagnosing, you need to understand what this parameter means and how the ECU controls it.
Management principles
SOP is one of the parameters that affects the environmental friendliness of the exhaust, so it is necessarily present in the set of parameters issued according to the standard OBD/EOBD protocol. Often its output looks very simplified, since the ECU often calculates it separately for each cylinder, but the existing parameter is often enough to evaluate engine performance. Moreover, it is enough to evaluate dependencies.
Let's connect to the Opel Astra H car (it was chosen because it is at hand, and not for any deep reasons) and see what the dependence of the SOP on the engine speed looks like:
It can be seen that at idle speed the SOP is somewhere in the range of 18-20 degrees. This is in our conditions. In colder weather, for example, it will move because the air temperature in the intake will be different. On an unheated engine, the OZ will also be different, for example, immediately after start, the ignition will be as late as possible. The fact is that the engine does not require special power characteristics immediately after starting, but it is necessary to warm up the catalyst and lambda probe as soon as possible. Late ignition leads to the fact that the hottest exhaust gases escape into the exhaust, which contributes to the fastest heating of the oxygen sensor and catalyst.
As the speed increases, the OZ increases. There is a very simple physical meaning here: at higher speeds the piston moves faster, but the combustion rate of the mixture does not change. This means that the mixture must be ignited earlier. This dependence persists both at idle and while driving.
On cars with a distributor and ignition corrector, the SOP depended on only one parameter. However, with the tightening of environmental requirements, more stringent requirements have emerged - it has become necessary to take into account many more factors. This was one of the main reasons for the transition to electronic ignition control.
Therefore, if you need to express the dependence of SOP on external conditions, it will look like a set of complex three-dimensional graphs like these:
By the way, when chip tuning, as a rule, these dependencies are also affected. Depending on the goals of chip tuning, the firmware can shift this dependence either to a more economical mode or to a more dynamic one.
Abnormal modes
Detonation
In normal mode, the mixture burns slowly, but during detonation it burns an order of magnitude, or even two orders of magnitude, faster. This is actually an explosion of the mixture. The problem with this mode is that the pressure also increases much faster than during normal combustion. This leads to shock loads on engine parts, primarily on the piston. Such loads can lead to engine destruction, so detonation must be avoided.
A regularly operating system with a distributor on the same Zhiguli and Volga cars, generally speaking, allowed detonation in certain modes; moreover, its presence in these modes was a sign of a correctly configured OZ. The repair manuals contained a recommendation to accelerate to a speed of 50 km/h and in direct gear and sharply press the accelerator pedal to the floor. With the OZ set correctly, a short-term detonation should have occurred.
In modern systems, the ECU also monitors detonation, and most often in the same “old-fashioned” way, literally by ear. The system includes a knock sensor, which is practically a microphone. This sensor is mounted on the cylinder block.
<
Knock sensor and its characteristic location on the cylinder block
If characteristic knocking noises occur in the engine, the ECU “hears” them and takes action. Some systems do not have a separate knock sensor, and knock is monitored not “by ear,” but by monitoring the current flowing through the spark plugs. We will not consider this technique in more detail; we will only mention that this was done, for example, using the Trionic system on Saab 9000 cars.
One way or another, after detecting detonation, the ECU must make sure that there is no more detonation. As a rule, the ECU shifts the ignition later, that is, reduces the SOP, until it realizes that detonation has stopped. Excessively late ignition will lead to a decrease in power, as we already discussed at the beginning of the article, but a decrease in power is much better than mechanical damage to the engine. It is in this way that a modern engine is fundamentally capable of operating even on eighty-grade gasoline. It will start and work, and most likely will not fall apart right away. However, it will not be able to develop normal power, and will “shut up” when trying to drive actively.
Therefore, all statements that a modern engine is able to “adapt” to any gasoline and that AI-92 can supposedly be poured into any engine are unfounded. There is no adaptation. What happens is something like this: the ECU “hears” detonation and shifts the OZ until it disappears, then gradually returns the OZ back, again “hears” detonation, and so on in a vicious circle until gasoline with the correct octane number gets into the engine. The main problem with this mode is that detonation still occurs, just not constantly, but intermittently. Of course, this prevents the engine from falling apart immediately, but there is no benefit from it. In addition, late ignition leads to hotter exhaust gases reaching the outlet, or even a still burning mixture, which can lead to burnout of the valves and overheating of the catalyst, and overheating of the catalyst is almost guaranteed to destroy it.
On some turbocharged engines, the ECU also has the ability to control the boost pressure. Of course, not directly, but through the control of the solenoid valve in the pneumatic line to the turbine wastegate actuator. As a rule, this is done in those engines where the boost pressure reaches values that, in certain situations, can provoke detonation. In these systems, when detonation occurs in the presence of high boost pressure, in addition to the shift of the boost pressure, the mentioned solenoid valve will open, leading to the opening of the wastegate and a decrease in boost pressure. This is done on the already mentioned Saab cars, and this valve is called APC.
Therefore, it is strongly recommended to use fuel with the octane rating for which the engine is designed. In a serviceable engine with the correct fuel, detonations will not occur.
Glow ignition
There are situations when the air-fuel mixture ignites not from a spark, but because there is a place in the combustion chamber that is heated above the permissible temperature. This could be, for example, carbon deposits in the combustion chamber, or a candle with an incorrect heat rating - as a rule, this is a consequence of an error in the selection of candles.
This situation is called “glow ignition” and is bad primarily because ignition occurs earlier than planned. This is bad in the same way as an excessively early OZ - in fact, part of the work of gases will be directed “against” the useful work. In addition, such ignition of the mixture can cause detonation, and we have already talked quite a lot about the problems associated with this.
The problem with glow ignition, however, is a purely “mechanical” problem - the control unit does not have the ability to somehow influence this process, so a diagnostic scanner will not be of much help here.
conclusions
It turns out that it is too early for auto mechanics and car owners to throw knowledge about UOP to the back of their minds. For example, understanding this parameter will easily help, even with only a standard protocol, to “catch” the fact of detonation, and according to the factory protocol on many cars, parameters such as the detonation OZ shift for each cylinder are also available. And understanding the processes occurring in the engine and control system is the main condition for quickly understanding the causes of the malfunction and eliminating it. We will continue to talk about other processes in future articles.
Bochkanov Evgeniy Aleksandrovich
© Legion-Avtodata
Moscow, Zelenograd [email protected]
How to determine the ignition timing and adjust it
How can you determine the initial ignition timing
? Ignition timing is a rather important point on which the engine operation of a carburetor and injection engine operating on gasoline or gas fuel directly depends. Knowing how to determine the OZ ignition timing on a car yourself, you can set everything up correctly.
So, what is OZ? In theoretical terms, this is the flashing of a fuel assembly (enriched fuel composition) inside the power plant at the moment when the piston reaches its apogee or TDC.
The ignition timing or ignition timing should be set skillfully, since it directly affects the functioning of the engine. The fact is that it is the gas pressure inside the engine system that affects the efficiency of the power plant and the efficiency of its operation. Gases are formed after the combustion of fuel assemblies, and their pressure must reach a maximum at a point after TDC, called by engineers the 10th degree. Thus, according to all theoretical calculations (which has been proven more than once in practice), the maximum gas pressure is ensured, which acts on the piston and pushes it down.
Setting the ignition timing on a VAZ 2110 car: general information
The ignition timing should be checked, as well as its installation, at idle speed of the car engine, at a crankshaft speed of 820–900/minute -1. The angle should be within 0±1° to the top dead center. If the ignition angle is incorrectly set, the car engine will overheat, will not be able to develop full power, will consume excess fuel, and detonation may occur.
The ignition timing should be checked using the mark located on the flywheel, as well as the scale located in the clutch housing hatch - in this case, the rubber plug must be removed. The pistons of the first and fourth cylinders, in the process of combining the marks located on the flywheel and the middle mark located on the scale, are installed at TDC. On the scale, one division equals 1° of crankshaft rotation.
Doctrine on fuel assembly combustion
How to check the ignition timing
As many people know, fuel assemblies do not burn completely after ignition. Or rather, it burns out, but not immediately. Moreover, it does not detonate in the engine cavities, as some amateurs believe. The combustion of gasoline is a chemical reaction that has its own speed. And you need to be able to coordinate it with the speed of the piston stroke. This is the method of obtaining the most optimal gas pressure at the required point.
The combustion of fuel assemblies is not just a chemical process, but a whole theory. For example, if you delve into the jungle of this area of science, it becomes clear that with a small spark from a candle, the front of the flame begins to spread. The spark burns for approximately no more than 1 millisecond, and during this insignificant time the temperature reaches the highest Celsius level - 10 thousand degrees. The volume of flammable material that receives the first charge is essentially instantly destroyed. And from this heat the flame front is transmitted throughout the entire chamber (CC).
It has been proven that the initial combustion rate is negligible. But as the flame increases, the speed increases by 70-80 times. Remains of fuel assemblies, which do not disappear completely due to the fact that they are located near the less cooled walls of the combustion chamber, burn out noticeably more slowly. Thus, the entire combustion process takes approximately 30 degrees UPKV (rotation angle of the crank shaft).
At different positions of the SPD, correspondingly different flows occur inside the engine. If the angle is set correctly, the ignition is not disrupted, then the optimal pressure of gases is delivered to the place where the piston passes TDC. According to the degrees scheme – 10-12°.
If the OZ deviates, for example, towards delay, then the most optimal gas force maintains the 45 degree zone, which implies a lower position of the piston. It turns out, as we see from the diagram, that the gases seem to be sent after the piston going down. The efficiency of such piston operation is reduced to almost zero.
It is in such cases, during the process of late ignition, that the fuel assembly burns out after the exhaust valves open. And the hot gases of the exhaust system can easily ignite only the approaching charge of the mixture. This is what causes the popping sounds, which are sent to the air flow distributor.
An unfavorable situation also occurs with early ignition. In this case, the apogee pressure level occurs at TDC or earlier. The gases begin to put pressure on the piston, which has not yet reached its apogee. Obviously, this option will not lead to anything good - the power of the internal combustion engine will noticeably decrease, detonation and other troubles will occur.
Definition of OPP
Initial ignition timing
To be able to determine the timing, you should first become familiar with the following concepts:
- The SOP depends directly on the amplitude of rotation of the crank shaft of the internal combustion engine. The higher the engine speed, the earlier the fuel assembly ignites and the closer the peak of optimal pressure is to the desired point
- The temperature of the power plant and the fuel mixture combined also affects the SOP. The colder the motor, the slower the reaction (the speed of the chemical transformation). Therefore, the OZ in this case should be set at an early moment. And vice versa, if the temperature is high, then at a later date.
- In addition, it is affected by the load placed on the motor. The faster the engine rotates, the lower the SOP must be set so that detonation does not occur (this is due to the fact that at optimal engine load, much more fuel assemblies begin to flow into the cylinders).
Ignition timing is delayed
Misaligned distributor adjustments can lead to the fact that a discharge on the spark plug electrodes forms too late - when the piston is already at top dead center (TDC) or has begun to move downwards - the working stroke. In this case, the following characteristic signs are observed:
- The crankshaft speed at idle is reduced.
- The power of the power unit drops noticeably, the car accelerates very sluggishly. The reason is the loss of flash energy of fuel burning during the working stroke of the piston.
- A strongly delayed spark causes the engine to shoot into the muffler. Gases rush through the opening exhaust valve.
- It is more difficult to start the engine when cold.
- Fuel consumption is increasing.
Reference. Symptoms of late sparking are more noticeable on vehicles equipped with gas installations. The moment of flash is very important here, since more propane is supplied to the cylinders and if the discharge is delayed, it burns out already in the manifold.
The consequence of late ignition on a diesel engine is difficult starting even on a warm engine and “sneezing” of black smoke from the exhaust pipe. Since fuel injection occurs at the very beginning of the power stroke, diesel fuel does not burn completely and is thrown out in the form of soot. If the fuel supply occurs too late, the power unit will not start at all.
Setting up OZ
Previously, many experienced owners of domestic cars adjusted the original OZ in the “old-fashioned” way, by ear. In fourth gear at medium speed while driving, if you suddenly press the accelerator pedal, you should clearly hear popping noises, and after that the car should confidently pick up speed.
Certain car ignition timing angles
In the absence of detonation, the ignition distributor is rotated at the advance point until popping sounds and confident acceleration appear. Conversely, late ignition is set when detonation lasts more than two seconds and acceleration does not occur.
In car service centers, a special device is used to regulate the OZ - a strobe light. As a rule, in all SZ equipped with a distributor, only the initial SOP is regulated.
A new opportunity to fine-tune the SPD appears with the advent of microprocessors. Thus, the advance angle is set for various operating modes of the internal combustion engine. If in distributors the VU and CR (vacuum and centrifugal type sensors) are responsible for changing the advance angle, then smart electronics itself calculates the required angle. This is done according to the firmware in the controller.
So, you should definitely start setting up the SOP with preparation. You need to arm yourself with a strobe light or test lamp, as well as a nut wrench. Also, in this case, you cannot do without a special tool designed to rotate the crank shaft. It is the position of this shaft that determines the value of the SOP.
Note. Recently, it has become fashionable to use a special corrector designed to change the SOP. This device determines the SOP automatically.
Here's how this operation is performed:
- The car is placed in neutral;
- The handbrake is applied;
- The cap-cover is removed from the distributor;
- Using a special tool, the crank shaft is rotated until the slider aligns with the mark on the timing belt.
Indicator lamp for SOP
Without an indicator or control lamp, it will be impossible to determine the SOP. The lamp should be connected with one lead to the bobbin and the other to the surface of the motor.
- The distributor drive lock is loosened (now the distributor can be rotated in any direction);
- The car ignition is turned on;
- The slider is clamped, and the distributor rotates against its direction.
Attention. You can determine the direction of movement of the slider as follows. While turning the crank shaft, look at the slider (it will be noticeable in which direction it rotates).
So, you should rotate it against the direction of the slider until the indicator lamp goes out. Then the distributor is turned back a few notches (very carefully) and a mark is made - this is the fixed ignition moment. The distributor body is fixed, the cap-cover returns to its place.
In order to somehow automate the adjustment of the VOP, a VR (vacuum regulator) is installed. This additional device makes it possible to transform the angle in automatic mode and depending on a particular load.
For example, when the engine operates in the idle mode, the VR turns the OZ towards the late ignition, and when the load on the engine increases, the speed increases, the VR is turned off and another regulator (CR) is activated, which sets the advance angle to the earlier ignition.
Why does the OZ go astray?
Such situations occur quite often. The standard parameters are lost because they are not suitable for specific operating conditions. And here the OZ must be adjusted independently, manually.
Why does the OZ go astray?
However, you should first check whether the intervention procedure is really necessary. As was written above, to test the correct OZ, the car needs to be accelerated on the highway to 35-45 km/h, then sharply press the accelerator pedal.
If short-term detonation noise occurs and strong acceleration occurs, you don’t have to do anything with the OZ. The angle is set correctly, everything is clear. You can also verify this if detonation disappears after the speed mark of 60 km/h.
Otherwise, if the detonation sound does not stop or the car does not accelerate, this indicates a faulty ignition. The first option - the OZ is set to an early moment, in the second - to a late moment. And accordingly: you need to rotate the distributor against the movement of the slider or in the direction of its rotation.
Determination of OZ on cars with LPG
Gas cylinders have become widespread recently. They are installed on cars equipped with gasoline engines. As a result, you can save a lot on fuel. Gas costs much less than gasoline.
However, installing HBO also brings the car owner problems associated with setting the ignition timing. A priori, fuel consumption increases (for gas it is an order of magnitude higher), and the afterburning of the fuel assembly occurs during the exhaust phase and lasts much longer.
What is a UOZ variator?
If you take into account all these nuances, then setting the OZ will be as easy as shelling pears. In this case, the gas will be converted into energy before the exhaust system starts operating, and the overall efficiency will increase significantly.
To set up the OZ on cars with LPG, it is customary to install automatic regulators such as a variator. They are purchased complete with gas equipment.
We hope that you will no longer have the question of how to determine the ignition timing and set a certain OZ.
Ignition adjustment on carburetor engines
Adjusting the ignition by turning the distributor
It is produced by turning the ignition distributor housing (distributor), the shaft of which is driven by transmitting torque from the engine through intermediate gears. On engines of the VAZ 2108 family, the distributor shaft is rotated by direct engagement with the camshaft, but this is not of fundamental importance. The most important thing is the exact coordination of the ignition system with the mechanics of the internal combustion engine.
By rotating the distributor, the desired ignition timing is adjusted. Setting late or early ignition is everyone’s business and depends on the desire to save fuel or driving style.
Regardless of whether the distributor is installed - contact or non-contact (with a Hall sensor), turning its body against the direction of rotation of the rotor increases the ignition timing. That is, to make the ignition “early”, you need to determine in which direction the rotor rotates - you can remove the cover from the distributor and turn the crankshaft. It will be clearly visible where to turn the distributor for early ignition. But the required ignition timing is not always determined by the engine characteristics specified by the factory. Its value is also affected by the octane number of the fuel.
This is very clearly visible when using gas equipment on cars with carburetor engines. When switching from petrol to gas for the first time, the car refuses to accelerate. To achieve normal engine operation, you have to not only turn the ignition on early, but turn the distributor as far as it can go in the opposite direction. And vice versa, when switching back to gasoline, such ignition advance will be unnecessary - the knocking of the piston pins caused by detonation will “tell” this. This is due to the large difference in octane numbers between gas and gasoline. A very simple but effective way to check the accuracy of setting the advance angle is to test the operation of the motor in motion. When you sharply press the gas pedal, a slight short-term knock of the piston pins should appear in the engine gaining speed.
How to set the ignition timing on the injector yourself
How to set the ignition timing on an injector
Long gone are the days when the world's first car rolled off the assembly line. It was equipped with a new injection system. The production of these machines today has increased 10-20 times. As you understand, we are talking about cars with injection systems. Let's find out how to set the ignition timing on the injector.
Today, 80 percent of people become owners of just such cars. Therefore, the ability to configure the ignition system is regarded as a very important advantage. It will allow you to always stay on the move, saving money on repair services and fuel.
Pro tip on how to check the quality of ignition timing settings
To check whether the ignition timing is set correctly, you must be guided by the following signs:
- In the operation of a warmed-up power unit, no “dips” should be felt at idle.
- A short detonation (about 3-5 seconds) should be present if you press the gas pedal with a sharp movement, the movement should occur on the most even section of the road surface in fourth gear and a speed of approximately 50 kilometers per hour. That is, the sound of fingers should be heard. If this does not happen, it means the ignition is too late. If this phenomenon is observed, but does not go away, then the ignition is too early.
Tools and Diagnostics
Tools are an important part of any job. They will be needed to make adjustments to the process of issuing SOP. Mandatory tools include screwdrivers, a measuring instrument, wrenches, and preferably a laptop with a specially installed program designed for diagnosing injection-type power units.
First, you should know that on an injection engine, electronics are responsible for driving the car. It is subordinate to the head – the computer system. Conducting quality testing of all components of the injection system is the first thing to do.
Here's how it's done:
- the ignition is turned on;
- the supply of fuel by the electric fuel pump is checked (the characteristic sounds of activation of the pump performing the injection should be heard).
If there are no sounds of the fuel pump operating, you need to check the relay that controls the operation of the pump.
Check UOS with a laptop
You should also pay attention to the instrument panel, on which the indicator may indicate. If this is the case, then you need to connect a laptop with a special program to the BC system. It will help you analyze errors and display them in a list.
If no problems are identified at this stage, then it’s time to start the internal combustion engine. On a functioning engine, the throttle assembly is checked first.
Here's how it's done:
- first, an external inspection of the sensor, which is responsible for the position of the damper, is carried out;
- then the wiring condition is tested;
- if everything is in order, it would not be superfluous to measure the voltage of the entire circuit and sensor using a measuring device;
- the obtained values must be compared with the standard indicators specified in the vehicle repair manual.
A normal current value can be considered to be in the range of 0.45-0.55V. The current value should not exceed 12 V, and the throttle opening degree should not be more than 1%. If deviations are noticed, then you need to adjust the throttle drive so that it closes the damper entirely.
Next, you need to press the gas pedal all the way, re-measuring the indicators this way. The damper open level should be 90%. As for the sensor voltage, the voltage must be 4.5 V.
Throttle actuator tuning is considered an important part of the work included in the diagnosis. It allows you to simultaneously set up a node and check the consistency of the values.
In order to adjust the drive you need to:
- disable the RDPV (sensor responsible for additional air flows);
- half open the throttle;
- make adjustments so that the damper completely covers the hole.