What is ignition timing?
This term refers to the moment when a spark occurs between the electrodes of the spark plug. It is determined by how the crankpin of the crankshaft is rotated. The determining factors are the degrees of rotation of the journal to the upper static point of the piston.
Roughly speaking, this is the moment at which the combustible mixture is ignited in the car.
The engine operating mode is decisive in adjusting the fuel ignition time. With it, an optimal change in pressure should occur in the cylinder. When calculating the correct time to ignite the fuel, do not forget that the combustible mixture always burns with a delay, so you need to work ahead.
How can I tell if it is installed correctly?
It is not difficult to carry out such a check. Find a flat section of the road and accelerate your car on it to a speed of 45 kilometers per hour. Engage fourth gear and observe the behavior of the car.
If at that moment a detonation occurred, which subsided after a few seconds, then everything was installed correctly. If the detonation has to wait, it means that the arson occurs too early.
If there was no detonation at all, it means the car has a late ignition that needs to be adjusted.
How to set ignition timing?
In modern cars, fortunately, a special program is responsible for the correct timing of fuel ignition. She herself checks for signs of imminent detonation, and if she finds them, she moves the point to the later side, and then begins to move it to an earlier and earlier time.
However, motorists often have to learn for themselves how to set the ignition timing.
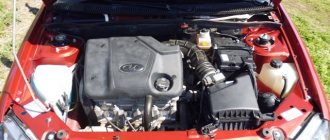
Pulley mark
So, first you need to remove the spark plug. There will be a hole in its place. It must be sealed by hand. Then, using a previously prepared key, turn the crankshaft so that compression begins to occur in the first cylinder. Be prepared that the released air at this time will begin to come out of the hole that you are holding with your hand.
Next, remember what fuel you “feed” your iron horse. If it is 92nd or 95th gasoline, find the mark on the pulley and align it with the mark indicating 5 degrees.
If you are used to buying cheaper fuel, then it is better to combine the same mark with the area corresponding to zero degrees.
Now you need to find the rotor. Its outer contact should be inclined ten degrees towards the first cylinder. There is a line running through the spring latches that should be parallel to the centerline of the motor. Check if this is true. If the line is deviated, bring it to the correct position.
If this fails, find the place where it is attached to the ignition mechanism. You will have to unscrew the nut and then rotate the device until it is in the desired position. Remember to put the nut back in place, just don't over-tighten it.
Achieving tension
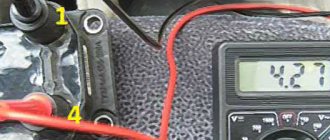
For the next step you will need a voltmeter. It will need to be connected to the ignition coil. Make sure that the coil terminal is connected to the low-voltage terminal of the distributor. The second contact of the voltmeter should be connected to ground.
Turn on the ignition. At this stage, free. We begin to carefully turn the breaker body in a clockwise direction until voltage readings appear on the voltmeter screen.
After this, you can tighten the fastening nut tightly.
Completing setup
Ignition timing adjustment is almost complete. Now you need to turn off the ignition. You can reinstall any parts that you had to remove during setup.
Don't forget to screw the spark plug back in.
After all the work is completed, check whether the fuel is now ignited correctly in the manner that we described earlier.
If you found our article useful, please leave a comment below and share your experience in setting the fuel ignition time.
Installing and adjusting ignition timing without using a strobe
The simplest and relatively reliable way to set the ignition timing at home, in our opinion, is to set it using a test lamp. Prepare a cleaning cloth, a nylon brush, a probe, a starting handle and a 12 V control light.
The sequence of the operation is as follows:
1. Set the crankshaft to the top dead center position of the compression stroke of the piston of the first cylinder. If the ignition distributor has not been removed from the engine, then the compression stroke of the first cylinder is determined by removing its cover - the rotor contact should be opposite the internal contact of the cover, connected by a wire to the spark plug of the first cylinder.
If the ignition distributor (after replacement or repair) is only installed on the engine, set the piston of the first cylinder to the beginning of the compression stroke.
2. Loosen the locking plate nut.
Rotate the housing of the ignition distributor-distributor
3. Turn the distributor body around its axis clockwise until the breaker contacts close - the lamp goes out.
Slowly turn the distributor body counterclockwise until the lamp lights up, while lightly pressing the rotor counterclockwise to select the gap in the drive.
While holding it in this position, tighten the locking plate nut.
Ignition system requirements
The basic requirements are listed below.
- Creates a spark in the correct cylinder based on the firing order of the cylinders.
- The ignition timing must be timely. The spark must appear at the moment of ignition in accordance with the optimal advance angle, depending on the engine speed and load on it.
- The spark energy must be sufficient. The amount of such energy depends on the composition, temperature and density of the fuel.
- Ensuring continuous operation during operation.
How to set the ignition correctly
Before setting the ignition, you need to remember that when carrying out any installation work on the car, all removed parts must be cleaned of dirt and grease. It would also be a good idea to clear the scale, and to make it easier to read the indicators, mark the central mark corresponding to TDC with a white marker.
All internal parts of the distributor are kept under voltage by the ignition system. If the distributor is faulty, attempting to adjust the spark plugs may result in electric shock. The vehicle's parking brake must be set to prevent it from rolling away.
Installation procedure
The question arises, how to set the ignition. So, we learned that combustion of the mixture should occur when the piston reaches TDC. This moment is determined by the position of the crankshaft. In other words, we are talking about the position (in degrees) of the crankshaft to TDC. If there is a shift towards TDC, then this position is called late ignition. The shift to BDC is called early SVR. The value of the latter directly depends on engine speed. This means that at a high shaft rotation speed, an early UOZ is installed. The procedure itself, how to set the ignition on a car, is much simpler than its verbal presentation.
Without going into details, we put the car, for example, a VAZ 2105, in neutral with the hand brake applied. The sequence of operation consists of removing the distributor breaker cover (distributor) and turning the crankshaft with a special key until the slider is directed towards the first cylinder. Visually fix the position of the factory marks and ebbs on the pulley and front cover. Their coincidence is extremely important.
We exhibit ourselves
Before you set the ignition on your car, you need to check:
- Serviceability of spark plugs.
- Breaker contacts.
- Capacitor for charge/discharge (tester).
- The ignition coil and the wires coming from it.
After making sure that the carburetor and vacuum unit are in good working order, you can start setting the ignition.
Crankshaft mark VAZ 2109
We assume that the distributor needs to be returned to its place after repair. To do this, we find the 1st cylinder and focus on the crankshaft and low tide marks on the timing cover (gas distribution mechanism). The operation is performed by turning the crankshaft. This coincidence will indicate a compression stroke. A plug inserted into the spark plug hole to check compression will definitely fly out. Next, you need to align the mark on the pulley with the longest mark on the cover. We install the distributor into the timing splines so that the slider is positioned in the direction of the 1st cylinder.
Next, to turn the crankshaft, the distributor is raised slightly and the gearing is transferred clockwise to one spline. This is done to give the distributor final adjustment. The contact gap is set according to the factory instructions. If there is a run-up between the marks, then the distributor needs to be turned a few degrees in one direction or another. Need to remember:
- The pulley mark has moved in the direction of rotation of the crankshaft, late ignition occurs. The distributor must be turned counterclockwise;
- The mark on the pulley is behind the ebb on the cover, so we have a much earlier ignition. Then turn the distributor clockwise by a certain number of degrees.
The advance angle can be set using a conventional test lamp or a strobe light. But that's another topic.
What equipment will you need?
A complete list of required equipment is presented below:
- crooked starter or ratchet wrench;
- a flat-head screwdriver equipped with a wide, powerful blade;
- open-end wrench 12×13;
- a set of different probes;
- rubber cone plug;
- spark plug key;
- vehicle operation and repair manual from the manufacturer;
- strobe;
- protective gloves and closed shoes;
- surface degreasing agent and lubricant;
- cloth rags and paper towels.
How to adjust the ignition yourself
For correct operation of the engine, it is necessary that at a specific moment (the time the piston reaches TDC) a spark is formed between the electrodes of the spark plug, igniting the fuel before the piston approaches TDC and the gas pushes it down.
We also recommend reading our specialist’s article on how to clean spark plugs.
We advise you to further study the article by our author, which talks about what the tightening torque of spark plugs is.
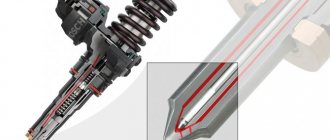
To regulate this moment, the ignition system has a special distributor, which is based on a slider and a contact group of the breaker. The most important adjustments to cam ignition are the gap between the breaker cams, the angle of the closed state of the contacts and the moment when the spark ignites.
Preparatory work
Before installing the ignition, make sure that the following conditions are met:
- The spark plugs must function properly and be ready for use. If there is oil deposits, you can resort to calcination. It is strictly not recommended to use sandpaper, as the special coating may be damaged. After removing carbon deposits, fine abrasive may not get where it is needed. As a result, the candle will be unsuitable for further use. Do not try to heat the candle red hot. The main thing is to ensure that all oil deposits burn out. The spark plug gap should be adjusted evenly, following the vehicle's operating instructions. Use a wire gauge.
- It is necessary to check the condition of the breaker contacts. If there are traces of metal burnout and corrosion, it is recommended to replace the contacts to avoid a short circuit. Experienced car enthusiasts recommend Beru contacts.
- It is recommended to check the capacitor for charge and discharge using a tester. The flow of current should occur slowly and smoothly. Use a pointer tester for this.
- Make sure there is good contact between the wires from the ignition coil. You can check the coil itself using a tester, a pressure gauge, or at a stand in a car shop (read more about how to check the ignition coil).
- The ignition coil, distributor and distributor cap must be cleaned. Feel free to change the lid if there is carbon deposits on it.
- It is necessary to evaluate the condition of the carburetor. If it does not respond when adjusted, it must be replaced.
- It is necessary to check the functionality of the vacuum ignition timing. The drive must move without jamming, the walls of the tube must be thick without cracks or breaks.
Ignition adjustment
Next you need to start making adjustments. First, connect the strobe by connecting its power wires to the battery terminals. Attach the strobe sensor to the high-voltage spark plug wire of the first cylinder. If this step gives you any questions, please refer to the operating instructions. The strobe light will illuminate the scale located on the rotating flywheel with short flashes, highlighting the desired mark. This mark corresponds to the ignition timing at which the spark plug produces the spark necessary to activate the engine. At the moment when a spark is generated, the signal from the sensor enters the strobe. At the same time, the device turns on and illuminates the numerical value that has arisen at a given moment in time.
To do the job, you will need the help of a third party who has a basic understanding of driving. Ask him to rev up the engine. When your assistant presses the gas pedal, you will observe the scale under the light of a strobe light. Keep your hands away from moving engine parts. In general, the engine should be allowed to cool a little before doing this.
After this, point the strobe light at the flywheel and find the numerical value. The strobe flashes should capture this value despite the rotation of the flywheel. This numerical value corresponds to the ignition timing in degrees.
Since the ignition operates non-linearly, this should be normal. As the speed increases, a correction is made to this angle. To determine the total angle, it is necessary to accelerate the engine to at least 3,500 rpm.
When the engine is running, the vacuum regulator makes adjustments to the numerical value of the ignition timing. Be sure to turn it off before starting the engine. If you do not know the exact numerical value of the optimal ignition timing, contact a car mechanic for help or look in a reference book.
Before making adjustments, loosen the bolt that secures the distributor housing to allow it to rotate freely. To adjust the angle, rotate the distributor in different directions to achieve early or late ignition.
Earlier ignition is achieved by rotating the distributor counterclockwise. The slider should rotate clockwise. Carry out the adjustment at increased engine speeds, slowly rotating the distributor housing. Continue rotating until the mark reaches the correct position.
Features of ignition settings in a carburetor engine
Setting the ignition according to the marks on a carburetor engine is carried out in exactly the same way as on an eight-valve injection engine. The only difference is the need to manually adjust the ignition angle. In a service station environment, this is done using a strobe light and tachometer.
But you can also make adjustments “by eye”. All that is required for such an adjustment is a 10mm spanner. The algorithm is as follows:
- Raise the hood and use a wrench to loosen the three nuts holding the ignition distributor cap to the body.
- We scroll the lid so that the mark on it coincides with the “zero” mark on the housing scale.
- We start the engine and warm it up to operating temperature.
- Scroll the cap clockwise until the engine begins to produce the maximum number of revolutions. After that, turn it half a division to the left.
- We get behind the wheel and accelerate the car to 60-70 km/h in 4th gear. We press the gas pedal sharply down and listen to the engine. If there is persistent detonation (fingers knocking), we have too early ignition. We stop and turn the lid a little more counterclockwise. With the ignition angle set correctly, when we press on the gas, detonation should last no more than 2 seconds, after which the engine, having picked up speed, continues to operate normally.
- Having achieved the desired result, tighten the cover nuts.
How does ignition timing work?
This parameter indicates the time when the combustible mixture is ignited. And it is determined by the position of the crankshaft when an impulse is applied to the spark plugs in advance relative to TDC (top dead center), and is measured in degrees. In order for the working mixture to completely burn out in the cylinder, it takes some time, so if the mixture is ignited at the moment when the piston is in the highest position (TDC), then its combustion will occur during the expansion and exhaust strokes. This will not provide effective pressure on the piston.
Thus, the ignition point should be selected ahead of the curve so that maximum pressure occurs at TDC. The value of this moment depends on a number of parameters, among them: the number of engine revolutions, the quality of the combustible mixture (lean or enriched), its fractional composition.
It should also be noted that detonation can often occur in gasoline engines, even at optimal angles, so you need to set the advance angle a little more.
How is the advance angle adjusted?
In injection VAZ-2110 cars, ignition adjustment is carried out by an electronic control unit. It receives the necessary information from the crankshaft position sensor and, based on it, determines the moment when it needs to fire a spark. But this only happens when the valve timing is set correctly. Otherwise, everything can happen exactly the opposite.
The advance angle in carburetor engines is also adjusted automatically. A vacuum corrector is used for this. The principle of its operation is to change the advance angle depending on the number of engine revolutions. This happens due to the difference in pressure arising under the throttle valve of the carburetor, to which the corrector is connected by a tube.
In addition, the advance angle is also manually adjusted by rotating the ignition distributor cap in one direction or another. This is a kind of rough tuning that allows you to adjust the engine to the quality of the fuel.
What are the consequences of incorrect ignition timing adjustment?
In modern engines, ignition timing is adjusted automatically using a special program. Thus, this indicator constantly moves to the earlier side by fractions of degrees, and as soon as the first prerequisites for detonation appear, the program moves the ignition point to the later side by several degrees, and this process is repeated in a circle.
If you set the advance angle incorrectly, this will lead to unstable operation of the engine during idle, it will be difficult to start, fuel consumption will increase, and this will also negatively affect the developed power.
A very large angle can lead to engine detonation, the consequences of which can be emergency damage to the engine. Based on all of the above, it becomes clear that information on how to set the ignition timing on your own is quite relevant and will help save the family budget, as well as extend the life of the car.
Installing the ignition on a classic using a lamp
Now it’s worth talking a little about how to set the ignition marks of the 402 engine or any other that uses a contact system. You will need a ratchet wrench, a length of wire, and a test light. You, of course, must have the marks on the camshaft and crankshaft correctly. Use a special wrench to turn the crankshaft until the marks on the pulley align with the protrusions on the timing cover. In this case, the large notch on the camshaft pulley should be opposite the tooth in the upper part of the cover.
In this position, the fourth cylinder should be at TDC. This is how the ignition marks of the VAZ-2106 and other classic models are installed. Install the slider on the distributor opposite the contact that corresponds to the fourth cylinder. Connect the lamp to the output of the coil “K” and ground. Rotate the distributor body, fix it in the position when the lamp goes out. If the cylinder head cover is removed, put it on, then start the engine, warm it up to operating temperature and adjust the advance angle by turning the distributor housing in the desired direction. Please note that the gap in the breaker contact must be set correctly.
Setting the ignition timing - instructions for the patient
We will offer approximate instructions for this operation. First of all, the spark plug is removed, and the resulting hole is tightly covered with a finger. Then you need to turn the crankshaft with a special wrench until compression begins in the first cylinder, at which time air will come out of the spark plug hole. Next, you need to align the mark located on the pulley, indicating the TDC position, with the mark that corresponds to 5°, if you are using 92 or 95 gasoline.
If the octane number of the fuel is less than 92, then TDC is aligned with the 0° mark.
The distributor rotor is positioned with the outer contact (corresponding to 10°) towards the first cylinder, and the line that passes through the spring latches should be parallel to the centerline of the motor. If it is not possible to install the distributor in this way, it is necessary to unscrew the nut by which it is attached to the ignition device and, by turning the roller, install it in the required position. Next, you need to secure it, but do not tighten the nut all the way.
Now let's look further at how to set the ignition timing. A voltmeter or test lamp should be connected to the ignition coil, and its output should be connected to the low-voltage terminal of the distributor itself. The second contact of the voltmeter is connected to ground. Next, turn on the ignition and turn the breaker body clockwise until the control lamp lights up. Once you reach the point where the voltmeter shows voltage, tighten the fastening nut.
Having turned off the adjusted mechanism, it is necessary to install all the removed parts in their original places, while observing the tightening torque of the spark plugs. And the last stage is verification. It is carried out quite simply: after accelerating the car on a flat horizontal section to 45 km/h, engage fourth gear, at this moment detonation should occur for a few seconds, which will gradually subside. If it is not present, it means that the ignition is later, but in the case when it does not go away for a long time, it means that it is early.
How to set the ignition on a VAZ - procedure
First, you will need to install the ignition mark. The crankshaft can be rotated either using a ratchet or using a special wrench using the nut. On the front cover of the engine and on the crankshaft pulley there are ebbs and notches, the combination of which corresponds to different ignition timing:
- The first mark in the direction of travel is an advance of the ignition angle by 10 degrees. Angle advance is an adjustment to the fuel burning rate. So, 10 degrees is the mark for 72 gasoline.
- Next comes the middle mark - 5 degrees ahead. It is for 80 gasoline.
- The last, short mark is a lead of 0 degrees. This means that the mixture will ignite exactly at the moment when the piston is at top dead center.
After the installation of the ignition mark is completed, you must immediately set the required gap in the contacts, naturally, where they exist. To do this, remove the distributor slider and unscrew the breaker fixing screw.
Before setting the gap, it is advisable to clean the contacts with sandpaper (600-800)
The gap between the breaker contacts in the open state should be 0.35-0.40 mm. For this you will need a flat probe.
Well, now we go directly to the ignition installation of the VAZ 2106. We unscrew the distributor mount (nut 13), and then pull it out of the housing.
Now you need to insert the distributor into place, taking into account several mandatory points:
- We set the top dead compression stroke mark in the first cylinder; accordingly, at this moment the spark should appear in it. In order to catch this moment, we put the cover on the distributor and mark the place where the armored wire from the spark plug of the first cylinder enters. Now you need to remove the cover and align the outer contact of the slider exactly opposite the mark. That is, at the moment when the piston is at top dead center, a spark is supplied from the central wire of the distributor through the contacts of the runner to the armored line from the first cylinder.
- Next, to set the ignition to 2106, you need to draw an imaginary line between the roof latches and install the distributor in place so that this line is parallel to the engine block. It’s worth saying right away that you won’t be able to get into the drive splines the first time; you’ll have to twist the housing a couple of millimeters. This is not scary, because the ignition installation requires subsequent adjustment. It is important that the distributor is completely seated in place so that it rests against the block. Next, we pull it into place.
The device of the ignition system of the VAZ 2106
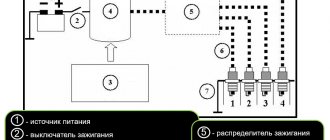
The ignition system (IS) of a gasoline engine is designed to create and timely supply pulse voltage to the spark plugs.
Composition of the ignition system
The VAZ 2106 engine is equipped with a battery-contact ignition system.
The ignition system includes:
- accumulator battery;
- switch (ignition switch with a group of contacts);
- double-winding transforming coil;
- distributor (distributor with contact-type breaker and capacitor);
- high voltage wires;
- candles.
The ignition includes low and high voltage circuits. Low voltage circuits include:
- battery;
- switch;
- primary winding of the coil (low voltage);
- breaker with spark arresting capacitor.
The high voltage circuit includes:
- secondary winding of the coil (high voltage);
- distributor;
- spark plug;
- high voltage wires.
Purpose of the main elements of the ignition system
Each SZ element is a separate unit and performs strictly defined functions.
Accumulator battery
The battery is designed not only to ensure the operation of the starter, but also to power the low voltage circuit when starting the power unit. During engine operation, voltage is supplied to the circuit not from the battery, but from the generator.
Verifying that the settings are correct
After we have dealt with the question of how to install the ignition on a VAZ 2109, we will consider the process of checking whether the adjustment work has been carried out correctly.
So, if configured correctly:
- during the process of rapid acceleration of the power plant (when the car is warm), there is no violation of the stability of its operation;
- When the car is moving at a speed of about 50 km/h in fourth speed and during sharp acceleration, there should be a short detonation of the engine. If there is no detonation, ignition is later; if it is present, but does not go through, it is earlier. We make the adjustment by turning the distributor in one direction or another.
Remember that it is often impossible to achieve stable operation of the power unit due to improper operation of the fuel system or even due to low quality gasoline. In this kind of situation, the best way out of it would be to set the carburetor to the most optimal operating mode and then adjust the ignition timing.
Very often, these ignition system malfunctions are caused by a trivial reason - an incorrectly set ignition.
Incorrectly set ignition does not have the best effect on the operation of the engine, worsening its performance characteristics. Many car owners, as soon as the first problems with the engine appear, due to lack of experience, decide that the cause of everything is a carburetor failure. In reality, the problem often lies in incorrectly adjusted ignition timing and can be eliminated if you know how to set the ignition on a VAZ-2109 (carburetor) using a simple set of tools.
- Difficulty starting the engine;
- unstable idling and uneven operation of the power unit as a whole;
- a noticeable decrease in engine power, as well as its throttle response;
- increased fuel consumption;
- the appearance of dips in speed when accelerating the car;
- the presence of thick black smoke in the exhaust gases when starting the engine and while driving (indicates that the timing is too early and, as a result, poor fuel combustion).
Each of these signs is the reason that the engine begins to work less efficiently, and this, in turn, affects the operating comfort of the car as a whole. Therefore, we recommend that you read the guide on how to set the ignition on a VAZ-2109 car with a carburetor engine in order to apply this knowledge in practice, if necessary.
In garage conditions, even a driver who has no experience in car repairs can adjust the advance angle. To do this, you will need a 10" wrench and a strobe light or light bulb. Naturally, with the help of a strobe, setting the ignition of the VAZ-2109 (carburetor) will be more convenient and accurate, but with the help of a light bulb you can also achieve a satisfactory result. Next, we will look at how adjustment work is carried out using both options.
Main malfunctions of the VAZ 2106 ignition system and their causes
Failures in the VAZ 2106 ignition system occur quite often. They can be caused by a variety of reasons, but their symptoms are almost always the same:
- inability to start the engine;
- unstable operation (triplication) of the engine at idle speed;
- reduction in engine power;
- increased gasoline consumption;
- appearance of detonation.
The reasons for such situations may be:
- failure of spark plugs (mechanical damage, breakdown, exhaustion of service life);
- mismatch of spark plug characteristics (incorrect gaps, incorrect heat rating) with engine requirements;
- wear of the conductor, breakdown of the insulating layer in high-voltage wires;
- burnt contacts and (or) distributor slider;
- formation of carbon deposits on the breaker contacts;
- increasing or decreasing the gap between the breaker contacts;
- breakdown of the distributor capacitor;
- short circuit (break) in the bobbin windings;
- malfunction in the group of contacts of the ignition switch.
Engine operation with early or late ignition
With the advent of electronic control of operation in engine design, many car owners completely forgot about such adjustments as setting the ignition.
It is even more vague how the engine’s performance changes when the ignition is set to early or late. But the loss of engine power can be associated precisely with an untimely spark supplied to the cylinders.
Violation of the ignition angle setting can be determined by engine operation
Signs of early and late ignition. Even the most experienced driver can easily identify a violation in the ignition installation based on several signs:
- Loss of engine power;
- Increased fuel consumption;
- Late reaction when pressing the gas pedal;
- Difficulty starting the engine;
- Characteristic “sneezing” manifestations.
In some cases, you can observe the release of burning products into the muffler. This “breakdown” is accompanied by popping noises in the exhaust system.
Cylinder detonation is destructive
The most unpleasant effect resulting from a violation of the installation angle is detonation in the cylinders when the engine heats up. Detonation combustion has destructive effects on parts of the cylinder-piston group.
Late supply of sparks to the cylinders additionally leads to the formation of carbon deposits on the cylinder walls, which disrupts the normal operation of the pistons in the cylinders and subsequently.
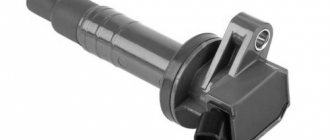
Design features and ignition adjustment. The contactless ignition system includes several elements:
- Breaker-distributor. The device ensures that a spark is supplied to high-voltage wires at the right time.
- High voltage coil. Provides conversion of low voltage supplied from the generator (or battery) to high values.
- Microprocessor ignition system. A small computer adjusts the ignition angle depending on engine operating conditions and crankshaft speed.
Ignition system of carburetor engines
Among other conditions for setting the angle, the octane number of the gasoline poured is also taken into account. Ignition in a small range can be adjusted.
In carburetor engines, instead of a microprocessor, a commutator is used, which is responsible for the quality of the spark.
Performing operations to adjust the ignition is only possible if a contactless ignition is installed on the engine without using a microprocessor. For cars with electronic control, faults in the system can be detected as a result of routine diagnostics by connecting a scanner to the connector of the car's on-board computer.
With electronic control, diagnostics are necessary
Computer analysis will help identify the true cause of engine malfunction. It is possible that unstable engine operation at idle speed, for example, has nothing to do with the ignition timing.
As a conclusion. Incorrect engine operation is not always associated with a violation of the ignition timing. Remember when spark plugs and high-voltage wires were replaced as part of maintenance.
Other reasons for unstable operation may include low-quality fuel that got into the tank after stopping at a “random” gas station.
Diagnosis of ignition system faults
In order to save time and money, it is recommended to check the functionality of the VAZ 2106 ignition system in a certain order. For diagnosis you will need:
- spark plug wrench 16 with crank;
- 36 head with handle;
- multimeter with the ability to measure voltage and resistance;
- control lamp (regular car 12-volt lamp with connected wires);
- pliers with dielectric handles;
- slotted screwdriver;
- a set of flat feeler gauges for measuring gaps;
- small flat file;
- spare spark plug (known to be working).
Battery check
If the engine does not start at all, that is, when you turn the ignition key, you cannot hear the click of the starter relay or the sound of the starter itself, the test should begin with the battery. To do this, you need to turn on the voltmeter mode on the multimeter with a measurement range of 20 V and measure the voltage at the battery terminals - it should not be lower than 11.7 V. With lower values, the starter will not start and will not be able to crank the crankshaft. As a result, the camshaft and distributor rotor, which drives the breaker contact, will not begin to rotate, and sufficient voltage for normal sparking will not form in the coil. The problem is solved by charging the battery or replacing it.
Checking the switch
If the battery is in good condition and the relays with the starter operate normally when starting, but the engine does not start, you should check the ignition switch. In order not to disassemble the lock, you can simply measure the voltage on the low-voltage winding of the coil. To do this, you need to connect the positive probe of the voltmeter to the terminal indicated by the signs “B” or “+”, and the negative one to the ground of the car. When the ignition is turned on, the device should show a voltage equal to the voltage at the battery terminals. If there is no voltage, you should “ring” the wire going from the contact group of the switch to the coil, and if it breaks, replace it. If the wire is intact, you will have to disassemble the ignition switch and clean the switch contacts or completely replace the contact group.
Checking the coil
After making sure that voltage is supplied to the primary winding, you should evaluate the performance of the coil itself and check it for a short circuit. This is done as follows.
- Disconnect the cap of the central high-voltage wire from the distributor cover.
- Insert a candle into the cap.
- Holding the spark plug with pliers with dielectric handles, we connect its “skirt” to the ground of the car.
- We ask the assistant to turn on the ignition and start the engine.
- We look at the spark plug contacts. If a spark jumps between them, the coil is most likely good.
Sometimes the coil works, but the spark is too weak. This means that the voltage generated by it is not enough for normal sparking. In this case, check the coil windings for opens and short circuits in the following order.
- Disconnect all wires from the coil.
- Switch the multimeter to ohmmeter mode with a measurement limit of 20 ohms.
- We connect the probes of the device to the side terminals of the coil (terminals of the low voltage winding). Polarity doesn't matter. The resistance of a working coil should be between 3.0 and 3.5 ohms.
If the actual winding resistance values differ markedly from the standard values, the coil should be replaced. In VAZ 2106 cars with a contact type ignition system, a B117A type bobbin is used.