Brake band in automatic transmission
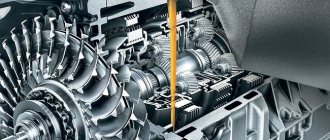
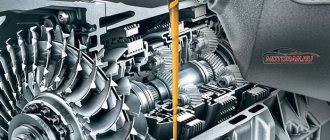
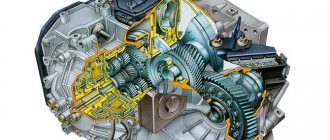
The essence of an automatic transmission is to transmit different rotation speeds to the ring and sun gears.
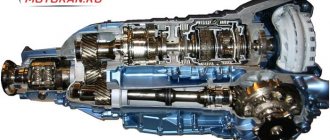
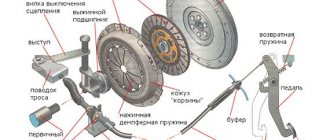
The advantage of an automatic transmission is that you can change speeds simply by using a small package of friction discs (clutches). Unlike a manual transmission, an automatic transmission also requires a torque converter to operate. During braking at full speed using a fluid coupling, the torque converter “isolates” engine rotation from the gearbox.
Another component of the automatic transmission is the brake band, which briefly blocks the elements of the planetary mechanism. Let's look at this element in more detail. So, in order to understand why a brake band is needed in an automatic transmission, it should be noted that one of the important aspects in the operation of an automatic transmission is the smoothest possible gear shifting.
As a result of turning the clutch and brake band on and off in a certain sequence, the torque from the internal combustion engine is redistributed in the planetary mechanism. This ensures smooth gear shifting.
The automatic transmission brake band is part of the planetary gear control system, as well as friction discs, freewheels, etc. If adjusted incorrectly, the automatic transmission brake band can cause the vehicle to jerk (when engaging first or reverse gear). Such a breakdown can shorten the service life of not only the automatic transmission, but also the internal combustion engine itself.
Purpose of the brake band
Many novice drivers ask me why a brake band is needed in an automatic transmission. The band brake secures the planetary mechanism of the automatic transmission. Self-clamping occurs. And then the tape relaxes. Thanks to this action, the car owner does not feel jolts when changing gears when one gear shifts to another.
Attention! If the transmission limit in the automatic transmission is adjusted incorrectly, the driver will feel a strong jerk when switching to first gear and reverse gear. Prolonged incorrect operation of the brake band will lead to failure of the engine and automatic transmission.
First, let's see where it is located.
- one end of the tape is connected to the machine body;
- the other end is with the servo piston.
The entire clamping procedure is carried out by the pressure force created by the transmission fluid.
- The planetary gear drum is locked when clamped. The latter occurs due to the servo piston. He is pushed by the oil and he clamps the tape.
- The planetary gear stops for a split second.
- The lubricating fluid enters the shutdown cavity. Next, release occurs, during which the drum begins to move in the other direction relative to the braking effect.
- At the same time, gear changes occur. Since the parts of the planetary gear, which restrained the brake mechanism, rotate in the other direction.
- The piston returns to its permanent location and the brake band is released. This process happens in a split second.
Where are they used?
Band brakes are installed on all devices where enhanced clamping torque is required. They are widely used in many areas due to the fact that the design is small, easy to maintain, and at the same time capable of developing sufficient braking force.
Most often they are installed on various types of crane structures, which include tower cranes, winches, and drilling rigs. In addition, band brakes are used on automatic transmissions, lathes, motor vehicles and small tractors.
Signs that a bolt needs adjustment
The need to replace the automatic transmission adjusting bolt on a Ford Focus 2 occurs when the gears are shifted incorrectly. Most often this manifests itself as follows:
- during rapid acceleration, during the transition of the automatic transmission from first gear to second gear, the car makes a slight push;
- sharp braking and the reverse transition from second to first speed can cause a sudden jerk;
- The car may jerk when switching between other speeds.
Such jerks are a consequence of the fact that the brake band of the automatic transmission does not have time to block the drum during sudden acceleration of the car. Sometimes this happens when changing other gears. When braking at a traffic light, the mechanism malfunctions and the smooth decrease in speed is replaced by a small jolt, which in a traffic jam can create an emergency situation. Typically, such problems are diagnosed on Ford Focus 2 cars with an automatic transmission that have a mileage of 100 thousand km or more.
Read
Adjustment, replacement and why a brake band is needed in an automatic transmission
The principle of fastening and operation of the automatic transmission brake band
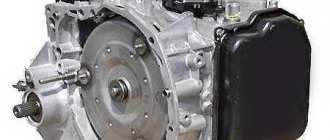
The brake band is a small part that is fixed to the automatic transmission housing.
Brake band mounting location:
- one end of the tape is fixedly fixed to the automatic transmission housing;
- the second end of the tape is connected to the moving piston of the servo drive.
The principle of fixing the planetary mechanism is similar to the principle of operation of brake shoes. Blocking occurs according to the “self-clamping” principle. All automatic transmission mechanisms are driven by transmission fluid. After liquid enters the servo drive activation cavity, its piston begins to move under the pressure of this liquid.
As a result, the brake band is clamped and, having fixed, blocks the elements of the planetary mechanism for a certain period of time. After a certain time, the planetary gear is unlocked and the transmission fluid flows further into the servo drive shutdown cavity.
The fluid pressure drops, the belt weakens, then the servo piston returns to its original position. The tape unclamps and returns to its free state.
The tape has two ends:
- one is attached to the box body;
- the second end of the tape is connected to the servo piston.
Automatic transmission mechanisms are driven by transmission fluid (oil), and the locking mechanism is no exception. When oil enters the drive cavity, its pressure moves the piston. As the latter moves, the belt is clamped and the planetary gear is fixed. The manipulation is performed for the required period of time.
Then, when the time comes to unlock the planetary gear, the oil enters the shutdown cavity. As the fluid pressure equalizes, the tape weakens, a special return spring begins to act on the piston, and it returns to its original state. The brake band is released completely.
Purpose of the brake band
The automatic transmission brake band is necessary to block the planetary gear elements for a short time. Fixing occurs on the automatic transmission housing. Despite its compact dimensions and small width, it provides good holding power.
The principle of fixation is taken from the work of brake shoes. The locking is based on the self-clamping effect. When the mechanism relaxes, the shock that accompanies the gear change softens. When the belt is released, the planetary gear drum, which was locked, rotates in the opposite direction relative to the applied braking effect. All manipulations occur as quickly as possible.
Features of operation
Typically, the tape is made from a flexible metal alloy and consists of many strips of it. The metal, despite its flexibility, is quite strong and can withstand high loads of abrasion and tearing. To make the belt more durable and reliable, a friction coating is applied to its inner part at the factory.
Appearance of the brake band:
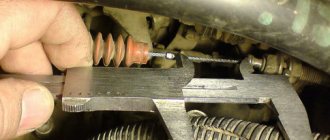
Operation of an automatic transmission leads to gradual wear of both the friction coating and the metal of the belt itself. Therefore, after a certain mileage, it may become necessary to replace it. On sale you can find both tapes supplied separately and equipped with tension bolts; It is advisable to purchase the tapes in the latter version. This is what the bolt looks like:
To the right of the screw you can see an adjusting pin with a lock nut, which may also be needed when adjusting the tape. The installation location of the tension bolts varies depending on the company that produced the automatic transmission: they can be located both inside the box and on its outside.
The most common malfunctions of the 4F27E automatic transmission:
- After several hundred thousand kilometers, these automatic transmissions almost always burn out the Direct and Overdrive Clutch packs, requiring replacement of gaskets, clutches, oil seals and bushings. In 2003, engineers tried to solve this problem by replacing Mazda clutches with reinforced one-way HeavyDuty designs, which partially solved the problem.
- The weak point of the 4F27E automatic transmission is also considered to be the drum seat of the rear cover caliper, which leads to oil leakage from under the rings. This occurs due to transmission overloads during forced driving. Moreover, it has been noticed that the rear cover of the Mazda is much softer than the cover of the Ford, which leads to its rapid wear.
Typical faults 4F27E /FN4A-EL:
Reverse drum play on the stator of the rear cover
From the very first years of operation, the clutches of the Overdrive (No. 247100A) and Reverse packages began to quickly burn out.
And since 2003, on Mazda FN4A-EL they were replaced with reinforced one-way clutches Heavy Duty (No. 247100BE), after which the burnout of the OD package decreased, approaching in terms of service life the thin Reverse and Forward-Direct clutches. Sometimes they order a reinforced set of clutches and steel discs. #247100AK.
The second in turn to burn out is the adjacent Reverse package 247110 - 247130. This happens at the next stage of wear, when oil begins to leave the Reverse package.
The rapid combustion of these couplings is associated with the design features of this type of box. Many manufacturers have a similar problem, even the Japanese Aisin with the U140-240 .
In general, the combustion of eternal clutches occurs due to the fact that the seat of the drum 556 (right) on the support of the rear cover 759 wears out and oil leaves from under the Teflon rings. Low oil pressure - weak pressing - slipping - heating - combustion.
The problem is both structural (caliper cover) and computer settings, which allow the electronic accelerator to overload this weak transmission unit. Moreover, if in Ford this problem occurs on very old cars, then in Mazda old age creeps up very early.
And this forced driving leads to significant lateral loads on the caliper, transmitted from the differential by gear 712 through gear 710 - this distorts the drum 556 and the outer Teflon ring of the cover caliper 759 stops slipping and jams between the drum and the cover, rubbing the slot-groove, through which then There is a loss of oil pressure. First in the Overdrive package, and a little later in the Reverse package.
There are other problems in this package: chips and dirt trapped under the rubber piston seals, aging of overheated rubber, but these are secondary problems, “the problem of weakened immunity.”
Back cover FN4A-EL No. 247759
Experts say that the material of the FN4A-EL is softer than that of the Ford automatic transmission (4F27E), so problems with the rear cover usually do not arise on the same Ford automatic transmissions. The problem area of the Mazda FN4A-EL.
The cover is being restored.
If you continue to drive with these vibrations, the OverDrive Drum #247550 sitting on the cover caliper with the Reverse package #247556 (below) breaks, and then the brake band with Pistons - OverDrive (247960) and the servo piston. From a lack of pressure, first the clutches burn, and then the drums themselves.
Brake band Overdrive (2-4) No. 247020 can be considered a consumable; more details about this problem can be found in the predecessor CD4E . Its malfunction leads to problems switching gears 2 and 4.
There is a reinforced version of this band - Overdrive Brake Band (Heavy Duty 4F27E) - No. 247020-AH.
Types of brake bands
Did you know that there are three types of band brakes. These types are given in the table, as well as their characteristics.
| Type LT | Characteristic |
| LAT 2 | This tape will operate at a pressure of no more than 5 MPa. Withstands friction temperatures up to 350 degrees. Used in tropical countries. |
| EM-K | This tape will operate at a pressure of no more than 3 MPa. Withstands friction temperatures up to 250 degrees. Used in countries with dry climates. |
| EM-1 | This type is used in various countries. Temperature characteristics – from – 60 to + 250. This is a rolled type of tape. |
The band brake for automatic transmission consists of elastic strips. They are manufactured at the manufacturing plant and undergo rigorous testing. Such tests include:
- tensile test. Strength and reliability are determined;
- flexibility test;
- to counteract abrasion.
Only after passing all these tests “excellently” can the band brake be allowed to be installed on an automatic machine. But no matter how durable it is or made of a flexible and indelible metal alloy, if the automatic transmission is used incorrectly, the vehicle will quickly become unusable.
Summing
The device is represented by two ends of the tape connected to a stopper for braking on the side where the rotating axis is located. The arms or lengths of the levers on which the force acts are proportional to the axis of movement. They can be both different and equal in size. If the arms are made equal, then such an indicator as the braking torque does not depend at all on the direction in which the pulley rotates.
The summing band brake is most often used in devices where a stable fixing torque is needed during reverse and forward rotation of the shaft. For example, in industrial machines where swing movement occurs. To create a certain braking torque in this type of device, greater force is required than in the simplest band brake.
Operating an automatic transmission with a brake band
Operating the vehicle with an automatic transmission gradually wears out the mechanism. If a driver likes to drive in urban conditions, it means that he often has to brake at intersections and pedestrian crossings. Frequent braking will lead to rapid wear of the friction and metal layer.
If you buy a new tape, pay attention to the presence of bolts in the kit. They are usually sold together with the TL. It is also advisable to replace these screws together with the gear shift braking mechanism.
Attention! The bolt heads are protected from corrosion and any exposure to moisture. Using one of the bolts of the kit, the driver can adjust the tension of the TL. This makes the work easier, since there is no need to climb into the machine itself and dismantle the casing.
Typically, all this work on adjusting and replacing the transmission fluid is carried out after changing the transmission fluid or after adding oil to the automatic transmission. No matter how much you would like to, you will have to turn the TL adjustment bolt so that the car does not jerk when changing speeds. For your comfort.
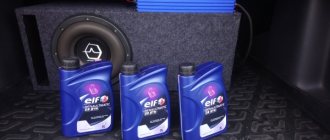
Changing transmission oil
If the Ford Focus 2 is equipped with an automatic transmission (4 steps), then the frequency of oil changes in it is 70,000 km. For this vehicle, it is recommended to use original Mercon V fuel. If a complete replacement is required, 10 liters are consumed, approximately 2 times less if a partial change is performed.
A special dipstick allows you to control the oil level in the automatic transmission. The check should be carried out with the box warm and the engine running. It is worth replacing the fuel in the box together with the filters.
You can change the oil yourself. When carrying out this procedure, it is necessary to install a new adjusting bolt for the automatic transmission brake band; removal of the transmission pan is required. New fuel is added through the dipstick. For preventative purposes, it is worth checking the transmission oil for cleanliness. If you follow the rules for operating the vehicle, repair of the Ford Focus automatic transmission will be needed after 200,000 km.
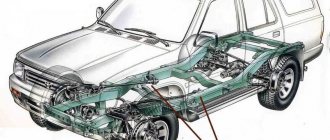
List of cars on which these types of automatic transmissions are installed
4 — number of speed switching stages.
F - front wheel drive, front-wheel drive.
27 - 270 lb ft designed to transmit maximum torque (up to 366 N m)
E - Fully Electronic Control
Problems with automatic transmission belt and their symptoms
Various malfunctions can occur in the planetary mechanism fixation unit, leading to abnormal behavior of the car and breakdown of the entire box:
- wear of the friction layer of the belt. In this case, the planetary unit is not completely blocked; when switching, the driver feels a “kick” of the box. In addition, a grinding noise may be heard from the automatic transmission;
- damage to the piston cuffs (breakage, physical wear). The tape completely loses its blocking ability, and the box jerks with each gear ratio change;
- piston rod failure due to mechanical damage. The piston breaks up into fragments that get into the transmission fluid and other automatic transmission components. The oil becomes contaminated with metal particles, which act on other parts of the transmission as an aggressive abrasive, and large debris can themselves damage or jam parts of the automatic transmission. Even a short trip with such a gearbox can permanently disable it, which will lead to an expensive overhaul of the automatic transmission or an equally expensive replacement.
Occasionally there are cases when the tape “wedges” the moving elements of the box. This occurs if the opening cavity of the servo drive is dirty or the spring is worn out. A characteristic sign of a problem is that the car refuses to start moving, or, for example, does not work in reverse gear.
Reasons for incorrect operation and adjustment of the automatic transmission brake band
During operation of a vehicle's automatic transmission, malfunctions may occur related to the planetary gear fixation unit.
Causes and effects:
- Damage or wear of the friction layer of the brake band, leading to incomplete blocking of the planetary mechanism. When changing gears, shocks and even grinding noises are felt in the automatic transmission;
- Breakage or other damage to the servo piston cuff. In this case, the brake band is not able to block the planetary assembly. Each change in gear ratio is accompanied by jerks from the automatic transmission;
- Damage to the servo piston rod. In the event of mechanical damage, the piston is destroyed, as a result of which its fragments are carried in the working fluid, end up in different automatic transmission components and can damage them. If the problem is not corrected in time, the box may fail;
- Wear or damage to the spring, contamination of the opening cavity of the servo drive. In this case, the brake band will “wedge” the moving parts of the automatic transmission. The car cannot start moving, reverse gear does not work, etc.
However, in some cases, adjusting this tape helps eliminate a number of problems. During the operation of a car equipped with an automatic transmission, malfunctions associated with shifting gears often occur. During switching, shocks or jerks appear in the box itself.
So, with the help of adjusting bolts or studs with locknuts acting on the system levers, the gap distance between the band and the brake drum changes. In other words, the gaps can be compensated, which allows you to get rid of automatic transmission shocks.
Adjustment features:
- the stud with lock nut is tightened with a torque wrench;
- It is important not to overtighten the brake band;
- It may be necessary to dismantle the gearbox pan (if the adjusting bolt is located inside the gearbox housing);
- adjusting the gap using special rods (only some types of automatic transmissions are adjustable).
It is also possible to adjust the automatic transmission brake band without a torque wrench. In this case, the order of adjustment is as follows:
- the car should be on a slight slope;
- to prevent the car from moving on its own, it is necessary to put the handbrake on, while placing a stop or brake shoe under the wheel;
- after that, the car must be removed from the handbrake and checked whether the brake shoe holds it;
- then you need to put the car on the handbrake again, while moving the brake shoe so that it is a few centimeters from the car wheel;
- it is necessary to loosen the locknut to make it easier to tighten the adjusting bolt;
- then you need to tighten the adjusting bolt until it stops lightly;
- Next, you need to remove the car from the handbrake, gradually loosening the adjusting bolt of the brake band until the car starts to roll;
- tighten the adjusting bolt 2-3 turns (the number of turns is determined experimentally until there is complete absence of jerking when shifting gears).
Functions of the Ford Focus 2 automatic transmission adjusting bolt
The adjusting bolt lives up to its name - it is responsible for tensioning the brake band, with the help of which timely switching from one automatic transmission gear to another occurs. The thrust bolt of the automatic transmission brake band on the Ford Focus 2 regulates the correct blocking of the drum, during which an automatic transition from first gear to second occurs.
The brake band of an automatic transmission has a friction surface with which it comes into contact with the brake drum. The more tightly the tape adheres to the drum, the more accurately it is blocked. The tight fit of these two parts is ensured by a stop or adjusting bolt, which exerts pressure on a special stop on the tape.
The operation of the Ford Focus 2 Hatchback and all its other modifications significantly affects the operation of many units, including automatic transmissions. Over time, the surface of the belt wears out, the belt changes its original dimensions, and the process of changing speeds is delayed. Slippage occurs between the drum and the brake band.
Read
Do-it-yourself repair of automatic transmission BTR M11
Signs of brake band wear
If the transmission line of the automatic transmission is worn out, then you will observe the following symptoms:
- Grinding and jerking indicate destruction of the friction layer. In this case, the planetary gear set is not completely clamped and blocked;
- jerks after each gear change or change in the position of the gear selector from “Forward” to “Reverse”, or vice versa. These symptoms indicate destruction of the servo piston cuff;
- If the servo drive rod is damaged, its destruction is not noticeable at first. Only later, when the wear products of the metal mechanism get into the filter and other parts of the automatic transmission, will the driver notice that the automatic falls into the emergency gang or does not want to shift. Ignoring the problem for too long will lead to a major overhaul of the automatic transmission. This is why it is so important to do annual maintenance on your machine;
- destruction or stretching of the spring will lead to the fact that the reverse gear will not work in the automatic transmission. And the tape itself will jam when switching.
To avoid the problems listed above, it is important to pay close attention to each part of the automatic transmission and respond to any abnormal twitching or jolting of the machine.
Adjustment procedure
Adjusting the TL is not as easy as it seems at first. You need to know a number of specific subtleties. Therefore, if you have never adjusted the brake band on an automatic transmission, then invite a friend who understands this topic. Then, you can begin the procedure.
Tools you will need:
- torque wrench;
- wrenches to remove the pan. Since on some automatic machines the adjusting bolts may be located inside the automatic transmission. To get into it, you will need to drain the transmission fluid.
Because there are machines in which the gaps are adjusted using rods. Adjustment is carried out by selecting the desired length of each rod. And these rods are located inside the gearbox housing and are adjusted by experienced mechanics during an oil change.
Attention! I recommend making adjustments after each lubricant change if you have the automatic transmission described above.
You will find what force to apply to tighten the rod in the manual for operating the machine. I do not advise exceeding the efforts indicated in the manual, and I also do not advise tightening the bolt with an eye to the future. The brake mechanism may fail due to overtightening.
If you do not have a torque wrench, you can tighten it by placing the vehicle on a hillside. Be sure to take a partner.
The process is as follows:
- Place the vehicle on a slope. Put the handbrake on
- Place brake shoes under the wheels to prevent the car from rolling.
- Move the shoes slightly forward from the wheels.
- Your partner should notify you when the car starts moving.
- Loosen the locknut of the screw.
- Tighten the bolt a little until it stops. Don't do it too hard.
- Remove the car from the parking brake.
- Loosen the bolt securing the vehicle until the vehicle rolls on its own.
- Replace the shoes and tighten the bolt two turns.
Now you will need to get into the car and ride it. If the tremors disappear, then you did everything right. If not, then the procedure should be repeated.
The subtleties of adjusting the tension yourself
The subtleties of adjusting the brake band adjustment bolt lie in the correct calculation of revolutions, if the brake belt has not been replaced, and the adjustment procedure is carried out on a mechanism that is already somewhat worn out. A precisely adjusted automatic transmission brake band prevents premature failure of clutches and gas turbine engines.
Let's look at an example using the A4LD and 4R44E machines.
- On these automatic transmissions, the bolt fit does not exceed 7 mm. The stock of the rod until it hits the wall is calculated using the following formula: 7 – 2.5 = 4.5 mm. This is the distance from the end of the bolt to the wall. Where 2.5 mm is the piston stroke, which was taken from 2 turns of the screw with a pitch of 1.25 mm.
- We remember the thickness of the friction layer. It is no more than 1 mm. This is what the manufacturer sets.
- Calculate the circumference of the working surface of the tape after taking the first measurements. We use the formula 2nR. It turns out 2x3.14x1. According to the formula, the following figure comes out - 6.28 mm. It means the difference between a complete friction layer and one worn down to 0 mm.
- Now let's find out when the piston hits the wall. This calculation corresponds to the formula 2x3.14x0.72. The last figure is the wear of the friction layer in mm. And the equation in this case will indicate 4.52 mm.
From these calculations we can conclude that if the layer is erased by 0.72 mm, then the rod will rest against the wall and there will be nowhere to tighten it. In this case, you will need to install a new automatic transmission transmission.
Internal placement of screws has a number of advantages:
- they do not corrode or become dirty;
- Adjustment of the belt can be done without dismantling the automatic transmission casing.
The latter is also important because the belt tension can be adjusted independently, without wasting time and money on expensive car service services.
The tension should be checked and adjusted not only after replacing the belt, but also in general after any repair and service operations on the automatic transmission, including topping up and changing the oil. If the box begins to “kick” and jerk, you should also check the belt tension.
Adjusting the automatic transmission bolt on a Ford Focus 2
Adjusting the thrust bolt of the automatic transmission of a Ford Focus 2 is the selection of its length and the direct installation of the part in place. Adjusting bolts are distinguished by markings that correspond to their specific length. The length of the stop varies from 36 to 39 mm in increments of 0.25. Each fastener has its own specific order code. The table below provides basic information about thrust fasteners.
Read
Ford automatic transmission repair
Bolt marking designation | Part code | Length in mm |
| 1 | FN11-21-3E1 | 36,0 |
| 2 | FN11-213E2 | 36,5 |
| 3 | FN11-21-3E3 | 37,0 |
| 4 | FN11-21-3E4 | 37,5 |
| 5 | FN11-21-3E5 | 38,0 |
| 6 | FN11-21-3E6 | 38,5 |
| 7 | FN11-21-3E7 | 39,0 |
| A | FN11-21-3E9 | 37,25 |
| B | FN11-21-3F1 | 37,75 |
| C | FN11-21-3F2 | 38,25 |
| D | FN11-21-3F3 | 36,25 |
| E | FN11-21-3F4 | 36,75 |
At the factory, Ford Focus 2 cars are equipped with adjusting parts marked 2 or 3. Car enthusiasts who adjust the automatic transmission stop with their own hands are recommended to purchase two parts at once: one should be 1 mm longer than the previously installed one, the other should be 1 mm longer. .25 or 1.5 mm.
An original automatic transmission adjustment part intended for Ford Focus 2 will cost the owner 700-900 rubles. But many drivers order cheaper analogues, for example, for a Mazda car, which are also suitable for an American car brand, but cost three times less.
Having ordered a couple of samples of different lengths, the driver can select the required stop by trial. Having installed the adjusting bolt with a minimal difference in length with the original part, the owner of the Ford Focus should check the car in motion. If the shocks and jerks have stopped, then the length of the bolt is optimal for the normal functioning of the brake band.
If jerking and other malfunctions in the automatic transmission continue, the adjusting bolt should be replaced with a longer one. And again observe the operation of the automatic transmission. Usually, on the second or third attempt, it is possible to find the optimal length of the thrust part.
In some cases, when the brake band is badly worn, a new stop will not save the situation, and the band itself must be replaced. This procedure will take more time and expense, and may require the assistance of qualified specialists. But in this case there is no need to change the adjusting part; with the new tape it should cope with the necessary tension.
Advantages
Band brakes are often used to create various types of lifts and cranes. Despite the simple design, these mechanisms are very reliable. Design engineers cite the following advantages of band brakes:
- small sizes;
- ease of maintenance;
- simple design;
- the ability to achieve greater braking torques with increasing coverage angle.
Of all the varieties, the most popular are simple belt mechanisms. They are easier to regulate. In addition, using simple calculations, you can calculate the band brake. Calculate the weight of the load and the braking force.
Subtleties of replacing the brake band
The first thing you will notice is the sealant on which the back cover of the machine is mounted. Remove it carefully, without tugging, so as not to deform it. Place a container to drain the oil, as it may leak.
Check how the LT fits against the body and drum. Pull it back. There should not be more than 4 gaps where it contacts the drum. If it is more, but the LT is new, then check the drum for defects.
What to consider when tensioning the tape yourself
When tightening the adjusting screw with a torque wrench, you may encounter the following problems:
- the key of the required value is not available;
- the existing key has not been tested for a long time, so there are doubts about its accuracy;
- The torque required for tightening cannot be captured due to subjective reasons.
Therefore, you need to be able to perform tension without using a torque tool. Here is an algorithm for making this adjustment:
- we install the machine on a slope with a slight gradient;
- secure the wheels with the parking brake;
- We additionally install a mechanical stop under one of the wheels and check whether it can hold the car when the handbrake is not tightened;
- tighten the handbrake again;
- place the stopper a few centimeters from the tire;
- It is advisable to have a partner who will monitor the condition of the car and report when it starts moving when making adjustments;
- loosen the locknut with a wrench - this will allow you to turn the adjusting screw;
- tighten the screw until it begins to rest;
- we remove the car from the handbrake, but so that it does not move;
- We begin to carefully loosen the screw until the car moves;
- tighten it a few (2-3) turns. This amount may vary depending on the transmission model. It must be determined experimentally. If the car still jerks, tighten the screw another turn and perform these iterations until a satisfactory result is obtained.
As you can see, there is nothing complicated, but the labor intensity of the method is several times higher than when using a torque wrench. Of course, there is no need to talk about jewelry precision of adjustment here either.
Self-replacement of the brake band is carried out in the following sequence:
- jack up the car;
- remove the wheel from the transmission side;
- remove the battery, as well as the air filter, if it allows access to the box;
- install a jack under the bottom of the automatic transmission and lift it;
- dismantle the box mounting pad;
- We begin to slowly and carefully lower the transmission, making sure that this procedure is not accompanied by extraneous noise;
- unscrew the cover bolts and gain access to the locking mechanism;
- unscrew the worn tape and install a new one;
- when closing the lid, place it on the sealant;
- perform all operations in reverse order;
- We adjust the TL tension using one of the available methods;
- We check how the car behaves in road conditions. Regardless of the driving mode, no shocks should be felt.
If the replacement belt has worn out much faster than expected, it is recommended to start looking for the reasons why this happened. Most often, the culprit is a malfunctioning servo drive, which causes the planetary mechanism to slow down in a weakened state of the belt.
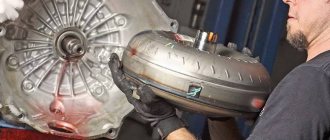
Replacing the brake band
To replace the brake band on an automatic transmission, you will need to follow the steps in the following procedure. The work will be more complicated than the adjustment.
- Drive to a level place and place the wheel on the automatic transmission side on a jack.
- Unscrew the bolts and remove the wheel.
- Remove the battery and air filter so that you can easily get to the automatic transmission.
- Place the second jack under the machine and lift it.
- Remove the box mounting pad.
- Lower the automatic transmission as slowly as possible. Then unscrew the bolts that block access to the brake band.
- Remove the brake band and install a new one.
- Now repeat all steps in reverse order.
- Tighten the machine adjustment screws with a torque wrench.
- Take a ride in a vehicle. If you do not feel shocks or hear noises, then you have completed the procedure perfectly.
But it's not that simple. Let's consider some things that the average car owner does not take into account when changing the automatic transmission transmission.