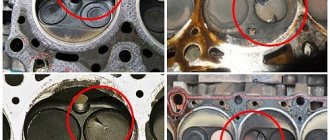
Wear diagnostics
The service life of piston rings varies. It all depends on the specific car model. For example, for VAZ engines it is about 150-200 thousand kilometers. Naturally, harsh operating conditions with frequent overheating of the internal combustion engine, the use of low-quality oil, and untimely engine maintenance lead to earlier failure of parts.
Signs of wear are easily detected:
- constant bluish exhaust, which is explained by poor-quality oil removal from the cylinder walls and burnout - drops of lubricant can be felt by hand if you bring it to the muffler while the engine is running;
- an increase in gas pressure in the engine sump, which leads to unexpected contamination of the air filter, carburetor, leakage under seals and gaskets - is explained by the passage of gases formed in;
- strong smoke from the crankcase ventilation hole - it will become noticeable if you remove the air filter cover or the hose from the breather.
Wear of elements is also judged by indirect signs: black spark plugs, increased fuel consumption, engine tripping and a drop in its power. Gas failures, noise when the engine is running, and oil burns are also observed. Having discovered this, it is urgent to measure and analyze the compression between the pistons and its cylinders.
Another diagnostic method is often used by mechanics at service stations. Experienced craftsmen detect wear of the piston group visually. They carefully monitor the operation of the power unit - if the gearshift lever shakes noticeably, uncharacteristic noises and knocks appear, this confirms the guess.
Also, experts can quickly understand whether the engine is smoking because of the rings or caps. In the latter case, the symptom is similar, but with sharp pressure on the accelerator, the puffs of white smoke increase. The engine behaves somewhat differently when the piston seals become coked - the car smokes during load, when the car goes up a hill. At the same time, when parts become lodged, the power unit loses power, and the spark plugs become covered with black soot.
It is important to understand that only oil seals may become stuck or damaged. Compression ones work normally at this time. At this point the engine will not lose compression, but will begin to consume large quantities of lubricant and smoke heavily.
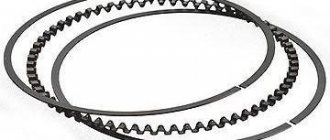
Wear of piston rings is usually due to their sticking or loss of elasticity. This happens as a result of using low-quality oil. The engine begins to overheat, the piston grooves become coked. The elements cease to perform their functions - to seal the combustion chamber, protect against overheating and regulate the thickness of the engine oil film.
Step-by-step instructions for replacing rings and valve stem seals
The decarbonization process removes small deposits. In case of severe wear, a complete replacement of all piston rings and valve stem seals is required:
- The necessary parts are selected in accordance with the make of the machine. You should give preference to original spare parts so as not to bother again later.
- The spark plugs are unscrewed, the cover is removed, and then the entire cylinder head (cylinder head). The oil is drained and the oil pan is unscrewed. Next, the connecting rod caps are unscrewed and the pistons are pulled out.
- Use a puller or a screwdriver to remove the old rings. Using old pistons, the landing grooves are cleaned. It is done carefully with an unnecessary ring. Their installation should be carried out only after connecting the piston to the connecting rod.
- Of all the piston rings, the oil scraper rings are installed first. All operations must be done by hand. On box-shaped ones with a spiral spring, the expander lock rotates 180° relative to the ring lock. For composite ones, the spring is installed first, then the lower plate and the upper one. The plate locks rotate 180° relative to each other.
- After installing the remaining rings, it is necessary to evaluate the appearance of the cylinders. In case of severe wear, boring and honing are performed.
- Place the pistons in their places, screw on the connecting rod caps and the oil pan.
Valve seals also play an important role in retaining oil. They remove excess from the valves. The caps are replaced either with or without removing the cylinder head.
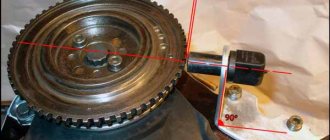
- In the first case, the crankshaft is turned with a wrench until the first pair of pistons is set to the top dead center (TDC) position. This is done to keep the valve from falling into the cylinder.
- The axles of the intake and exhaust rocker arms with hydraulic compensators are removed. In many models they can fall out - nylon clamps are useful for this.
- Using a special puller, you must simultaneously compress the valve springs and remove the crackers with tweezers. They are needed to compress the spring relative to the valve axis. An assistant will come in handy here.
- After removing the worn cap, install a new one in its place. It should be remembered that they are divided into inlet and outlet.
- The crackers are installed in reverse order. Next, you should rotate the crankshaft to the TDC position of the other pair of pistons. Everything is done the same way. If you replace the caps and remove the cylinder head, you can pull out the valves and assess their condition. The resulting carbon deposits must be cleaned off.
- After installing the valves and springs in place, reinstall the rocker arm axles.
- Along the way, you can check the tension of the timing belt, and also use the marks to establish the correct ignition. This will protect the CPG from wear.
- Install the cylinder head cover. It will require a new gasket.
- Install a new filter and fill with oil.
- Connect all devices, start the engine.
Starting operation of the unit with new parts will require their grinding in. Unnatural sounds and whistles are possible. Smoke may pour out of the exhaust pipe, and the engine may stall. For the first 500 - 1000 km, you should not increase the speed much.
Replacing rings: where to start?
So, new parts have already been purchased, then you can proceed directly to the process of replacing them. The first thing that needs to be done next is dismantling all components, as well as mechanisms. This will provide full access to the necessary parts, or rather, will allow you to easily replace the oil scraper piston rings.
What is included in the dismantling work package?
- The air filter should be removed, followed by the fuel pump.
- Don't forget about the distributor in the ignition system. In order to dismantle the drive housing, it is necessary to disassemble the bolted connection.
- After this, you should remove the negative terminal from the battery, as well as the pulley (toothed) from the camshaft. At this point, part of the work can be considered successfully completed.
- Next, in order to better get to the cover located on the head of the block, it is necessary to remove the mass drive.
- The last thing you can do is unscrew the nuts that secure the camshaft bearing housings.
Second stage of dismantling work
In order for the replacement of rings and valve stem seals to lead to proper engine operation, general diagnostics of the vehicle is necessary. As a rule, at this moment the wear of other parts and their good fit are checked. Under no circumstances should the position of the camshaft keys be ignored. If during the dismantling process it is noticed that they are not seated too tightly, then they should also be removed. This must be done to avoid loss of the part while the vehicle is moving.
After everything was done, access to the camshaft was completely opened, which must be pulled out along with the oil seal. Next, in order to remove the oil scraper rings, you should install the spare part in a position where the piston will be at TDC. Having pulled out the candle, you need to insert a rod into the resulting hole. If this is not done, the valve will easily fail.
Next, you need to use a special tool to compress the springs located on the valve and pull out the two crackers. You can get them out using tweezers. After this, using a special tool, you should press out the rings. This completes the dismantling work.
Installation process
Now let's talk about how to properly complete the installation process. This work will consist of several stages:
- First, the springs should be removed from the new parts. This must be done extremely carefully to avoid damage.
- Next, you need to coat all elements with engine oil. After this, you can press the engine itself and return the springs to their intended place.
Important: oil scraper rings are replaced in strict accordance with the sequence. The detailed removal process is described above. Be careful that the sides are where they should be. Otherwise, this may cause a sharp increase in the amount of oil consumed.
Preparation: necessary tools
The most important stage of any work, and even more so on an engine, is preparation. The following tools will be required:
- spanners;
- set of heads with ratchet;
- a groover or a piece of wire - a nail file will also work;
- special pliers for removal and installation - if you can’t find them, a thin flat-blade screwdriver will do;
removal pliers
- universal clamp mandrel for installation with a tightening knob.
In some cases, if the engine is being adjusted at the same time, a device is needed to determine the top dead center of the piston.
Choice, purchase of new pistons
There are competent instructions for choosing a new set of piston elements:
- pay attention to the appearance of the packaging - all information about the manufacturer and material must be available;
- inspect the sealing elements themselves - the top side should be marked, there are no defects on the surfaces;
- check for instructions that describe the correct one.
Never trust sellers who claim that imperfections on the surfaces of parts will be rubbed in. This is an outright lie, refuse such a purchase!
It is easier to search for a set of piston rings through online stores. Here you can find original products and substitutes - the price of duplicate piston rings is much lower. You can search by car VIN or codes of old parts. It is also possible to select elements according to engine technical data.
Usually the choice is complicated by the material. Cast iron or steel - which is better? In addition, the rings can be coated with a protective molybdenum or chromium layer. Obviously, the latter will cost an order of magnitude higher, since they a priori have a longer service life. It is advisable to install alloy steel products on turbocharged engines - always with a protective coating. In standard cases, if the engine is low-power, cast iron is more affordable.
As for the difference between thin and thick products. Note that thin sealing elements are produced by a limited number of companies. They cost more and are designed for engines revving over 6 thousand rpm. They are non-standard. Therefore, you need to understand that their resource is less than standard thick ones.
The best manufacturers of engine piston rings are the German ones Mahle, Victor Reinz, Kolbenschmidt. They also compete with the Japanese company Riken. These brands are mercilessly counterfeited, which often leads to incidents. Therefore, you should follow the instructions given above. It will be useful to learn in advance about the manufacturer’s security features, which are updated regularly.
Video: replacing piston rings
A mechanic shows how old Honda CR-V RD1 piston rings are removed and new ones are assembled. Recommends paying attention to the taper, fragility, the difference between the compression and oil scraper products, and the gap in each lock. All spare parts must be dry and clean. The instructions are completely for “dummies” - beginners who are doing this for the first time.
It teaches well how to find the right side of a part. As a rule, the top side is always marked by the manufacturer. However, if this is a used product or the letter T is missing for some other reason, it is recommended to pay attention to the color of the surface. The lower part of the seal is usually shiny, the upper part is matte.
Instructions: replacing rings
First, the car is prepared: the battery is de-energized, antifreeze and oil are drained from the oil pan. Then the piston rings are replaced using one of the traditional methods - with removal of the internal combustion engine and without dismantling. The engine has to be pulled out to bore the liners to the next repair size if there is wear on the cylinder walls - scratches, burrs and other flaws. This can be easily checked by removing only the cylinder head and visually inspecting the condition of the bushings.
In other cases, when there are no defects, the usual replacement is carried out without dismantling:
- the oil pan is removed;
- the oil pump is dismantled - checked and, if worn, replaced;
- the connecting rod caps are unscrewed - the places of the original caps must be marked, since they cannot be swapped;
- the elements, together with the engine pistons, are pushed upward;
- The sealing parts are pulled out with pliers.
At this stage you can finally check the condition of the cylinders. If the rings are ground unevenly, most likely the cylinders have taken an oval shape in cross section. In any case, they need renovation.
The caps for the connecting rods, as mentioned above, must be marked. This is easily done on a sheet of paper, where the engine cylinders are drawn and marked with a specific number. After removal, the yoke and its nuts, say number 3, are placed in the appropriate place.
Further actions if the wear of the rings is uniform:
- remove carbon deposits from the grooves and bottom - this is called;
- install the oil scraper element first;
- then put on the compression ones - first the second, then the first.
When installing the second compression and oil scraper element, you must act extremely carefully! They are fragile, since strict strength requirements are not imposed on them. Often, when pressed and squeezed hard, they crack and break. The first compression ring is almost impossible to break.
Particular attention should be paid to the joints of the rings. For compression rings of domestic engines, according to the passport, it is 0.45-0.60 mm. The gap between the ends of the oil scraper elements is slightly higher. In addition, the piston ring gap should not be in one vertical line. It is advisable to place each at an angle of 120° relative to the previous one. This is done intentionally to prevent gases from escaping into the crankcase.
Next, the pistons are put back into the cylinders. A clamp mandrel or crimp will be required, otherwise the elements will interfere with the normal installation of the piston rings. As a rule, the mandrel is universal. However, fans of this business have a special tool made for a specific size of piston rings. This device compresses the parts, after which the piston is easily driven into place by tapping on the bottom. Before this, the inner surface of the cylinder (liner) is lubricated with auto scrap.
It is extremely important to be able to correctly install the crankshaft journal in the upper position. This is done by scrolling. There is also a special device for determining the TDC of the outer piston.
At the final stage, the engine is checked. It starts up and is given time to “growl” at idle. If everything is stable, there are no fluctuations or uncharacteristic knocking, the replacement operation is completed. However, new parts must break in, so the engine must be run in first. The more competently this is done, the longer the car’s power plant will last.
They run the car for no more than 2000-3000 kilometers, before warming up the internal combustion engine to operating temperature at idle. During the trip, do not overload the engine. There should be no one in the car except the driver. Do not go up hills, especially long ones. It would be ideal to choose a flat piece of asphalt. It is also not recommended to increase the speed above 3000 - in the first thousand it is generally strictly prohibited!
How to properly install piston rings
To answer the question of how to replace piston rings without removing the engine, it is necessary to troubleshoot the CPG at the initial stage. To do this, you will need to remove the cylinder head, after which the general condition of the pistons and cylinder walls will be assessed.
This is done to identify possible defects (scores on the walls, wear, destruction or melting of the piston, etc.). Let us add that there are engines on which it is impossible to assess the condition of the CPG without removing the pan. There is often a high probability that simply replacing the rings with new ones may not be enough, since if serious wear is detected, it is necessary to bore the cylinder block.
Please note that installing new compression rings into worn cylinders without removing the engine is highly not recommended. The fact is that during operation, a so-called step is formed on the cylinder mirror. After installing new parts, there is a high probability that the piston rings will break on the specified step, which will require repeated disassembly and more expensive engine repairs.
Moreover, the rings wear out both the cylinder bore and the inner surface of the piston groove. For these reasons, new piston rings, which are installed without replacing the pistons and repairing the cylinders, either do not grind in at all, or the grinding in occurs very slowly and ineffectively.
Taking into account the above, the best option would be to bore the cylinder block, perform honing of the cylinders, after which new repair pistons and piston rings are installed. It is not possible to carry out such repairs without removing the engine. At the same time, the positive results of repairs involving engine removal are much more predictable.
In any case, the rings are changed on a removed engine or the piston rings are replaced without removing the unit, the general procedure is as follows:
- remove the cylinder head;
- carry out troubleshooting of the cylinder head, BC and CPG;
- take appropriate measurements to determine the required size of piston rings;
- purchase piston rings that are suitable in size and performance characteristics;
- drain the engine oil and open the oil pan;
- if necessary, remove the oil pump;
- next you will need to remove carbon deposits in the upper part of the cylinder;
- then unscrew the connecting rod heads (caps) and push them up (mark each head, since during subsequent assembly the connecting rod head must correspond to the connecting rod from which it was removed).
To figure out how to properly install the rings on the piston, follow the following recommendations. The piston rings themselves are relatively easy to change. To remove old rings, you need to spread the edges of the ring in the lock area until the ring comes out of the groove on the piston. This procedure can be performed either using special forceps or using a small flat-head screwdriver.
Afterwards, it is necessary to remove carbon deposits from the grooves on the piston. If this deposit is not removed, then after installing new piston rings, the piston will be difficult to install back into the cylinder. To remove carbon deposits from the piston grooves, you can use an old compression ring, which, for convenience, breaks into two parts.
Having completed the procedure for cleaning the piston grooves, you must study the instructions for installing rings, which are included with the new kit. This instruction contains the procedure for installing piston rings on the piston, that is, the sequence of their correct installation and the order of arrangement. The upper or lower side is also indicated, according to which the piston ring must be installed with the upper or lower location of the special mark.
When installing rings on the piston, care must be taken, since the middle compression and lower oil scraper rings are highly fragile. As for the top ring, this element is stronger than the others, but also requires the correct installation approach.
Installing rings on the piston
Next, excerpts from the instructions for installing piston rings from the Mahle manufacturer will be reviewed, as well as individual tips and recommendations will be added.
- After cleaning the grooves from carbon deposits, you need to make sure that there is no damage on their side surfaces and radii.
- To install the rings, use a special collet tool.
- Installation of rings must begin with the lower piston ring. Avoid unnecessary force to avoid possible deformation of the rings.
- Before installation, find the marking on the ring in the form of the inscription TOP (from English “top”). Rings with such markings must be placed towards the piston bottom with the marked side.
- If rings that have an expander spring are being installed, then the junction in the form of the ends of the spring with the wire insert is placed taking into account the recommended offset of 180° degrees relative to the junction of the piston ring.
If the expander spring has a Teflon jacket, this element must be located in the area where the ring joint is located. After installing the spring, the rings, which consist of several lamellas, must be positioned so that the joints of the said lamellas are directed towards the piston pin hole. When placing the upper lamella, the ends of the spring must be fixed. - If the piston has special retainers in its grooves that prevent the rings from turning, then the piston ring joints must be pinned to secure them.
- After installation is complete, it is necessary to check the clearance of the side surfaces. If the indicator falls within the framework of up to 0.100 mm, then such a gap is allowed. Identification of an increase in the clearance from the maximum permissible indicates the need to purchase and install new pistons.
- During installation, it is necessary to take into account the degree of wear of the cylinder mirror. Such wear is considered acceptable at a value of 0.100 mm (taking into account the cylinder diameter). If the gap is larger, then the cylinder block requires relining or boring for repair pistons.
As mentioned above, special attention during installation should be paid to both the relative position and orientation, as well as the type of piston rings. Oil scraper rings differ from compression rings in their unique U-shaped profile, and also have an expansion spring in their design.
The second compression ring is equipped with a scraper-edge, since it is partially involved in the process of oil removal in parallel with the operation of the oil scraper ring. The presence of a lip on a piston ring usually indicates that the ring is being installed with the lower lip position in mind. When installing the rings on the piston, the force must be carefully measured. Otherwise, you can easily break the piston ring.
We also add that after installing the rings on the piston and placing it in the cylinder, the rings make a tight fit to the walls of the cylinder. A so-called thermal gap is formed in the locks. Then, using a feeler gauge, you need to measure this gap, which should not exceed 0.25-0.45 mm. If the specified gap is less, then the ring will not be able to fit properly in the piston groove. To solve the problem, you can use a needle file and carefully remove the extra fractions of millimeters.
In terms of proper placement, to prevent gases from blowing through the ring locks, you need to know how to install the piston rings. When installed correctly, the rings fit onto the piston taking into account the circumferential displacement. As an example, we can consider installing 3 piston rings. With this installation, the locks must be placed so that each of the locks is located 120 ° relative to the other.
Approximate cost of replacement and terms in car services
On average, the replacement price at a service station varies between 7-25 thousand rubles. Specifically, this depends on the type of engine, its condition, the models of rings used and the need for additional repairs. For example, if during the replacement, problems with the cylinders are revealed, the service center will charge you additionally for boring.
As for the price list for just replacing the rings, it looks something like this:
- domestically produced passenger cars - 7 thousand rubles;
- foreign cars such as sedan, hatchback, coupe - 10 thousand rubles;
- SUVs, minibuses - 15 thousand rubles.
In terms of time, it takes 1-2 days if you don’t need to bore anything. Of course, here again everything depends on the specific car service and its workload.
You can easily replace the piston rings with your own hands. You just need to act strictly according to the instructions, preferably under the guidance of an experienced person.
Running in the engine after replacing the piston rings
Regardless of whether the piston rings were only replaced or the engine underwent a major overhaul, the engine will require a break-in. This is due to the need to break in new parts. Running in the engine after replacing the piston rings should be similar to running in the engine of a new gasoline or diesel car.
After replacing the rings, the engine cannot be operated in heavy loaded conditions (high speeds when driving, idling, driving at low speeds in high gears, etc.) for at least 3-5 thousand km. Also, you should not start a trip without first warming up the internal combustion engine.
Next, we will consider the opinions of experienced auto mechanics and answer the general question of how long the engine needs to be run in after replacing the piston rings. It is a fairly common statement among experts that it will take about 10-15 thousand km to completely grind in the rings. This leads to the conclusion that after a minimum run-in of the car after engine overhaul or replacement of rings (up to 5 thousand km), it is highly undesirable to spin the power unit above the average speed range for another 5 or even 10 thousand km. mileage